Home Home > 2019 > 12
Sign up | Login

Deprecation notice: openSUSE Lizards user blog platform is deprecated, and will remain read only for the time being. Learn more...

Archive for December, 2019

Highlights of YaST Development Sprint 91

December 18th, 2019 by

The last two weeks of the year, and also the first one of the new year, are vacation season in many parts of the world and YaSTland is not an exception. But before we enter hibernation mode, let’s take a look to the most important features and bugfixes we implemented in the last sprint of 2019. That includes:

  • bringing back to life some sections of the Software Manager,
  • implementing system upgrade with the new SLE media types,
  • making the installation in Raspberry Pi and IBM Z System even better,
  • improving usability of encryption,
  • reducing the footprint of the Snapper plugin for ZYpp,
  • as always, many other small improvements and fixes.

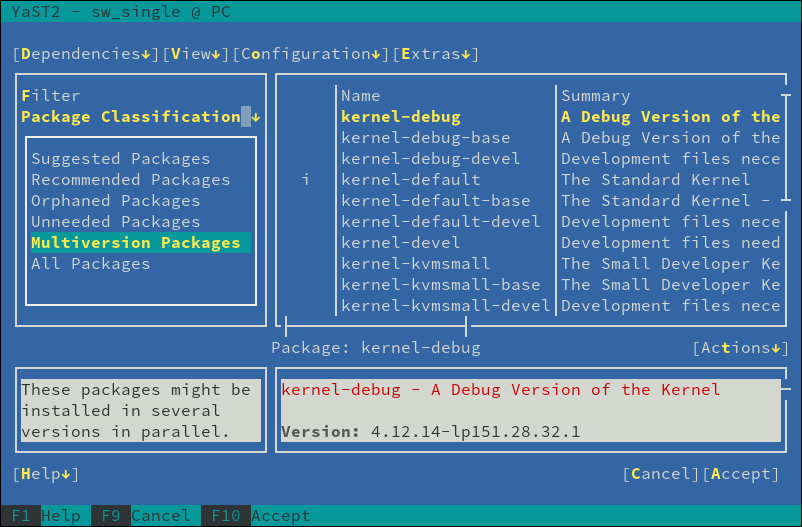
Restored Some Package Views: Recommended, Suggested, etc.

Let’s start with a redemption story. Some time ago we implemented feature fate#326485 which requested dropping the “Package Groups” view from the package manager UI. That was quite an easy task.

However, a few weeks later we got a bug report that the lists of recommended, suggested, etc… packages couldn’t be displayed anymore. It turned out that, in the Qt package manager front-end, the removed “Package Groups” view not only used to display the static group data from the packages but it also contained some special computed package lists like orphaned, suggested or recommended packages. So these lists were lost as a collateral damage of removing the “Package Groups” view.

The ncurses package manager was not affected by the same problem because, in that front-end, those views are grouped in a separate “Package Classification” section. So the task for this sprint was to somehow revive the lists in Qt and make them again available to the users.

We partly reverted the Package Groups removal and restored displaying those special package groups. To make it consistent we also use the “Package Classification” name for the view, like in the ncurses package manager.

The new Package Classification view in Qt

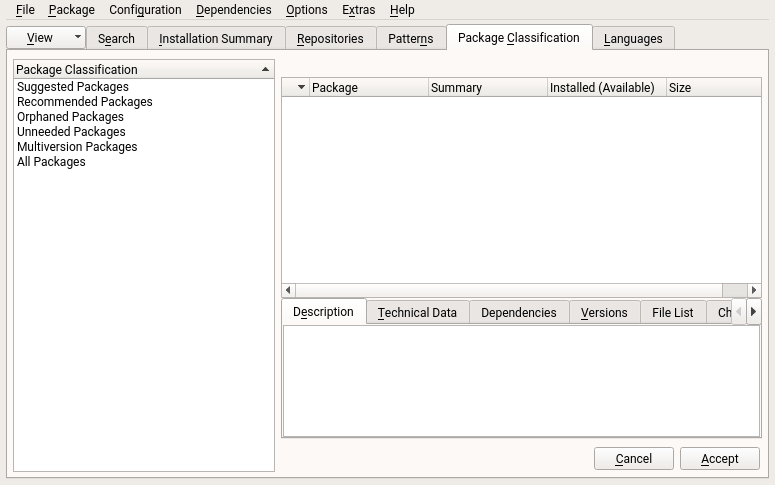
On the other hand, the ncurses front-end was missing some lists like the “Multiversion Packages” and “All Packages”. To take consistency another step further, we added these missing lists and did some small cleanup and fixes so now both the Qt and the ncurses package managers should offer the same functionality and should look similar.

The revamped Package Classification view in ncurses

User-friendly Encryption Device Names

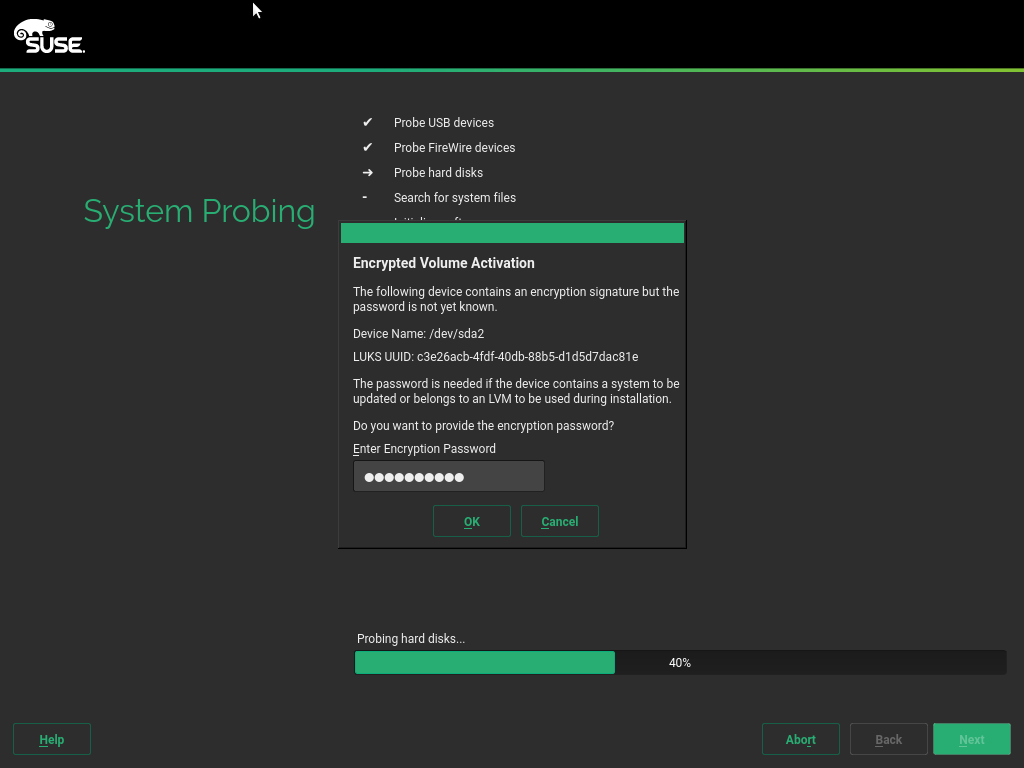
And talking about bug reports that trigger some usability revamp, some users had pointed that, when the system is booting and prompts for the password of an encrypted device, it’s not always that easy to identify which exact device it is referring to:

Booting password prompt before the change

The root of the problem is that when YaST creates an encryption device (during the installation by means of the storage proposal, or manually with the Expert Partitioner), the device mapper name for the new encrypted device is generated from the udev id of the underlying device (e.g., cr_ccw-0XAF5E-part2).

We decided to improve the encryption naming generation in YaST for Tumbleweed and future releases of Leap and SLE. From now on, the name will be based on the mount point of the device. For example, if an encrypted device is going to be mounted at root, its device mapper name would be cr_root. In general, when the encrypted device is mounted, the device mapper name would be cr_mount_point (e.g., cr_home_linux for an encrypted device mounted at /home/linux).

Booting password prompt after the change

Note that udev-based names might still be used for some scenarios. For example, when the device is not mounted or for an indirectly used encrypted device (e.g., an encrypted LVM Physical Volume).

And related to the identification of encryption devices, we have also added more information about the device when the encryption devices are activated during the installation process. Providing the password for the correct device was very difficult because the user needed to know the UUID of the encryption device. Now on, the activation popup also informs about the kernel name of the underlying device, making much easier to identify it.

New password prompt during installation

Because names matter… which leads us to the next topic.

How does it Feel to Run a Mainframe?

As you may know, (open)SUSE runs in a vast range of hardware, including powerful mainframes like the IBM Z family. One of the strengths of our beloved distributions is that, despite the differences in hardware and scope, the installation and usage experience is very similar in all the supported systems.

Consistency and ease of use are good, but when you drive a luxury car you want to see the brand’s badge on top of the hood. So in future versions of the installer, the model of the machine will be displayed when installing in an IBM Z system. See the right-top corner of the following screenshot.

IBM Z Model in the installer

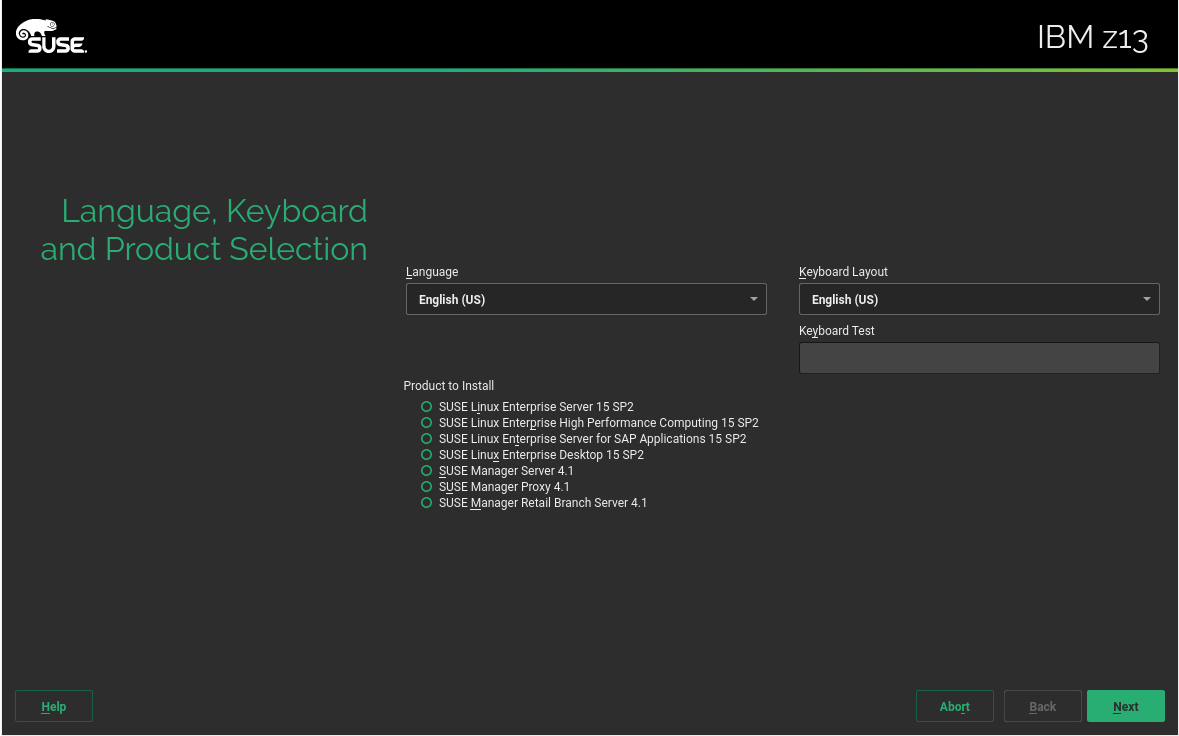
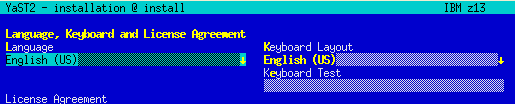
The text-based installer also has been modified to include the same banner in a similar place.

IBM Z Model in the text-mode installer

But in the same way that (open)SUSE enables you to install and use Linux in a mainframe “just like in any other computer”, we also target to do the same in the other extreme of the hardware spectrum.

Better Support for Raspberry Pi in the Partitioning Proposal

One year ago we announced that openSUSE Leap 15.1 and SLE-15-SP1 would be the first Linux distributions that could be installed in Raspberry Pi devices following the standard installation procedure, instead of deploying a Raspberry-specific pre-built image. The only prerequisite was the existence in the target SD card (or disk) of a partition containing the Raspberry Pi boot code.

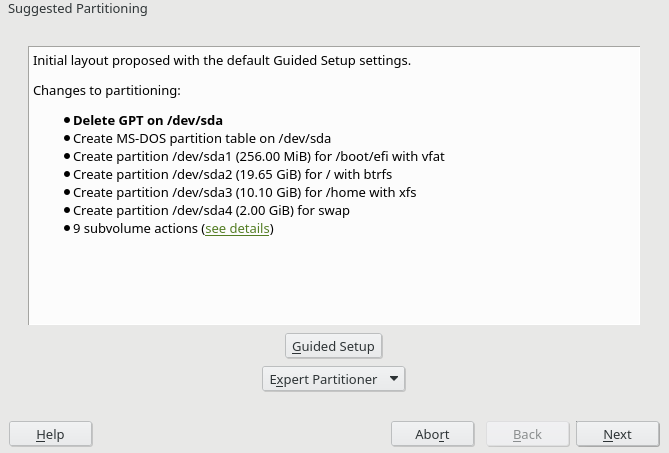
But we are now able to go one step further for SLE-15-SP2 (and Leap 15.2). Thanks to the technologies included in those upcoming releases, (open)SUSE will not longer need a separate partition with the boot code in all cases. Now the installer can make a reasonable installation proposal in all situations, even if the target storage device doesn’t contain a booting partition in advance. See, for example, what the installer suggests by default for installing a fully standard SLE-15-SP2 Beta1 in a 32 GiB SD card that contained initially a GPT partition table (tip: GPT partition tables cannot be used to boot in a Raspberry Pi device… and the installer knows it).

Installer proposal for a Raspberry Pi

With that, the installation of the standard SLE-15-SP2 Beta1 (the aarch64 version, of course) in a Raspberry Pi 3 or 4 is as easy as “next”, “next”, “next”… with the only exception of a couple of packages that must be manually selected for installation (raspberrypi-* and u-boot-rpi3). Hopefully, future beta images of both SLE and openSUSE Leap 15.2 will select those packages automatically when installing in a Pi, which will make the (open)SUSE experience in those devices basically identical to any other computer.

SLE Upgrade with the New Media Types

And talking about the standard installation images of the upcoming SLE-15-SP2, we explained in our previous blog post that those versions of SUSE Linux Enterprise (SLE) and all its associated products will be distributed in two new kinds of media – Full and Online. The Full Media contains many repositories and the system can be installed without network connectivity. The Online Media is similar to the openSUSE’s net installer, it contains no repository and it must download everything from the network. The big difference with openSUSE is that SLE systems need to be registered in order to have access to remote repositories.

But apart from installation, those two new media types can also be used to upgrade an existing system… at least after all the improvements implemented during the latest sprint.

In the case of the Online Media, if the system is registered the upgrade process will switch all repositories to point to their corresponding versions at the SUSE Customer Center (SCC) and will get the new software from there. If the system is not registered, the upgrade process is cancelled and the user is advised to either register the system or use the Full Media.

The Full Media can be used to upgrade any system, registered or not, but the process is different in each case. For a non-registered system, the repositories will be switched to the ones included in the media and the system will be upgraded from there. For registered systems the process is the same that with the Online Media, so the software will be fetched from the remote repositories at the SUSE Customer Center.

Last but not least, we also made sure the process with both medias works with an AutoYaST upgrade (yes, you can also use AutoYaST to perform an unattended upgrade, in addition to the better known unattended installation). For a registered system, we simplified the procedure as much as possible and it only needs access to SCC and an empty AutoYaST profile. For non-registered systems it is a little bit more complex because the profile must specify which repositories from the media should be used for the upgrade. But other than that, the process works quite smooth.

And, of course, we used the opportunity to improve the unit test coverage of the code and to improve the documentation, including the profiles we used for testing.

The Snapper Plugin for ZYpp Becomes More Compact and Future-proof

Snapper lets you make filesystem snapshots. It has a companion, snapper-zypp-plugin, a plugin for ZYpp that makes snapshots automatically during commits. See the “zypp” descriptions in this listing:


# snapper list

  # | Type   |Pre # | Date                     | User | Used Space | Cleanup  | Description  | Userdata     
----+--------+------+--------------------------+------+------------+----------+--------------+-------------
  0 | single |      |                          | root |            |          | current      |              
[...]
824 | pre    |      | Tue Dec 17 10:00:27 2019 | root |  16.00 KiB | number   | zypp(zypper) | important=no
826 | post   |  824 | Tue Dec 17 10:02:19 2019 | root |  16.00 KiB | number   |              | important=no
827 | single |      | Tue Dec 17 11:00:01 2019 | root |  16.00 KiB | timeline | timeline     |             
828 | single |      | Tue Dec 17 11:00:01 2019 | root |  16.00 KiB | timeline | timeline     |             

To make our enterprise products supportable for a looong time, we have rewritten this plugin to C++, starting with snapper-0.8.7. (The original Python implementation is not dead, it is resting in old Git commits.)

As a result, Python regular expressions are no longer supported in the /etc/snapper/zypp.conf file. POSIX extended regular expressions work instead, which should work sufficiently well for the purpose of package name matching. Shell patterns continue working unchanged.

Happy new year!

During the following three weeks, the YaST team will interrupt the usual sprint-based development pace. That also means, almost for sure, that we will not publish any blog post about the development of YaST until mid January of 2020. So we want to take this opportunity to wish you a happy new year full of joy and Free Software.

See you soon and make sure to start the year with a lot of fun!

openSUSE on reproducible builds summit

December 13th, 2019 by

As in the past 3 years, I joined the r-b summit where many people interested in reproducible builds met.

There were several participants from companies, including Microsoft, Huawei and Google.
Also some researchers from universities that work on tools like DetTrace, tuf and in-toto.
But the majority still came from various open-source projects – with Fedora/RedHat being notably absent.

We had many good discussion rounds, one of which spawned my writeup on the goal of reproducible builds

Another session was about our wish to design a nice interface, where people can easily find the reproducibility status of a package in various distributions. I might code a Proof-of-Concept of that in the next weeks (when I have time).
I also got some help with java patches in openSUSE and made several nice upstream reproducibility fixes – showing some others how easy that can be.

This whole event also was good team-building, getting to know each other better. This will allow us to better collaborate in the Future.

Later there will be a larger report compiled by others.

Highlights of YaST Development Sprint 90

December 5th, 2019 by

As usual, during this sprint we have been working on a wide range of topics. The release of the next (open)SUSE versions is approaching and we need to pay attention to important changes like the new installation media or the /usr/etc and /etc split.

Although we have been working on more stuff, we would like to highlight these topics:

  • Support for the new SLE installation media.
  • Proper handling of shadow suite settings.
  • Mount points handling improvements.
  • Help others to keep the Live Installation working.
  • Proper configuration of console fonts.
  • Better calculation of minimum and maximum sizes while resizing ext2/3/4 filesystems.
  • Small fixes in the network module.

The New Online and Full SLE Installation Media

The upcoming Service Pack 2 of SUSE Linux Enterprise products will be released on two media types: Online and Full.

On the one hand, the Online medium does not contain any repository at all. They will be added from a registration server (SCC/SMT/RMT) after registering the selected base product. The Online medium is very small and contains only the files needed for booting the system and running the installer. On the other hand, the Full medium includes several repositories containing base products and several add-ons, which can help to save some bandwidth.

Obviously, as the installer is the same for both media types, we need to adapt it to make it work properly in all scenarios. This is an interesting challenge because the code is located in many YaST packages and at different places. Keep also in mind that the same installer needs to also work with the openSUSE Leap 15.2 product. That makes another set of scenarios which we need to support (or at least not to break).

The basic support is already there and we are now fine-tuning the details and corner cases, improving the user experience and so on.

Proper Handling of Shadow Suite Settings

A few weeks ago, we anticipated that (open)SUSE would split system’s configuration between /usr/etc and /etc directories. The former will contain vendor settings and the latter will define host-specific settings.

One of the first packages to be changed was shadow, which stores now its default configuration in /usr/etc/login.defs. The problem is that YaST was not adapted in time and it was still trying to read settings only from /etc/login.defs

During this sprint, we took the opportunity to fix this behavior and, what is more, to define a strategy to adapt the handling of other files in the future. In this case, YaST will take into account the settings from /usr/etc directory and it will write its changes to a dedicated /etc/login.defs.d/70-yast.conf file.

Missing Console Font Settings

The YaST team got a nice present this year (long before Christmas) thanks to Joaquín, who made an awesome contribution to the YaST project by refactoring the keyboard management module. Thanks a lot, Joaquín!

We owe all of you a blog entry explaining the details but, for the time being, let’s say that now the module plays nicely with systemd.

After merging those changes, our QA team detected that the console font settings were not being applied correctly. Did you ever think about the importance of having the right font in the console? The problem was that the SCR agent responsible for writing the configuration file for the virtual consoles was removed. Fortunately, bringing back the deleted agent was enough to fix the problem, so your console will work fine again.

Helping the Live Installation to Survive

Years ago, the YaST Team stopped supporting installation from the openSUSE live versions due to maintainability reasons. That has not stopped others from trying to keep the possibility open. Instead of fixing the old LiveInstallation mode of the installer, they have been adapting the live versions of openSUSE to include the regular installer and to be able to work with it.

Sometimes that reveals hidden bugs in the installer that nobody had noticed because they do not really affect the supported standard installation procedures. In this case, YaST was not always marking for installation in the target system all the packages needed by the storage stack. For example, the user could have decided to use Btrfs and still the installer would not automatically select to install the corresponding btrfsprogs package.

It happened because YaST was checking which packages were already installed and skipping them. That check makes sense when YaST is running in an already installed system and is harmless when performed in the standard installation media. But it was tricky in the live media. Now the check is skipped where it does not make sense and the live installation works reasonably well again.

A More Robust YaST Bootloader

In order to perform any operation, the bootloader module of YaST first needs to inspect the disk layout of the system to determine which devices allocate the more relevant mount points like /boot or the root filesystem. The usage of Btrfs, with all its exclusive features like subvolumes and snapshots, has expanded the possibilities about how a Linux system can look in that regard. Sometimes, that meant YaST Bootloader was not able to clearly identify the root file system and it just crashed.

"Missing '/' mount point" error

Fortunately, those scenarios are reduced now to the very minimum thanks to all the adaptations and fixes introduced during this sprint regarding mount points detection. But there is still a possibility in extreme cases like unfinished rollback procedures or very unusual subvolumes organization.

So, in addition to the mentioned improvements in yast2-storage-ng, we have also instructed yast2-bootloader to better deal with those unusual Btrfs scenarios, so it will find its way to the root file system, even if it’s tricky. That means the “missing ‘/’ mount point” errors should be gone for good.

But in case we overlooked something and there is still an open door to reach the same situation again in the future, we also have improved YaST to display an explanation and quit instead of crashing. Although we have done our best to ensure this blog entry will be the only chance for our users to see this new error pop-up.

YaST2 Bootloader: root file sytem not found

Improving the Detection of Mount Points

As mentioned above, improving the detection of mount points helped to prevent some problems that were affecting yast2-bootloader. However, that is not the only module that benefits from such changes.

When you run some clients like the Expert Partitioner, they automatically use the libstorage-ng library to discover all your storage devices. During that phase, libstorage-ng tries to find the mount points for all the file systems by inspecting /etc/fstab and /proc/mounts files. Normally, a file system is mounted only once, either at boot time or manually by the user. For the first case, both files /etc/fstab and /proc/mounts would contain an entry for the file system, for example:

$ cat /etc/fstab
/dev/sda1  /  ext4  defaults  0  0

$ cat /proc/mounts
/dev/sda1 / ext4 rw,relatime 0 0

In the example above, libstorage-ng associates the / mount point to the file system which is placed on the partition /dev/sda1. But, what happens when the user bind-mounts a directory? In such a situation, /proc/mounts would contain two entries for the same device:

$ mound /tmp/foo /mnt -o bind
$ cat /proc/mounts
/dev/sda1 / ext4 rw,relatime 0 0
/dev/sda1 /mnt ext4 rw,relatime 0 0

In the Expert Partitioner, that file system will appear as mounted at /mnt instead of /. So it will look like if your system did not have the root file system after all!

This issue was solved by improving the heuristic for associating mount points to the devices. Now, the /etc/fstab mount point is assigned to the device if that mount point also appears in the /proc/mounts file. That means, if a device is included in the /etc/fstab and the device is still mounted at that location, the /etc/fstab mount point takes precedence.

As a bonus, and also related to mount points handling, now the Expert Partitioner is able to detect the situation where, after performing a snapshot-based rollback, the system has not been rebooted. As a result, it will display a nice and informative message to the user.

System not rebooted after snapshot rollback

Improved Calculation of Minimum and Maximum Sizes for ext2/3/4

If you want to resize a filesystem using YaST, it needs to find out the minimum and maximum sizes for the given filesystem. Until now, the estimation for ext2/3/4 was based on the statvfs system call and it did not work well at all.

Recently, we have improved YaST to use the value reported by resize2fs as the minimum size which is more precise. Additionally, YaST checks now the block size and whether the 64bit feature is on to calculate the maximum size.

Polishing the Network Module

As part of our recent network module refactorization, we have improved the workflow of wireless devices configuration, among other UI changes. Usually, these changes are controversial and, as a consequence, we received a few bug reports about some missing steps that are actually not needed anymore. However, checking those bugs allowed us to find some small UI glitches, like a problem with the Authentication Mode widget.

Moreover, we have used this sprint to drop the support for some deprecated device types, like Token Ring or FDDI. Below you can see how bad the device type selection looks now. But fear not! We are aware and we will give it some love during the next sprint.

Network Device Type Selection

Conclusions

The last sprint of the year is already in progress. This time, we are still polishing our storage and network stacks, improving the migration procedure, and fixing several miscelaneous issues. We will give you all the details in two weeks through our next sprint report. Until then, have a lot of fun!