When I re-booted my blogging habits with very UN-sexy and technical topic ‘GNU C Compiler and how to make it with openSUSE’. I thought nobody bothers to read these because A) Everyone who reads openSUSE blogs are PRO B) everyone wants to do Javascript, Python or ‘Put your script language here not C. I can tell actually C ain’t that bad you just have to shoot yourself to leg and then learn how to walk again.
Last blog entry was about ‘openSUSE and GCC part 3: RPM devel packages‘ someone (thanks for pointing that out really!) noted that I should fix C-Code example I was stunned! There were someone that really readied blog entry. Okay he/she didn’t say did he/she like it but some one read it.
I have one real reason to this blog-stuff. I hope I have found something like this when I young and I was starting my journey in Linux land. Currently there is so many more people now in populating it and it’s coming up fast. So If you find errors or don’t understand something be welcome to ask or want to know about something specific let me know! Now we get on today’s topic that is ‘pkg-config and what one can do with it’. (more…)
Archive for October, 2013
openSUSE and GCC part 4: Pkg-config and what one can do with it
October 28th, 2013 by Tuukka PasanenLinuxDays 2013
October 24th, 2013 by calumma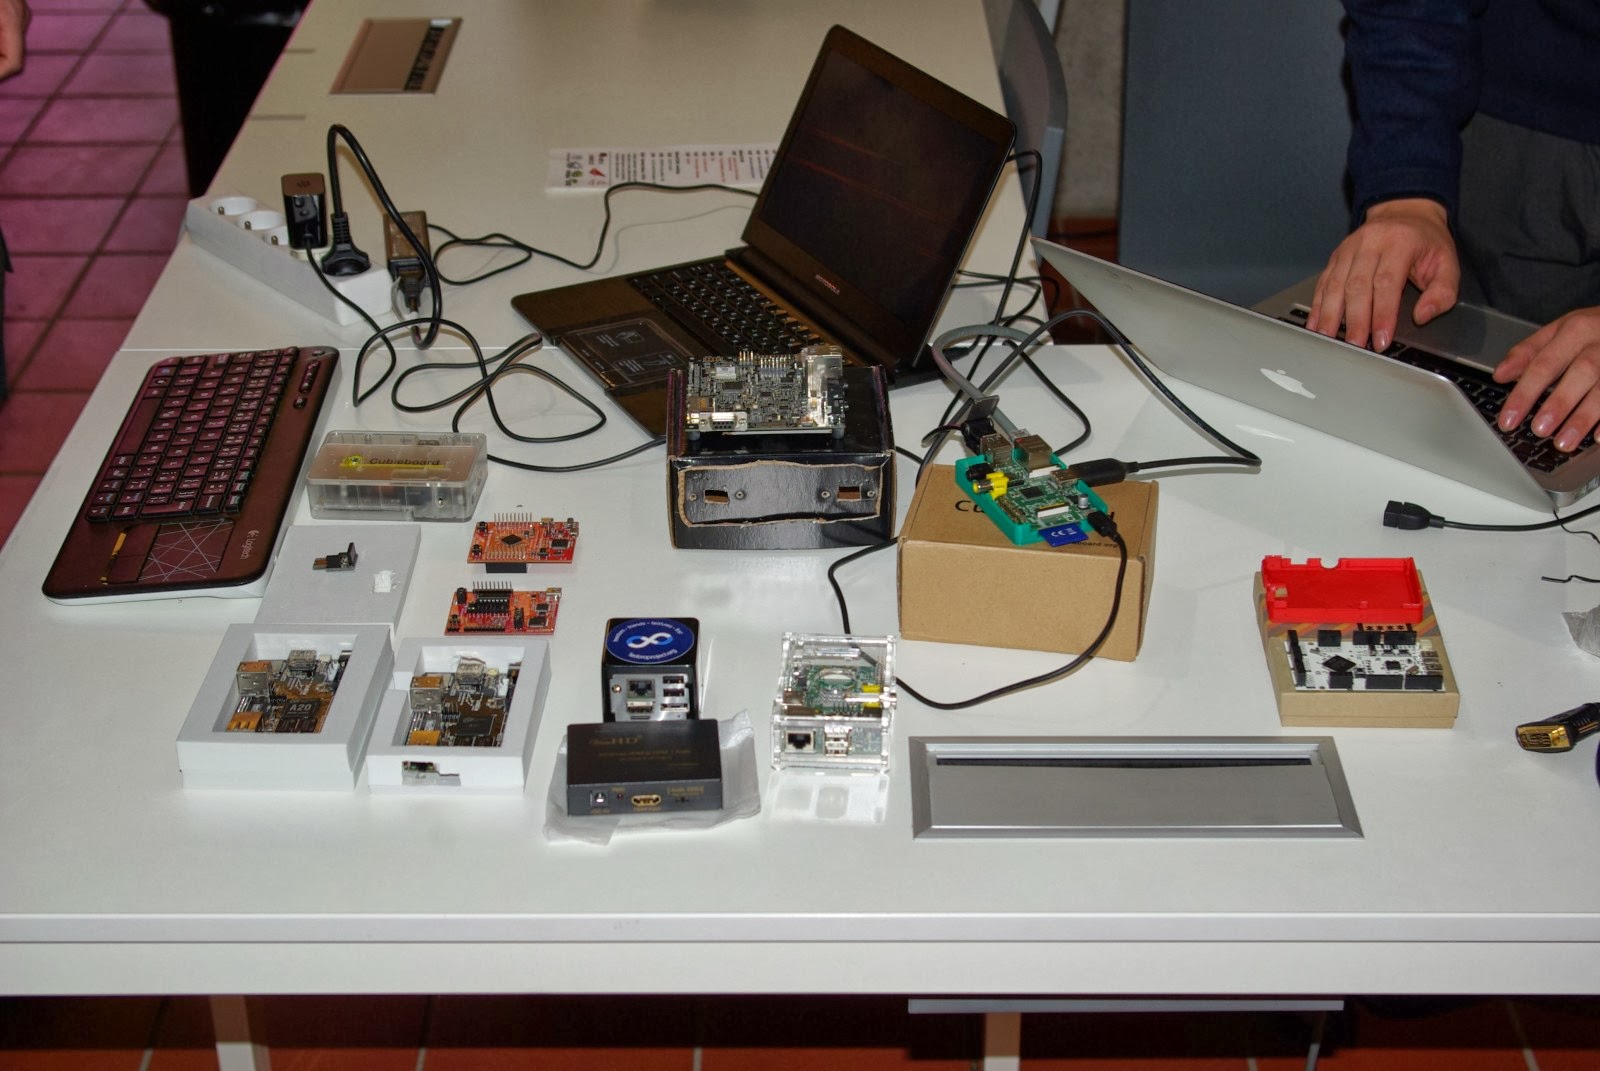
Michal Hrušecký writes about Linuxdays 2013. Last year, openSUSE helped this event kick off big, and we were there again this year!
Introducing Linuxdays 2013
Of course you remember the openSUSE Conference 2012: bootstrapping awesome, the four-for-the-price-of-one event? The one in Prague? We had the combination of the openSUSE Conference, SUSE Labs, a Gentoo miniconf and the local LinuxDays conference. The last two for the first time ever. While Gentoo miniconf didn’t have continuation, LinuxDays conference has been bootstrapped successfully and this year in the beginning of October, the conference took place for the second time. And Amazing it was.
Visitors and talks
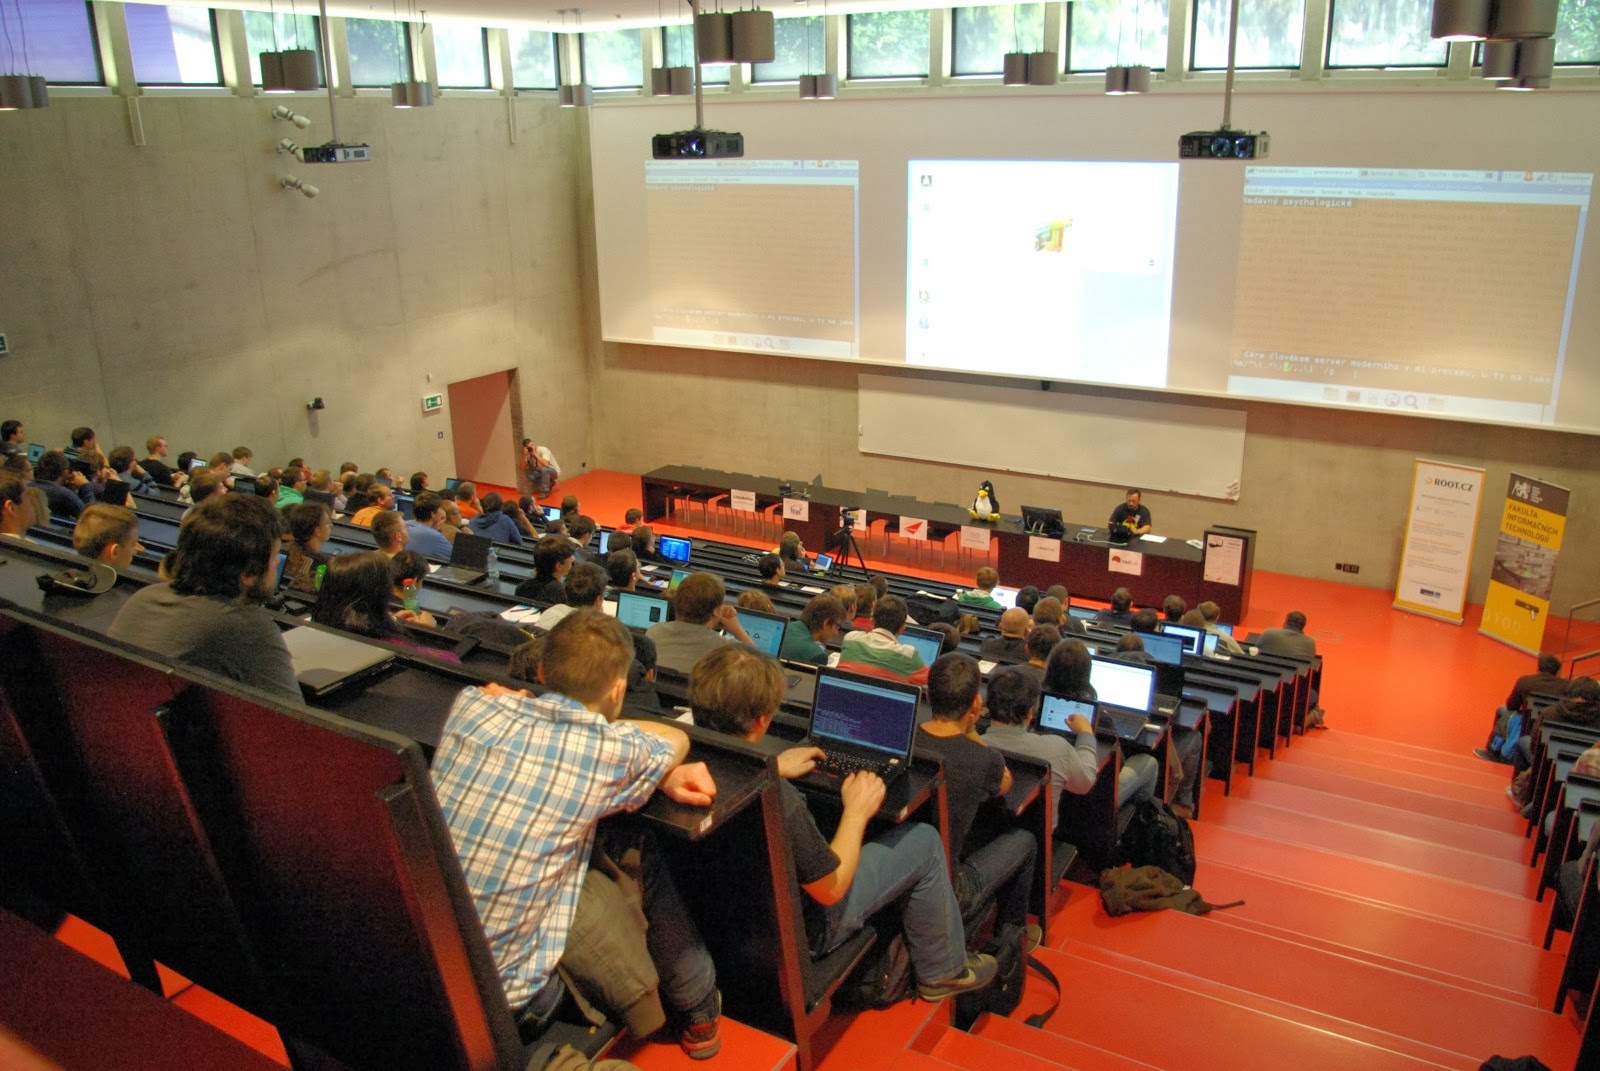
Let’s start with some numbers. Before the conference started, there were 650 registrations. On Saturday about 400 people went through registration and on Sunday about 300 joined the event. A little geeky number – about 600 different Mac addresses connected to the WiFi. The event featured 31 talks and 6 workshops for these visitors.
Presentations were for both beginners and advanced geeks. There were talks describing Gnome 3 evolution, news in Libre Office or how openSUSE gets created. On the other hand, there were talks about MySQL fine tunning, an introduction to Autotools and a session about TCP Multipath.
Workshops and booths
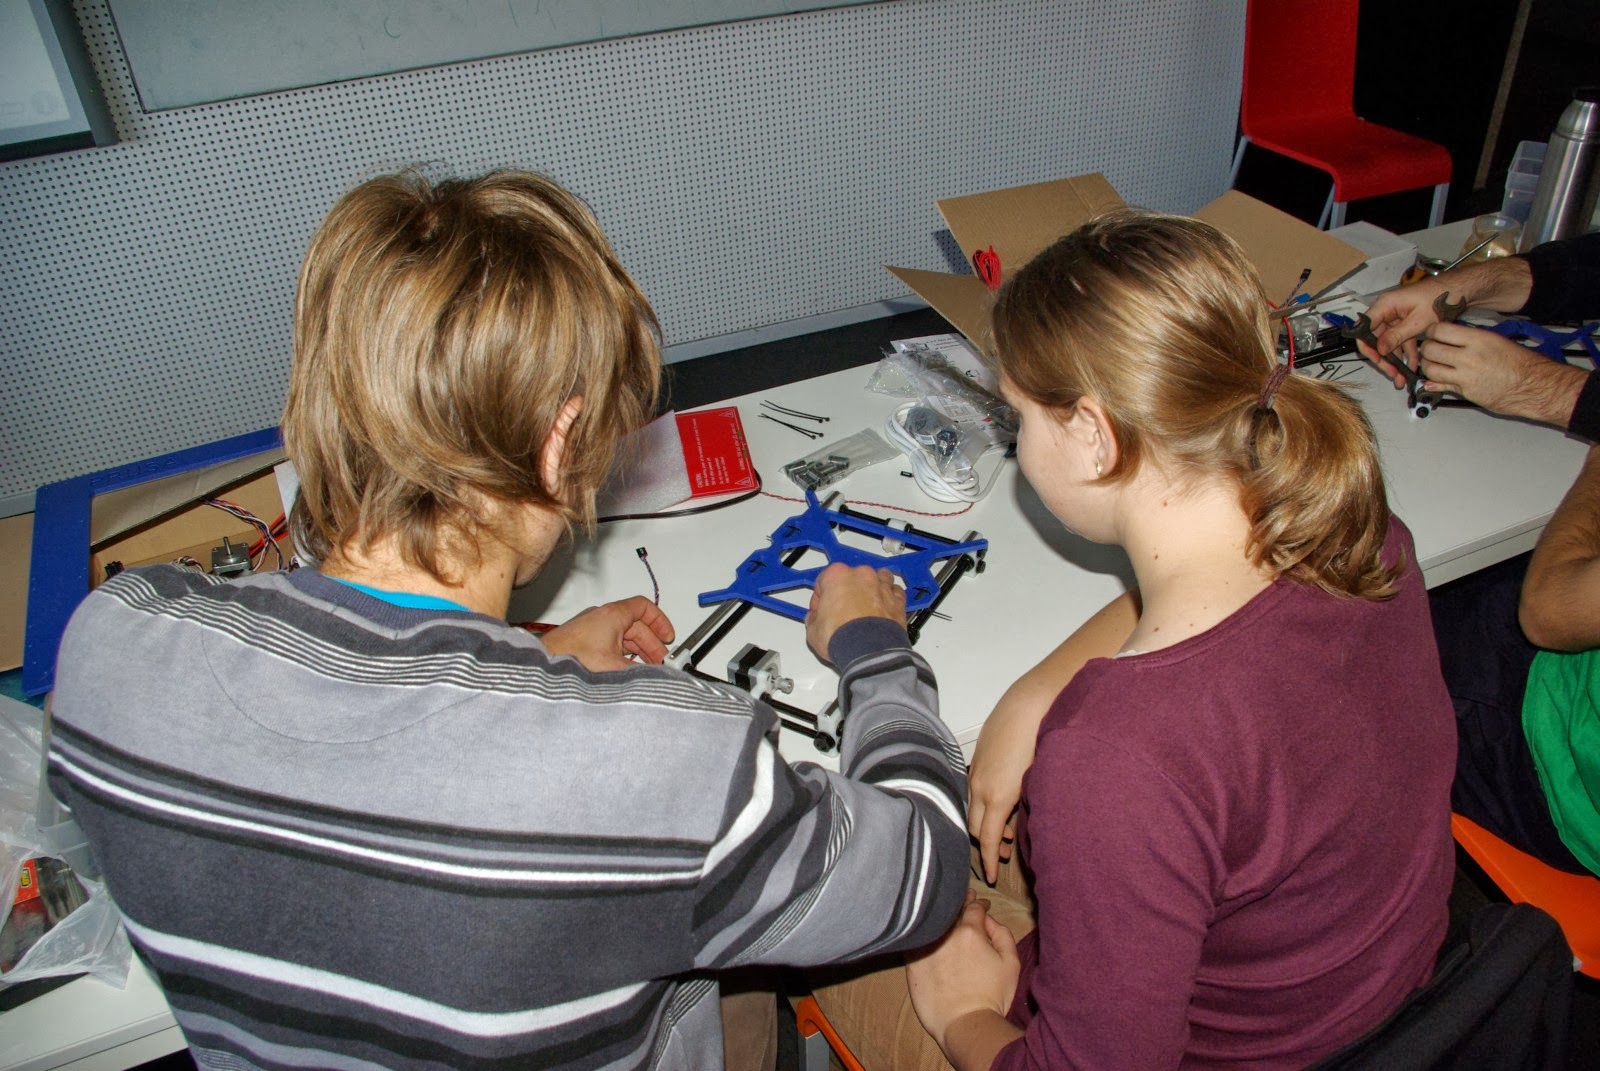
Another interesting part of the conference was the 3D printing workshop. It ran through the whole Saturday and a part of Sunday. People could order parts for 3D printers with delivery to the conference and there was a team of experienced 3D printer builders in the workshop helping people build their own printer. There was huge interest in this workshop, but due to the limited capacity, only the first nine registrations were accepted. In the end all nine 3D printers were successfully built and many people saw and learned how to build their own!
Like last year, there were booths with various interesting open source projects. Mainly distributions – Debian, Fedora, Gentoo, openSUSE, Slax and Ubuntu – but there were also XFCE and Geany booths, an OpenMobility booth and a booth with some geeky stuff to buy, like mugs, T-shirts or Raspberry-Pi’s with various shields.
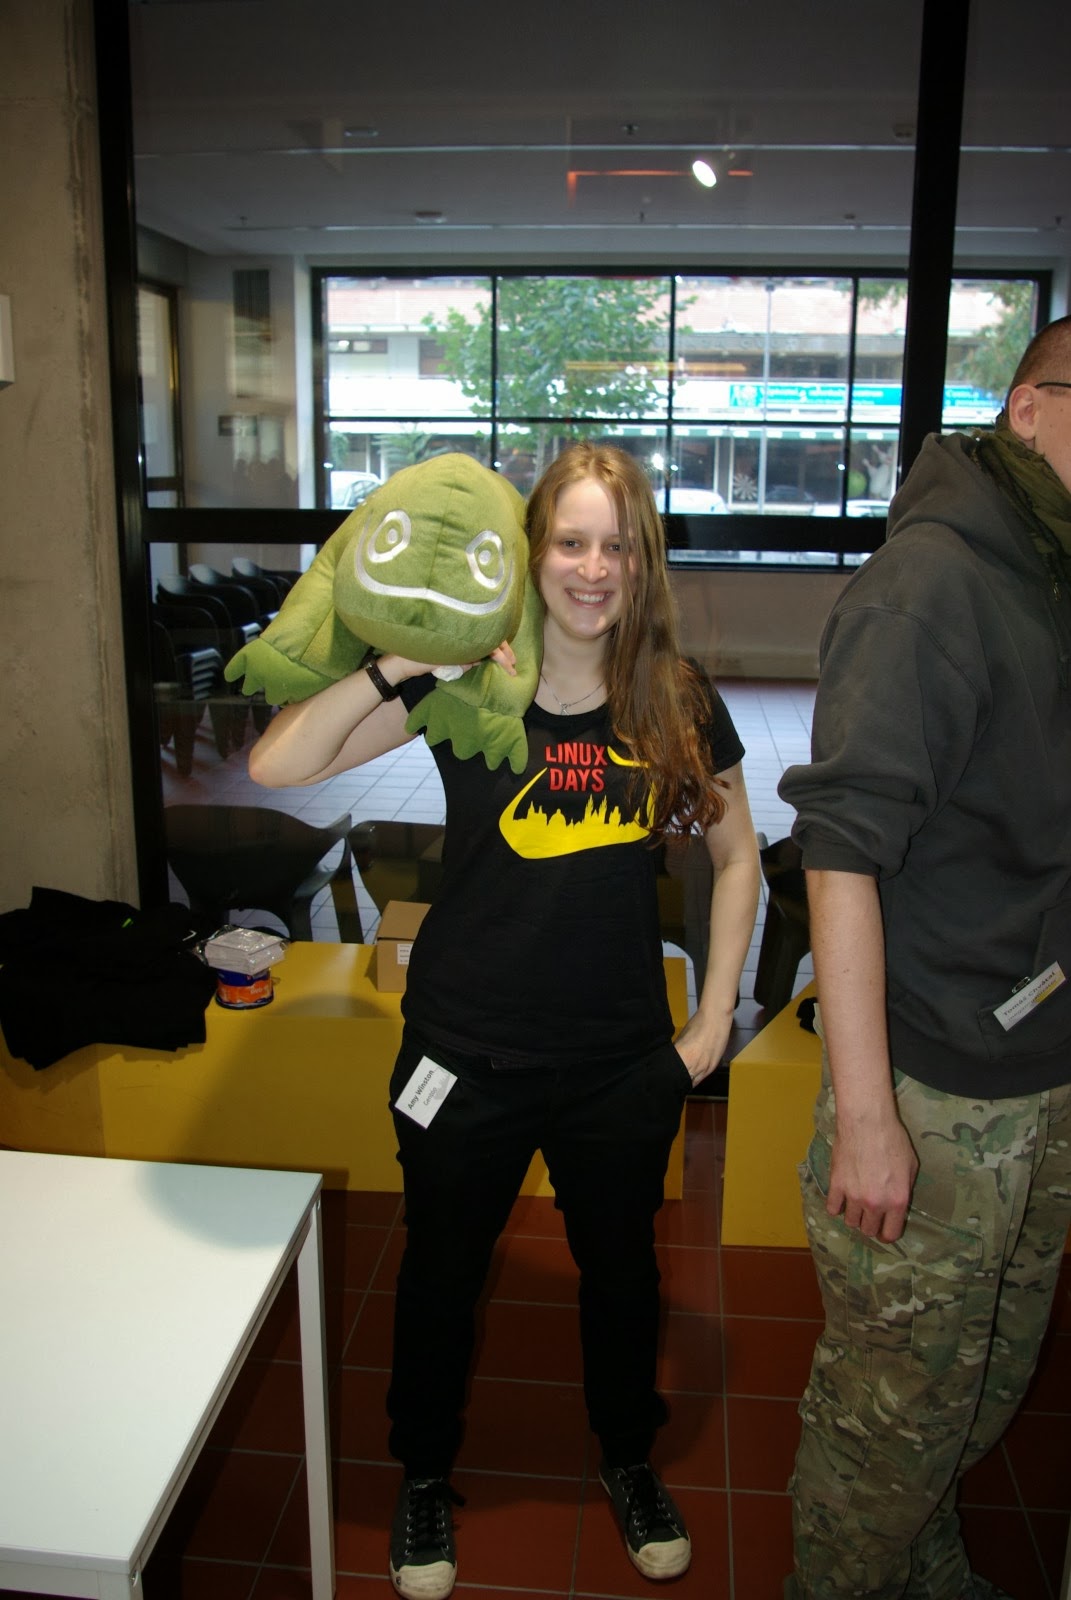
As far as the openSUSE stand goes, people liked our DVDs, both the ones with openSUSE and SLE (we had some evaluation versions to give away), but as always Geeko got the most attention. People just looooove this lizard. We had plenty of questions regarding where can they get one.
Overall, the conference was quite a success and there will definitely be a LinuxDays 2014!
Statistics
And now it’s time for numbers again. Who were our top contributors to openSUSE Factory in the last week? Here you go:
| Spot | Name |
| 1 | Raymond Wooninck |
| 2 | Dominique Leuenberger |
| 3 | Hrvoje Senjan, Bjørn Lie |
| 4 | Richard Brown |
| 5 | Dirk Mueller |
| 6 | Denisart Benjamin |
| 7 | Todd R |
| 8 | Michal Vyskocil |
| 9 | Sascha Peilicke |
| 10 | Matthias Mailänder, Marguerite Su |
openSUSE and GCC part 3: RPM devel packages
October 22nd, 2013 by Tuukka PasanenIn last blog I explained how to compile application with Gnu C Compiler as knows as ‘gcc‘. In blog I try to explain what are RPM devel packages and how to use them in C-application with ‘gcc‘. (more…)
Beta and RC work
October 17th, 2013 by calumma
As part of the openSUSE community efforts gearing up for openSUSE 13.1, the openSUSE team has been hard at work on a variety of things. Ludwig Nussel, in his role of controller in the team, keeps an eye on progress of the tasks we have been assigned. He gives an overview of some of the things we have been doing.
For beta 1
For beta 1 the focus was on testing and of course practical changes in a variety of areas. Here’s a list of the tasks on progress.opensuse.org.
After the btrfs discussion we checked out how often it is used and did some recommendations to give it extra testing. The result was that it was clearly mentioned in the Beta announcement and that during the installation YaST2 would ask if you could test btrfs.
We organized the Beta Pizza Hackaton, getting internal help from the SLE team on fixing openSUSE bugs. The idea came up to make it a contest. We went over the bugs that were reported, putting them in categories (bronze/silver/gold) to signify importance for the release. We developed an IRC bot to announce changes and a script to record who-did-what to help a committee of ‘wise men’ to decide who would win.
In the technical area, we agreed with the documentation team to move the manuals into activedoc. That way they are easier to maintain and always up to date. And Greek was included as primary language on the dvd! We also had to work with MS to get the bootloader and kernel signed properly for UEFI systems, we documented the development process, hacked further on testing tools, and of course there was a lot of writing of articles for news.opensuse.org.
Last but not least, we’ve been talking to Open Source press and helping them to ensure we have a boxed version of openSUSE 13.1 in Germany. We (and the openSUSE Board, as it is their decision) are still looking for providers in other countries!

RC1
Here’s a list of the tasks on progress.opensuse.org. And the summary:
To help the marketing team, we made and ran a script to remind packagers to tell marketing about their features. Based on this and help from the community, we made a start with the feature guide, writing about KDE, GNOME and the Linux kernel. A second goal was to get the ‘promote openSUSE 13.1’ article out, for which we had to kick people for artwork and we had to update countdown.opensuse.org. We also updated software.opensuse.org with information about the USB stick installation.
On the technical side, we did a lot of testing work and of course pick fixes to go into Factory. There was also work with Legal for a new EULA (End User License Agreement) which does not mention Novell anymore (will be included in the final); and we added openSUSE 13.1 to bugzilla, pinged our translators about the release and kicked people about the community repos.
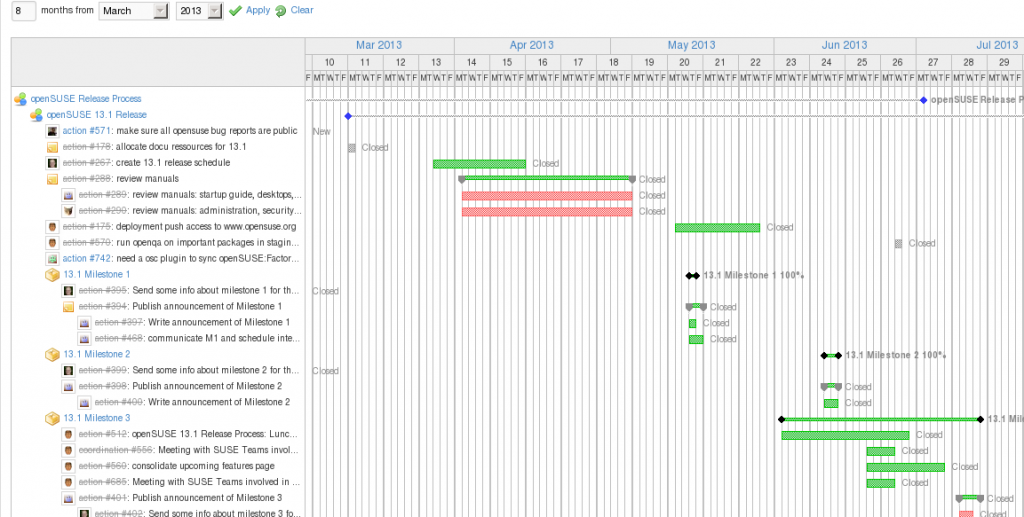
A lot
As you can see, there are a lot of tasks we have to juggle. progress.opensuse.org with it’s useful Gantt chart is a big help for that, but it also simply requires work: checking what is done, what is not done, kicking people to do their thing. We’re hoping to get more community members involved with progress.opensuse.org – a few are already helping out via this tool and you’re welcome to check out how we do it!
The end result is that we can release a quality product, on time – something to be proud of!
Statistics
We’re back with weekly statistics (the stats from last week were in the RC1 announcement. Here are the top-10 contributors to openSUSE Factory of the last week:
| Spot | Hacker |
| 1 | Denisart Benjamin |
| 2 | Dominique Leuenberger |
| 3 | Raymond Wooninck |
| 4 | Hrvoje Senjan |
| 5 | Tomáš Chvátal |
| 6 | Stephan Kulow |
| 7 | Marguerite Su |
| 8 | Sascha Peilicke, Matthias Mailänder, Marcus Meissner |
| 9 | Cristian Rodríguez |
| 10 | Guido Berhörster, Dirk Mueller, Andreas Schwab |
openSUSE and GCC part 2: compiling ‘Hello World’
October 15th, 2013 by Tuukka PasanenI really hope you readied last article ‘OpenSUSE and GCC part 1: getting started‘ or you understand basics and you have GCC (Only GNU C Compiler as GCC stands Gnu Compiler Collection) installed. This time we learn how to compile application called ‘Hello World’. It’s so popular application even wikipedia have article about it. (more…)
Hackweek: Hot Chili Sauce for Hot Lizards
October 8th, 2013 by Thomas SchraitleThis hot sauce can be used to spice up your food, give you creative
energy, and is a nice gift for your friends and family members — not
only for Hackweek.
Name: hot-chili-sauce
Summary: Toms’s Hot Chili Sauce
License: BSD
Version: 1.0
Group: Cooking/Sauce/Chili
openSUSE and GCC part 1: getting started
October 7th, 2013 by Tuukka PasanenI try to explain in this series of blog entries how to install gcc (GNU C-Compiler) and what to do with it. I also try to explain little make and CMake/Autotools. This is not very generic tutorial because I like to promote openSUSE as coding platform. Most of the tips goes just fine with every distro. For the first words I like to say one thing: openSUSE is excellent platform for C-coding. Though, you can choose your programming language but this time I like to talk about GCC and specially C-Compiler. I’ll try to how to get there with these writings because I have noticed that this substance is getting less attention that it needs. Also noted that GCC anf GNU is 30 years and I have used it almost 15 so time to share some information. (more…)
Only for the brave, Proprietary AMD/ATI Catalyst fglrx 13.10 BETA2 (13.20.11-1) rpm released
October 6th, 2013 by Bruno FriedmannOnly for the brave, Proprietary AMD/ATI Catalyst fglrx 13.10 BETA2 (13.20.11-1) rpm released
Notice
This release concern only owners of radeon HD5xxx or above. And adventurous users who know how to deal with troubles.
The majority could easily wait the final release, expected somewhat later even if it take a long time 🙂
This is experimental & BETA software, it could fix issues you encountered, but also can eat your kittens. You’ve been warned !
flgrx build for 3.11 series kernel ( Tumbleweed & 13.1 ).
But this time I’ve to update the Sebastian script myself, so I consider also the package as beta stage.
Installing the new repository
Admitting you’ve the normal repository named FGLRX, (use zypper lr -d to find the number or name you give it). You have to start by disabling it
so you could fallback to it quickly. Open a root console or add sudo at your convenience and issue the following command:
zypper mr -dR FGLRX
The beta driver is available for 11.4 (evergreen kernel), 12.1, 12.2, 12.3, 13.1, Tumbleweed (12.3 based + kernel 3.11) at amd-fglrx-beta
To add another repository in the same console as root issue the following command which will install normally the right repository for your distribution
zypper ar -n FGLRX-BETA -cgf http://geeko.ioda.net/mirror/amd-fglrx-beta/openSUSE_`lsb-release -r | awk '{print $2}'` FGLRX-BETA
If you are using Tumbleweed use this one
zypper ar -n FGLRX-BETA -cgf http://geeko.ioda.net/mirror/amd-fglrx-beta/openSUSE_Tumbleweed FGLRX-BETA
Now the update/upgrade process
zypper dup -r FGLRX-BETA
Let the system upgrade the package, and try to enjoy the new beta
Creating openQA Test Cases for openSUSE 13.1
October 2nd, 2013 by calumma It is time for an update on openQA! Alberto Planas Domínguez discusses how to install and create tests (or “needles“) for the tool that helps keep openSUSE Factory stable.
openQA and testing openSUSE
Our work on openQA was introduced a few months ago on this blog. To recap, the major improvements we made were related to the detection of failed and succeeded tests by introducing the ‘needles’ (PNG files with metadata associated in JSON format) and using openCV to determine test results; and a host of changes to speed up the testing process and improve the webUI a bit. The work is currently residing in a branch by the openSUSE team on github but the original author, Bernhard Wiedemann, plans to test, integrate and deploy openQA during hackweek.
The fact that the new code isn’t running on openqa.opensuse.org yet is unfortunate but not a huge issue. Right now, to contribute test cases, you have to install and run openQA yourself. And with the packages available for openSUSE this is not a huge deal.
So, let’s talk about using openQA and creating test cases!
Installing openQA
Installing openQA is easy. Add a repository in zypper, install some packages and run some scripts. You can find a full description of the installation process in the openQA Tutorial. In summary, you have to go through these steps:
Install the repository and the packages and reboot
% zypper ar http://download.opensuse.org/repositories/devel:openQA/openSUSE_12.3 devel:openQA
% zypper in openQA kvm OVMF
% reboot
Install needles and fix ownership
% /usr/lib/os-autoinst/tools/fetchneedles
% cd /var/lib/os-autoinst/needles
% sudo chown -R wwwrun distri

testing in progress!
After that we need to make some adjustment in the apache configuration before we can run the service. See the openQA Tutorial for the details.
Get testing
openQA testing works on the base of ISO images which we have to provide to openQA. So the next logical step is to download the last development ISO image from software.opensuse.org/developer and copy it to /var/lib/openqa/factory/iso. Now we can create the jobs (different test sets) and launch the server:
% rpc.pl --host localhost iso_new /var/lib/openqa/factory/iso/*.iso
If we have systemd running, the workers will take the jobs, create a virtual machine, and run the tests in order.
Look Ma, my first test!
Once openQA is installed we can start creating and running tests. Tests are written in Perl, and use an API exported by openQA to the applications. The internal logic of a test is something like the following:
- The test sends a set of events (keystrokes) to the virtual machine
- openQA takes screenshots of the consequences of these events
- The test compares the resulting images with a database of images (or needles, see the previous openQA article for details)

We can move through the installation process using this cycle multiple times. For example, in the test 051_installation_mode.pm we can find this:
sendkey $cmd{"next"};
waitforneedle("inst-timezone", 30) || die 'no timezone';
In the first command we send a keystroke to the system, in this case alt-n because the dictionary $cmd maps the “next” key to this keystroke. After that we wait 30 seconds and check if we find an image compatible with the “inst-timezone” needle.
Inside a test, the main function that can be used to send events is sendkey(), and sendautotype() when we want to send a full string. When we want to assert the current image we can use waitforneedle(), which launches an exception if the needle is not found, and checkneedle(), which returns the result in case that we have a match between the current image and a needle.
More complicated tests
Using this basic functionally we can build higher levels of abstraction to simplify the interaction between the test and the system. For example, we can build a function that writes the password when we execute a sudo command. One of the problems when we execute a program as a root inside a test is that the system not always asks for the root password when we call the sudo program. We can work around this as follows:
sub sudo() {
my $passwd = shift;
my $prog = shift;
sendautotype("sudo $prog\n");
if (checkneedle("sudo-passwordprompt", 2)) {
sendautotype(passwd);
sendkey "ret";
}
}
We use checkneedle() instead of waitforneedle() to make a decision inside the test instead of making an assert and marking the test as failed.
An openQA test is in fact an instance of an object. We usually inherit from a base class an overwrite one of the methods to run the test. The basic structure of a test is:
Horsies looking for needles
use base "basetest";
use strict;
use bmwqemu;
# Determine if the test can run.
sub is_applicable() {
}
# Main code of the test
sub run() {
}
# Return a map of flags to decide if the fail
# of this test is important, or to decide a
# rollback of the VM status.
sub test_flags() {
}
1;
The method is_applicable() is called to check if the test can run for a given configuration (more about this later). If the function returns true, openQA will call the run() method. It is in this function that we need to put the test code.
The test_flags() is used to decide what to do when the test fails. Depending on what this function returns, openQA can decide to mark the ISO as a wrong ISO if the test fails, or mark only this tests as failed and continue with the next test. There is one more interesting feature here. OpenQA makes snapshots of the CPU, the memory and the hard disk (using a QEMU option). If the test goes well openQA creates a snapshot labeled ‘lastgood’ that can be recovered if the next test fails. This feature is useful to guarantee that every test can be started from a stable system (and failing tests can put the system in an non stable state).
Variables
When openQA creates a new test job, what is really doing is setting a specific combination of environment variables that need to be checked by the test in order to adjust the test’s behavior or to discard itself (through the is_applicable() method).
For example, when we want to test the KDE Desktop Environment, openQA create a new variable named DESKTOP with value “KDE”. This variable can be checked in the test code using $ENV{DESKTOP}. As another example, say we want to create a test to check if Firefox is working properly on two desktops. We can use:
sub is_applicable() {
return $ENV{DESKTOP}=~/kde|gnome/;
}
If the variable DESKTOP is not KDE or GNOME, the test will not be executed.
I want to learn more
If you want to dig into openQA, you can check the source code and the different tests that are now running every day in our deployed instance. You can find the source code of V1 in Bernhard Wiederman’s repository github.com/bmwiedemann/os-autoinst and github.com/bmwiedemann/openQA, V2 is currently in the openSUSE Github account at github.com/openSUSE-Team/os-autoinst and github.com/openSUSE-Team/openQA with here the needles. As mentioned before, Bernhard plans on integrating the V1- and V2 code during hackweek.
You can grab the code to learn by checking other tests, like for example the ones in x11test.d and inst.d.
Contribute!
There is a simple way to start contributing to openSUSE through openQA:
- Install openQA
- Create a new test in x11test.d to test your application
- Send a pull request to the project with the test and the needles
Currently, these tests would then be used by the openSUSE team (running internally) to keep the quality of the upcoming release up, but once V1 and V2 are merged and deployed, you can see and act on the results on openqa.opensuse.org.

The weekly statistics
And as every week, here’s the top-10 contributors to openSUSE Factory of last week. We’re pretty much in bug fixing mode now so a big thanks to each of the contributors for helping make openSUSE 13.1 stable!
| Spot | Name |
| 1 | Dominique Leuenberger |
| 2 | Denisart Benjamin |
| 3 | Dirk Mueller |
| 4 | Sascha Peilicke |
| 5 | Dr. Werner Fink |
| 6 | Marcus Meissner, Bjørn Lie |
| 7 | Ismail Donmez |
| 8 | Todd R |
| 9 | Stephan Kulow, Hrvoje Senjan |
| 10 | Niels Abspoel |
Use the Scan to PC function on a Samsung Multifunction
October 1st, 2013 by Ciaran FarrellSo I went out and bought myself a spanking new multifunction creature from Samsung called a CLX3305FN. Generally, this fits into the CLX3300 series, but it has LAN only – no wifi (that would be the CLX3305FW). One of the reasons I decided I wanted this was because of the advertised “Scan to PC” function. I figured it would be simple on Windows and that I’d be able to get it working on Linux through YaST or sane/scanimage etc – i.e. a PITA but it would work.
As it turned out, it didn’t work at all. The function is supposed to be for Windows only. However, the clever lads over at bchemnet.com reverse engineered the protocol that was used between the scanner and a windows PC and managed to hack a script together which runs as a server daemon. It just sits there twiddling its thumbs until a user presses the “Scan to PC” button on the printer/scanner. Then it kicks into action and uses sane to send scan commands to the scanner. The result of it is that the scan lands in $HOME/Scans/ – thus, the Scan To PC function is neatly implemented for Linux. There are, of course, rough edges (such as the scanner sending in RAW rather than JPEG) but nothing that couldn’t be fixed in a hackweek.
So where can you get it? The package is available at http://software.opensuse.org/package/python-samsungScannerServer – but you’ll need to install the Samsung Unified Driver for Linux first. I found it at http://www.samsung.com/us/support/owners/product/CLX-3305FN but apparently bchemnet.com has a repo for debian/ubuntu where you can download it too. Once you install that and my package, you’ll probably have to do a systemctl start samsungScannerServer (“probably” because I don’t really know how systemd worked and schustered together a .service file based on google search results).
Another nice hackweek project would be to use something like inotify to discover incoming scanned files, gpg to encrypt them and email them to the user (and then delete the unencrypted version). I also need to look into getting the unified samsung driver working on ARM so I can use my raspberry as a scan server which sends encrypted scans to my email address…
Advertisement
-
Lizards
Adrian Schröter (12)
Agustin Chavarria (6)
Alessandro de Oliveira Faria (13)
Alex Barrios (12)
Alexander Naumov (10)
Alexander Orlovskyy (3)
Alin M Elena (5)
Andrea Florio (27)
Andreas Jaeger (70)
Andreas Stieger (12)
Andrew Wafaa (31)
Arvin Schnell (9)
Atri Bhattacharya (3)
Bernhard Wiedemann (31)
Bonnie Kurniawan (1)
Bruno Friedmann (98)
Calumma Brevicorne (29)
Carl Fletcher (1)
Christopher Hobbs (17)
Ciaran Farrell (3)
Stephan Kulow (17)
craig gardner (2)
Stephan Barth (2)
Thomas Schmidt (2)
Dinar Valeev (1)
Dirk Mueller (2)
Dmitry Serpokryl (7)
Efstathios Iosifidis (21)
Fabio Mucciante (5)
Federico Lucifredi (9)
Greg Freemyer (1)
Holger Sickenberg (2)
Hubert Mantel (1)
Ilya Chernykh (5)
Ismail Donmez (1)
J. Daniel Schmidt (2)
James Tremblay (7)
Jan Blunck (4)
Jan Loeser (3)
Jan Madsen (1)
Jan-Christoph Bornschlegel (3)
Jan-Simon Möller (20)
Javier Llorente (12)
Jigish Gohil (85)
Jiri Srain (1)
Jiří Suchomel (3)
Johan Kotze (5)
José Oramas M. (6)
Josef Reidinger (16)
Juergen Weigert (1)
Julio Vannini (9)
Dinar Valeev (5)
Kevin "Yeaux" Dupuy (11)
Klaas Freitag (55)
Lars Vogdt (11)
Ludwig Nussel (13)
M. Edwin Zakaria (4)
Marcus Hüwe (39)
Marcus Meissner (2)
Marcus Moeller (3)
Marcus Schaefer (4)
Martin Lasarsch (8)
Martin Mohring (11)
Masim "Vavai" Sugianto (20)
Michael Andres (1)
Michael Löffler (7)
Michal Marek (7)
Michal Vyskocil (12)
Miguel Angel Barajas Hernandez (2)
P Linnell (2)
Nelson Marques (55)
Nenad Latinović (1)
Nikanth Karthikesan (2)
Przemyslaw Bojczuk (1)
Peter Pöml (4)
Petr Gajdos (2)
Petr Mladek (60)
Petr Uzel (5)
Ray Wang (1)
Raymond Wooninck (1)
Ricardo Chung (7)
Ricardo Varas Santana (7)
Richard Bos (11)
Robert Schweikert (16)
Rossana Motta (1)
Rupert Horstkötter (10)
Sascha Manns (66)
saydul akram (3)
Sebastian Siebert (6)
Shawn Dunn (2)
Stanislav Visnovsky (7)
Stefan Haas (1)
Stefan Hundhammer (5)
Stefan Schubert (7)
Steffen Winterfeldt (8)
Suresh Jayaraman (3)
Susanne Oberhauser (3)
Thomas Göttlicher (6)
Thomas Schraitle (26)
Togan Muftuoglu (3)
Tuukka Pasanen (36)
Will Stephenson (22)
YaST Team (90)