Home Home > 2018 > 10
Sign up | Login

Deprecation notice: openSUSE Lizards user blog platform is deprecated, and will remain read only for the time being. Learn more...

Archive for October, 2018

Highlights of YaST Development Sprint 65

October 23rd, 2018 by
  • Snapper: list indicates special snapshots; what is snapper anyway?
  • Bcache: configuring attributes
  • AutoYaST: whole disks; partitioned RAIDs; Xen virtual partitions; better merging
  • Booting: "warning, everything is fine!"
  • CaaSP/Kubic: proposing NTP servers according to DHCP response
  • Partitioner UI is a bit faster now

Snapper: Show Currently Mounted and Next to be Mounted Snapshot

Btrfs has some special snapshots: The snapshot currently mounted, and the snapshot that will be mounted next time (unless a snapshot is selected in grub). Now snapper informs the user about these two special snapshot when listing snapshots by a special sign after the number:

# snapper --iso list --disable-used-space
 # | Type   | Pre # | Date                | User | Cleanup | Description           | Userdata     
---+--------+-------+---------------------+------+---------+-----------------------+--------------
0  | single |       |                     | root |         | current               |              
1+ | single |       | 2018-10-18 10:33:50 | root |         | first root filesystem |              
2  | single |       | 2018-10-18 10:43:45 | root | number  | after installation    | important=yes
3- | pre    |       | 2018-10-18 11:03:11 | root |         | ruin system           |              
4  | post   |     3 | 2018-10-18 11:03:11 | root |         | ruin system           |              

For more details visit http://snapper.io/2018/10/18/show-special-snapshots.html.

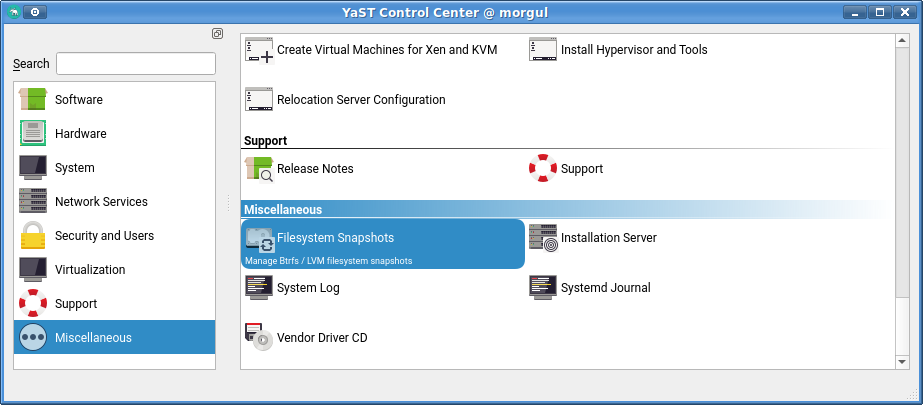
More Descriptive Name for Snapper Module in YaST Control Center

Previously, the module was called just "Snapper", but users who don’t know that Snapper is could not make any sense of that. We changed it to "Filesystem Snapshots".

Funny anecdote: One team member asked if Snapper really supports LVM when he read the subtitle "Manage Btrfs / LVM filesystem snapshots". Yes, it does! (It has been doing that for a long time). You don’t need Btrfs for snapshots; LVM can also do that, albeit a little differently than Btrfs.

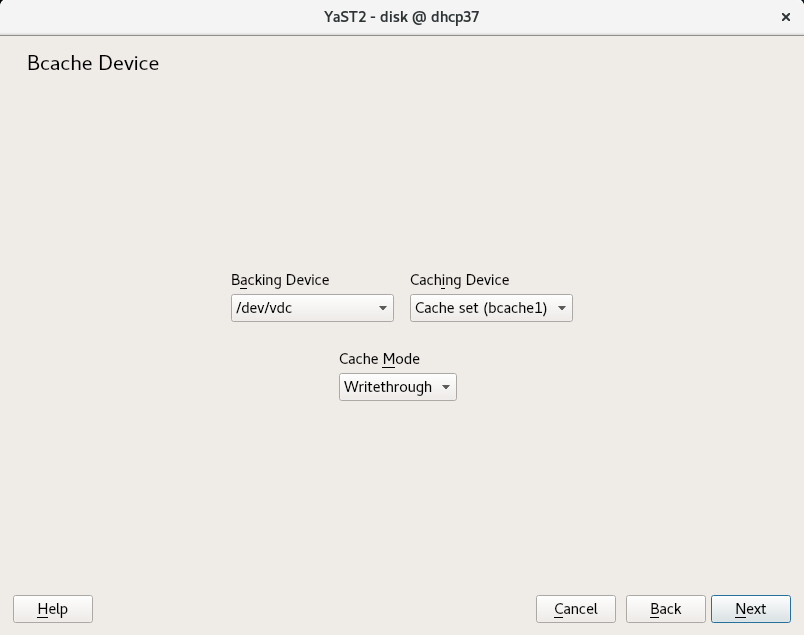
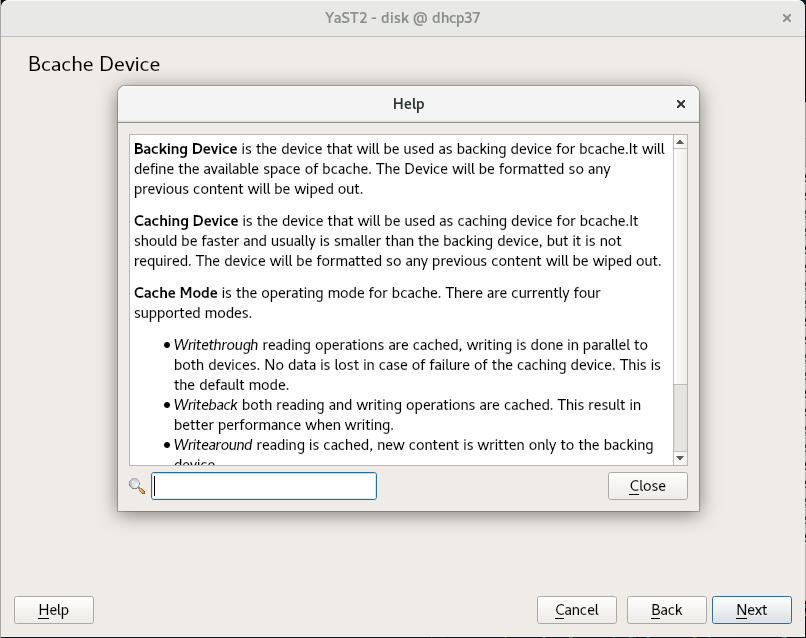
More Bcache Improvements

As you can see in the previous blog post, we are currently working on adding support for Bcache into the YaST partitioner. This time we allow to configure the cache mode for a new bcache device. If you are not sure what a particular cache mode means, we provide also a quite extensive help text. Beside this configuration we also limit operations to prevent data loss or operations that can result in unreliable results. Here with a couple of screenshots:

Using whole disks in AutoYaST

On one hand, now it is possible to format and mount a whole disk without creating any partition. In order to do so, you only need to set the <disklabel> element to none and AutoYaST will understand that you do not want to partition the drive but to use the whole disk as a filesystem.

<drive>
  <device>/dev/sdb</device>
  <disklabel>none</disklabel>
  <partitions config:type="list">
    <partition>
      <mount>/home</mount>
      <filesystem config:type="symbol">xfs</filesystem>
    </partition>
  </partitions>
</drive>

Given the definition above, AutoYaST will format the whole /dev/sdb disk mounting it at /home. But that is not all: it is even possible to use a whole disk as an LVM physical volume or as a software RAID member. The support for the first case was already present in previous AutoYaST versions, but it was not working correctly in SUSE Linux Enterprise 15 and openSUSE Leap 15.

<drive>
  <device>/dev/sdb</device>
  <disklabel>none</disklabel>
  <partitions config:type="list">
    <partition>
      <lvm_group>system</lvm_group>
    </partition>
  </partitions>
</drive>

AutoYaST and partitioned software RAIDs

AutoYaST is now able to create partitioned software RAIDs, something that was not possible in pre-storage-ng times. However, in order to support such a scenario, we needed to change the way in which software RAIDs are described in AutoYaST profiles, although the old format is still supported. So let’s have a look at how a RAID looks like now.

Instead of grouping all RAIDs in a single and special <drive> section, now each RAID is defined in its own section:

<drive>
  <device>/dev/md0</device>
  <raid_options>
    <raid_type>raid0</raid_type>
  </raid_options>
  <partitions config:type="list">
    <partition>
      <mount>/</mount>
      <filesystem config:type="symbol">btrfs</filesystem>
    </partition>
    <partition>
      <mount>/home</mount>
      <filesystem config:type="symbol">xfs</filesystem>
    </partition>
  </partitions>
</drive>

Of course, if you do not want the RAID to be partitioned, just set the <disklabel> element to none, as for any other device.

Better Xen Virtual Partitions support

Analogous to how software RAIDs were defined in AutoYaST until now, Xen virtual partitions with a similar name were grouped in the same <drive> section. It means the /dev/xvda1, /dev/xvda2, etc. were defined within the <drive> section for xvda, which does not exist at all.

To make things clearer, we have decided to use a separate drive section for partition:

<drive>
  <type config:type="symbol">CT_DISK</type>
  <device>/dev/xvdd1</device>
  <disklabel>none</disklabel> <!-- not really needed -->
  <use>all</use>
  <partitions config:type="list">
    <partition>
      <format config:type="boolean">true</format>
      <mount>/home</mount>
      <size>max</size>
    </partition>
  </partitions>
</drive>

AutoYaST Rules: Cleaning the profiles before being merged

AutoYaST rules offer the possibility to configure a system depending on system attributes by merging multiple control files during installation. Check the Rules and Classes section for further documentation.

The merging process is often confusing for people, and the sections in the merged XML files must be in alphabetical order for the merge to succeed.

AutoYaST was cleaning the profiles after a merge, but if the resultant profile was merged with another profiles that profiles were not cleaned before the merge. That was confusing and error prone, so we have fixed it cleaning also them before the merge.

Better explanation of the requirements to boot with GPT

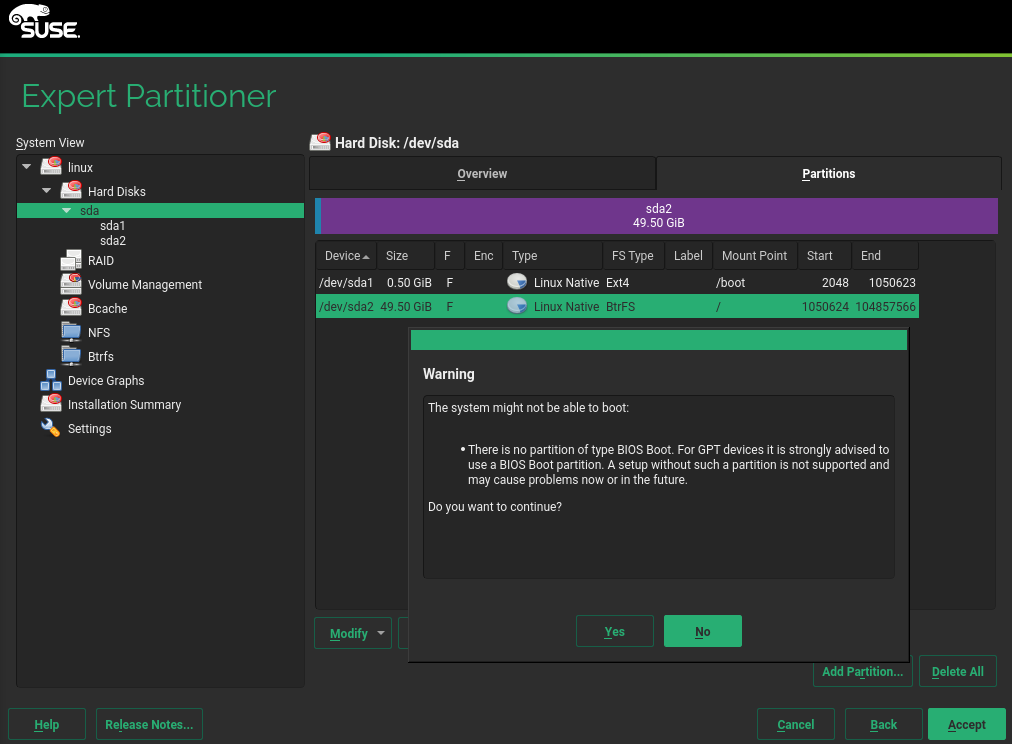
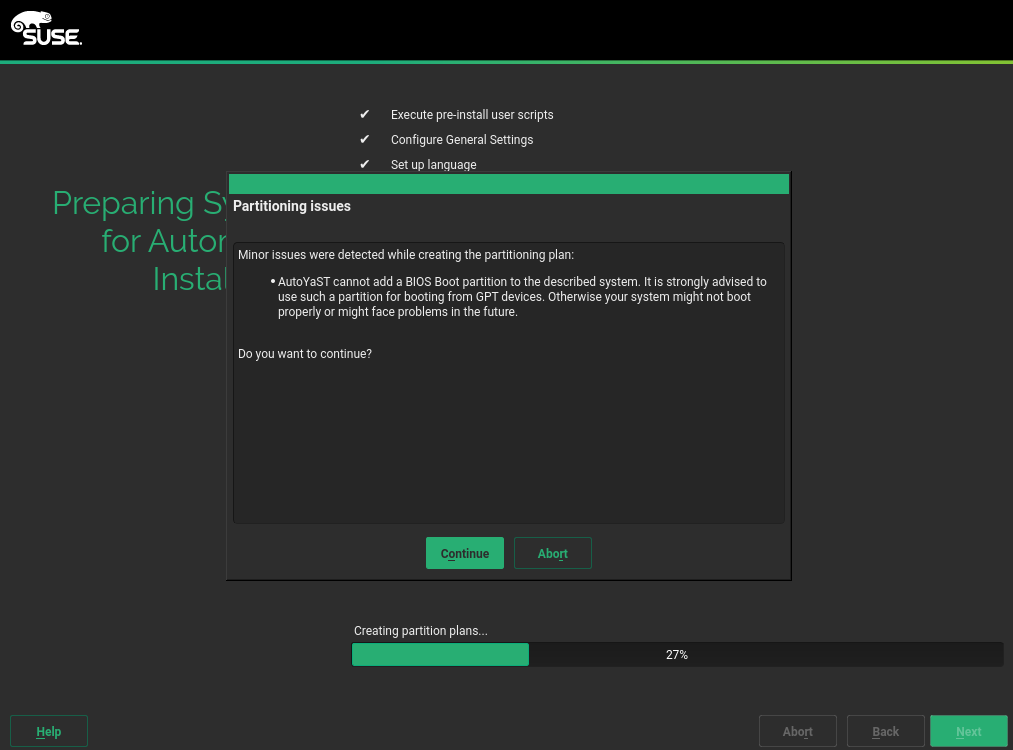
As our readers know, one of the main goals of yast-storage-ng was to offer a more reliable and precise diagnosis on what partitions need to be created in order to ensure that a new system being installed will be able to boot. If something doesn’t fit with such diagnosis, the installer shows a warning message.

In the case of booting a system installed in a GPT device, using the legacy BIOS system (as opposed to EFI), that means SLE-15 and openSUSE Leap 15.0 will warn the user if there is no partition of type BIOS Boot. But there are two problems with that.

  • The warning messages from the Partitioner and, specially, from AutoYaST don’t do a great job in explaining what is wrong.
  • Some users have reported they have GPT systems booting fine in legacy mode without a BIOS Boot partition and, thus, our diagnosis in such cases may be wrong.

We even had a comment in our source code reinforcing the second point!

So we tried to fix our wrong diagnosis… just to end up realizing it was in fact right. After carefully evaluating all the possible setups, checking the different specifications, the Grub2 documentation and even checking the Grub2 source code, we found that layouts without a BIOS Boot partition could get broken (resulting in a non-bootable system) by some file-system level operations. So only the configurations including a BIOS Boot partition can be considered to be 100% safe, both in the short term and against future changes in the system.

We simply cannot allow our users to fall into traps without, at least, a warning message. So we kept the behavior as it was and we focused on improving the messages. After all, advanced users knowing the risks can ignore such warnings. This is how the new warning look in the Partitioner of the upcoming SLE-15-SP1 (and, thus, in openSUSE Leap 15.1).

And this is what AutoYaST will report if the profile doesn’t specify a BIOS Boot partition and it’s not possible to add one to the layout described by such profile.

CaaSP / Kubic: Propose NTP servers according to DHCP response

All-in-one dialog of CaaSP installer asks for NTP Servers. Up to now it searched for NTP servers using SLP only. Otherwise only manual configuration was possible.

Since now CaaSP installer parses DHCP response and fetches NTP servers if any was provided. NTP Servers obtained from DHCP are preferred over those discovered via SLP.

Partitioner UI is a bit faster now

We noticed that clicking around the partitioner UI feels slow. So we used the built-in (Y2PROFILER=1) as well as an external (rbspy) profiler to pinpoint the places that need optimization (mostly caching). Can you see a difference in the following screencast?

Highlights of YaST Development Sprint 64

October 9th, 2018 by

Another two weeks of development, another report from the YaST team. During this sprint, we have been working to improve the usage and installation experience in many areas, including but not limited to the following.

  • Improvements in several areas of the Partitioner.
  • More informative Snapper.
  • Better integration of the new Firewall UI with AutoYaST.
  • Improvements in roles management and in the roles description.
  • Better support in YaST Firstboot for devices with no hardware clock, like Raspberry Pi.

Let’s dive into the details

Changes in the Partitioner UI to Unleash the Storage-ng Power

We have explained already in several previous posts how we were struggling to come up with a set of changes to the user interface of the Partitioner that would allow to expose all the new functionality brought by storage-ng, while still being familiar to our users and fitting in a text console with 80 columns and 24 lines.

We finally implemented the interface described in this gist, which fits into a 80×24 text console and allows all kind of operations. Check that document for more info about the behavior and its rationale.

But what does “all kind of operations” mean? For example, it means it’s possible to start with three empty disks and end up creating this complex setup using only the Partitioner.

Complex storage setup

  • In that example, /dev/md0 is an MD RAID defined on top of two partitions and formatted as “/”. Nothing impressive here so far.
  • /dev/md1 is an MD RAID defined on top of a combination of full disks and partitions. Using disks as base for a RAID was not possible in the old Partitioner.
  • Even more, /dev/md1 contains partitions like /dev/md1p1 and /dev/md1p2, another thing that the old Partitioner didn’t allow to configure.
  • /dev/volgroup0 is an LVM VG based on one of those MD partitions, allowing to combine the best of the MD and LVM technologies in a new way.
  • Last but not least, /dev/sdc is a disk formatted to host a file-system directly, with no partitions in between (also a new possibility).

The general approach of the new UI is described in the linked document. But since an image is worth a thousand words (and an animation is probably worth two thousands), let’s see how some part of the process to create the complex setup described about would look in a text console.

This is how you can now directly format a disk with no partitions.

Formatting a disk

Playing with the partitions of a disk is also a good way to get a feeling on how the buttons are now organized and how they dynamically change based on which row is selected in each table. Click on the following image to animate it and see those views in action.

Playing with partitions

And for a full experience of completely new stuff. Click on the image below to see an animation showing the whole process of creating an MD RAID on top of two full disks and then creating partitions within the resulting RAID.

Creating a partitioned RAID

But although the text mode is the limiting factor to design a YaST UI, many users install their systems and use the Partitioner in graphical mode. For those wondering how the reorganized buttons look in that case, here are some screenshots of the installation process of the upcoming SLE-15-SP1 (static screenshots this time, we already had enough animations for one post).

Managing RAIDs with the new Partitioner UI

Managing Partitions with the new Partitioner UI

Displaying Bcache Devices Consistently in the Device Graphs

Surely most Partitioner users have recognized the style of the visual representation used above for the complex example setup. As you know, the Partitioner offers similar representations in the “Device Graphs” section, both for the original layout of the system and for the target one.

After adding support for Bcache to the Partitioner we detected a small but annoying problem in those graphs. The caching devices were using their UUID as labels, which had two drawbacks.

  • It was too long.
  • It’s not known in advance for “planned” cache sets (i.e. sets that will be created after going forward in the Partitioner), which resulted in boxes with no labels

So know we use a fixed “bcache cache” label for all cache sets, which looks like this.

New label for cache sets in the Device Graph

As opposed to the old way with empty boxes.

Lack of labels in the old Device Graphs

Adding and removing Bcache devices

And since we mention the Bcache support in the Partitioner, it’s worth noticing that the implementation continues moving forward at good pace. During this sprint we implemented a first version of the operations to add a new Bcache device and to delete it.

When adding a new device, the only options that can currently be defined is which devices to use to construct it. But the next sprint has started and you can expect more options to be supported in the near future.

Creating a new Bcache device

When the Bcache device is created, then it can be formatted, mounted or partitioned with the same level of flexibility than other devices in the system. So soon (after the usual integration and automated testing phases) Tumbleweed users will be able to use the YaST Partitioner to test this exciting technology.

Of course the operation to delete a Bcache device offers the usual checks and information available in other parts of the Partitioner, like shown in the following screenshot.

Deleting a bcache device

Both screenshots are taken with an updated version of the installer of the upcoming SLE-15-SP1, since this functionality will be available in such distribution and, of course, also in openSUSE Leap 15.1.

Snapper: Show Used Space for each Snapshot

As those following our blog already know, the YaST Team is also somehow responsible for the development and maintenance of Snapper, the ultimate file-system snapshot tool for Linux. And Snapper has also received some usability improvements during this sprint.

For systems with btrfs and quota enabled, the output of “snapper list” now shows the used space for each snapshot. The used space in this case is the exclusive space of the btrfs quota group corresponding to the snapshot.

# snapper --iso list
Type   | # | Pre # | Date                | User | Used Space | Cleanup | Description      | Userdata     
-------+---+-------+---------------------+------+------------+---------+------------------+--------------
single | 0 |       |                     | root |            |         | current          |              
single | 1 |       | 2018-10-04 21:00:11 | root | 15.77 MiB  |         | first filesystem |              
single | 2 |       | 2018-10-04 21:19:47 | root | 13.78 MiB  | number  | after install    | important=yes

For more details about this change, its advantages and limitations, check the new post at the Snapper blog.

Simplified Role Selection

The role selection dialog in SLE-15 is always displayed in the installation workflow. However, it does not make much sense to display it if there is only one role to select. When you do not register the system and do not use any additional installation repository then in the default SLES-15 installation you can see only the minimal system role.

Selecting one out of one roles

In such case you cannot actually change anything as the only role is pre-selected by default and the only thing which you can do is to press the Next button.

Therefore we improved in for SLE15-SP1, if there is only one role to select then the role is selected automatically and the dialog is skipped.

In addition to that, many of the role descriptions have been adapted and simplified to, hopefully, be more clear.

YaST Firstboot in devices with no hardware clock

SLE and openSUSE can be installed on a great variety of devices, including some system that doesn’t include a hardware Real Time Clock, like the popular Raspberry Pi. That means the usual mechanism to establish the current date and time (using the hwclock command) fails in such devices. That general problem was detected during the usage of YaST Firstboot to configure new devices.

So now YaST detects situations in which there is no Real Time Clock and uses the date as an alternative to set the date and time. This fix, already submitted to openSUSE Tumbleweed, will be available in all upcoming versions of SLE (like SLE-12-SP4 and SLE-15-SP1) and openSUSE Leap.

Better integration of the new Firewall UI with AutoYaST

On the previous report we anticipated the new UI we are building for configuring Firewalld from YaST. During this sprint we have been focusing on some aspects that need to be finished before we can release this new functionality.

Now this UI can be invoked from the AutoYaST module in YaST, meaning it can be used to import and then fine tune the current configuration of the system so it can be exported to an AutoYaST profile.

And since we are already in animation mood, check how the new UI can be used to define an AutoYaST profile.

Using the Firewalld UI from the AutoYaST module

Very soon the whole functionality will be ready for prime time and we will release it together with a separate blog post to explain all the details.

Stay tuned

We are already working on the next sprint, with special focus on AutoYaST, on Snapper and on improving the installation experience in several scenarios. As mentioned above, it’s likely that you will get more news from us (about the new Firewalld support) even before that sprint is finished.

But if you can’t wait for more news, don’t hesitate to visit us on our Irc #yast channel on Freenode. Otherwise, see you here again soon.

YaST Squad Sprint 63

October 1st, 2018 by

Another YaST sprint is over and it is our pleasure to offer a report which includes a wide ranging of topics:

  • The partitioner continues getting more love and attention: now you can partition your RAID devices and we have started to work on supporting Bcache.
  • A new YaST2 firewall UI is around the corner.
  • The self-update feature has been extended to cover more cases.
  • YaST supports now your brand new 4K display during installation.

And, of course, some bugfixes (like proper handling of problems when trying to deactivate a DASD channel) and infrastructure improvements (check out our take on Travis caching).

Managing partitions within MD RAID devices

Our beloved Partitioner was one of the stars of the previous report, with news about several improvements and refinements. During this sprint it also received some love, not only with the addition of a couple of new features but also with more discussions and prototypes about the reorganization of the UI needed to bring even more improvements.

One of those features introduced in the previous sprint was the ability to create a RAID based on whole disks with no partitions. Now we have closed the circle by allowing to manage partitions within a RAID. So now it’s possible to create RAID arrays based on any combination of disks and partitions and then either use those arrays directly to host a file system (or to act as LVM physical volume) or create partitions inside the array. Partitions that can be, of course, formatted, encrypted, used as LVM physical volumes, etc. With that, we can now say the Partitioner support every possible MD RAID setup.

In the following animated screenshot you can see how the partitions of an MD RAID are listed in the left-hand tree of the Partitioner and in the table of devices of the RAID section, similar to how partitions of a hard disk are displayed.

As you may have noticed, the main difference with other views is that, as already anticipated by the UI discussions summarized in our previous sprint report, the set of buttons adapts dynamically to the selected item on the table offering a different set of actions for MD arrays and for partitions.

Another step to define the future of the Partitioner user interface

The interface showed in the previous screenshot, with its dynamic behavior, is just the first step in the direction already defined in the document that resulted from the previous sprint. Having that first fully functional prototype enabled us to rekindle the discussion about the best way to offer all the new possibilities of storage-ng in the Partitioner while keeping the user interface recognizable and familiar to the YaST users.

After another round of discussions and several iterations of mock-ups, we ended up with the idea documented at this gist. That will be the guide for the UI changes we are already implementing as part of the next sprint as a way to unleash even more of the underlying power of storage-ng.

Initial support for Bcache in the Partitioner

But apart from revamping and improving the support for existing technologies with new possibilities, we also want the Partitioner to grow in scope, putting the new kernel technologies into the hands of our users. One of such technologies is Bcache.

Bcache allows to improve the performance of any big but relative slow storage device (so-called “backing device” in Bcache terminology) by using a faster and smaller device (so-called caching device) to speed up read and write operations. The resulting Bcache device has then the size of the backing device and (almost) the effective speed of the caching one.

As a first step to offer full Bcache support, the Partitioner can visualize all the Bcache devices and allows to manipulate its partitions. Broader support, like creating new Bcache devices, will follow in upcoming sprints.

Initial Bcache support in the Partitioner

A New YaST2 Firewall UI is Coming

firewalld replaced the venerable SuSEfirewall2 as the default firewall solution in SUSE Linux Enterprise 15 and openSUSE Leap 15.0. And there is high chance that you have noticed that YaST does not offer a user interface to manage the firewall configuration anymore. Instead, it asks the user to use firewall-config, the official firewalld UI.

But, fortunately, that’s about to change. During recent sprints we have been working in a new UI to manage firewalld configuration. It is still a work in progress, but it is capable of assigning interfaces to zones and opening services/ports for a given zone.

Allowed services in a firewall's zone

We plan to release a first version as soon as we finish the integration with the AutoYaST user interface. So stay tunned!

Better HiDPI (4k Display) Support

What is better than a high screen resolution? Simple: a higher screen resolution. 4k displays are arriving in the consumer mainstream, and 8k displays are the next big thing.

But there are some real-world problems with that: with that large resolution, texts and graphics may become tiny – too tiny to read, too small to fill the available space on the screen.

On your desktop, you can tweak those things – select larger fonts or larger icon sizes. But for the installer that’s another matter; it needs to autodetect the presence of such a display and then auto-scale the user interface so it is actually usable.

We had a number of such issues in YaST; one was the font size, another the size of pixel graphics such as the time zone selection map. Those are now fixed.

For backwards compatibility, the Qt library which we are using for the graphical UI of YaST does not do that completely automatically but we needed to explicitly enable a HiDPI mode. But now it does it all automagically for YaST.

Updating Additional Installation Data

As you may know, YaST is able to update itself during system installation, which enables us to fix the installer by releasing updated packages even after the official release.

However, sometimes we need to fix packages which are not part of the installer but they provide some additional data for it like installation defaults, system role definitions, etc.

In order to support those scenarios, we have extended the installer to use the self-update repository as a regular (but temporary) one during the installation process. So with the next SUSE Linux Enterprise release we will be able to update that data too.

Fixing DASD Channel Deactivation Support

Recently we discovered that YaST was getting frozen in s390 architecture when the user tried to deactivate a DASD channel in use. The problem was that dasd_configure, the underlying tool which takes care of deactivating the channel, was waiting for user confirmation.

Definitely, losing user data is not an option so, from now on, the operation will be just canceled and YaST will report the problem, including all the details, so the user can solve the issue before trying to deactivate the channel again.

DASD deactivation details

Faster Travis Rebuilds using ccache

For continuous integration at GitHub we use Travis which is easy to configure and use. Unfortunately, building there a big project like libstorage-ng takes a lot of time. In this case it is almost half an hour.

Waiting so long to see the result after doing a small change in the code is quite annoying and unconvenient. And this is exactly the scenario where using the ccache tool helps a lot. ccache is a small wrapper around the standard C/C++ compiler which saves the compilation result for later. So if the same file is compiled later again then the cached result is returned immediately without calling the real compiler.

Together with the Travis caching mechanism, which we use for storing and restoring the ccache files for each build, we reached a significant speed up. From 29 minutes to about 6 minutes, that is about four times faster!

Of course, it highly depends how much the environment (compiler, libraries) or the source files have been changed since the last build. The bigger changes the more recompilation is needed, so in reality the speedup might be smaller.

Check the related pull request if you are interested in the implementation details.

More to come

The following sprint is already running and the team is working in really interesting stuff: finishing the bcache support, releasing a first version of the new firewall UI, proper support to use a whole disk as an LVM PV in AutoYaST, several improvements to the installer for CaaSP/Kubic, etc.

So stay tunned!