Home Home > Tag > Raspberry Pi
Sign up | Login

Deprecation notice: openSUSE Lizards user blog platform is deprecated, and will remain read only for the time being. Learn more...

Posts Tagged ‘Raspberry Pi’

Highlights of YaST Development Sprint 68

December 4th, 2018 by
  • UDF: Share big files with other operating systems
  • Raspberry Pi: Fully customized installation with YaST

Support for UDF file system

UDF (Universal Disk Format) is a file system format widely used for DVDs and newer optical disk formats, replacing ISO 9660. But this technology is not limited to optical media only, in fact it can be perfectly used on flash devices like USB sticks and hard drives too. UDF is one of the best choices when transferring data between platforms. Mostly all modern operating system already support it, including Windows, BSD, MacOS X, Solaris, OS/2 (eComStation), BeOS (Haiku) as well as Linux kernel.

UDF offers several advantages. One of them is the support for quite very large files. With UDF you can create files of several terabytes, making really ridiculous the maximum limitation of 4 gigabytes in VFAT. And not only that, UDF also has optional built-in ability to minimize wearing-off of rewritable media with limited rewrite cycles, such as flash, CD-RW and DVD-RAM.

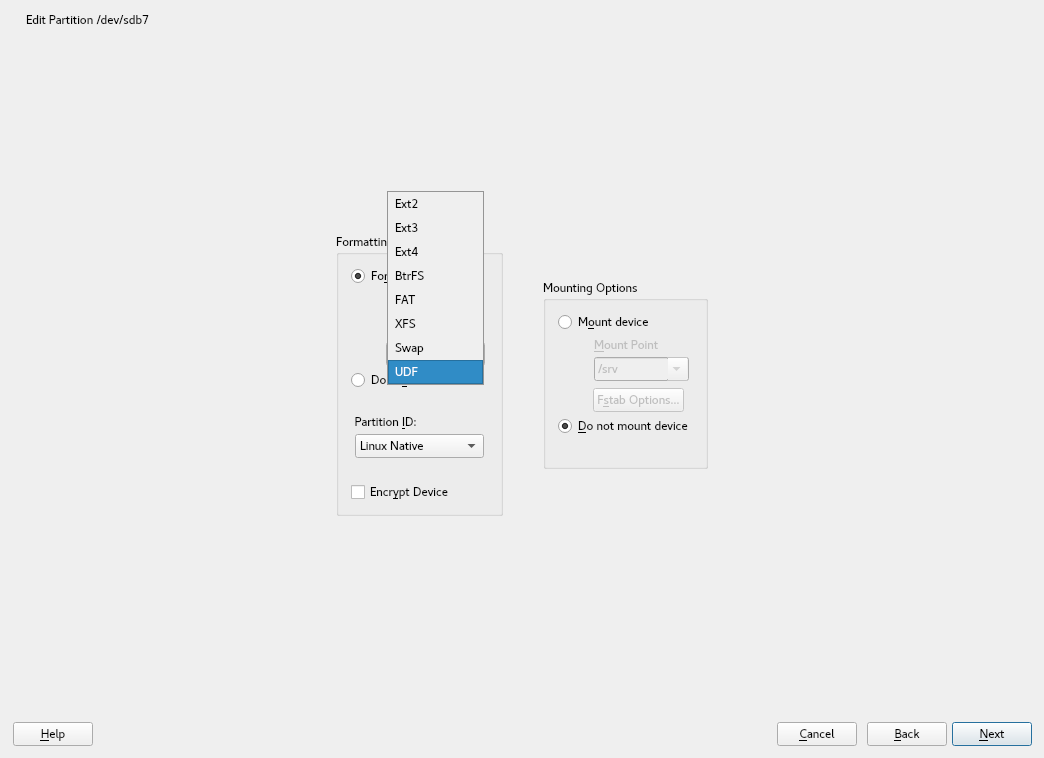
YaST is starting to support UDF file systems out of the box. The Expert Partitioner now offers the UDF option when formatting a device, see the following screenshot. And this is available even during the installation, so you could create a volume with UDF format and share it between your different operating systems.

Just click "next" to install (open)SUSE in a Raspberry Pi

Anybody who has not been living under a rock for the last five years knows Raspberry Pi. And anyone who has used one of those devices knows the usual way to put an operating system into it is different from what we are used to do in other computers. Instead of installing from a regular ISO, customizing all the options in the process, Raspberry Pi and similar mini-computers are usually loaded with a pre-built image of an operating system (specific for each model) downloaded from the Internet. Many of those precooked Linux systems are purpose-specific and many decisions (like the file-system type to use) are already taken by those who built the image.

But we wanted SLE 15-SP1 and openSUSE Leap 15.1 to be the first multi-purpose operating systems to support a full standard Linux experience in Raspberry Pi. No custom specific ISO to install from, no precooked image to be copied, just taking the standard unmodified SLE or openSUSE ISO image and installing like you would do in any other computer. And we wanted the process to be as easy as pressing "next", "next", "next", "install". With the installer detecting and proposing the set of default configurations that makes sense, as usual.

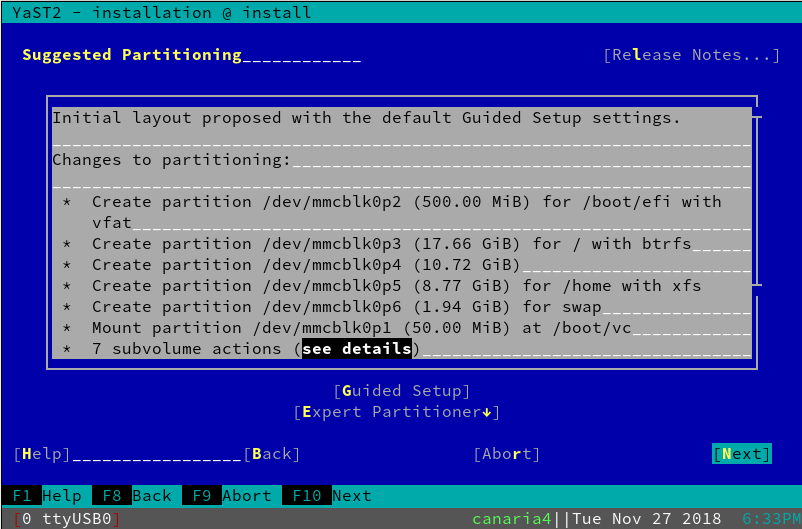
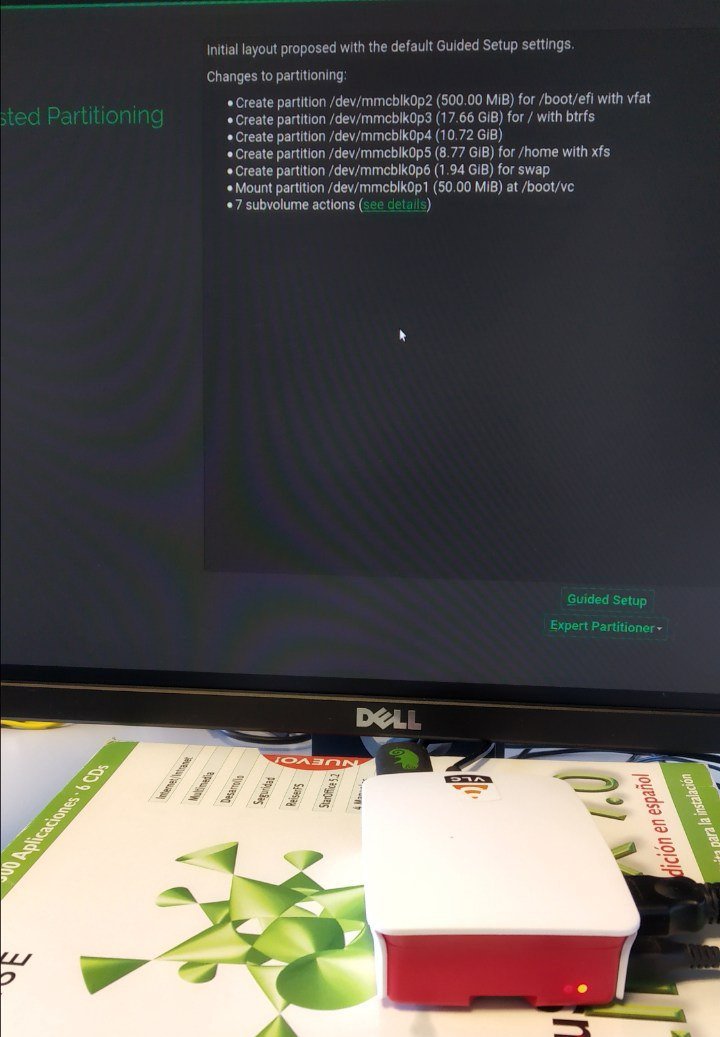
The main challenge in that regard was the partitioning layout. In order to boot, the Raspberry Pi needs a very specific partition containing the system firmware. So it is important for the installer to detect such a partition and preserve it no matter what, mounting it in /boot/vc to allow the operating system to perform updates of the firmware. In the following screenshot of the installation process performed trough the Raspberry Pi serial console you can see that in action.

The serial console is the method preferred by the experts to manage the Raspberry Pi locally and it works out of the box with the pre-releases of the upcoming SLE-15-SP1 and Leap 15.1. But less advanced users will likely prefer to perform a graphical installation with a keyboard and a screen attached to the device. For it to work flawlessly, the following arguments must be provided to the installer during boot.

textmode=0 modprobe.blacklist=vc4

The second argument prevents the HDMI output to be disconnected shortly after the computer has booted, something that will only happen with some monitors. It happened to us during our testing (that you can see below) and that argument certainly made the problem disappear.

Just one final note if you want to play with this: Take into account Raspberry Pi uses a different internal architecture than usual PCs. So instead of the x86 image of the installer, you will need to use the aarch64 one. The aarch64 architecture is officially fully supported by SLE and also available for openSUSE Leap and Tumbleweed as an unofficial port.

Install ddclient on your openSUSE Raspberry Pi

May 25th, 2015 by

We’ve seen two Dynamic DNS clients. We’ll see another one here.

1. First of all, install the program.

$ zypper in ddclient

2. Create the confing file

$ nano /etc/ddclient.conf

with the following content

daemon=5m
timeout=10
syslog=no # log update msgs to syslog
#mail=root # mail all msgs to root
#mail-failure=root # mail failed update msgs to root
pid=/var/run/ddclient.pid # record PID in file.
ssl=yes # use ssl-support. Works with
# ssl-library

use=if, if=eth0
server=freedns.afraid.org
protocol=freedns
login=login_name
password=the_password
somedomain.mooo.com

Change the ones that are in bold letters.

3. Start the service

$ systemctl enable ddclient

Reboot

Upgrade your openSUSE Raspberry Pi from 13.1 to 13.2

May 24th, 2015 by

We’ve seen how to create an SD card. I used the 13.1 version. The wiki page https://en.opensuse.org/HCL:Raspberry_Pi is not very clear (to me) about resize partitions. So I tried to upgrade the version 13.1. Here what I did.

1. Check if the update repository already exists and is enabled.

$ zypper repos –uri

You should have the following enabled

3 | openSUSE-13.1-repo-update | openSUSE-13.1-repo-update | Yes | Yes | http://download.opensuse.org/ports/update/13.1/

If not, then add it

$ zypper addrepo –check –refresh –name ‘openSUSE-13.1-Update’ http://download.opensuse.org/update/13.1/ repo-update

2. Refresh and update your system

$ zypper ref && zypper update

3. Remove all third party/OBS repos you no longer need.

$ zypper lr

# Remove with

$ zypper rr (alias or number)

4. Change all remaining repo URLs to the new version of the distribution (needs to be run as root).

$ cp -Rv /etc/zypp/repos.d /etc/zypp/repos.d.Old

5. Change the repos.

$ sed -i ‘s/13\.1/13.2/g’ /etc/zypp/repos.d/*

6. Refresh new repositories (you might be asked to accept new gpg key)

$ zypper ref

If you haven’t removed third party/OBS repositories you may encounter some errors as these repositories may not exist yet or they may have different unguessable URL. It is always recommended to remove them and add their newer version after upgrade.

7. Upgrade

$ zypper dup

Now you have to wait. Reboot at the end, just to be sure that everything went smooth.

Run copy.com on your openSUSE Raspberry Pi

May 23rd, 2015 by

A good question is why do you want to sync a folder on your Raspberry Pi with a cloud service. The answer is little complicated. It’s a subproject that I’m working on right now. I want to upload some data I’ll create on a Raspberry Pi (with limited size of SD card). The uploaded data will be saved on other computer and the SD will be clear again to create new data.

The cloud service I prefer is always ownCloud.
Here I used http://www.copy.com. It provides 15GB of disk but you can increase it.

First of all download the file

$ wget http://copy.com/install/linux/Copy.tgz

Then extract it

$ tar xzvf Copy* copy/armv6h/

This will create a folder called “copy,” and in it there will be three sub-folders: “armv6h,” “x86,” and “x86_64.” The first one contains the Copy client binaries for the Raspberry Pi, the second contains the Copy client for 32-bit Linux on a PC, and the third the same client but for 64-bit Linux PCs.

$ cd /copy/armv6h

Now there are 2 ways of using copy. The CopyCmd tool and CopyConsole.

CopyCmd

List of the directories

$ ./CopyCmd Cloud -username=user@gmail.com -password=’mypass’ ls

Upload all content of local /home/user/directory/ to remote /directory

$ ./CopyCmd Cloud -username=user@gmail.com -password=’mypass’ put -r /home/user/directory/ /directory

CopyConsole

The CopyConsole tool keeps a folder on your Raspberry Pi synchronized with the data on Copy.com.
The sync app runs in the background and is started like this:

$ ./CopyConsole -daemon -username=user@gmail.com -password=’mypass’ -root=/home/user/directory

This will sync the local /home/user/directory to copy.com. If you delete something from there, it’ll delete from local folder as well.

Remeber to run this command everytime you restart your pi. It’s better to run it manually because there is username and password that are personal (unless you created an account just for your raspberry pi).

Make your openSUSE Raspberry Pi a seedbox

May 22nd, 2015 by

Raspberry Pi is a quite slow ARM board, compared to other boards. Even if you compare Raspberry Pi B+ against Raspberry Pi 2. So maybe one of the best use of RasPi is to make it seedbox. Let’s say you’re at the office and a friend tells you to test a distro. You can login to your home Raspberry Pi seedbox and add the torrent file there.

Here I will show you how to setup Transmission, vftpd and suggestions for Android programs.
First of all, download and create the openSUSE SD card (resize your SD card to full size or you can mount the extra size as extra partition. Since it’s not something important, then you can use full size of your SD card).
Then setup the dynamic dns service (see previous posts).
Finally set a static IP (to use it with port forward of your router).

INSTALL TRANSMISSION

First install transmission:

$ zypper in transmission transmission-daemon

Create 2 folders for incomplete torrents and completed torrents:

$ mkdir -p /torrents/incomplete && mkdir /torrents/complete

Configure proper permissions for transmission:

$ chgrp transmission /torrents/incomplete
$ chgrp transmission /torrents/complete
$ chmod 770 /torrents/incomplete
$ chmod 777 /torrents/complete

(more…)

Set static IP on your openSUSE Raspberry Pi

May 21st, 2015 by

To set a static IP in Debian based distros is easy. Just change a file (/etc/network/interfaces).
In openSUSE is easier. Everything can be done under YaST.

1. Open YaST and go to Network Devices>Network Settings.

2. Then choose Statically Assigned IP Address (move with tab button and click on space button). Give the static IP you want and as Subnet Mask, 255.255.255.0. Press Next (press enter).

3. You’ll see an overview of the ethernet card.

4. Go to Hostname/DNS and add Google’s DNS servers (optional).

5. Next, go to Routing and add your router ip (usually 192.168.1.1).

Now press OK, reboot and try to login again with SSH.

inadyn and openSUSE Raspberry Pi

May 20th, 2015 by

We’ve seen how to install no-ip.
Fortunately, there’s not only this service but other services too. Just for reference, here are some (not only free):

http://www.dyndns.org
http://freedns.afraid.org
http://www.zoneedit.com
http://www.no-ip.com
http://www.easydns.com
http://www.tzo.com
http://www.3322.org
http://www.dnsomatic.com
http://www.tunnelbroker.net
http://dns.he.net/
http://www.dynsip.org
http://www.sitelutions.com
http://www.dnsexit.com
http://www.changeip.com
http://www.zerigo.com
http://www.dhis.org
https://nsupdate.info
http://duckdns.org
https://www.loopia.com
https://www.namecheap.com
https://domains.google.com
https://www.ovh.com
https://www.dtdns.com
http://giradns.com

Let’s see one of them https://freedns.afraid.org. After you register, go to Dynamic DNS link (on the left top box-for members).
Add your host with type A and subdomain and domain what you like as host.

Now there’s going to be a list of your host names. Right click on the Direct Link and copy the link. You should keep the alpha-numeric key. The address will be something like http://freedns.afraid.org/dynamic/update.php?[alpha-numeric-key]

Now it’s time to install the client. I’ve found it from https://github.com/troglobit/inadyn.

1. First of all, install the needed programs to build the service.

$ zypper in gcc-c++ gcc git libopenssl-devel make nano

2. Then

$ mkdir inadyn

$ cd inadyn

3. Download the program from ftp://troglobit.com/inadyn/

$ wget ftp://troglobit.com/inadyn/inadyn-1.99.9.tar.xz

and decompress it

$ tar xvfJ inadyn-1.99.9.tar.xz

4. Go to the directory

$ cd inadyn-1.99.9

5. Compile and install

$ make

$ make install

6. Create the confing file

$ nano /etc/inadyn.conf

with the following content

--username USERNAME
--password PASSWORD
--update_period 3600
--forced_update_period 14400
--alias HOSTNAME,alphanumeric key
--background
--dyndns_system default@freedns.afraid.org
--syslog

The bold words are the ones you should change. Remember the alphanumeric key is the one you got from right click on the Direct Link.

7. Start the client. Create the service file.

$ nano /usr/lib/systemd/system/inadyn.service

8. Add the following content.

[Unit]
Description=inadyn Dynamic DNS Update Client
After=network.target

[Service]
Type=forking
ExecStart=/usr/local/sbin/inadyn

[Install]
WantedBy=multi-user.target

9. Start the service

$ systemctl start inadyn.service

and enable the service

$ systemctl enable inadyn.service

10. Reboot and check if the service is running.

$ ps -A | grep inadyn

you should get results something like:

1526 ? 00:00:00 inadyn

no-ip and openSUSE Raspberry Pi

May 19th, 2015 by

We’ve seen how to install openSUSE image on the SD card.
Next step is to be sure that we can have access from outside our house (since most of the times, Raspberry Pi is located at home).

To do that we use Dynamic DNS services. A free service (so far) is No-IP. Most of the routers support it. You can use your router’s service. But what if you want 2 different host names on the same IP? Let’s say you have different ARM boards on the same router or you have a server etc.

1. First of all, install the needed programs to build the service (same as I did with ZNC)

zypper in gcc-c++ gcc git libopenssl-devel make nano

2. Then

mkdir noip

cd noip

3. Download the program

wget http://www.no-ip.com/client/linux/noip-duc-linux.tar.gz

and decompress it

tar vzxf noip-duc-linux.tar.gz

4. Go to the directory

cd noip-2.1.9-1

5. Compile and install

make

make install

While it install’s the software you will prompted to enter the username & password. Once that is done it will ask you teh refresh interval … leave it.. to have the default value. You are required to answer some more questions … just ans NO an d you should be good to go.

6. Start the client

/usr/local/bin/noip2

To check if the service is running, use the command:

/usr/local/bin/noip2 -S

and the results should be like

1 noip2 process active.

Process 1516, started as noip2, (version 2.1.9)
Using configuration from /usr/local/etc/no-ip2.conf
Last IP Address set EXTERNAL IP
Account USERNAME
configured for:
host HOSTNAME
Updating every 30 minutes via /dev/eth0 with NAT enabled.

Auto start the client on reboot

But what if you reboot? You want to start the client everytime you reboot. This can be done with systemd.

1. Create the service file.

nano /usr/lib/systemd/system/noip.service

2. Add the following content.

[Unit]
Description=No-IP Dynamic DNS Update Client
After=network.target

[Service]
Type=forking
ExecStart=/usr/local/bin/noip2

[Install]
WantedBy=multi-user.target

3. Start the service

systemctl start noip.service

and enable the service

systemctl enable noip.service

Create an SD card for your Raspberry Pi B and B+

May 18th, 2015 by

Most of the projects around the Internet use Raspbian as main Raspberry Pi distro. Unfortunately, Raspbian doesn’t work for me. Minibian worked. So I serched other distros. My favourite is Arch Linux because there are plenty of programs that I need for projects, but it needs some extra steps from terminal to create the SD.

Here we’ll see how to create an SD card of openSUSE. There are plenty of information at the wiki page https://en.opensuse.org/HCL:Raspberry_Pi
. I’ll collect the information I need for projects, I’ll write next.

I used 13.1 as distro because it’s easier for me to resize the SD card.

1. Download the image (openSUSE-13.1-ARM-JeOS-raspberrypi.armv7l.raw.xz) from here:

http://download.opensuse.org/repositories/devel:/ARM:/13.1:/Contrib:/RaspberryPi/images/

decompress the image.

2. Find the device name of your card

cat /proc/partitions

usually it’s going to be /dev/mmcblk0.

and create the card (as root)

sudo dd if=openSUSE-13.1*.raw.xz of=/dev/mmcblk0 bs=4M;sync

3. Since I didn’t use a monitor (HDMI or DVI), I had to do some extra steps before boot my raspberry pi.

a. Delete the file /var/lib/YaST2/reconfig_system to start headless.
b. Resize the ext4 partition with Gparted.

4. When boot the Raspberry Pi, use the following

ssh root@IP

user: root
password: linux

Now the first command will be

zypper ref

and then update

zypper up