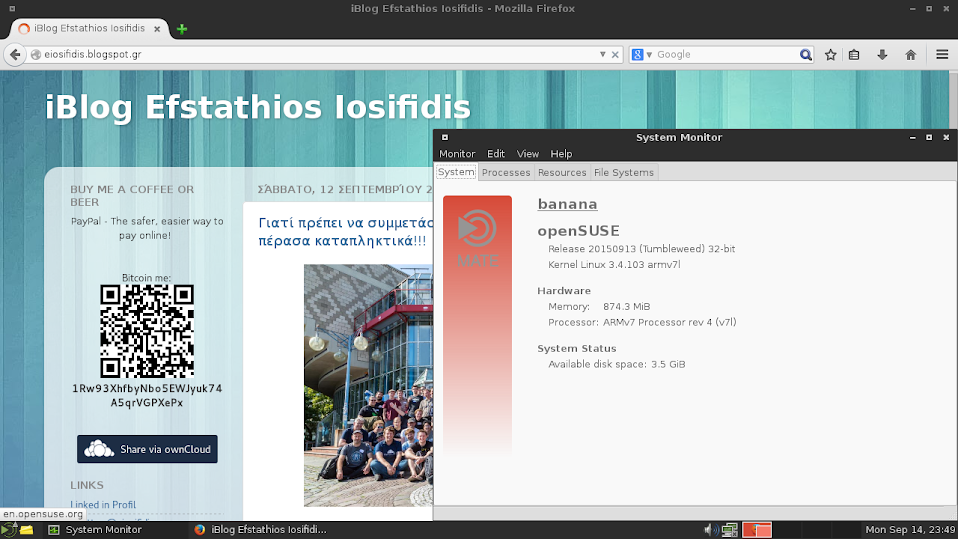
I won a Banana Pi from ownCloud. So I tried to install openSUSE.
There are 3 options:
1. According to the wiki page, you can download the image they provide but there’s no kernel support for Mali400MP2 GPU (who knows if it’s fixed by now). No Mali mean no GUI. The link to image is http://download.opensuse.org/ports/armv7hl/tumbleweed/images/.
2. Download the image from http://www.lemaker.org. The GUI used is XFCE.
3. Do it the hard way, build it yourself. I would like to install MATE. I know, I could use the lemaker image.
I followed the page HowTo Build Banana Pi Image.
This post has 2 sections. The first is how to create the SD card and the next one is how to install MATE.
Create the SD card.
1. Create a folder where you’re going to work (download the nessesary files).
mkdir WORKSPACE
cd WORKSPACE
2. I’ll skip the steps 1-5 from the Build it yourself page. You can download the file:
Download also the rootfs openSUSE image file.
openSUSE-Tumbleweed-ARM-JeOS.armv7-rootfs.armv7l-Current.tbz
3. Create the folder with the ROOTFS_DIR
mkdir ROOTFS_DIR
4. Decompress the file to ROOTFS_DIR
openSUSE-Tumbleweed-ARM-JeOS.armv7-rootfs.armv7l-Current.tbz
5. Now work with the file BananaPi_hwpack.tar.xz. Decompress the file.
tar xvfJ BananaPi_hwpack.tar.xz
6. Copy related files to the directory ROOTFS_DIR
cp kernel/script.bin ROOTFS_DIR/boot
cp kernel/uImage ROOTFS_DIR/boot
Create the file:
nano ROOTFS_DIR/boot/uEnv.txt
with the following content
mmcboot=fatload mmc 0 0x43000000 script.bin || fatload mmc 0 0x43000000 evb.bin; \
fatload mmc 0 0x48000000 uImage; if fatload mmc 0 0x43100000 uInitrd; \
then bootm 0x48000000 0x43100000; else bootm 0x48000000; fi
uenvcmd=run mmcboot
bootargs=console=ttyS0,115200 console=tty0 \
disp.screen0_output_mode=EDID:1280x720p60 \
hdmi.audio=EDID:0 root=/dev/mmcblk0p1
Copy the rootfs folder:
cp -r rootfs/* ROOTFS_DIR
7. Now prepare the SD. Format the sdcard (assume the sdcard mounted at /dev/sdb. You can find it with the command cat /proc/partitions)
sudo umount /dev/sdb1
sudo dd if=/dev/zero of=/dev/sdb bs=1k count=1024
sudo dd if=bootloader/u-boot-sunxi-with-spl.bin of=/dev/sdb bs=1024 seek=8
Create partition (you can do it using gparted too)
sudo fdisk /dev/sdb
* Delete partitions: o
* List partitions: p
* Create new partitions: n
* Primary partitions: p
* Partition number: 1
* Press ENTER twice to use the total size of the card
* Write the partition table: w
Format the parititon
sudo mkfs.ext4 /dev/sdb1
8. Copy ROOTFS_DIR into sdcard
mkdir mnt
sudo mount /dev/sdb1 mnt
sudo cp -a ROOTFS_DIR/* mnt
sudo sync
sudo umount mnt
Now boot the card. The default username/password are:
Username: root
Password: linux
Unfortunately ssh didn’t work. I logged in and changed few things.
First of all I edited the file sshd_conf
And found:
Port 22
PasswordAthentication yes
PermitRootlogin yes
Then I used the command
Rebooted and all set.
You can download the image from openSUSE-Tumbleweed-BananaPi-headless-20150928.tar.xz
copy it at least 2GB sd card and resize it.
Install MATE Desktop
The first thing you have to do is to update (zypper up).
The easiest way is to open YaST and go to Software Management.
Then filter by Patterns.
Click to install MATE Desktop Environment and MATE Base system.
After everything is installed, make MATE-session as default window manager
Find the line:
DEFAULT_WM = “kde-plasma”
and change it to
DEFAULT_WM = “mate-session”
Then reboot. Login and type startx
Both comments and pings are currently closed.