After adding many new features and introducing quite some important changes for the upcoming (open)SUSE releases, the YaST team is now going into bug squashing mode. We want to offer our users another rock solid release, so we are focusing on polishing our work.
However, when it comes to the storage layer, the story is slightly different. We are bringing back all those feature that you already know and love from the old Expert Partitioner but in a better shape.
So let’s have a look at the most relevant changes:
- We have been working on improving the system upgrade process in order to offer a smooth transition.
- The Expert Partitioner got back the settings dialog and the ability to clone disks.
- Regarding the new storage layer, subvolumes, resizing and support for unformatted DASD devices have been improved.
- YaPI is now deprecated.
In addition to that, we have fixed some issues like package installation from NFS/Samba/CIFS repositories, a problem preserving the DHCP client-id and a bunch of translations issues.
Offline Upgrade from SLE11
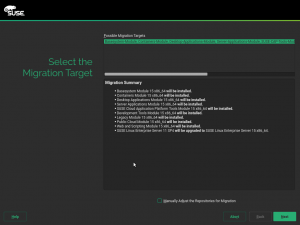
In the previous post we announced support for the offline migration from SLE12 to SLE15 via SCC. In this sprint we focused on upgrading from SLE11 products to SLE15.
The main difference (from the registration point of view) between SLE11 and SLE12/SLE15 is that SLE11 uses the old Novell Customer Center (NCC) for registration while the newer products use the SUSE Customer Center (SCC).
However, the SCC server knows which systems are registered in NCC (there is some kind of automatic synchronization between them) so it is possible to only use the SCC server during migration without any interaction with the old NCC. That makes the transition transparent for our users.
Besides some small adjustments, the changes in YaST were mainly related to handling the different configuration files. As expected, the most difficult part was testing, so we have added some notes below about the process.
In the end we could migrate a SLES11 system to SLES15 via SCC, performing a manual upgrade and an automated one with AutoYaST too. There were some issues related to package dependencies but these are not related to YaST or SCC, so probably some RPM packages will need to be fixed.
SLE11 Migration Notes
When migrating from a SLE11 system, there are some specific issues you should be aware:
- The SLE11 systems registered using the internal SUSE registration keys (belonging to the Novell Inc organization) are synchronized every 24 hours. That means it might take up to 24 hours after registering a new SLE11 system to make it upgradable to SLE15 via SCC. If the registration has not been synchronized from NCC yet you will see the “Invalid credentials” error during migration.
- For customers there is a trick: logging into the SCC Web UI will cause the registrations to be syncrhonized in few minutes. But this does not work for the SUSE keys.
- Migration from SLE12 is not affected by this issue because SLE12 already uses SCC and the data synchronization from NCC is not involved in the migration process.
Generic Migration Notes
These notes apply when upgrading from both SLE11 or SLE12:
- Because SLE15 is in Beta stage, your registration key needs to be entitled for the Beta products. Otherwise you will see “No migration found” error in YaST. Either join the SUSE Beta program or just wait until the SLE15 product is released and the migration is enabled.
- Once the system is migrated, the process cannot be repeated. But if you rollback the migrated system (using a backup or a snapshot), running
SUSEConnect --rollbackwill restore your registration status.
Configuring the Expert Partitioner
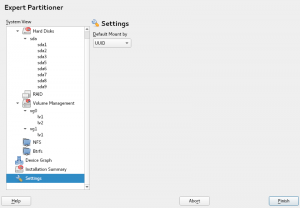
The Expert Partitioner features again a “Settings” section where users can adjust some settings to influence how the partitioner works. It is a work in progress, but for the time being the user can configure how the devices should be mounted (path, UUID, label, etc.).
But these settings are not only limited to the Expert Partitioner scope but to the whole storage layer. You could, for instance, launch again the Guided Setup after adjusting them and the new values will be taken into account.
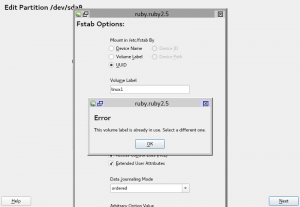
Moreover, the partitioner is now able to perform some additional checks over mount options. For example, when trying to mount a device by label, the user will be warned if that label is not valid (for instance, because there is another file system using that label).
Cloning Partitions Layout
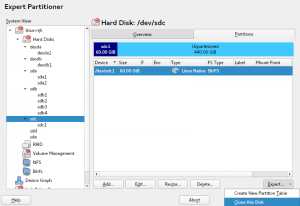
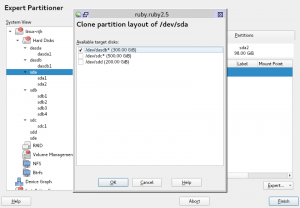
Cloning partitions layout was one of that kind of surprising features the old Partitioner offered. Imagine you have a disk with some partitions and you would like to have the same partition layout in another disk (or even in several disks). This is very common, for example, when you are creating a MD RAID setup, where it is useful to have the disks partitioned in the same way. To avoid the annoying work of creating all disk partitions manually, the new Expert Partitioner allows again to clone a disk layout by using the Expert button.
When you are cloning a disk, you can select all the devices where you want to clone the partition scheme of the current disk. Only suitable devices for cloning will be offered, that is, you will not see in the list disks without enough size or different topology.
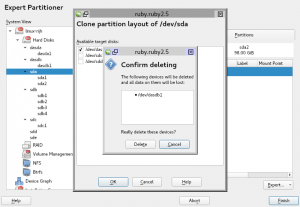
After selecting in which disks you want to clone, a confirmation message will be presented and you will be warned about all devices that will be deleted before performing the disk cloning. In case you accept, you will have exactly the same partitions in all selected devices, including gaps between partitions.
Temporary Mount and Unmount File Systems for Resize
Unfortunately most file systems support resizing only while the file system is mounted or while it is unmounted. Whereas doing a temporary mount is easy, a temporary unmount is often not possible since file systems are usually in use.
libstorage-ng now inserts unmount and mount actions when needed for a specific file system. It also provides function to immediately mount or unmount a file system, so that the UI can give feedback to the user if unmounting failed.
Taking Btrfs Subvolume Hierarchy Right
btrfs subvolumes are rather delicate beasts and great care has to be taken to do things right.
For one, subvolumes are organized like a directory hierarchy. And you cannot create new subvolumes just anywhere but only in free ‘leaf’ positions. That is, neither another subvolume nor a directory with this name must exist.
In other words, if (for example) a subvolume foo/bar/xxx already exists you can no longer create a subvolume foo/bar.
Let’s see what happens:
# you must mount the btrfs file system first
~ mount /dev/sdb5 /mnt
~ btrfs subvolume list -tap /mnt
ID      gen     parent  top level       path
--      ---     ------  ---------       ----
257     8       5       5               foo
258     8       257     257             /foo/bar/xxx

~ btrfs subvolume create /mnt/foo/bar
ERROR: target path already exists: /mnt/foo/bar
The reason for that error is that there is already a directory called `foo/bar`. At this point, there are two options:
- Delete the subvolume
foo/bar/xxxand the directoryfoo/barif you do not mind to loose the data in that subvolume - Or rename temporarily and move it back later
Let’s move the existing subvolume out of the way (no fancy command, just using mv) and then create the new one:
~ mv /mnt/foo/bar /mnt/foo/old_bar
~ btrfs subvolume create /mnt/foo/bar
Create subvolume '/mnt/foo/bar'
~ mv /mnt/foo/old_bar/xxx /mnt/foo/bar/xxx
~ rmdir /mnt/foo/old_bar

~ btrfs subvolume list -tap /mnt
ID      gen     parent  top level       path
--      ---     ------  ---------       ----
257     9       5       5               foo
258     8       259     259             /foo/bar/xxx
259     9       257     257             /foo/bar
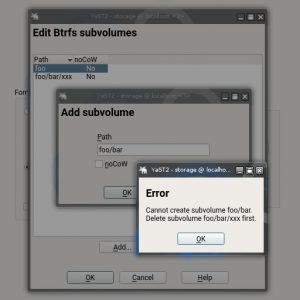
That’s rather a complicated stunt and you even might have valuable data in the old `foo/bar` directory that could get lost in the process. So YaST refuses to do this.
Instead, it recognizes the situation and shows a hint to the user:
Of course it’s all different if you are about to format the btrfs filesystem anyway. Then the YaST partitioner will simply create the subvolumes in the correct order and everything will be fine.
Better handling of unformatted DASD and other unavailable devices
Direct-access storage devices (DASD) are the most common storage devices in s390 mainframes. When compared to common hard disks, they are special in several ways. One of them is that they need to be formatted at low-level (to not be confused with the usual meaning of “format” related to creating a file system) in order to be used by the operating system.
We got a bug report for the pre-release of SLE15 because the installer was crashing when trying to use an unformatted DASD as part of the automatic partitioning proposal (i.e. the Guided Setup). So we instructed YaST to ignore such devices, not only in the automatic proposal but also in the Partitioner. It makes very little sense to list devices in the Partitioner that cannot be manipulated in any way. That’s consistent with the SLE15 approach for other “untouchable” devices, like the hard disks that are part of a BIOS-defined RAID or the individual connections of a multipath device.
In other words, the “Hard Disks” section of the Partitioner only shows disks that can be indeed used as disks (e.g. can be partitioned) and, unlike previous SLE15 pre-releases, now unformatted DASDs are not longer in that list. As always, the user can still go a couple of steps back in the installation process and perform a low-level format the DASD in order to make them appear.
YaPI is deprecated and should not be used anymore
Dropping some old stuff is part of our roadmap too. For instance during this sprint, we have marked YaPI as deprecated.
YaPI was designed to expose functionalities from YaST but, to be honest, it is not much used these days. Due to the complexity to maintain several interfaces every time we develop a new feature, we have decided to drop YaPI. Although the code has not been completely removed, we consider it as deprecated and it should not be used anymore.
Installing Packages from NFS or Samba/CIFS
We got a bug report that when installing a system from an NFS repository, the installed system will be unable to access that repository later.
The problem was that for accessing the NFS repositories (and Samba/CIFS as well) you need additional packages which can mount such file systems. And these packages are not included in the minimal installation.
That means you cannot access the repository later which is a quite unfortunate situation. You get into the chicken/egg problem – you need to install a package to access the repository but to access the repository you need to have the package already installed…
During debugging it turned out that the problem was caused by using a dropped value from the `/etc/install.inf` file. In the past, linuxrc wrote the type of the installation repository there, but that’s not written anymore.
The fix was to evaluate all used repositories and check if any of them is located on an NFS or Samba/CIFS system. As a side effect, it fixed an issue when installing from DVD but using an additional repository located on NFS (or Samba/CIFS).
Preserving the DHCP client-id
Since SLE15, wicked will use the RFC 4361 client-id. This change needed some adaptation in the installer to copy the created identity (duid + daid) to the installed system so, after rebooting, it can get the same IP (when it is possible) that was used during the installation.
Fixing Translation Issues
Currently we are getting quite a lot of bugs about missing translations in YaST. It turned out that some bugs were caused by a missing textdomain statement in the YaST code. In such situations, no translatable texts are extracted from those files and, obviously, translators cannot translate them.
The YaST script printed a warning in that case, but it can be easily overlooked. The reason for a warning is that the check is not perfect and it reports many false positives (it complains about missing textdomain calls that are not required).
Fixing the script would be too difficult so we took other approach: we added the harmless textdomain statement also to files which strictly did not require it. Then we could change the warning to error and stop the script with a failure.
Now the more strict check is enabled in the continuous integration (Travis) so we should get a failure earlier, before the change actually hits the build service, preventing bug reports later.
We need your help!
Our QA department is doing a pretty good job when it comes to detect problems. But we would love to get feedback from you too. So, if possible, have a look at (open)SUSE beta versions and report any issue you find.
Thanks!
Both comments and pings are currently closed.
