Home Home > Miscellaneous
Sign up | Login

Deprecation notice: openSUSE Lizards user blog platform is deprecated, and will remain read only for the time being. Learn more...

Archive for the ‘Miscellaneous’ Category

openSUSE OBS git mirror

September 13th, 2019 by

There was some discussion about our OBS and how in contrast Gentoo, VoidLinux or Fedora used git to track packages.

So I made an experimental openSUSE:Factory git mirror to see how well it goes and how using it feels.
The repo currently needs around 1GB but will slowly grow over time. I did not want to spend effort to import all history.

Binary files are replaced by cryptographically secure symlinks into IPFS
and I am currently providing files up to 9MB there.

If you can not run ipfs, you can still get these files through any of the public gateways like this:
curl https://ipfs.io$(readlink packages/a/aubio/aubio-0.4.9.tar.bz2) > OUTPUT

So some benefits are already obvious.
It is now much easier to find and download our patches.
Downloading and seaching all of openSUSE is now much faster.
And it works even on Thursdays (when our maintenance window often causes OBS downtimes).

It is meant to be a read-only mirror, so there is no point in opening pull-requests on github.

I hope, you enjoy it and have a lot of fun…

Highlights of the Latest YaST Development Sprints

June 25th, 2019 by

May and June have been, so far, interesting months for the YaST Team. We worked hard to polish the last details of the recently released openSUSE Leap 15.1, we attended the openSUSE Conference 2019 (with many fruitful conversations), we shared quite some time together around a table without computers (most of the time, we are a geographically distributed team), many team members enjoyed vacations (it’s spring time in Europe), we organized a Leap 15.1 launch party with technical talks in Gran Canaria… and we ran out of energy to also publish our traditional sprint reports in this blog.

We will try to fix that with this blog post in which we will try to summarize some highlights from the latest three development sprints, namely the 77th, 78th and 79th. So be warned, this is going to be a loooong post.

Support for Multi-device Btrfs File Systems

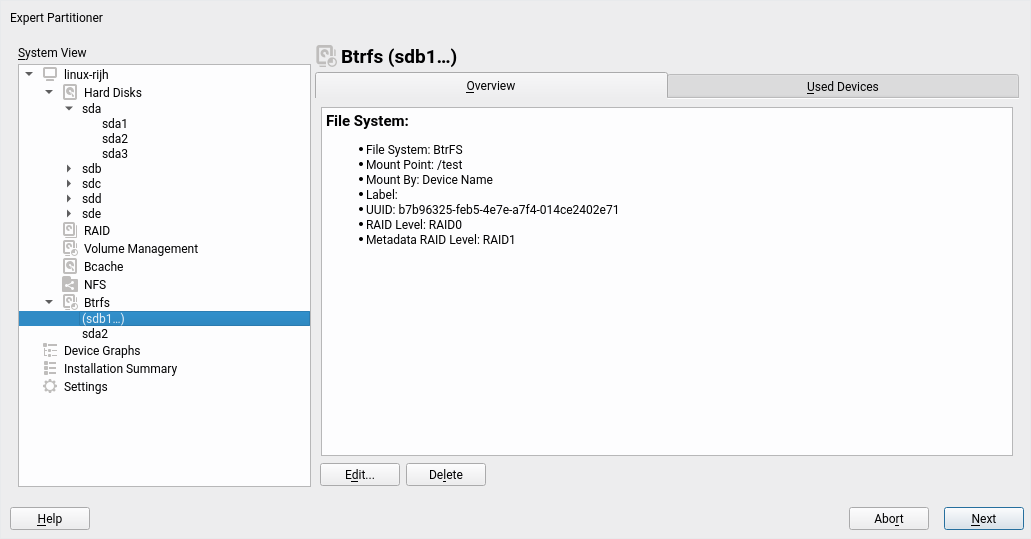
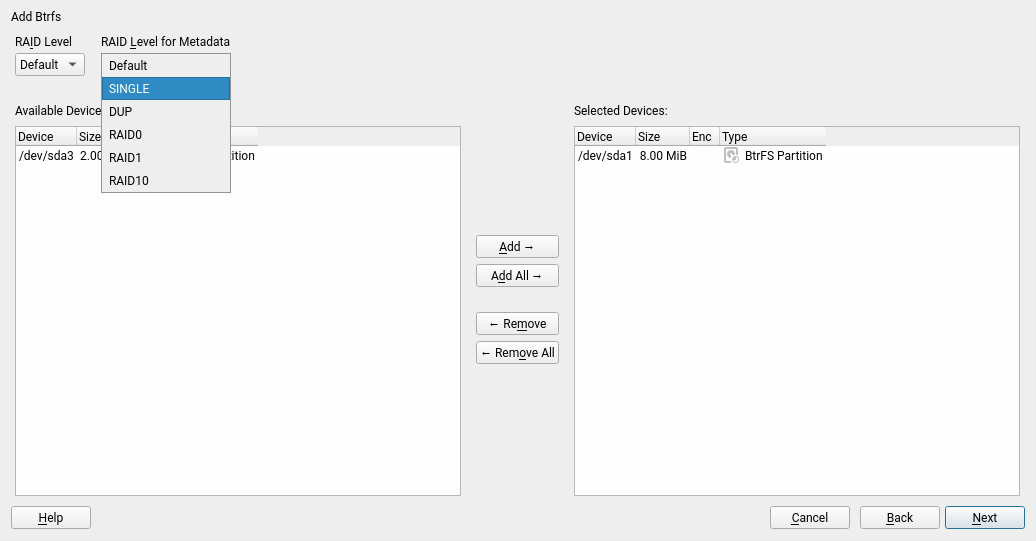
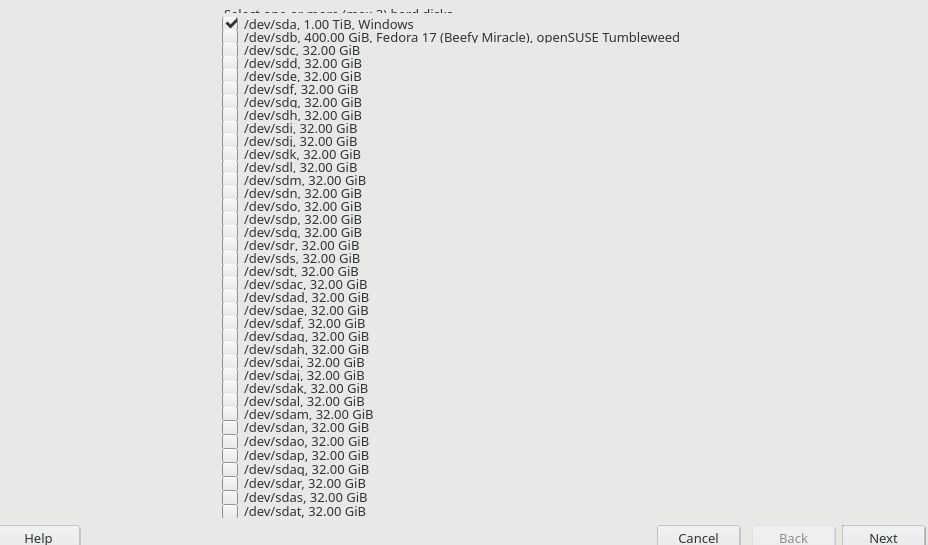
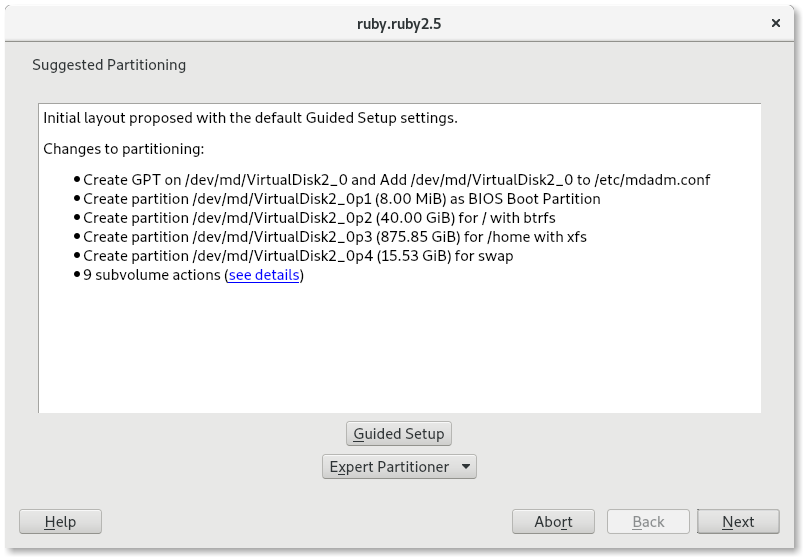
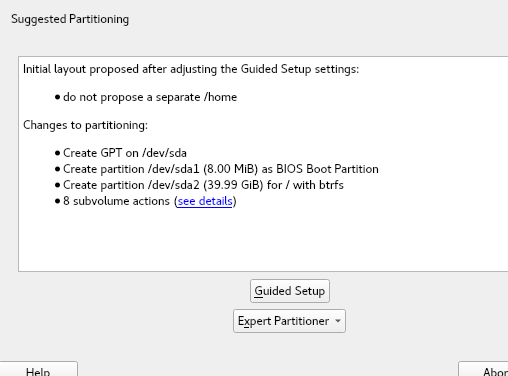
We have been working steadily during the three sprints in implementing all the necessary bits to offer a good experience installing and upgrading an (open)SUSE system on top of several block devices by means of Btrfs RAID capabilities. That includes support in the Partitioner, in AutoYaST, in the storage guided setup and more.

We decided that all that deserved a separate blog post. You can find here: Getting Further with Btrfs in YaST.

More Improvements for the Partitioner

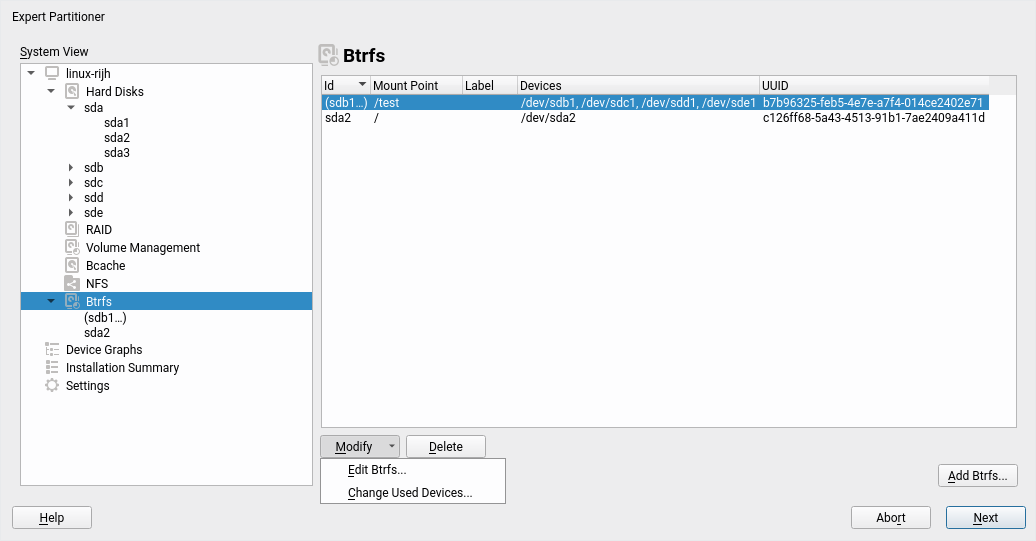
That blog post mentions a couple of changes in the Partitioner that, although initially motivated by the introduction of multi-device Btrfs, go beyond that scope and are aimed to make the all the lists of devices more useful and informative.

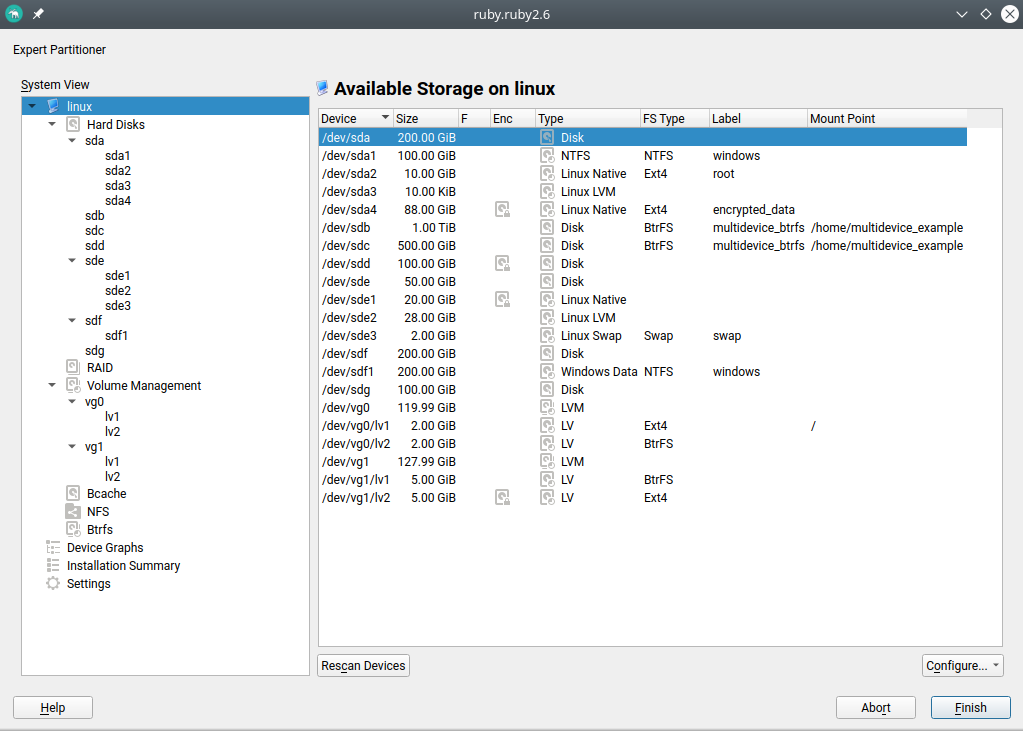
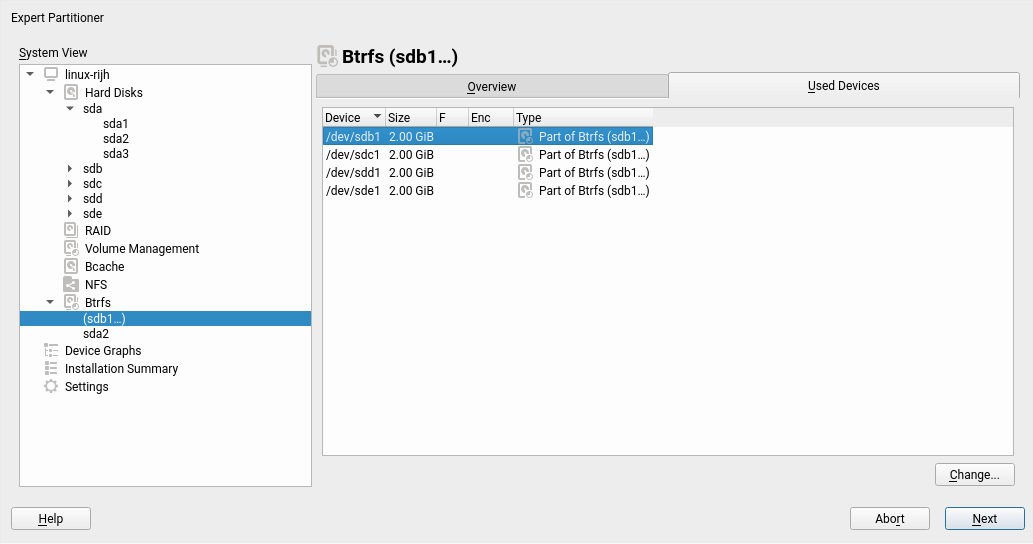
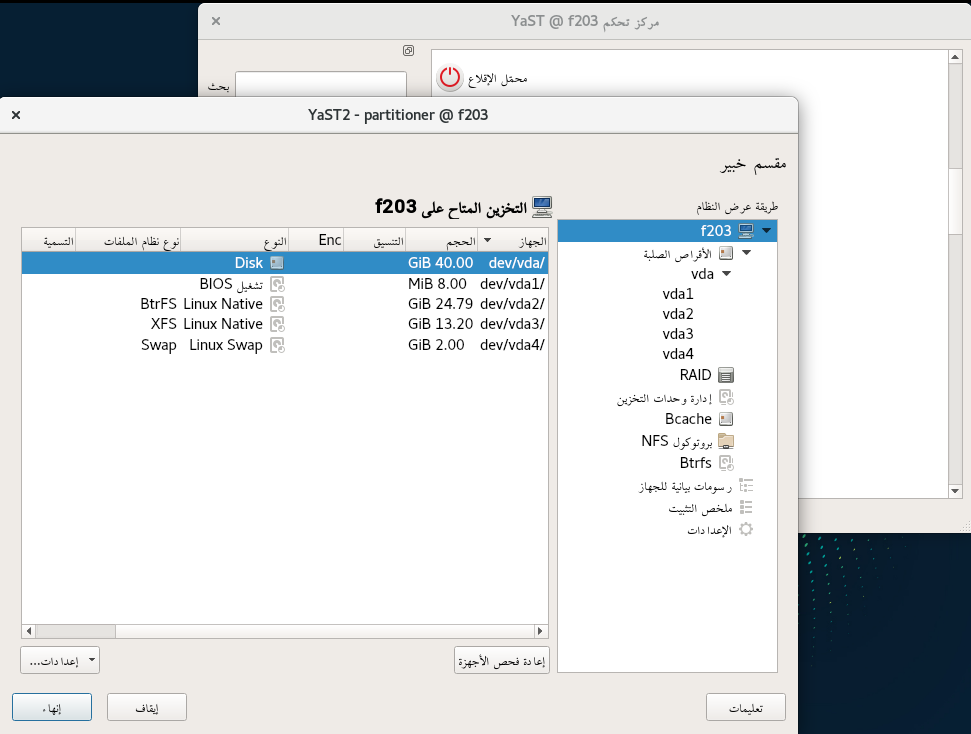
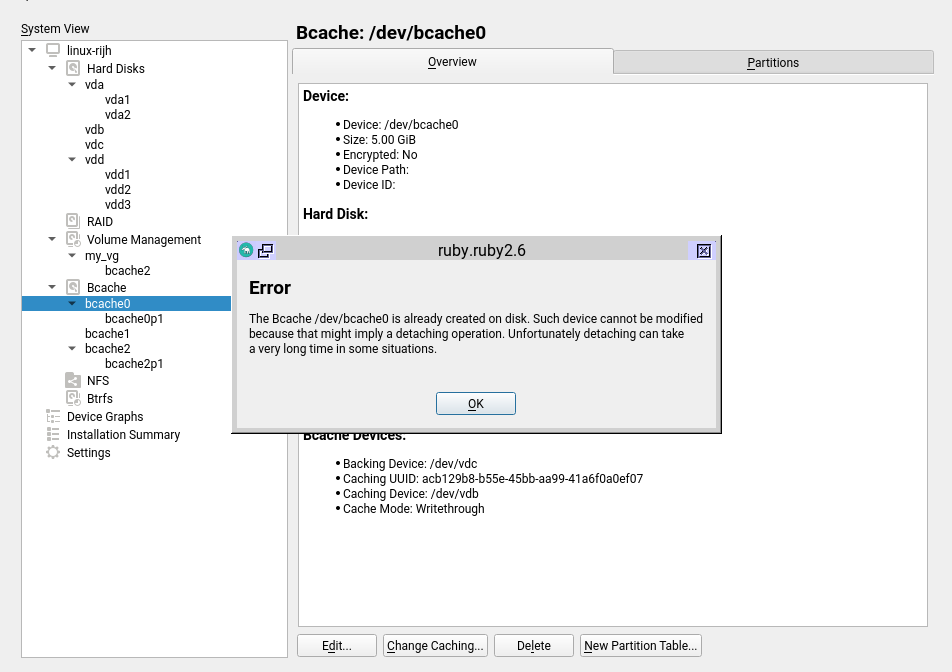
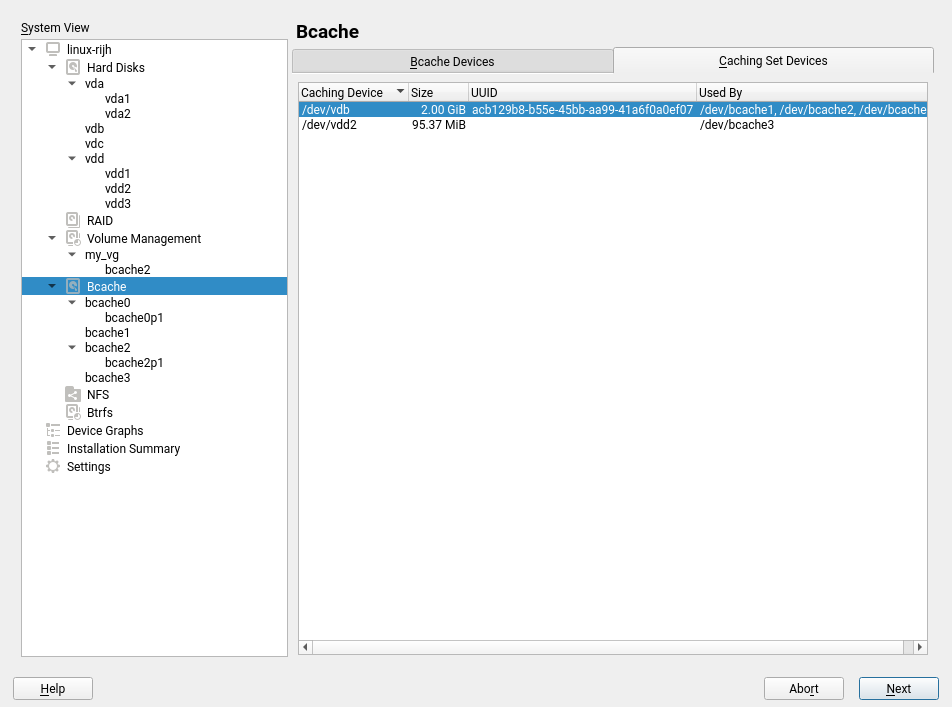
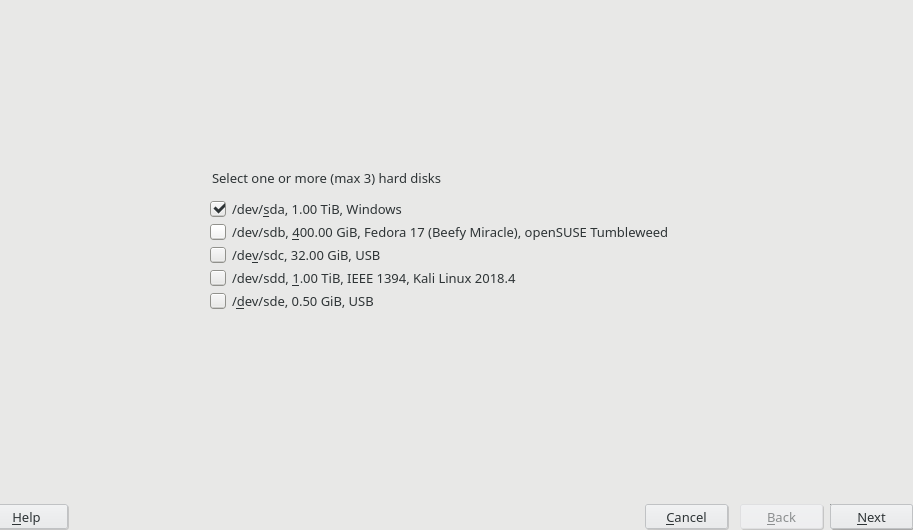
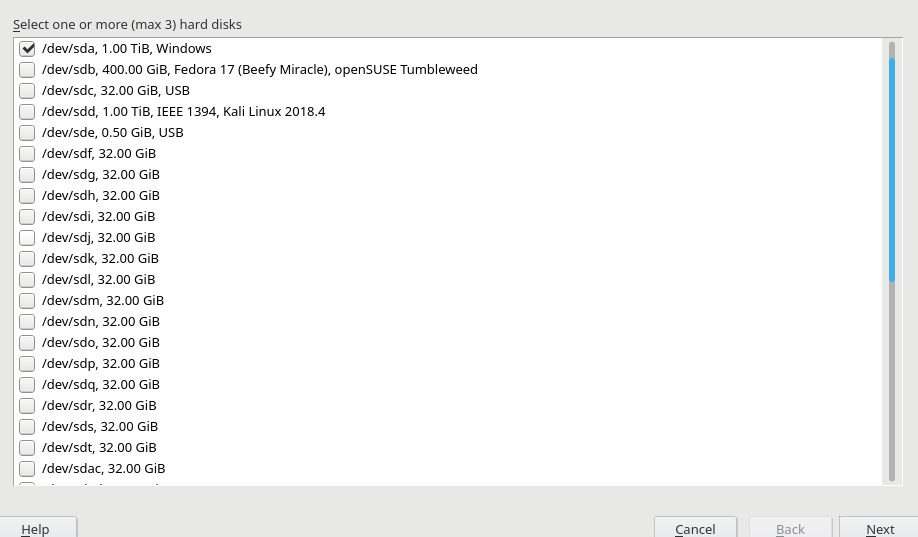
Traditionally the Partitioner used two separate columns “Type” and “FS Type” to describe the function of every device. That was sometimes hard to understand. Moreover, quite often the important information (like the relationship between a partition and its RAID or LVM) was simply missing in those tables.

Traditional devices table in the Partitioner

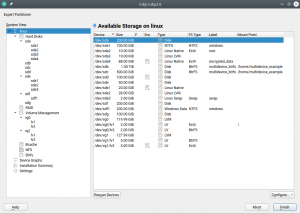
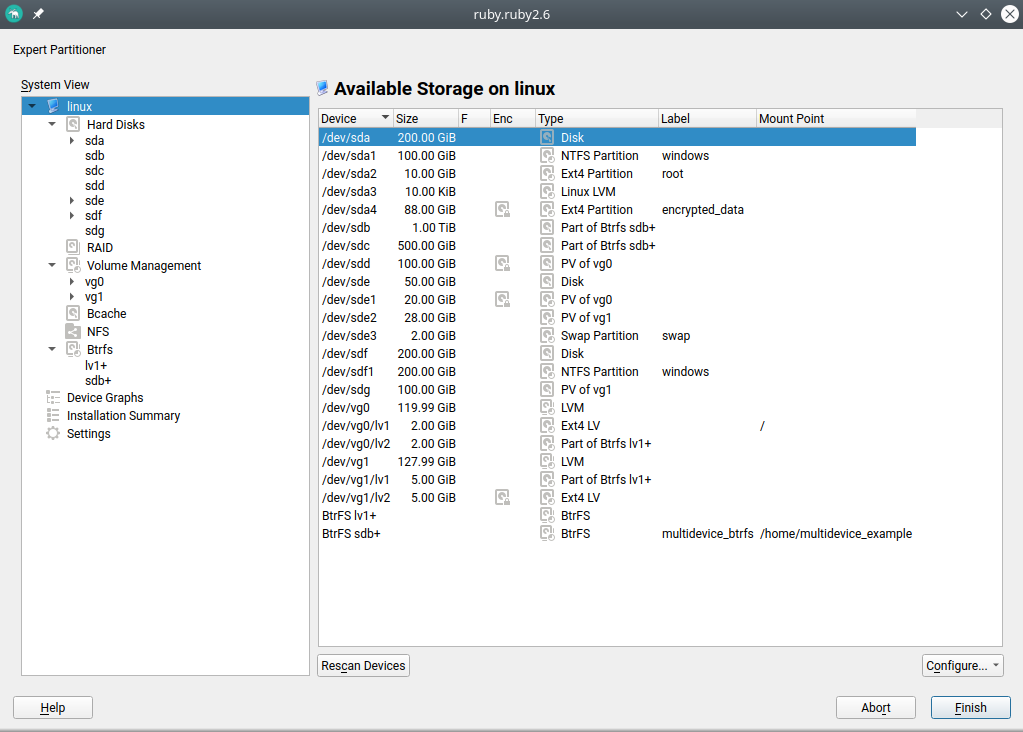
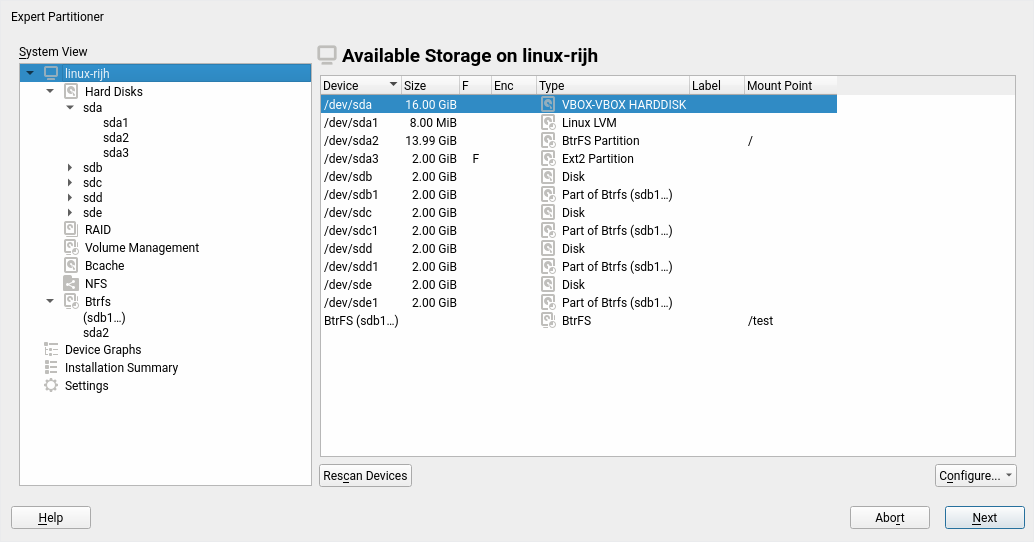
We have merged those columns into a more informative one that identifies the devices and also gives an overview of the relationship between them at first glance. In addition, the table displaying all the system devices now includes multi-device file systems.

Revamped table of devices

Mitigating CPU vulnerabilities from YaST

If you are interested in security (or simply if you have not been living under a rock) you probably have heard about CPU based attacks like Spectre or Meltdown. The last year has seen a number of these CPU issues, all of them coming along with their own kernel options to change the Linux behavior in order to mitigate the security risks at a price of some performance loss.

However, not all users know what affects their architectures or particular models of CPU and which kernel parameters to use to gain more performance if the security risk is acceptable for them.

For that purpose, a new meta-option called “mitigations” was added to the Linux kernel. It allows to enable and disable at once several of those mitigations that prevent CPU attacks. See more information at this document published by SUSE.

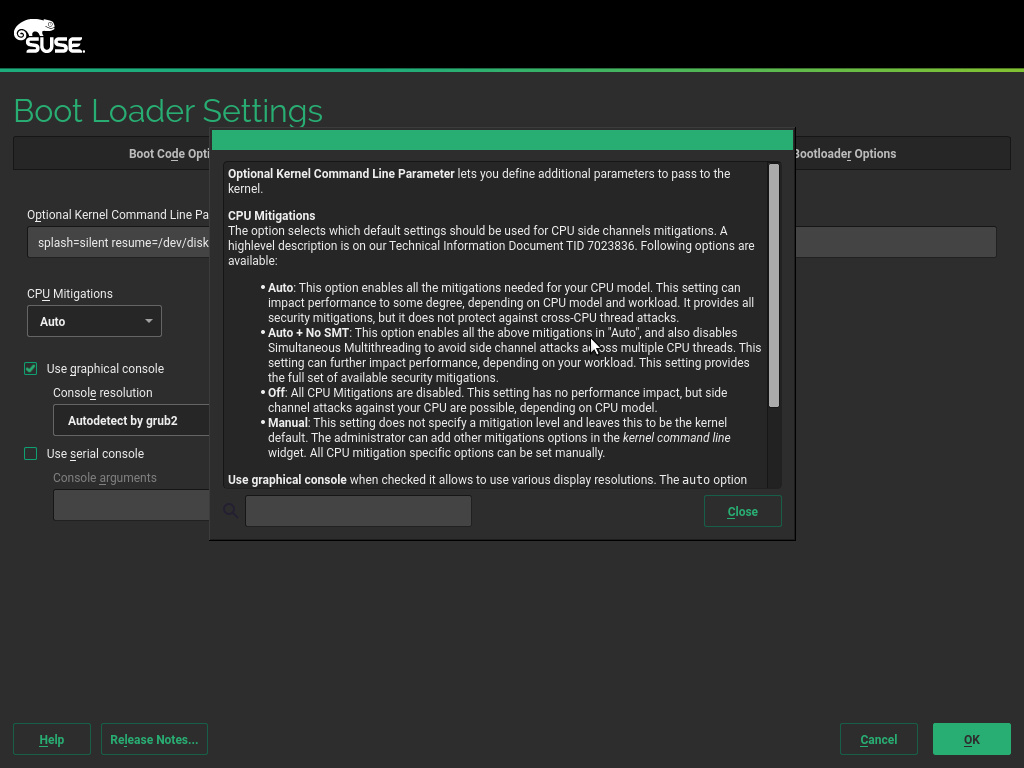
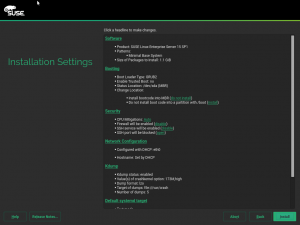
We find that kernel option very useful, so we decided to provide an easy way for users to adjust it. Now the YaST bootloader screen contains a new setting which offers three pre-defined options and even a fourth one to let the users fine-tune the settings on their own. As you can see in the screenshot below, we have included extensive documentation in the help dialog, so you will not need to search for this blog post in the future.

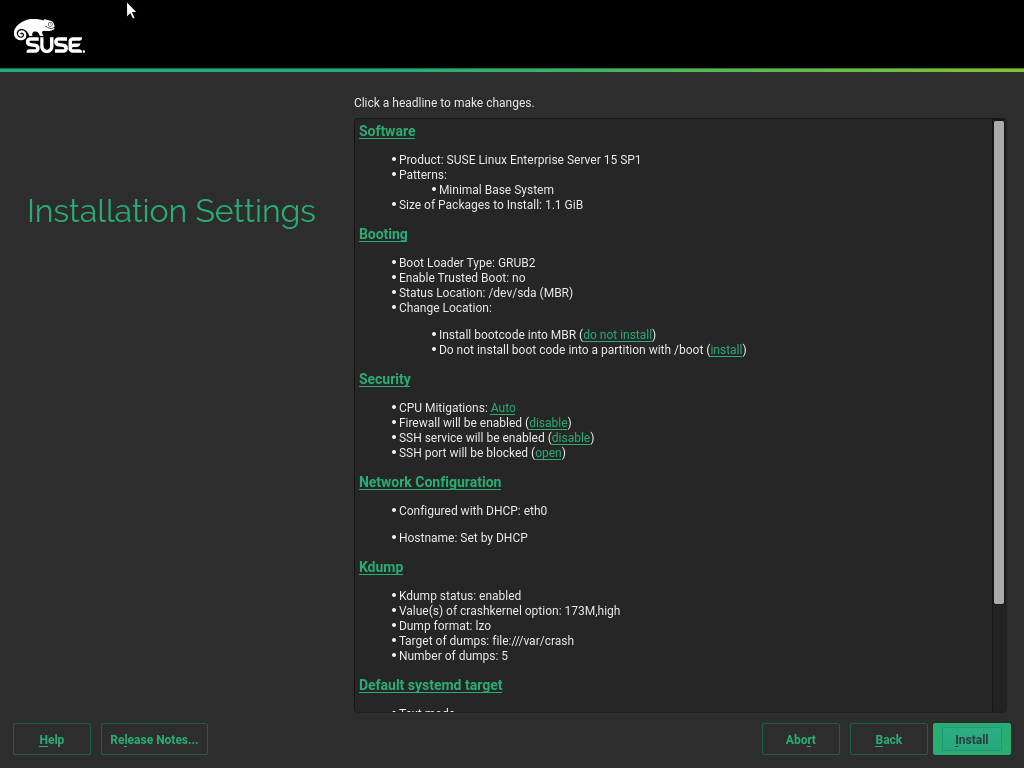
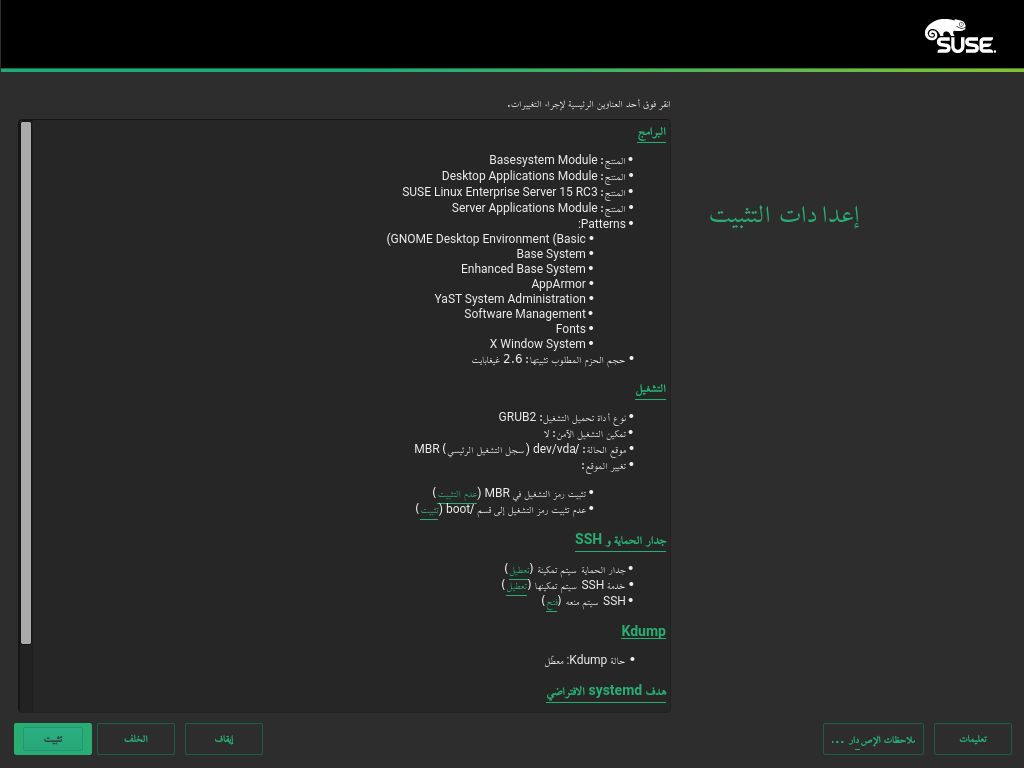
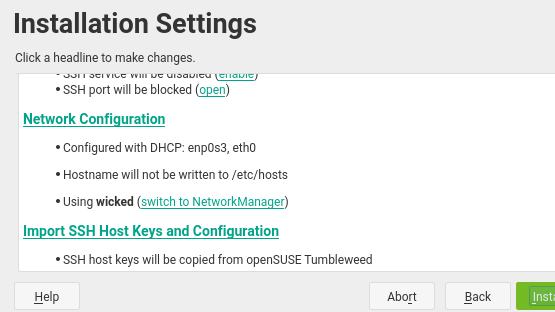
It is also possible to modify this option directly from the installation summary. For that purpose, the “Firewall” section was renamed to “Security” and it now includes the possibility to tweak the CPU mitigation options, alongside the traditional settings for firewall and opening the SSH port.

CPU mitigations in the installation summary

Another success story of (open)SUSE offering a promptly solution for our users to easily adapt their systems to ever-changing complex needs.

Memory Optimizations during Installation

While the release of openSUSE Leap 15.1 was approaching, we got several bug reports stating the YaST installer used to freeze when using only 1GB RAM with online repositories (see bug#1136051).

It turned out that at some point YaST loads the details of all available packages. And that needs a lot of memory if you enable the online repositories during installation. For example the OSS Leap repository contains more than 35.000 binary packages!

The problem was in the YaST internal API accessing the package manager library (libzypp). It did not allow to filter the objects, YaST had to read all objects and then do the filtering in the code. And for each object it returned all attributes, even those which were not needed (like the package description, full RPM name, etc…). All that data required a lot of memory.

To fix that we have introduced new API calls that allow specifying more filters (like return all selected packages, packages from specific repository,…) and you can set which attributes should be returned. If you need to know only the name and the version then you will not get the other useless attributes. And to ease the usage of the new API in YaST we provided a nice object oriented wrapper written in Ruby.

This optimization saves a lot of memory, 1GB of RAM should be enough for future installations with the online repositories, even if they grow even more.

Unfortunately, we were only able to diagnose the problem and provide a solution a couple of weeks before the official release of Leap 15.1. Introducing a change in such a sensitive part of the installer was considered too risky (it would have invalidated many of the tests that had been already performed) so the installer included in openSUSE Leap 15.1 is still memory hungry if online repositories are used. For that release, we simply increased the official memory requirements to 1.5 GiB.

Online Migration from openSUSE Leap 15.1 to SLES15-SP1

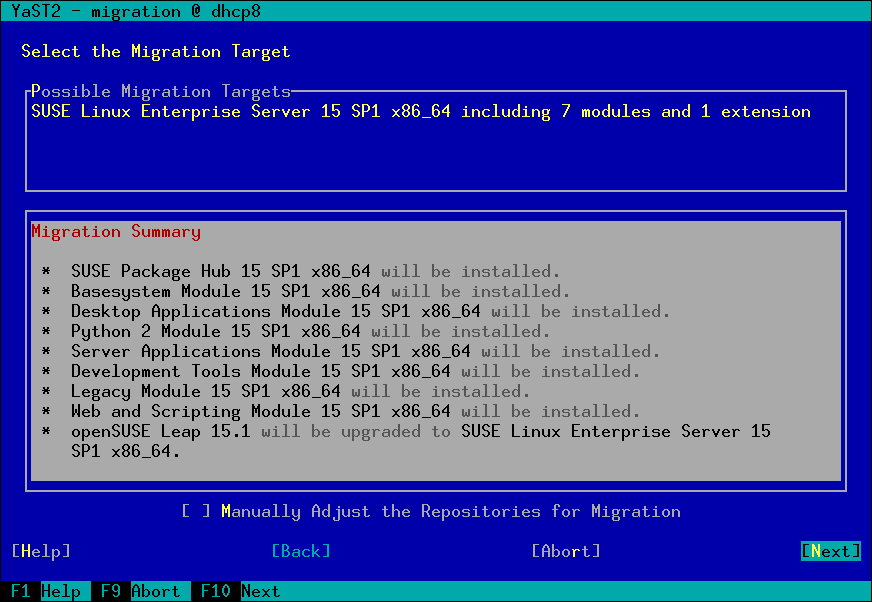
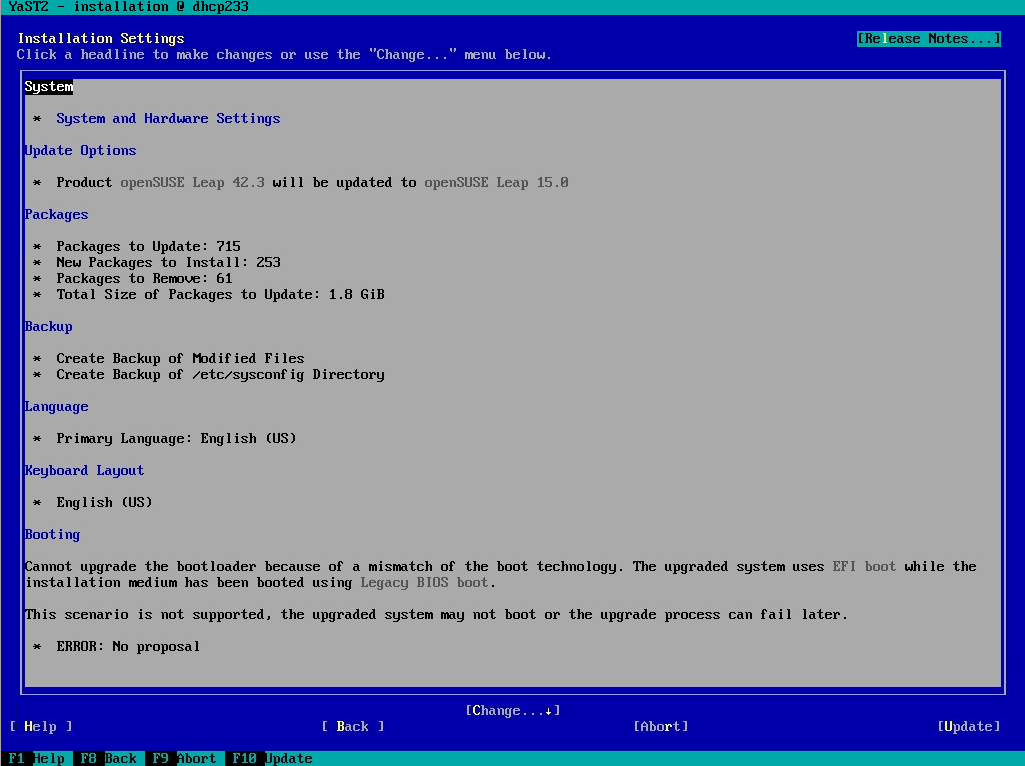
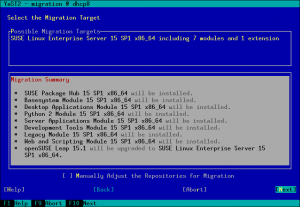
For openSUSE Leap 15.0 it was only possible to migrate from Leap to SLES (SUSE Linux Enterprise Server) manually (see the documentation). With Leap 15.1 the goal was to also support a migration using YaST. But we got a bug report saying the online migration from openSUSE Leap 15.1 to SLES15-SP1 displayed a wrong migration summary and didn’t work well.

It turned out that YaST needed some small fixes to support this properly. The main problem was that YaST did not expect that the base product or the package vendor can be changed during online migration, so far it was only possible to upgrade to the next SLE service pack level. But that is fixed now.

Wanna try the migration from openSUSE Leap 15.1 to SLES15-SP1? Then follow these steps.

  1. Install the yast2-registration and yast2-migration packages in the Leap 15.1 installation
  2. Make sure the latest online updates are installed (to install the fixes mentioned above)
  3. Start the YaST registration module and register the openSUSE Leap 15.1 product using your registration key
  4. Then start the YaST migration module, select the migration to SLES15-SP1
  5. (There might be reported some package dependency issues in the migration summary, go to the package manager and resolve them. Usually removing the old openSUSE package is the right solution.)
  6. Start the migration, the SLES packages will be downloaded and installed
  7. At the end the system will be rebooted to start the freshly installed SLES, enjoy! 🙂
  8. (It is recommended to review the orphaned packages, leftovers from the Leap installation, with the command zypper packages --orphaned and possibly remove them.)

From Leap to SLES via YaST

Please note that only minimal server installations of Leap are supported for upgrade, full installations especially with third party packages might not work correctly.

Why Cannot I Read the Logs?

Long time ago, the logs of any Linux system were spread over several files living under the /var/log subdirectory. YaST offers its “System Log” module to inspect those files in a convenient way. Since the introduction of Systemd and its journal, that information has been gradually moved to this new mechanism by default. And YaST offers its “Systemd Journal” module to inspect and query that journal.

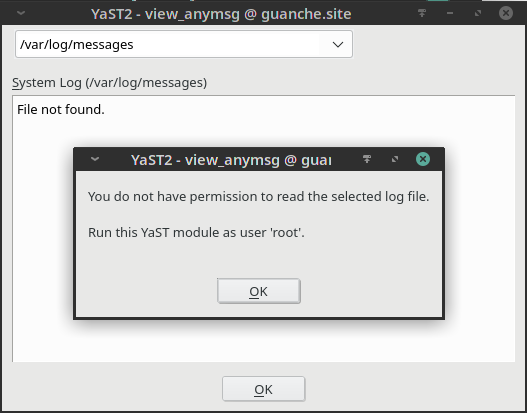
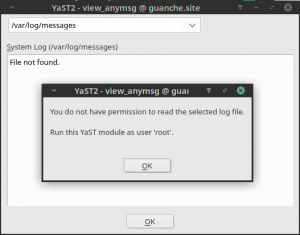
Both YaST modules can be executed by any user in the system, not only by root. That’s intentional because both the Systemd journal and the traditional Linux log files can register information targeted to unprivileged users. But there was some room for improvement in the error message displayed by both modules when such users were trying to access to protected information.

This is how the new more explanatory message looks in the “System Log” module.

Explanatory pop-up for log viewer

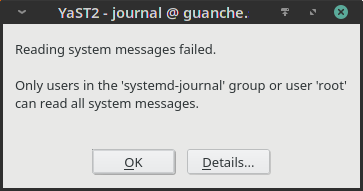
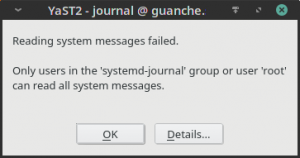
And this is the extended message for “Systemd Journal”, that now mentions the systemd-journal user’s group.

Improved message in the journal viewer

Another Day at the YaST Office: Adapting to Changes

As we usually remark in our blog posts, a significant part of the work of the YaST Team consist in keeping YaST in sync with the constant changes in the underlying system. Of course, these sprints were not an exception in that regard. Without trying to do an exhaustive list, let’s take a look to some of those adaptations since the mentioned underlying changes may be interesting for some readers.

Turns out Systemd developers has decided to change the list of possible states for Systemd services. The systemd-sigabrt state is obsolete and a new systemd-watchdog one was added. In the YaST team we learned some time ago that the list of Systemd states changes more often than what most people would expect. As a consequence we have an automated check to detect these situations. The bell ringed, we adapted the code and everything keeps working.

Systemd is not the only technology that keeps evolving. Quite some time ago, RMT replaced SMT as the default proxy technologies for the SUSE Customer Center. Although both has coexisted for quite some time, from SLE-15 onward only RMT is offered. Thus we have adapted all the references to SMT that still existed in YaST. From now on, only RMT is mentioned to avoid confusion.

Another common adaptation we have to perform in YaST is adjusting some module when the output of the command it runs under the hood has changed. Recently we found out the developers of the command iscsiadm has decided to use more than one exit code to indicate a successful execution (traditionally, only zero should mean that). After a long discussion, we decided to adapt YaST iSCSI to also be happy with the error code 21. What means for you? That future versions of YaST iSCSI should work faster in some situations, since the confusion will not longer result in a timeout.

YaST Firstboot: a Better Example File

Those were just some example of the many adaptations we did lately for changes in the system. But not all adjustments are motivated by external changes. We also realized the example configuration file provided by YaST Firstboot (at /etc/YaST2/firstboot.xml) needed some love. Due to the nature of YaST Firstboot, that file should be customized before using YaST Firstboot. But providing an example file with three different steps about acceptance of licenses (two of them enabled and the third one disabled) and other inconsistencies was definitely not helping anyone to understand how to use the module.

In fact, the status of that default example configuration and of the documentation managed to confuse even SUSE’s quality assurance team. So we improved the example file shipped in the package to make it more realistic and we also updated the YaST Firstboot documentation to clarify how to use that file. Because not all improvements are always done by coding.

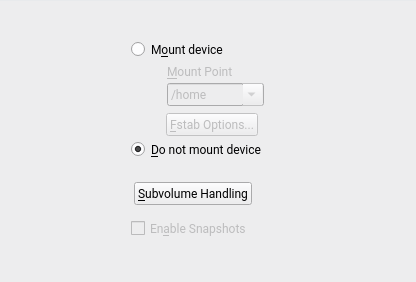
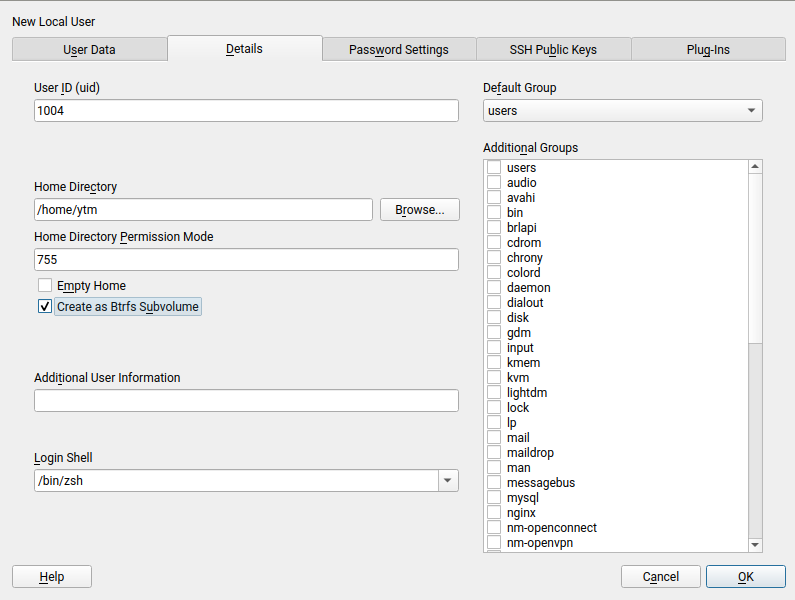
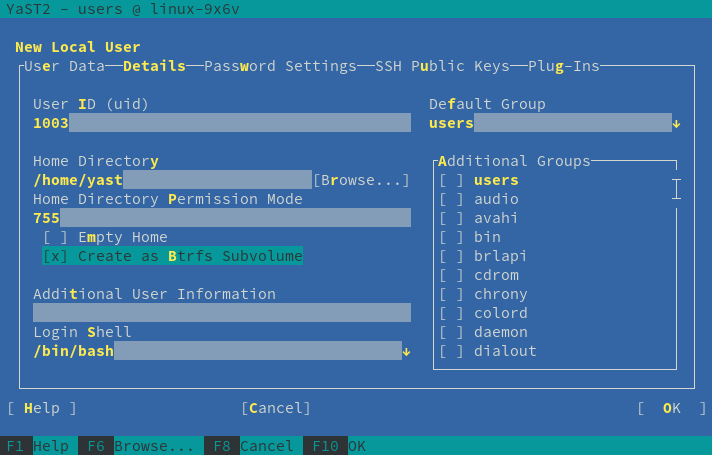
Leap 15.1’s Most Annoying Bug: Create Home as Btrfs Subvolume

As all openSUSE users should know, for every Leap release a page is created in the openSUSE wiki listing the so-called Most Annoying Bugs. Leap 15.1 was a very smooth release and this time the corresponding list contains only one bug… and it’s a YaST one. 🙁

In an installed system, when YaST was creating a new user it was always trying to create its home directory as a Btrfs subvolume. Even in cases in which that was impossible. For example, if the directory to be created was not in a Btrfs file system.

Writing user error

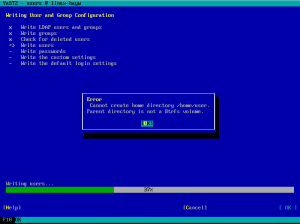
Fortunately, the bug didn’t affect the installation process or AutoYaST. We created a fix that was quickly available as a maintenance update. So make sure your openSUSE system is updated before trying to create new users with YaST.

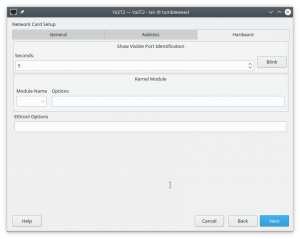
YaST Network refactoring: status report

Since we submitted the first bits of the yast2-network refactoring by the end of April, we have made quite some progress in this area. Although it is still an ongoing effort, we would like you to give you an update on the current state.

We might say that we have been working on two different areas the user interface implementation and the future data model.

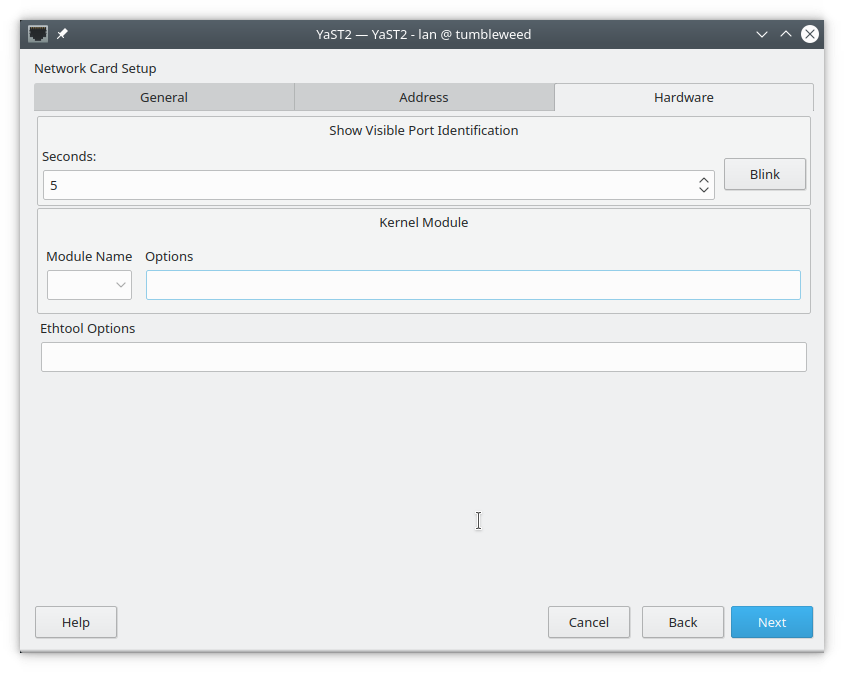
About the user interface, the team has improved the code quite a lot to make it easier to maintain and extend. We have introduced some classes to de-couple the widgets from the data, and it pays off. Additionally, we have fixed some bugs (many of them related to validations), simplified the process of adding new devices and reorganized the hardware tab.

New hardware tab in YaST Network

Regarding the internal data model, we have been thinking about the best way to represent network configuration in an agnostic way so, in the future, we can not only support Wicked but other options too (for the time being, the NetworkManager support is quite limited). If you are curious about the details, we have added a document describing the approach to the repository.

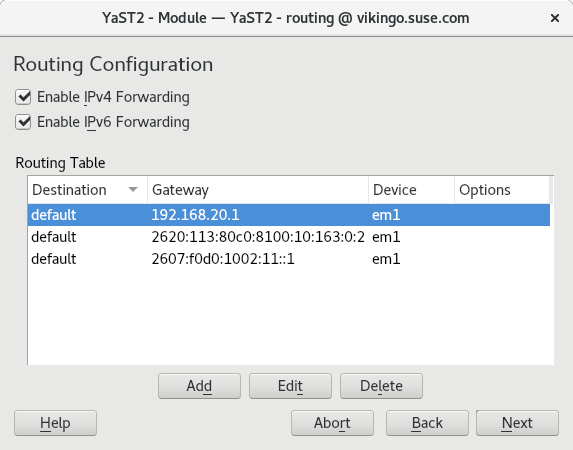
The new data model is already being used to handle DNS and Routing configuration. So if you are using Tumbleweed you have been already using the new network code for some weeks, including the UI enhancements presented in our latest post.

New network routing dialog

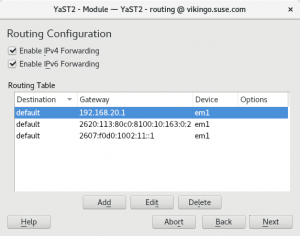
Although the data model is so far only used in the mentioned parts, the plan is to submit to Tumbleweed a heavily refactored UI layer during next sprint. So stay tuned.

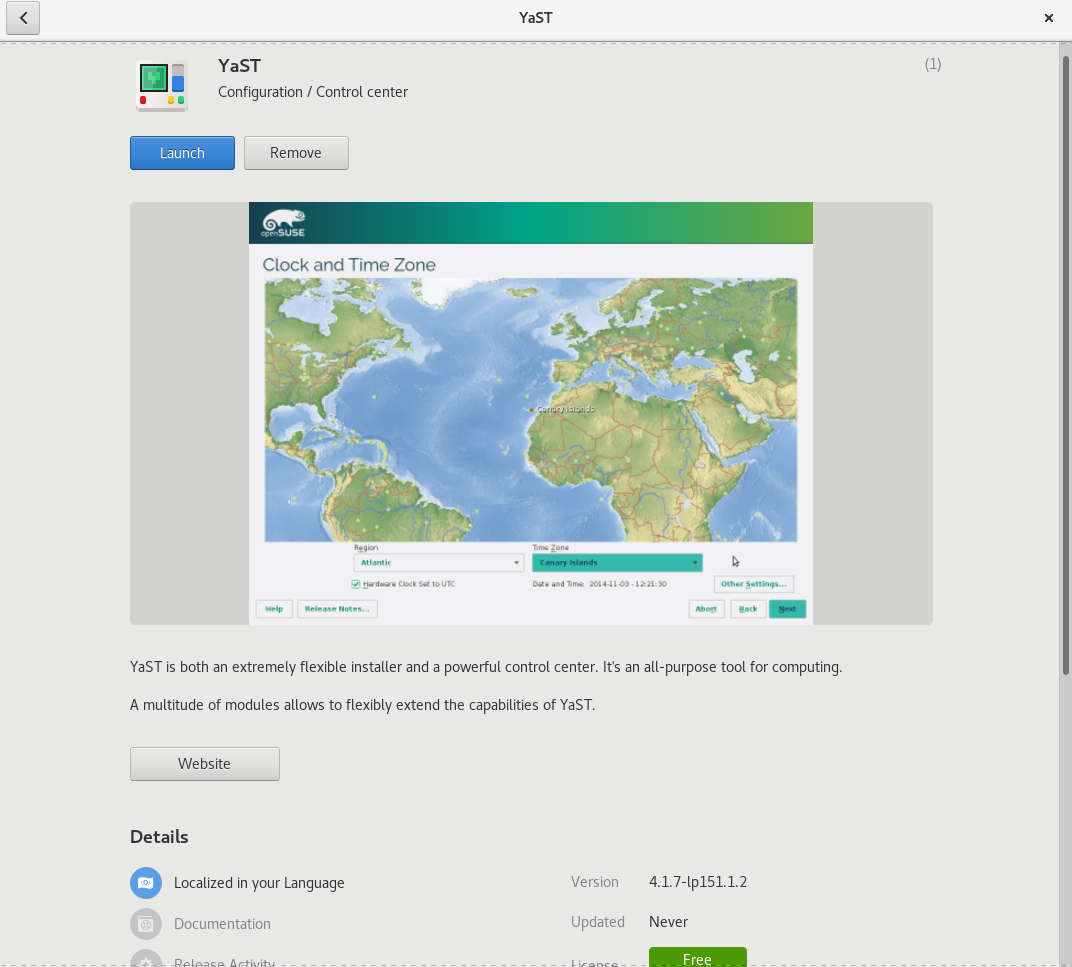
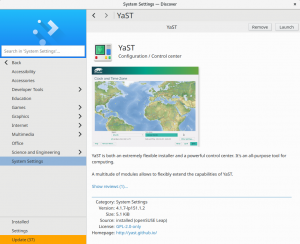
Added Appstream Metadata to the YaST Packages

The YaST package manager is not the only software manager in the (open)SUSE distributions. There are some more, like Discover in KDE or the GNOME software manager, not to mention the online openSUSE appstore.

While the YaST manager is package oriented, those other software managers are application oriented. That makes a huge difference, especially for the beginner users.

The full list of packages does not only include the applications (basically anything a user can start from the desktop), but also shared libraries, pieces that provide functionality for other applications or basic components needed for the system to work. With so many software packages (the openSUSE OSS repository contains over 35.000 of them!) it’s sometimes hard to find the software you need unless you know what you are looking for.

To offer an application-oriented view on top of all that, the application managers need some special data describing the applications inside the packages. The data are located in the /usr/share/metainfo/*.xml files, if you are interested in the technical details check the AppStream documentation provided by the Freedesktop.org.

Our absolutely awesome community contributor Stasiek Michalski (more famous by his nickname lcp) realized YaST was not offered in those application managers and decided to fix it. So he created an XML generator which collects the data from YaST packages and automagically generates the metainfo XML file needed by the other software managers.

YaST in GNOME Software

As a result, the Gnome Software Manager, Discover and other software managers will offer YaST in Tumbleweed just as any user-oriented application. Thanks lcp!

YaST in Discover

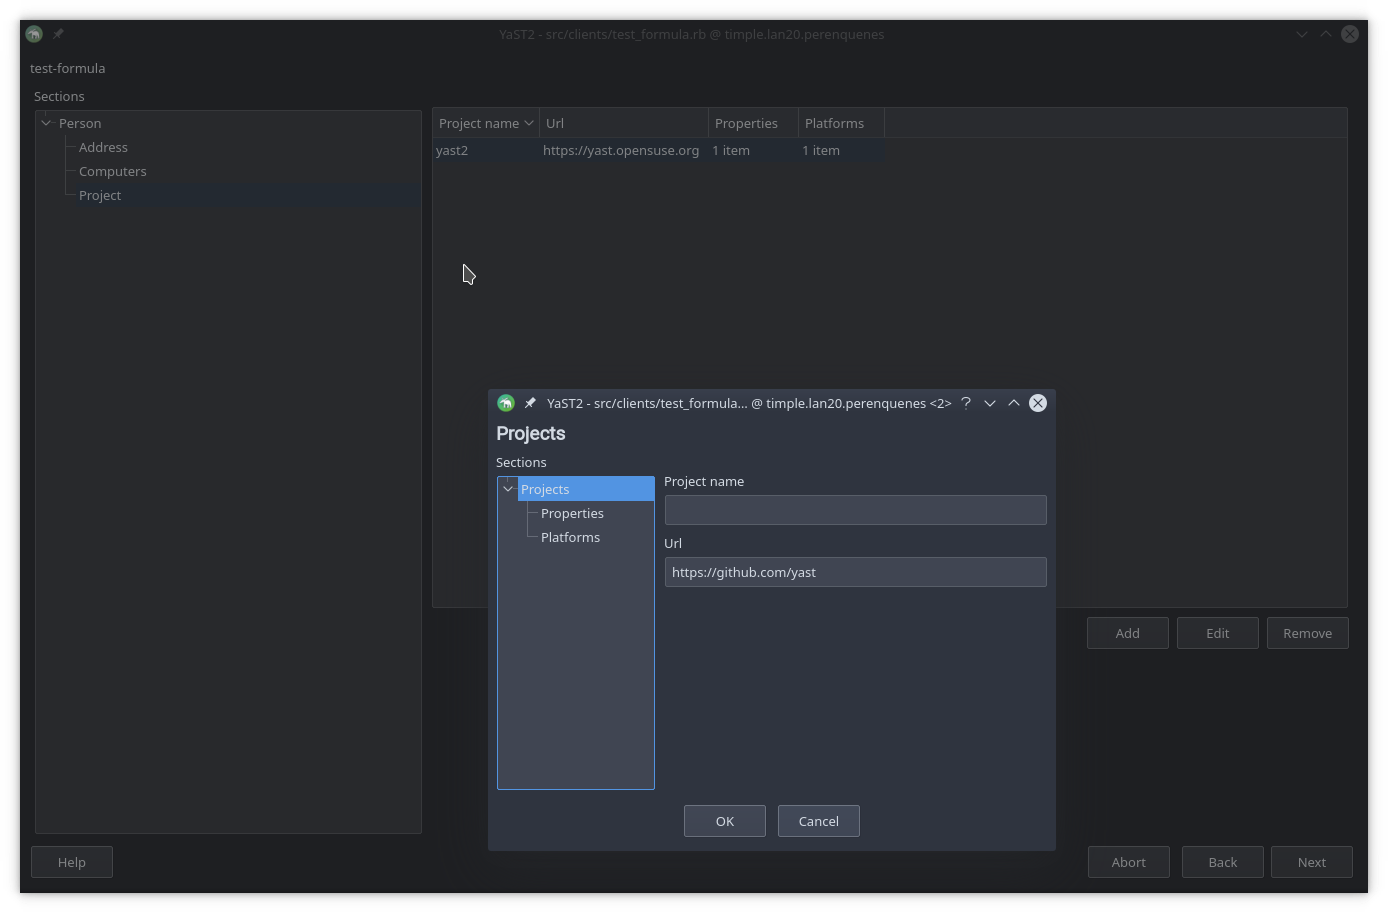
AutoYaST Pre-install Scripts & Storage

AutoYaST has a special feature to allow users to customize the installation process and take control in different stages of the installation. For that, the AutoYaST profile offers a section where you can insert your custom scripts. There are four types of scripts: pre-scripts, postpartitioning-scripts, chroot-scripts, post-scripts and init-scripts.

For the particular case of pre-scripts, the documentation states that “It is also possible to change the partitioning in your pre-script“. That means, for example, you could use a script to create a new partition or to configure some kind of technology. Therefore, it would be very convenient to re-analyze the storage devices after running the user pre-scripts. In fact, that was the default behavior in the old storage stack, but the new one was slightly modified to only re-analyze the system under certain conditions.

But turns out some SLE customers were using pre-scripts to configure the behavior of multipath and those changes were not being noticed by AutoYaST.

The solution was quite trivial. We simply decided to always perform a new storage re-analysis after the AutoYaST pre-scripts. We did not find strong reasons to not do it and there should not be significant performance penalty.

And, for the specific case of multipath, YaST now copies some configuration files (e.g., /etc/multipath.conf and /etc/multipath/bindings) to the target system when performing a new installation. Otherwise, the installed system would not contain the configuration applied during the installation.

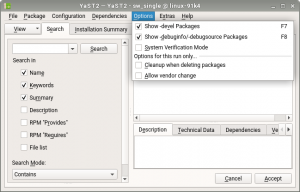
Clarifying the Usage of Software Management Options

Our software manager is one of the most complex YaST modules, which makes some aspects of its usage not fully obvious for some users. You may have even notice that is the only YaST module in which the interface is clearly different when executed in text and graphical mode. Specially the menu at the top of the interface, which is organized in different sections.

Some users where confused by the fact of some options not being persisted between different executions of the module. Those options are there to modify the current operation of the module, not to change the configuration of package management in the system.

When executed in text mode that was clear because such options where labeled as “temporary change” but the graphical mode didn’t have any indication about it. As you can see in the following screenshot, that’s fixed now.

Temporary options in YaST Software

Product License Hard to Understand? Try Another Language!

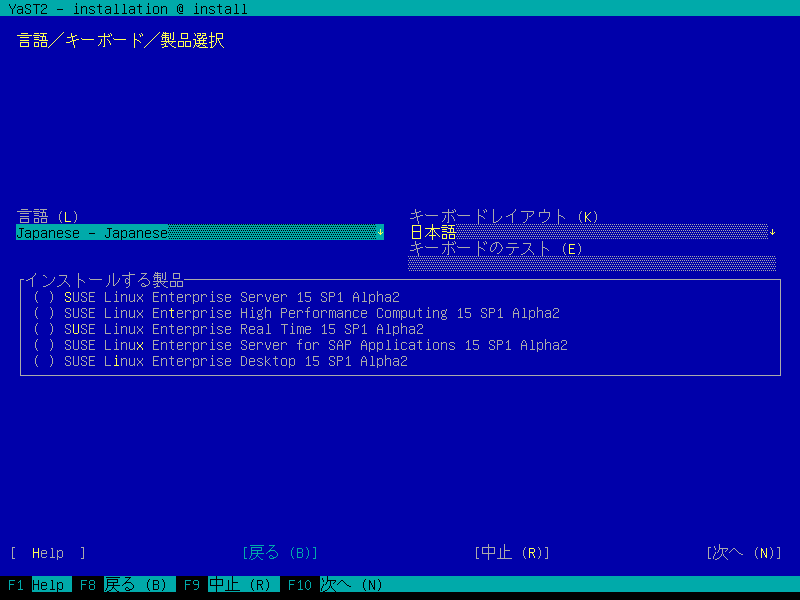
Some user reported that in the text-mode installation it was impossible to switch the language of a product license. Although during graphical installation everything works flawlessly, in text mode the language switching widget was there… but disabled.

The point is that such behavior was not exactly a bug. It was in fact done on purpose. We decided to prevent such language change some time ago because on the Linux console we’re not able to display the characters of many languages. Hopefully some of our usual reader have just shout “that’s not true!” 😉 Those users remember that in the report of our 67th sprint we explained that now we always use fbiterm when installing in text mode in order to be able to display characters of almost every language.

We are now able to display all languages that currently have license translations, so we have enabled the language switching widget and now both graphical installation and text-based one deliver an equivalent user experience.

More about languages

This is not the only change related to internationalization we did in these sprints. We also added a specific warning message for situations in which YaST is used to change the language of the system but there is no repository containing the needed translation packages. Something that obviously only affects users configuring system in very restricted environments.

As you can see in this and other recent reports, we have to deal relatively often with difficulties related to translation and internationalization. To reduce the effect of those problems on our final users, we also added some extra mechanisms to detect internationalization errors introduced during development. Hopefully that will mean that in future reports the space dedicated to comment language-related problems gets shorter and shorter. 🙂

And that was just a summary!

As long as this post looks, there are many interesting things we have done in these weeks we left out, intentionally or not. We definitely should avoid skipping three reports in a row in the future!

This week it’s Hack Week at SUSE, which means regular YaST development will be put on hold… or will turn into something completely different. You never know what the result of a Hack Week can be!

But in any case we will go back to our sprint-based pace in August. So expect a new blog post in three weeks. See you then!

Getting further with Btrfs in YaST

June 19th, 2019 by

Since the YaST team rewrote the software stack for managing the storage devices, we have been adding and presenting new capabilities in that area regularly. That includes, among other features, the unpaired ability to format and partition all kind of devices and the possibility of creating and managing Bcache devices. Time has come to present another largely awaited feature that is just landing in openSUSE Tumbleweed: support for multi-device Btrfs file systems.

As our usual readers surely know, Btrfs is a modern file system for Linux aimed at implementing advanced features that go beyond the scope and capabilities of traditional file systems. Such capabilities include subvolumes (separate internal file system roots), writable and read-only snapshots, efficient incremental backup and our today’s special: support for distributing a single file system over multiple block devices.

Multi-device Btrfs at a glance

Ok, you got it. YaST now supports multi-device Btrfs file system… but, what that exactly means? Well, as simple as it sounds, it’s possible to create a Btrfs file system over several disks, partitions or any other block devices. Pretty much like a software-defined RAID. In fact, you can use it to completely replace software RAIDs.

Let’s see an example. Imagine you have two disks, /dev/sda and /dev/sdb, and you also have some partitions on the first disk. You can create a Btrfs file system over some devices at the same time, e.g., over /dev/sda2 and /dev/sdb, so you will have a configuration that looks like this.

        /dev/sda                /dev/sdb
            |                       |   
            |                       |   
     ---------------                |   
    |               |               |   
    |               |               |   
/dev/sda1       /dev/sda2           |   
                    |               |   
                    |               |   
                     ---------------
                            |   
                          Btrfs
                            |   
                            |   
                            @ (default subvolume)
                            |   
                            |   
                 -----------------------
                |       |       |       |   
                |       |       |       |   
              @/home  @/log   @/srv    ...

Once you have the file system over several devices, you can configure it to do data striping, mirroring, striping + mirroring, etc. Basically everything that RAID can do. In fact, you can configure how to treat the data and the Btrfs meta-data separately. For example, you could decide to do striping with your data (by setting the data RAID level to the raid0 value) and to do mirroring with the Btrfs meta-data (setting it as raid1 level). For both, data and meta-data, you can use the following levels: single, dup, raid0, raid1, raid10, raid5 and raid6.

The combination of this feature and Btrfs subvolumes opens an almost endless world of possibilities. It basically allows you to manage your whole storage configuration from the file system itself. Usage of separate tools and layers like software-defined RAID or LVM are simply dispensable when using Btrfs in all its glory.

Managing multi-device Btrfs with the YaST Partitioner

Interesting feature indeed, but where to start? As usual, YaST brings you the answer! Let’s see how the YaST version that is currently being integrated in openSUSE Tumbleweed will ease the management of this cool Btrfs feature. SLE and Leap users will have to wait to the next release (15.2) to enjoy all the bells and whistles.

First of all, the Btrfs section of our beloved Expert Partitioner has been revamped as shown in the following picture.

New Btrfs section of the Partitioner

It lists all the Btrfs file systems, single- and multi-device ones. You can distinguish them at first sight by the format of the name. The table contains the most relevant information about the file systems, alongside buttons to add a new file system and to delete and modify the existing ones.

Existing Btrfs file system can be inspected and modified in several ways. The “Overview” tab includes details like the mount point, file system label, UUID, data and meta-data RAID levels, etc. The file system can be edited to modify some aspects like the mount options or the subvolumes.

Overview of a Btrfs file system

In addition, the tab called “Used Devices” contains a detailed list of the block devices being used by the file system. That list can also be modified to add or remove devices. Note such operation can only be done when the file system does not exist on disk yet. Theoretically, Btrfs allows to add and remove devices from an already created file system, but a balancing operation would be needed after that. Such balancing operation could take quite a considerable amount of time. For that reason it has been avoided in the Expert Partitioner.

Devices of a Btrfs file system

Of course, you can still format a single device as Btrfs in the traditional way (using the “edit” button for such device). But let’s see how the new button for adding a Btrfs file system opens new possibilities.

Adding a Btrfs file system

Similar to the RAID dialog, you have the available devices on the left and you can select the devices where you want to create the file system, and also you can indicate the data and meta-data RAID levels. Of course, the admissible RAID levels will depend on the number of selected devices. You will go to the second step of the Btrfs creation by clicking the “Next” button. In this second step, you can select the mount options and define the subvolumes, see the next image.

Options for a new Btrfs file system

And apart of all that, the Expert Partitioner has received several small improvements after including multi-device Btrfs file systems. Now that the multi-device Btrfs file systems are considered first class citizens, they are included in the general list of devices. Note the “Type” column has also been improved to show more useful information, not only for Btrfs but for all kind of devices.

Revamped list of devices

What else works?

But YaST goes far beyond the Partitioner. We have also ensured the storage proposal (i.e. the Guided Setup) can deal with existing multi-device Btrfs configurations when you are performing a new installation. Moreover, the upgrade process is also ready to work with your multi-device Btrfs file system.

Last but not least, AutoYaST can now also be used to specify that kind of Btrfs setups. The official AutoYaST documentation will include a specific section about advanced management of Btrfs file systems on top of several block devices. The content is being reviewed by the SUSE documentation team right now.

What does not work (yet)?

There is still one scenario that is not 100% covered. As described in bug#1137997, is still not possible to use the “Import Mount Points” button in the Partitioner to recreate a multi-device Btrfs layout. But fear not, it’s in our list of things to fix in the short term!

Get it while it’s hot

Free Software development is a collaborative process and now we need YOU to do your part. Please test this new feature and report bugs if something does not work as you expected. And please, come with your ideas and further improvements and use cases. And, of course, don’t forget to have a lot of fun!

Highlights of YaST Development Sprint 75

April 10th, 2019 by

With the upcoming releases of openSUSE Leap 15.1 and SLE-15-SP1 approaching, the YaST Team at SUSE is investing a quite significant time in polishing details and fixing small (and not so small) bugs. But fortunately, that still leaves us enough time to also work in our mid term goals.

So welcome to our usual selection of selected bug-fixes (listing them all would be boring) and exciting new stuff. This edition includes:

  • A nice howto for reporting Snapper bugs
  • Tons of fixes for right-to-left languages like Arabic
  • Some adjustments and improvements in the storage area
  • A sneak peak into the future of the yast2-network code
  • Some contributor-oriented content: like our new pull request templates and revamped Docker images for testing

Snapper Bug Reporting Howto

During this sprint we fixed a bug that was causing Snapper to crash under very specific circumstances. The scenario was quite unusual so we had to request quite some information from the reporter of the bug to confirm what was happening. As a nice consequence, in addition to having now a more robust Snapper (one bug killed) you can also enjoy a new page in the openSUSE wiki listing the information you should attach to Bugzilla if you find a bug in Snapper while using (open)SUSE.

Which is also a nice excuse to remind you about the equivalent "Report a YaST bug" page.

YaST around the globe… in all directions

Many of the YaST users and of our blog readers are not native English speakers that surely appreciate the fact that YaST and (open)SUSE in general can be used in several languages. But have you ever thought about the implications of developing a multi-language software? Sure? In all of them? 😉

Human languages are so diverse as the human cultures and there are many details to take into account, from the usage of different alphabets to the various ways of dealing with genre or number (in English the words have just one form for singular and another for plural, but that can be way more complex in other languages). In today’s issue we will take a look to one of our favorite translation issues – languages that are written from right to left, like Arabic.

The installer summary in Arabic

Dealing with text that is a mixture of Latin and Arabic script is complex and sometimes we have to deal with interesting bugs. Fortunately we have our own weapon to fight those bugs. If in Star Wars they have protocol droids like C3PO, in the YaST team we have Martin Vidner, which is the closer human equivalent.

He fixed all the reported bugs and even created a tool to help debugging similar problems in the future. You can find the source code of that tool in Github. There is even a hosted instance of the tool to be used by translators or anyone who is curious.

Now, even complex interfaces like our Partitioner look correct enough in right-to-left languages, so we will not have to send mirrors to all our Arabic users.

The YaST Partitioner in Arabic

If you want to know more about this exciting but very complex problem of bidirectional texts, you can start with the following documents.

  • Martin’s great summary of the types problems found in YaST and their respective solutions.
  • Wikipedia: Bi-directional text, an overview of the concepts
  • Unicode Standard Annex #9: Unicode Bidirectional Algorithm, the gory details, 50 pages of them
  • More Arabic YaST

    On related news, we got also some reports about some problems visualizing bullet-points in Korean with the beta versions of the future SLE-15-SP1. But as we could verify, all those problems are gone now.

    SLES installer in Korean

    Storage Fixes

    Other area that has received some attention in this sprint is the storage management. Three related features needed adjustments before the upcoming (open)SUSE releases:

    • Fixed the detection of the boot disk in the Partitioner warnings.
    • The Guided Setup now works better when doing several attempts in different disks.
    • AutoYaST can now install over NFS.

    One of the last storage features that the YaST Team has developed is the support for Bcache devices in the Expert Partitioner. While our QA team was testing it, they found a bug. The Partitioner was complaining because the boot disk did not contain a partition table, which is a mandatory condition for a Legacy (non-UEFI) x86 system. But it was a bogus warning, since they had actually defined a /boot partition in another disk.

    That’s how we found that our Partitioner gets confused if there is a separate partition mounted at /boot and located in a different disk than the root file-system. The Partitioner insisted in considering the disk containing / to be the one that would be using for booting, instead of checking the structure of the disk containing /boot. Now that is fixed and the improvement will be available for the upcoming SLE 15 SP1, Leap 15.1 and, of course, openSUSE Tumbleweed.

    But that was not the only storage bug fixed just in time for the upcoming releases. Some sprints ago, the Storage Proposal algorithm for the initial proposal was modified to try installing on each of the individual disks. If the installation was not possible over a given disk, even after disabling all optional configurations (e.g., snapshots and separate /home), a new proposal is tried over the next disk and so on. The problem was that the disabled options in the previous attempt were not restored back when switching to the next disk. This caused some ugly side effects, for example, if the swap partition was disabled when trying over the first disk, then the proposal did not try to create a swap when it was performing the proposal over the next disk. But now this is also fixed and it will work as expected.

    And last but not least, AutoYaST now supports to install over a Network File System (NFS). This feature was left back when the new YaST storage stack was re-implemented for SLE 15 GA. Actually, this is a non documented feature. That’s why we overlooked that SUSE 12 was able to do it using some hacks and a non-validating AutoYaST profile. But no worries, the feature is available again and such profile will work now in any updated SLE-15 or Leap 15.0. Of course, it will also work while installing SLE-15-SP1 or openSUSE Leap 15.1 and Tumbleweed.

    Nevertheless, we are working on a better and documented way of supporting that scenario in the future, with no need to twist the specification of the AutoYaST profile. Stay tuned for more information.

    Rethinking the Location of Special Boot Partitions

    And now that the storage layer looks sane and healthy for the upcoming releases, we also took some time to think about future improvements. As you know, the storage Guided Setup always proposes to create special boot partitions as needed on each case. That can be a BIOS BOOT (for Legacy x86 systems with GPT), an ESP (for UEFI systems), PReP (for PPC systems) or zipl (for S/390 systems). Strictly speaking those partitions doesn’t have to always be in the same disk than the root partition and in some cases having it on a separate one can have some advantages (like sharing the ESP partition with another operating systems).

    But we have been reconsidering all the cases, the expectations of most users and of the majority of BIOS vendors and the known bugs in other operating systems about sharing boot partitions. We have decided to be more strict in the future about the location of those partitions. Starting today with openSUSE Tumbleweed and in the 15.2 releases of openSUSE Leap and SLE, the Guided Setup will always propose those partitions in the system disk. That is, in the disk containing /boot and the root filesystem.

    The future of YaST Network is here

    Those who follow this blog know that we invested quite some time on the last couple of years rewriting the part of YaST that was more buggy and harder to modify – the storage stack. And surely you have already noticed that since we did it we are introducing new features at a very good pace (like bcache, more powerful Partitioner, Raspberry Pi support, etc.) and fixing the reported bugs in a matter of days or even hours.

    The next in our list of YaST areas to revamp is the networking support. And we are happy to announce that we are starting to have some visible results in that. There is still a very long road ahead and we will provide more information in upcoming reports. But at least we have already a preview of a fully rewritten management of network routes. It’s still not available in openSUSE Tumbleweed. But for those who can’t wait, here you can see the first screenshot. All based in new and clean code backed by automated tests.

    New network routing dialog

    Activating Online Repositories in openSUSE Leap 15.1

    The openSUSE Tumbleweed installer asks at the beginning of the installation whether to activate and use the online repositories when a network connection is available.

    The reason is that the installation DVD does not contain all available packages because of the limited media size. Another advantage is that the installer might directly install newer packages than on the media, this avoids installing the older versions first and then upgrading them to the latest version.

    However, in some case you might not want to use the online repositories, for example if the network connection is slow or is paid.

    We got a bug report that this question was missing in the Leap 15.1. It turned out that the control.xml file which drives the installer did not contain this step. After adding few lines into the file you can now enjoy the online repositories also in Leap 15.1!

    Online repositories in Leap 15.1

    Why are we writing about this? The reason for the missing step in the Leap 15.1 was a bit surprising. Normally all YaST packages are developed in the Git master branch for both Tumbleweed and Leap. However, in this case the Leap 15.1 has been already branched and was developed separately, the changes in the master went only to the Tumbleweed. And we overlooked that small difference when adding this step.

    To avoid this in the future we added a pull request template with a reminder which informs the developers about this difference in the Git setup when opening a pull request.

    If your project also has some unusual setup then the pull request template might a good reminder for you as well.

    Building the Docker Images in OBS

    But the reminders about the correct branches and procedures is not the only news we have for YaST contributors and main developers. As you may remember, few years ago we switched to using Docker at Travis. That works well but we found some disadvantages of that initial setup.

    • You need extra account at the Docker Hub to manage the images.
    • There is no link between OBS and the Docker Hub, we cannot easily trigger image rebuild when a package is updated in OBS.
    • We only blindly triggered the rebuild every 2 hours (in some cases the rebuild is not necessary, in some cases it took too much time).
    • The Docker Hub can use the new OBS packages only after they are published by OBS.
    • The build at the Docker Hub is quite slow (~20 minutes in our case), if an image is currently being built the build is added into the queue and it will start after the previous builds are finished.

    The result is that a new package can be available in Travis several hours after merging the pull request. And even after triggering the build manually it still might take more than one hour.

    We needed a faster cycle and the solution, as usually happens, was in the openSUSE ecosystem. As you may know, the Open Build Service is able of much more than just building packages. So we decided to make use of the OBS capacity of building Docker images.

    Building both our packages and our Docker images in OBS comes with many advantages:

    • The image build is started immediately when the new packages are built, it does not wait for publishing the packages and does not wait for full rebuild (only for the needed packages).
    • No extra accounts/permissions (just use your OBS account).
    • The build in OBS is faster (6-7 minutes).
    • No need for extra Jenkins jobs periodically triggering the image rebuilds.

    This means the new packages should be available in the Docker image in about 10-15 minutes after merging a pull request (for leaf packages, changing a core package which triggers a complete YaST rebuild will of course take more time).

    If you want to learn more about this topic, take a look to the following links:

    And that was not all!

    As usual, the content of this report is just a small subset of all the work the YaST Team does in two weeks. In this sprint, most of that work went to fixing all kind of bugs in preparation for the next releases. Big bugs, small ones, hidden bugs and embarrassingly obvious ones. Hopefully, you got a fix for your reported bug. If not, you can always stay tuned for more news after the next sprint. And don’t forget to have a lot of fun!

Highlights of YaST Development Sprint 71 & 72

February 27th, 2019 by

We know we owe you a report for the previous development sprint (namely the 71th). But we also know how to compensate that. This week we have not only one, but up to three blog posts to keep you tuned to the YaST evolution.

So let’s start with the summary of what have been implemented and fixed lately. That includes

  • Improvements in the Bcache support in the Partitioner
  • Users home as Btrfs subvolumes
  • Better visualization of Salt formulas in YaST Configuration Management
  • Automatic selection of the needed driver packages
  • Improvements in many other areas like AutoYaST, bootloader, the Partitioner and the storage Guided Setup

You will find links to the other more exhaustive blog posts, about the recently added Bcache support and the revamped Configuration Management module, in the corresponding sections of this report.

Final Improvements in the Bcache Support

During several sprints, we have been detailing our efforts to offer a decent support for the Bcache technology in the YaST partitioner. During this sprint we have implemented what we consider the three final bits:

  • Bache devices without caching
  • Modifying Bcache devices
  • Listing all caching sets

We will now detail this three improvements. But to celebrate that Bcache support looks complete now in the Partitioner, we have published a separate blog post explaining what Bcache is and how to take advantage of that technology using the YaST Partitioner. Enjoy!

And back to the topic of recent improvements, we should mention that the Bcache technology allows to create a Bcache device without an associated caching one. This is useful if you are considering to use Bcache in the future. In that case you can setup all your slow devices as Bcache backing devices without a cache, leaving open the possibility of adding caching devices later. That is now possible by selecting the new option labeled “without caching” during creation, as shown in the following screenshot.

No caching device in Bcache

Of course, that’s not much useful without the possibility of modifying a Bcache device. So in the latest sprints we also added a new “Change Caching” button.

New option to modify a bcache

This option will only work for bcaches that do not exist in your system yet (e.g., a bcache that you are creating right now). For existing bcache devices, this option is only available when the bcache has no associated caching device yet. Otherwise, a detaching action would be required, and that could take very long time in some situations.

Avoiding detach operations in bcache

And last but not least (regarding Bcache), now the Expert Partitioner also shows the list of all caching sets in a separate tab (unsurprisingly) titled “Caching Set Devices”. It is only an informative tab, but thanks to it you will be able to check all devices currently used for caching at a quick glance.

List of caching sets

Create the User’s Home as a Btrfs Subvolume

As many (open)SUSE users know, Btrfs offers several advantages over traditional Linux file-systems. One of them is the possibility of using subvolumes to customize the configuration and features of different parts of the same file-system.

From now on, the YaST Users module allows to create the home path of new users as a subvolume instead of a plain directory, as long as a Btrfs file-system could be found in the system, of course. As simple as checking the “Create as Btrfs Subvolume” option that you will find just below the “Home Directory” field.

Using a Btrfs subvolume as home

In a multi-user system, using Btrfs subvolumes for the home paths of the users can open a world of possibilities. The system administrator can decide to give some users the ability to create snapshots of their corresponding home directories, even automated on every login and/or logout using PAM Snapper. Similar ideas can be applied to a Samba deployment. Moreover, using subvolumes as homes can also be useful to implement per user quotas.

Beyond multi-user systems, fine-tuning the mount options or customizing snapshots and quotas can also be useful for some special system users (e.g. the user associated to a database system).

And all that, as always in YaST, equally easy to configure with the graphical interface and with the text-based one.

Moreover, using subvolumes as homes can also be useful to implement per user quotas, ncurses version

Better Visualization of SUSE Manager Salt Formulas

As we announced on January, we have been working on updating the SUSE Manager Salt Formulas support in YaST Configuration Management to comply with the latest forms specification. As it happens with the Bcache support, we feel we have reached a point in which the feature is polished enough to be shipped in the next (open)SUSE stable releases and to deserve its own separate blog post. So go and enjoy our third blog post of this week, a sneak peak into the marriage of SUSE Manager and YaST, thanks to the magic of Salt Formulas.

In that regard, we have been recently improving how the forms look like to make them as easy to use as possible. Bear in mind that a form can be quite long and the support for scrolling in YaST2 is quite limited. In order to workaround this problem, YaST2 will display a tree at the left side outlining the structure of the form.

Tree view of long salt formulas

Apart from that, we have solved some known problems, like exporting date/time and numeric values in a correct way or handling missing and default values properly.

Sure there are some details that we like to improve but, for now, what we need is feedback from you. So, if you are interested in such a functionality, please check the mentioned dedicated blog post about the topic and have a look to yast2-configuration-management 4.1.5.

Automatically Selecting the Driver Packages in Installed System

In openSUSE Leap 15.0 and SUSE Linux Enterprise 15, the packages containing drivers needed by the system are installed automatically if they are available during the installation. However, if a repository with driver packages is added later in the installed system then the drivers are not automatically selected to install.

Fortunately, in Leap 15.1 and SLE-15-SP1 the package solver implements a new solver mode in which it selects for installation only the recommended driver packages, without also dragging other non-driver recommended packages into the system.

For example, after adding the nVidia driver repository in Leap 15.1 (YaST ➝ Software Repositories ➝ Add ➝ Community Repositories, select “nVidia Graphics Drivers”) and starting the package manager (YaST ➝ Software Management), the respective nVidia driver packages are automatically selected to install if there is a supported nVidia graphics card present in the system. This of course works also for the other driver packages and hardware devices.

Just a last note about automatic selection of recommended driver packages. When running the package manager for the first time in a recently installed openSUSE Leap 15.1, it might automatically select some additional packages to install coming from the Leap OSS on-line repository (which is added automatically the end of the installation). Do not be surprised, that’s actually desired. If you do not want to install those packages simply deselect them, YaST will remember that and it will not select them next time.

See more details in the corresponding documentation.

Improved Disk Selection Screen in the Storage Guided Setup

Although it may sound surprising for some users, it’s not uncommon to install SUSE Linux Enterprise on systems with dozens or even hundreds of disks. Of course, in those advanced scenarios the automatic partitioning proposal is not much useful and users are expected to use the Expert Partitioner. But, what if someone tries to use the partitioning Guided Setup in a system with 30 disks? In SLE-15 (or Leap 15.0, in the case of this concrete screenshot) they will see a screen as unusable as this.

Broken Guided Setup screen

Of course, it only gets worse if the number of disks increases or if the text-mode interface is used. So we improved the disk selection screen, taking also the opportunity to include additional information to make easier to identify removable devices like USB and IEEE 1394 ones. In future releases, the screen will normally look pretty much as it looks in the previous version, just with the extra information about USB.

Normal Guided Setup screen

But if the system contains more than 10 disks to choose from, then a different widget that makes scrolling possible will be used, ensuring the user interface remains usable enough in both graphical and text-based modes.

Guided Setup screen with more than 10 disks

YaST Bootloader Becomes Less Whinny

When the installation of the system is spread over multiple physical disks, YaST Bootloader always tries to setup the bootloader in all those disks. This helps for example when MD RAID is used to achieve redundancy and some disk fails. Then the system can still boot from any of the other disks, since they also contain a proper bootloader.

But in some cases the installation can be spread over multiple disks but with only one of them being prepared to host the bootloader (e.g. containing the needed partitions). YaST bootloader used to complain about it while generating its proposal, which resulted in an error shown during installation.

In this sprint we have relaxed the YaST Bootloader expectations a bit. It still tries to create a fail-over setup, but the proposal does not complain if at least one disk looks bootable. Additionally if Grub2 is properly installed to at least one device, then possible failures in other disks will not result in an error pop-up, but just logged for future reference.

Device Order for MD RAIDs in AutoYaST

During the development of storage-ng, the feature to specify the device order for MD RAIDs with AutoYaST was lost. The feature can be useful for RAID level 10 to ensure that one full half of the RAID will only reside on one disk subsystem and the other half on the other subsystem. Only then a complete failure of a single subsystem keeps the RAID working.

Now the feature has been re-implemented for Leap 15.1 and SLE-15-SP1 and the “device_order” tag of the AutoYaST profile works as expected. For further information about configuring RAID with AutoYaST, consult the AutoYaST documentation.

Improvements in the Partitioner

That AutoYaST feature was not the only thing that temporarily disappeared with the replacement of the old storage components by storage-ng. The “Provide Crypt Passwords” button in the Partitioner was also not there in the early versions included in openSUSE Leap 15.0. But it was not really an omission, but a consequence on how the activation of logical devices works now in YaST.

During installation, all pre-existing logical devices that need some initialization are always activated to make possible to use them. That includes LVM, Multipath devices (for which a user confirmation is requested) and encrypted devices (for which the password is asked to the user). But triggering such activations in an already installed and running system cannot be done so lightly, since it affects the execution of the whole system.

Still, there are cases in which a user executing the YaST Partitioner in an already installed system may desire to activate currently inactive devices. To allow that we brought back the “Provide Crypt Passwords” button, but with two small changes compared to its historical behavior.

  • It activates all kind of devices, not only the crypt ones.
  • It refreshes all the Partitioner information, reading again the status of all the storage devices.

Provide Crypt Passwords button

Of course, any change in behavior is a nice opportunity to revisit and expand the help texts.

The button explained

Another change that was intentionally introduced in the first versions of the rewritten Partitioner was the fact that new file-systems always got an empty label by default, independently of the previous content of the partition being formatted.

But the old Partitioner used to do things differently when reformatting a partition. In that case, it actually copied the label of the previous file-system into the new one. Some users told us (via bug reports) they wanted the old behavior back, so now the Partitioner preserves the old label when a partition is reformatted.

Wow, that was a lot!

As usual, this report only covers a small portion of what the YaST Team has been doing. But definitely this time our readers will have enough material to keep themselves entertained for quite some time. Specially combining this with the two already mentioned monographic posts about the Bcache support and about the compatibility with SUSE Manager Salt Formulas.

Have a lot of fun reading!

Highlights of YaST Development Sprint 67

November 20th, 2018 by

Time flies and another development sprint has finished for the YaST team. During it we have focused on improving the installation process, refining it and adding new features to unleash new possibilities. That includes:

  • More options to configure Kubic during installation.
  • Several improvements in the storage proposal.
  • Easing the network configuration and the usage of online repositories in openSUSE.
  • Improving installation in text mode for CJK and other languages.
  • Configuring SSH access during installation and in a running system.
  • And many other small fixes here and there!
  • Many of these features will be already available in openSUSE Tumbleweed during November (the sprint just finished November 16th and the integration process usually takes some days), others will be visible for the first time in the next SLE-15-SP1 and Leap 15.1 Alpha versions.

    New Dialogs in the openSUSE Kubic Installation

    The SUSE CaaSP and the openSUSE Kubic products got a new installation workflow some time ago. Originally they used a specific installation workflow (a single all-in-one configuration dialog), but the problem was that many openSUSE/SLE installation features were missing because the installer code was completely different.

    That has been changed some time ago to use the usual installation as in standard SLE or openSUSE products. You can read the details about the new installation workflow at the Kubic wiki page.

    However, the CaaSP or Kubic products required some more specific settings depending on the selected role. During this sprint we have added the corresponding steps to the installation.

    New installation steps for openSUSE Kubic

    Currently the extra dialog only asks for the NTP server address, but some more options can be added later.

    Improve Textmode Support for CJK and Other Languages

    YaST is able to cope with many languages even when running in textmode. When a user wants to run the installer in textmode using some specific languages -like Chinese, Japanese or Korean-, YaST will use a special terminal emulator called fbiterm which is able to display the characters which are needed in those languages.

    Now, instead of keeping two different approaches depending on the language, YaST will try to use this special terminal emulator whenever is possible for all text based installations. Unfortunately, there is a small set of languages that are not properly handled by fbiterm. In those cases, YaST will inform the user about the problem and it will fall back to English.

    YaST installing SLE-15-SP1 in Japanese

    As a side effect of this unification, the font used during the textmode installation has changed for all the languages that didn’t used fbiterm in the past. So your SUSE or openSUSE installation may now look slightly different.

    Storage proposal: playing nicely with Intel Rapid Start Technology

    Intel Rapid Start Technology (shorted as IRST) enables systems to quickly resume from deep sleep (e.g. if your battery runs out). It’s a firmware-driven technology that relies on the existence of a special partition located on a SSD (solid state device).

    But our partitioning proposal (the so-called Guided Setup) was not aware of the important role of such partition, so it sometimes proposed to delete it in order to use the freed space for installing (open)SUSE on top.

    We have improved that and now the IRST partition will only be deleted as a last resort, if deleting all other allowed partitions in the disk is still not enough to make the new system fit. Moreover, an IRST partition located in the same disk than a Windows system will only be deleted if the user explicitly allows the storage proposal to delete that Windows installation.

    Running the storage proposal on top of software RAIDs and USB devices

    But that’s not the only improvement done in the area of the partitioning guided setup. We have also broadened its usefulness by allowing it to be used on top of new kinds of devices.

    First of all, it’s now possible to execute the guided setup on top of a software MD RAID. For that, the candidate RAIDs has to fulfill one of two conditions: to contain a partition table or to be completely empty (which includes not being formatted, encrypted or used for any other purpose). That is not only another step to take advantage of the relatively recent capability of YaST to partition software RAIDs (thanks to libstorage-ng) but also a very natural way to support the usage of Dell EMC PowerEdge RAID controllers S130 and S140, which offer an hybrid solution based on software RAIDs but backed up by a firmware-driven configuration.

    Partitioning proposal on top of a software MD RAID

    Almost for the same price, we decided that it was time to offer the available USB devices as candidates for the guided setup, even when there are also non-USB candidates. Excluding, of course, the installation media (except when performing a network-based installation, in that case the USB device can be reused to install the system).

    As usual, these features will be soon available in openSUSE Tumbleweed, as well as in the next stable versions of openSUSE Leap (15.1) and SUSE Linux Enterprise (SLE-15-SP1).

    Fine-tuning the initial storage proposal

    All the described changes open new possibilities for the users to decide where to execute the storage proposal. But as our users already know, when the installer reaches the storage proposal step for first time (before the user has had the chance to run the Guided Setup or the Expert Partitioner), an initial proposal is automatically calculated and displayed. This proposal is performed without user intervention, and all necessary information is taken from the control file of the current product. For example, whether to create a separate home, or whether to enable snapshots for root, etc.

    During the previous sprint, this initial proposal was already improved to make an attempt over each individual disk instead of considering all disks together. Now we have improved this behavior to not discard the first disk so early, even if that means getting a smaller (open)SUSE system.

    For example, let’s image we have a system with a first small SSD disk of 40 GiB and a second big Hard Disk of 1 TiB, which is a relatively common configuration for laptops. Since the first disk is too small to allocate a system with the optimal partition sizes and a separate /home partition, the installer used to switch to the second disk, in which it could propose a root partition of the recommended size to use Btrfs snapshots (50 GiB) and a partition for /home bigger than the 40GiB specified as minimum for it in the product description.

    Initial storage proposal before the latest change

    Now, more attempts will be performed in the first disk before giving up and moving to the next one. So, when the proposal is not possible with the desired sizes and with all the optional devices enabled, it will try to disable some optional settings and to relax the size requirements (using the minimum sizes instead of the recommended ones). In the following screenshot you can see the result of this adjusted initial proposal.

    Initial storage proposal after the latest change

    Tumbleweed: Add Online Repositories during Installation

    We added a step in the installation workflow to enable online repositories. This means you can now get the latest packages installed immediately during installation instead of installing older versions from the installation media first and later updating them to the latest versions from the openSUSE servers.

    Also, because of disk space limitations, the installation media don’t contain all the packages that openSUSE provides and thus not all system roles; some of the less frequently used desktops, for example, had not been available in the role selection (formerly desktop selection) dialog. With online repositories, they are now available immediately during installation.

    For details, see the corresponding pull request.

    Choosing the network backend

    And more changes to the installer you will be able to enjoy very soon in openSUSE Tumbleweed and also in the upcoming openSUSE Leap 15.1. Now it’s possible to choose the network backend, wicked or NetworkManager, to be used in the final installed system from the Network proposal.

    As easy as a click on a hyperlink, as you can see in the images below.

    New shortcut to change the network backend

    Managing SSH public keys

    When you want to access to a system via SSH, it is a good practice to use public key based authentication instead of the common password-based approach. For that reason, we have added support to handle authorized SSH public keys in the user and group management module, also known as the users module.

    Configuring SSH in yast2-users

    Additionally, you will be able to set up a public key for the root user at installation time, something that can be especially handy for products like the SUSE CaaS Platform.

    And it keeps moving!

    The YaST crew keeps working hard on fixing bugs and, specially, on building new features for everybody to enjoy in the upcoming versions of all the products of the SLE and openSUSE families. So, as much as we would like to keep talking to you all about all the improvements… it’s time to go back to coding! See you again in two weeks with a new report.

Highlights of YaST Development Sprint 64

October 9th, 2018 by

Another two weeks of development, another report from the YaST team. During this sprint, we have been working to improve the usage and installation experience in many areas, including but not limited to the following.

  • Improvements in several areas of the Partitioner.
  • More informative Snapper.
  • Better integration of the new Firewall UI with AutoYaST.
  • Improvements in roles management and in the roles description.
  • Better support in YaST Firstboot for devices with no hardware clock, like Raspberry Pi.

Let’s dive into the details

Changes in the Partitioner UI to Unleash the Storage-ng Power

We have explained already in several previous posts how we were struggling to come up with a set of changes to the user interface of the Partitioner that would allow to expose all the new functionality brought by storage-ng, while still being familiar to our users and fitting in a text console with 80 columns and 24 lines.

We finally implemented the interface described in this gist, which fits into a 80×24 text console and allows all kind of operations. Check that document for more info about the behavior and its rationale.

But what does “all kind of operations” mean? For example, it means it’s possible to start with three empty disks and end up creating this complex setup using only the Partitioner.

Complex storage setup

  • In that example, /dev/md0 is an MD RAID defined on top of two partitions and formatted as “/”. Nothing impressive here so far.
  • /dev/md1 is an MD RAID defined on top of a combination of full disks and partitions. Using disks as base for a RAID was not possible in the old Partitioner.
  • Even more, /dev/md1 contains partitions like /dev/md1p1 and /dev/md1p2, another thing that the old Partitioner didn’t allow to configure.
  • /dev/volgroup0 is an LVM VG based on one of those MD partitions, allowing to combine the best of the MD and LVM technologies in a new way.
  • Last but not least, /dev/sdc is a disk formatted to host a file-system directly, with no partitions in between (also a new possibility).

The general approach of the new UI is described in the linked document. But since an image is worth a thousand words (and an animation is probably worth two thousands), let’s see how some part of the process to create the complex setup described about would look in a text console.

This is how you can now directly format a disk with no partitions.

Formatting a disk

Playing with the partitions of a disk is also a good way to get a feeling on how the buttons are now organized and how they dynamically change based on which row is selected in each table. Click on the following image to animate it and see those views in action.

Playing with partitions

And for a full experience of completely new stuff. Click on the image below to see an animation showing the whole process of creating an MD RAID on top of two full disks and then creating partitions within the resulting RAID.

Creating a partitioned RAID

But although the text mode is the limiting factor to design a YaST UI, many users install their systems and use the Partitioner in graphical mode. For those wondering how the reorganized buttons look in that case, here are some screenshots of the installation process of the upcoming SLE-15-SP1 (static screenshots this time, we already had enough animations for one post).

Managing RAIDs with the new Partitioner UI

Managing Partitions with the new Partitioner UI

Displaying Bcache Devices Consistently in the Device Graphs

Surely most Partitioner users have recognized the style of the visual representation used above for the complex example setup. As you know, the Partitioner offers similar representations in the “Device Graphs” section, both for the original layout of the system and for the target one.

After adding support for Bcache to the Partitioner we detected a small but annoying problem in those graphs. The caching devices were using their UUID as labels, which had two drawbacks.

  • It was too long.
  • It’s not known in advance for “planned” cache sets (i.e. sets that will be created after going forward in the Partitioner), which resulted in boxes with no labels

So know we use a fixed “bcache cache” label for all cache sets, which looks like this.

New label for cache sets in the Device Graph

As opposed to the old way with empty boxes.

Lack of labels in the old Device Graphs

Adding and removing Bcache devices

And since we mention the Bcache support in the Partitioner, it’s worth noticing that the implementation continues moving forward at good pace. During this sprint we implemented a first version of the operations to add a new Bcache device and to delete it.

When adding a new device, the only options that can currently be defined is which devices to use to construct it. But the next sprint has started and you can expect more options to be supported in the near future.

Creating a new Bcache device

When the Bcache device is created, then it can be formatted, mounted or partitioned with the same level of flexibility than other devices in the system. So soon (after the usual integration and automated testing phases) Tumbleweed users will be able to use the YaST Partitioner to test this exciting technology.

Of course the operation to delete a Bcache device offers the usual checks and information available in other parts of the Partitioner, like shown in the following screenshot.

Deleting a bcache device

Both screenshots are taken with an updated version of the installer of the upcoming SLE-15-SP1, since this functionality will be available in such distribution and, of course, also in openSUSE Leap 15.1.

Snapper: Show Used Space for each Snapshot

As those following our blog already know, the YaST Team is also somehow responsible for the development and maintenance of Snapper, the ultimate file-system snapshot tool for Linux. And Snapper has also received some usability improvements during this sprint.

For systems with btrfs and quota enabled, the output of “snapper list” now shows the used space for each snapshot. The used space in this case is the exclusive space of the btrfs quota group corresponding to the snapshot.

# snapper --iso list
Type   | # | Pre # | Date                | User | Used Space | Cleanup | Description      | Userdata     
-------+---+-------+---------------------+------+------------+---------+------------------+--------------
single | 0 |       |                     | root |            |         | current          |              
single | 1 |       | 2018-10-04 21:00:11 | root | 15.77 MiB  |         | first filesystem |              
single | 2 |       | 2018-10-04 21:19:47 | root | 13.78 MiB  | number  | after install    | important=yes

For more details about this change, its advantages and limitations, check the new post at the Snapper blog.

Simplified Role Selection

The role selection dialog in SLE-15 is always displayed in the installation workflow. However, it does not make much sense to display it if there is only one role to select. When you do not register the system and do not use any additional installation repository then in the default SLES-15 installation you can see only the minimal system role.

Selecting one out of one roles

In such case you cannot actually change anything as the only role is pre-selected by default and the only thing which you can do is to press the Next button.

Therefore we improved in for SLE15-SP1, if there is only one role to select then the role is selected automatically and the dialog is skipped.

In addition to that, many of the role descriptions have been adapted and simplified to, hopefully, be more clear.

YaST Firstboot in devices with no hardware clock

SLE and openSUSE can be installed on a great variety of devices, including some system that doesn’t include a hardware Real Time Clock, like the popular Raspberry Pi. That means the usual mechanism to establish the current date and time (using the hwclock command) fails in such devices. That general problem was detected during the usage of YaST Firstboot to configure new devices.

So now YaST detects situations in which there is no Real Time Clock and uses the date as an alternative to set the date and time. This fix, already submitted to openSUSE Tumbleweed, will be available in all upcoming versions of SLE (like SLE-12-SP4 and SLE-15-SP1) and openSUSE Leap.

Better integration of the new Firewall UI with AutoYaST

On the previous report we anticipated the new UI we are building for configuring Firewalld from YaST. During this sprint we have been focusing on some aspects that need to be finished before we can release this new functionality.

Now this UI can be invoked from the AutoYaST module in YaST, meaning it can be used to import and then fine tune the current configuration of the system so it can be exported to an AutoYaST profile.

And since we are already in animation mood, check how the new UI can be used to define an AutoYaST profile.

Using the Firewalld UI from the AutoYaST module

Very soon the whole functionality will be ready for prime time and we will release it together with a separate blog post to explain all the details.

Stay tuned

We are already working on the next sprint, with special focus on AutoYaST, on Snapper and on improving the installation experience in several scenarios. As mentioned above, it’s likely that you will get more news from us (about the new Firewalld support) even before that sprint is finished.

But if you can’t wait for more news, don’t hesitate to visit us on our Irc #yast channel on Freenode. Otherwise, see you here again soon.

YaST Squad Sprint 61

August 29th, 2018 by

We have to admit that lately we have not been exactly regular and reliable in delivering our blog posts. But with the vacation season coming to an end, we are determined to recover the good pace. Since the proof is in the pudding, here is our latest report, just one week after the previous one.

Improving the user experience in the Services Manager

And talking about the previous report, we presented there several improvements in the YaST Services Manager module, including the new “Apply” and “Show Log” buttons. With the “Apply” button, all changes performed over the services are applied without closing the Services Manager, which allows you to continue using it and to inspect the logs of a service without relaunching the Services Manager again. But this new “Apply” button only makes sense when there is something to save, so during this sprint we have improved the UI to disable the button when nothing has been changed yet. In addition, now it is easier to know what we have edited so far in the Services Manager. For every change over a service, the new value is explicitly highlighted by using the special mark (*). For example, when you change the start mode of a service from “On boot” to “On demand”, you will see “(*) On Demand” in the corresponding column, see example.

https://lizards.opensuse.org/2018/08/22/yast-squad-sprint-59-60/

The list of services and the changes performed on them can be quite long. So in addition to the new mark, now a confirmation popup is shown up when using the “Apply” or “OK” button. This popup will present a summary with all changes that will be applied, that is, what services will be started or stopped, what services will change its start mode to “on boot”, “on demand” or “manually”, and even which will be the new default Systemd Target in case you have modified it. See an example in the following screenshot.

New summary of changes in the Services Manager

These improvements will reach openSUSE Tumbleweed soon and will be available in the upcoming versions of SLE (SLE-15-SP1) and openSUSE Leap (15.1).

Yast2 Systemd classes reorganized

Related to the changes in the Service Manager and in a more developer-oriented note. Yast2 Systemd (the set of YaST components that handle Systemd units under the hood) also has been completely reorganized in a more Ruby compliant way. Moving from YCP-style modules to a set of classes that behave like nice citizens of the Ruby ecosystem in their own proper namespace.

AutoYaST support for Xen virtual partitions

And to continue with refinements over the features introduced in the previous sprint, we have also improved the support for the so-called Xen virtual partitions that we presented in our previous post. As explained there, the old storage stack used to represent the Xen devices like /dev/xvda1 as partitions of a non-existing /dev/xvda hard disk. In the new stack, those devices are treated as they deserve, as independent block devices on themselves with no made-up disks coming from nowhere.

But AutoYaST profiles from a SLE-12 or Leap 42.x still pretend there are hard disks grouping the Xen virtual partitions. So in addition to the fixes introduced in the Partitioner during the previous sprint, we also had to teach the new storage stack how to handle fanciful AutoYaST <drive> sections like this, used to describe groups of Xen devices (xvda1 and xvda2 really exist in the system, xvda doesn’t).

 <drive>
    <device>/dev/xvda</device>

    <partition>
      <partition_nr>1</partition_nr>
      ...information about /dev/xvda1...
    </partition>

    <partition>
      <partition_nr>2</partition_nr>
      ...information about /dev/xvda2...
    </partition>

  </drive>
</pre>

The fix will be released as an installer self-update patch so users installing SLE-15 (with access to a self-update repository) can take advantage of it. In the mid term we will have to come up with a more realistic format to represent such devices in the AutoYaST profiles, but so far the limitations of the current AutoYaST format enforces us to keep the current approach.

Ignoring inactive RAID arrays

But that’s not the only new skill of Storage-ng for this sprint. It also learned how to better manage inactive RAID arrays. MD RAID arrays are built to handle failures of the underlying physical devices. When some of the devices fail, the RAID becomes “degraded” which means the data is still accessible but it’s time to fix things. When too many devices suffer a fault, the RAID becomes inactive and it cannot operate any longer until it’s repaired. Our Partitioner was not handling this situation well, popping up a generic “unexpected situation” error message.

Generic error message in Storage-ng

We have fixed that, and the storage stack doesn’t go nuts any longer if an inactive RAID array is found. Even more, it now shows an “Active: Yes/No” field under the RAID heading to inform the user in case the RAID is in such bad shape.

Partitioner displaying an inactive RAID array

All that will be soon available as a maintenance update for SLE-15 and Leap 15.0. So far, no mechanisms have been introduced to stop the user from modifying an inactive RAID array with the Partitioner. That will come in the future, together with other MD RAID improvements in Storage-ng targeting future releases of SLE and openSUSE Leap.

Media support in the Installation Server module

It’s quite embarrassing but it turned out that the Installation Server YaST module in SLE15 and openSUSE Leap 15.0 is not able to add the SLE15/Leap15 installation media. The reason is that the new media use a different repository format and the Installation Server module crashed when trying to add a new repository.

Fortunately the fix was small and allows adding the new media correctly. We plan to release a maintenance update for SLE15, openSUSE Leap 15.0 and SLE12-SP3. It turned out that the code in SLE11-SP4 is more robust and does not crash so we do not need an update there.

Improved help text for system roles

We recently got a bug report about how hard was to read the help text in the installation screen explaining the system roles. So we took it as an opportunity to try how flexible our help text system is. Adding some richtext format made it look much better in graphical mode and also surprisingly well text mode. Let’s see some screenshots from Leap 15.0, although the fix applies to as well to openSUSE Tumbleweed and the SLE15 family.

This is how it looked before the fix.

The poorly formatted help of the System Roles screen

And that how it looks now, in both Qt and Ncurses, with the new format.

The properly formatted text of the System Roles screen

Proper format even in text mode

Fixed PHP support in the YaST HTTP server module

The YaST HTTP server module allows enabling the PHP support in the Apache web server configuration. However, as the module is not actively developed it turned out that the PHP support was broken. YaST wanted to install the apache2-mod_php5 package which is not available in openSUSE Leap 15.0 or SLE15, there is a newer apache2-mod_php7 package.

After checking the other required packages it turned out that a similar problem exists for some other Apache modules. To avoid this issue in the future again we have added an additional test which checks the availability of all potentially installed packages. If there is a new version or a package is dropped we should be notified earlier by continuous integration instead of an user bug report later.

Stay tuned

Of course, in addition to the mentioned highlights we have fixed several small and medium bugs. And we plan to continue improving YaST in many ways… and to keep you punctually updated. So don’t go too far away.

Update on YaST Development Status

July 5th, 2018 by

Five weeks without blogging is certainly a quite an hiatus for the YaST Team. But fear no more, we are back! This is the first time in quite a while in which our post is not titled “Highlights of YaST Development Sprint” and there are good reasons for that.

Adapting the YaST Team Structure the Agile Way

Now that openSUSE Leap 15.0 is out and SUSE Enterprise Linux 15 is ready to be shipped, we felt it was time to rethink our activities. For the duration of the storage-ng development, we had split the YaST team into two sub-teams: Team S for Storage and Team R for the Rest. But now new challenges await us; there are some things that were pushed aside because getting storage-ng into an acceptable state had top priority.

We decided we’d try an approach that other development teams in SUSE have already been using successfully: split up the YaST team into “squads” of 3-5 people each for the duration of a couple of sprints. Each squad is centered around a big topic that needs to be addressed. There is no long-term fixed assignment of anyone to any squad; the idea is to shuffle people and thus know-how around as needed, of course taking each developer’s interests into account. So the squads and the topics will change every few weeks.

Is this the pure spirit of Scrum and the agile bible? We don’t know. And we don’t care. The agile spirit is to adapt your work based on what makes sense in every moment. We work the agile way, so the way of working also has to be agile.

The next sprint’s report will contain more information about the first set of squads and the results they are delivering. But meanwhile we have done much more than just reorganizing our forces. While the sprint-based work was suspended (thus the blog title not containing the word “sprint”), the YaST team still managed to put out of the door quite some features, improvements and bug fixes targeting mainly Tumbleweed.

Expert Partitioner: Moving Partitions

After quite some effort, the YaST team has completely rewritten the Expert Partitioner from scratch using the new storage stack (a.k.a. storage-ng). And although this new Expert Partitioner already offers practically all the same features than the old one, some last options are still coming. One them in the button for moving partitions, which saves us of a lot unnecessary work in many cases. For example, imagine you are installing openSUSE Tumbleweed and the installer automatically proposes you to create a partition for root and, just following it, a second partition for home. In case you don’t like the default proposed sizes (e.g. because you want a bigger root), you have to use the Expert Partitioner to fix the situation. You have to completely remove the home partition, resize root for enlarging it and then create home again with the same options than before.

Now, with the “Move” button, this kind of modifications are much easier. For that example, you can accomplish exactly the same by simply resizing home (without deleting it completely) and moving the resized home closer to the end of the disk (by using Move button). After moving the home partition, you have enough free space for enlarging the root partition. In the following screenshot you can see this dialog for moving partitions.

Moving partitions

One important thing to take into account is that the movement of partitions is only possible for new partitions, that is, it is not possible to move partitions that already exist on disk.

Trying to move an existing partition

YaST Masking Systemd Mount and Swap Units

And speaking about the Partitioner and its relationship with the rest of the system, the transition from SysVinit to Systemd changed the behavior of (open)SUSE concerning mounting devices. Systemd generates mount units for various file systems, e.g. those listed in /etc/fstab. The result is that Systemd may automatically mount any file system, even if that file system has been manually unmounted before. This can be problematic when the user needs the file system to be unmounted for certain operations, like resizing or unplugging.

Thus, now the Partitioner uses a new mechanism to prevent that to happen during its execution. Starting with version 4.0.194, the yast2-storage-ng package includes and uses the script /usr/lib/YaST2/bin/mask-systemd-units to mask all mount and swap units one by one. The script might also be useful for direct use of system administrators. So… profit!

Showing Logs the Systemd Way

And since we speak about how Systemd has changed the way the overall system works, it’s also worth noticing how more and more services has been adopting the Systemd journal for its logging purposes.

Some of the existing YaST modules to configure a given service include a button to show the logs of such service. In the past, they used to display the content of /var/log/messages with some basic filtering to ensure only the information relative to the service (e.g. tftp) was shown. But that didn’t work out of the box for services already using the Systemd journal, and we had gotten quite some bug reports about it.

Fortunately, the solution is really at our fingertips. You surely know by now that there is a YaST module for viewing the journal content with powerful queries for filtering, searching and so so on. The obvious solution is to use that YaST journal module also within other YaST modules, in order to show domain specific logs.

So far we adapted the YaST tftp module, but it will be easy to fix also other places that use the old approach that no longer works. And this is how it looks when you click the “Show Logs” button in the YaST module to configure tftp.

Journal entries for the tftp module

Usability Improvement in the Repositories Manager

The YaST repositories manager displays the repositories sorted by priority. But some people have a lot of repositories in their system and make no use of the priorities. Since there was not a clear second criteria, the order of the repository list looked quite arbitrary in those cases. Now all the repositories with the same priority are sorted by name, which makes more sense. See how it looked before the improvement.

List of repositories sorted only by priority

And compare to how it looks now.

List of repositories sorted by priority and name

Handling Inconsistent Boot Methods During Upgrade

We got a rather interesting amount of bug reports for openSUSE Leap 15.0 about collisions between the grub2 and grub2-efi bootloaders during the upgrade process. The root cause was that the installation medium used a different booting mode than the installed system being upgraded. For example, the installed system uses EFI boot but the upgrade is executed from a DVD booted via legacy mode (i.e. disabling EFI). In that case, the kernel running from the DVD does not expose some devices that are needed to write to the EFI boot manager. Moreover, it causes troubles to the updater itself, which does not expect this situation.

Looking at the majority of the bug reports, it is obvious that in most cases it happens by accident rather than the user consciously trying to mix both boot modes. So to improve the user experience we added a warning that will be displayed when this situation is detected, before starting the upgrade. That gives the user the possibility to fix the problem or to continue if the situation is really intentional.

Below you can see how it looks, both in graphical and text mode, in a patched openSUSE Leap 15.0 installation media, since the feature was developed too late to be included in the official installation images.

Graphical warning about inconsistent boot mode

Text-mode warning about inconsistent boot mode

What’s Next? Hack Week!

As commented at the beginning of the post, we have restarted the sprint-based work, although with a little twist to try out the squads approach. But before we come back to you to show the results of the first squad-based sprint, we have something else to do – Hack Week 17!.

Again it’s the time of the year for all SUSE Engineers (and any Open Source enthusiast willing to join) to innovate and learn new stuff. So please forgive us if we go too deep into playing and we are less responsive next week. See you again soon!

Highlights of YaST Development Sprint 57

May 31st, 2018 by

Three weeks from our last update on this blog. Time flies when you are busy! As you know, openSUSE Leap 15.0 was released in the meantime, which also means the active development of SLE15 is coming to an end… so time to look a little bit further into the future.

That’s why we had a face-to-face workshop with the whole YaST Team at the beautiful city of Prague during several days right before joining the openSUSE Conference 2018.

But we have done much more in three weeks than attending workshops and conferences. Apart from last-minute fixes, here you have a list of some interesting changes we have done in YaST in this period. Take into account that some of these changes didn’t make it into Leap 15.0, although all will be available in SLES15 and are probably already integrated into openSUSE Tumbleweed.

Fine tuning installer behavior in small disks

As you may know, the default installation of SLE and both openSUSE distribution enables Btrfs snapshots in the root partition alongside separate partitions for /home and swap. That means a default installation needs quite some space. In SLE12 and openSUSE Leap 42.X, if such disk space was not there the installer silently tries to disable the separate /home and even the snapshots in order to be able to create an initial proposal.

That behavior has become configurable for each product and role with Storage-ng and during the last sprint there was some controversy about what the configuration should be, both for openSUSE and the SLE family. It may look like a minor problem, but it becomes very relevant in virtualization environment (where virtual disks smaller than 10 GiB are not uncommon) or certain architectures with special storage devices like s390 and ARM.

The final decision was to never disable snapshots automatically in the case of openSUSE, so the user will be forced to manually go through the Guided Setup and explicitly disable snapshots to install in a small disk. In the SLE case, it was decided to keep the traditional behavior (automatically disabling snapshots if really needed) but making the situation more visible by adding a previous sentence to explain how the initial proposal was calculated.

So the installation in a normal disk would look like this.

Default initial partitioning proposal

While the installation in a very small disk displays some information similar to the following screen (the wording was slightly improved after taking the screenshots).

Adjusted initial partitioning proposal

The explanatory text preceding the list of actions will be available in all products based on SLE15, but will not be there for Leap 15.0, since the modification to the installer was not ready on time for the deadline and, moreover, would have been impossible to get the translations on time.

By the way, if you are interested in a more in-depth explanation on how the partitioning proposal adapts to all kind of situations like small disks and other scenarios, don’t hesitate to check Iván’s presentation at openSUSE Conference 2018 detailing its internals.

More parameter passing for s390

And talking about uncommon scenarios and the s390 architecture, you may remember that in the latest sprint we improved the handling of the persistent network device names kernel parameter for such systems. Shortly after, we found out a similar improvement was needed also for the FIPS parameter.

FIPS is a military encryption standard in USA. If the installation is started using the corresponding parameter, YaST will enforce strong encryption and will install an specific FIPS pattern. Moreover, after the recent fix, a system installed in hardened mode s390 will continue operating in this mode after the installation.

Fun with MD RAIDs

As SLE15 comes closer, future users start testing the system with more exotic and complex hardware setups. Same applies to openSUSE Leap 15.0 right after the official release. As a result of all that testing, we found several scenarios in which Storage-ng got confused about MD RAIDs defined by some specific hardware or manually by the user before starting the installation.

By default, the old storage didn’t handle partitions within software RAIDs and it didn’t handle software RAIDs directly on top of full disks (with no partitions in the physical disks). For the first version of Storage-ng present in Leap 15.0 and SLE15, we tried to implement the same behavior with the intention to rethink the whole thing and open new possibilities in the close future. Check more about the present and future of Storage-ng in Ancor’s talk at openSUSE Conference 2018.

Unfortunately, while trying to replicate the old storage behavior with software-defined MD RAIDs, we overlooked some heuristic that was hidden in the old implementation to recognize some special setups in which a given RAID device currently detected as regular software-defined RAIDs should be treated like hardware RAIDs. That’s the case of Software RAID Virtual Disks defined on a S130/S140 controller on DellEMC PowerEdge Servers through the BIOS Interface. We also found that some users used to produce a similar situation by manually creating software MD RAIDs and creating partitions within them before starting the installation.

With the preparation of SLE15 already in the final stages and with openSUSE Leap 15 already out, it was too late to introduce drastic changes in how MD RAIDs are detected and used. To mitigate the problem while limiting the potential breakage, we reintroduced an ancient installer parameter. Now, when we run the installer using LIBSTORAGE_MDPART=1, all existing software-defined RAIDs will be considered as BIOS RAIDs.

Using LIBSTORAGE_MDPART

The new parameter is not available in Leap 15.0 (we added it too late) and will hopefully not be necessary anymore in future versions of SLE and openSUSE, since the short term plan is to redesign everything about how MD RAIDs are handled during installation.

And even more fun with MD RAIDs

Another example of RAID that looks like defined by software but is indeed assembled by BIOS is the Intel RSTe technology. In this case, the usage of LIBSTORAGE_MDPART is not needed, but still we found the bootloader installation to be broken because YaST was once again getting confused by the mixed RAID setup.

Fortunately it was possible to fix the issue and verify the solution in only two days, despite the YaST Team not having direct access to the hardware, thanks to the outstanding help of the user reporting the bug. Connecting users and developers directly always produces great results… and that’s one of the reasons open source rocks so much!

Improved error reporting for wrong bootloader in AutoYaST

That was not the only improvement in the bootloader handling done during this sprint. We also invested some time improving the user experience in AutoYAST, since the error message displayed when using an EFI variant not supported in the system architecture was far from being useful or even informative.

So alongside a more clear message, AutoYaST will now list all the possible values supported on the given architecture to better guide the user.

More precise bootloader error in AutoYaST

Setting the default subvolume name in AutoYaST

AutoYaST also received improvements in other areas, like making use of the new possibilities offered by Storage-ng. The new storage layer allows the user to set different default subvolumes (or none at all) for every Btrfs file system. As shown in the example below, a prefix name can be specified for each partition using the subvolumes_prefix.

<partition>
  <mount>/</mount>
  <filesystem config:type="symbol">btrfs</filesystem>
  <size>max</size>
  <subvolumes_prefix>@</subvolumes_prefix>
</partition>

To omit the subvolume prefix, set the subvolumes_prefix tag:

<partition>
  <mount>/</mount>
  <filesystem config:type="symbol">btrfs</filesystem>
  <size>max</size>
  <subvolumes_prefix><![CDATA[]]></subvolumes_prefix>
</partition>

As a consequence of the new behaviour, the old btrfs_set_default_subvolume_name tag is not needed and, therefore, it is not supported in Leap 15.0 and SLE15.

Skipping Btrfs subvolume creation

And more changes in AutoYaST that arrived just in time for SLE15 and openSUSE Leap 15.0. Recently, we have introduced a new flag in AutoYaST partition sections to skip the creation of Btrfs subvolumes because, due to a known limitation of our XML parser, it is not possible to specify an empty list.

So from now on, setting create_subvolumes to false will prevent AutoYaST from creating any Btrfs subvolumes in a given partition.

<partition>
  <mount>/</mount>
  <filesystem config:type="symbol">btrfs</filesystem>
  <size>max</size>
  <create_subvolumes config:type="boolean">false</create_subvolumes>
</partition>

Keep it rolling!

As usual, the content of this post is just a small part of everything we did during the sprint. There were also many other fixes and improvements, from auto-repairing wrong partition tables (with different sizes than the underlying disk) during installation to better interaction with other components like udisk or mdadm auto-assembling and many other things in between.

But it’s time to go back to work and start implementing all the new ideas that emerged from the YaST Team Workshop and the openSUSE Conference. See you in the next report!