Home Home > 2019 > 02 > 27
Sign up | Login

Deprecation notice: openSUSE Lizards user blog platform is deprecated, and will remain read only for the time being. Learn more...

Archive for February 27th, 2019

Highlights of YaST Development Sprint 71 & 72

February 27th, 2019 by

We know we owe you a report for the previous development sprint (namely the 71th). But we also know how to compensate that. This week we have not only one, but up to three blog posts to keep you tuned to the YaST evolution.

So let’s start with the summary of what have been implemented and fixed lately. That includes

  • Improvements in the Bcache support in the Partitioner
  • Users home as Btrfs subvolumes
  • Better visualization of Salt formulas in YaST Configuration Management
  • Automatic selection of the needed driver packages
  • Improvements in many other areas like AutoYaST, bootloader, the Partitioner and the storage Guided Setup

You will find links to the other more exhaustive blog posts, about the recently added Bcache support and the revamped Configuration Management module, in the corresponding sections of this report.

Final Improvements in the Bcache Support

During several sprints, we have been detailing our efforts to offer a decent support for the Bcache technology in the YaST partitioner. During this sprint we have implemented what we consider the three final bits:

  • Bache devices without caching
  • Modifying Bcache devices
  • Listing all caching sets

We will now detail this three improvements. But to celebrate that Bcache support looks complete now in the Partitioner, we have published a separate blog post explaining what Bcache is and how to take advantage of that technology using the YaST Partitioner. Enjoy!

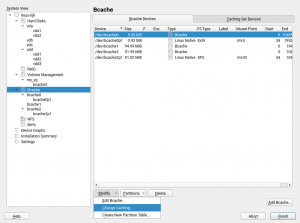
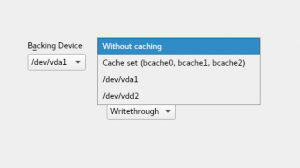
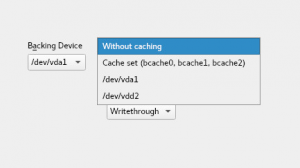
And back to the topic of recent improvements, we should mention that the Bcache technology allows to create a Bcache device without an associated caching one. This is useful if you are considering to use Bcache in the future. In that case you can setup all your slow devices as Bcache backing devices without a cache, leaving open the possibility of adding caching devices later. That is now possible by selecting the new option labeled “without caching” during creation, as shown in the following screenshot.

No caching device in Bcache

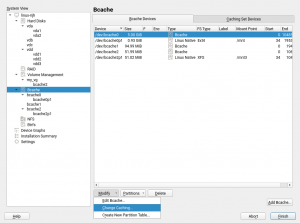
Of course, that’s not much useful without the possibility of modifying a Bcache device. So in the latest sprints we also added a new “Change Caching” button.

New option to modify a bcache

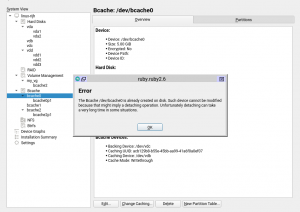
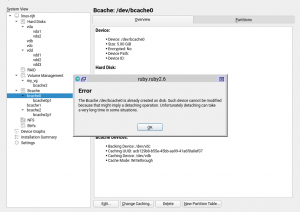
This option will only work for bcaches that do not exist in your system yet (e.g., a bcache that you are creating right now). For existing bcache devices, this option is only available when the bcache has no associated caching device yet. Otherwise, a detaching action would be required, and that could take very long time in some situations.

Avoiding detach operations in bcache

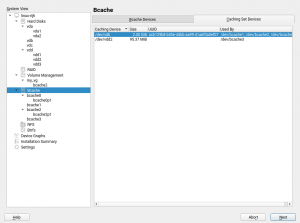
And last but not least (regarding Bcache), now the Expert Partitioner also shows the list of all caching sets in a separate tab (unsurprisingly) titled “Caching Set Devices”. It is only an informative tab, but thanks to it you will be able to check all devices currently used for caching at a quick glance.

List of caching sets

Create the User’s Home as a Btrfs Subvolume

As many (open)SUSE users know, Btrfs offers several advantages over traditional Linux file-systems. One of them is the possibility of using subvolumes to customize the configuration and features of different parts of the same file-system.

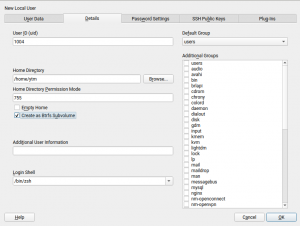
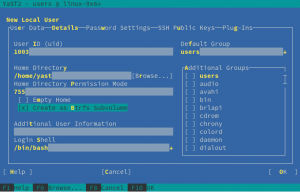
From now on, the YaST Users module allows to create the home path of new users as a subvolume instead of a plain directory, as long as a Btrfs file-system could be found in the system, of course. As simple as checking the “Create as Btrfs Subvolume” option that you will find just below the “Home Directory” field.

Using a Btrfs subvolume as home

In a multi-user system, using Btrfs subvolumes for the home paths of the users can open a world of possibilities. The system administrator can decide to give some users the ability to create snapshots of their corresponding home directories, even automated on every login and/or logout using PAM Snapper. Similar ideas can be applied to a Samba deployment. Moreover, using subvolumes as homes can also be useful to implement per user quotas.

Beyond multi-user systems, fine-tuning the mount options or customizing snapshots and quotas can also be useful for some special system users (e.g. the user associated to a database system).

And all that, as always in YaST, equally easy to configure with the graphical interface and with the text-based one.

Moreover, using subvolumes as homes can also be useful to implement per user quotas, ncurses version

Better Visualization of SUSE Manager Salt Formulas

As we announced on January, we have been working on updating the SUSE Manager Salt Formulas support in YaST Configuration Management to comply with the latest forms specification. As it happens with the Bcache support, we feel we have reached a point in which the feature is polished enough to be shipped in the next (open)SUSE stable releases and to deserve its own separate blog post. So go and enjoy our third blog post of this week, a sneak peak into the marriage of SUSE Manager and YaST, thanks to the magic of Salt Formulas.

In that regard, we have been recently improving how the forms look like to make them as easy to use as possible. Bear in mind that a form can be quite long and the support for scrolling in YaST2 is quite limited. In order to workaround this problem, YaST2 will display a tree at the left side outlining the structure of the form.

Tree view of long salt formulas

Apart from that, we have solved some known problems, like exporting date/time and numeric values in a correct way or handling missing and default values properly.

Sure there are some details that we like to improve but, for now, what we need is feedback from you. So, if you are interested in such a functionality, please check the mentioned dedicated blog post about the topic and have a look to yast2-configuration-management 4.1.5.

Automatically Selecting the Driver Packages in Installed System

In openSUSE Leap 15.0 and SUSE Linux Enterprise 15, the packages containing drivers needed by the system are installed automatically if they are available during the installation. However, if a repository with driver packages is added later in the installed system then the drivers are not automatically selected to install.

Fortunately, in Leap 15.1 and SLE-15-SP1 the package solver implements a new solver mode in which it selects for installation only the recommended driver packages, without also dragging other non-driver recommended packages into the system.

For example, after adding the nVidia driver repository in Leap 15.1 (YaST ➝ Software Repositories ➝ Add ➝ Community Repositories, select “nVidia Graphics Drivers”) and starting the package manager (YaST ➝ Software Management), the respective nVidia driver packages are automatically selected to install if there is a supported nVidia graphics card present in the system. This of course works also for the other driver packages and hardware devices.

Just a last note about automatic selection of recommended driver packages. When running the package manager for the first time in a recently installed openSUSE Leap 15.1, it might automatically select some additional packages to install coming from the Leap OSS on-line repository (which is added automatically the end of the installation). Do not be surprised, that’s actually desired. If you do not want to install those packages simply deselect them, YaST will remember that and it will not select them next time.

See more details in the corresponding documentation.

Improved Disk Selection Screen in the Storage Guided Setup

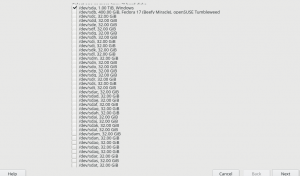
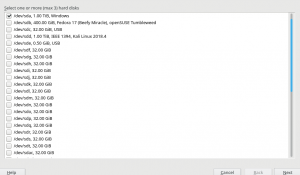
Although it may sound surprising for some users, it’s not uncommon to install SUSE Linux Enterprise on systems with dozens or even hundreds of disks. Of course, in those advanced scenarios the automatic partitioning proposal is not much useful and users are expected to use the Expert Partitioner. But, what if someone tries to use the partitioning Guided Setup in a system with 30 disks? In SLE-15 (or Leap 15.0, in the case of this concrete screenshot) they will see a screen as unusable as this.

Broken Guided Setup screen

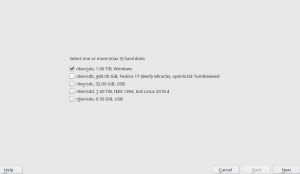
Of course, it only gets worse if the number of disks increases or if the text-mode interface is used. So we improved the disk selection screen, taking also the opportunity to include additional information to make easier to identify removable devices like USB and IEEE 1394 ones. In future releases, the screen will normally look pretty much as it looks in the previous version, just with the extra information about USB.

Normal Guided Setup screen

But if the system contains more than 10 disks to choose from, then a different widget that makes scrolling possible will be used, ensuring the user interface remains usable enough in both graphical and text-based modes.

Guided Setup screen with more than 10 disks

YaST Bootloader Becomes Less Whinny

When the installation of the system is spread over multiple physical disks, YaST Bootloader always tries to setup the bootloader in all those disks. This helps for example when MD RAID is used to achieve redundancy and some disk fails. Then the system can still boot from any of the other disks, since they also contain a proper bootloader.

But in some cases the installation can be spread over multiple disks but with only one of them being prepared to host the bootloader (e.g. containing the needed partitions). YaST bootloader used to complain about it while generating its proposal, which resulted in an error shown during installation.

In this sprint we have relaxed the YaST Bootloader expectations a bit. It still tries to create a fail-over setup, but the proposal does not complain if at least one disk looks bootable. Additionally if Grub2 is properly installed to at least one device, then possible failures in other disks will not result in an error pop-up, but just logged for future reference.

Device Order for MD RAIDs in AutoYaST

During the development of storage-ng, the feature to specify the device order for MD RAIDs with AutoYaST was lost. The feature can be useful for RAID level 10 to ensure that one full half of the RAID will only reside on one disk subsystem and the other half on the other subsystem. Only then a complete failure of a single subsystem keeps the RAID working.

Now the feature has been re-implemented for Leap 15.1 and SLE-15-SP1 and the “device_order” tag of the AutoYaST profile works as expected. For further information about configuring RAID with AutoYaST, consult the AutoYaST documentation.

Improvements in the Partitioner

That AutoYaST feature was not the only thing that temporarily disappeared with the replacement of the old storage components by storage-ng. The “Provide Crypt Passwords” button in the Partitioner was also not there in the early versions included in openSUSE Leap 15.0. But it was not really an omission, but a consequence on how the activation of logical devices works now in YaST.

During installation, all pre-existing logical devices that need some initialization are always activated to make possible to use them. That includes LVM, Multipath devices (for which a user confirmation is requested) and encrypted devices (for which the password is asked to the user). But triggering such activations in an already installed and running system cannot be done so lightly, since it affects the execution of the whole system.

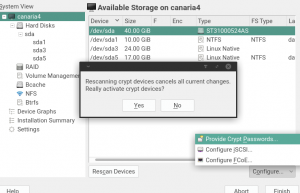
Still, there are cases in which a user executing the YaST Partitioner in an already installed system may desire to activate currently inactive devices. To allow that we brought back the “Provide Crypt Passwords” button, but with two small changes compared to its historical behavior.

  • It activates all kind of devices, not only the crypt ones.
  • It refreshes all the Partitioner information, reading again the status of all the storage devices.

Provide Crypt Passwords button

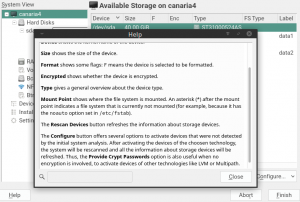
Of course, any change in behavior is a nice opportunity to revisit and expand the help texts.

The button explained

Another change that was intentionally introduced in the first versions of the rewritten Partitioner was the fact that new file-systems always got an empty label by default, independently of the previous content of the partition being formatted.

But the old Partitioner used to do things differently when reformatting a partition. In that case, it actually copied the label of the previous file-system into the new one. Some users told us (via bug reports) they wanted the old behavior back, so now the Partitioner preserves the old label when a partition is reformatted.

Wow, that was a lot!

As usual, this report only covers a small portion of what the YaST Team has been doing. But definitely this time our readers will have enough material to keep themselves entertained for quite some time. Specially combining this with the two already mentioned monographic posts about the Bcache support and about the compatibility with SUSE Manager Salt Formulas.

Have a lot of fun reading!
Getting YaST Configuration Module up-to-date

February 27th, 2019 by

An Introduction to the YaST Configuration Management Module

YaST Configuration Management is a relatively unknown module that was born back in 2016 during a workshop and was developed further during Hack Week 14. The idea was to enable AutoYaST to delegate part of its duties to a configuration management system like Salt or Puppet. Therefore, AutoYaST would take care of the initial installation (partitioning, software installation, etc.) and it will hand the control over to one of those systems for further configuration.

During Hack Week 15 the module got support for SUMA Salt Parametrizable Formulas and later it was adapted to
run during the 1st stage of the installation. Apart from that, the module received fixes and minor updates as needed.

But by the end of 2018, we started to work on the module again in order to:

  • Update the SUMA Salt Parametrizable Formulas support.
  • Add support for YaST Firstboot
  • Improve the documentation (the README was basically rewritten).

In this article, we will review these changes including, of course, some screenshots. If you want to try this features by yourself, you will need to install yast2-configuration-management 4.1.5 and yast2-firstboot 4.1.5 (or later).

Updating the SUMA Salt Parametrizable Formulas Support

Since the initial implementation of the SUMA Salt Parametrizable Formulas support, the forms specification evolved quite a lot, rendering the module outdated. Support for new data types, collections, conditions, etc. was simply missing.

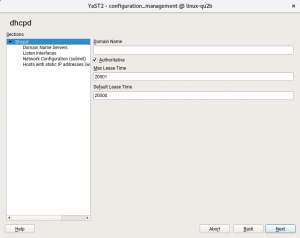
When it comes to the new UI design, the main problem we faced is that, in YaST, we must take 80×24 interfaces into account and the support for scrolling in our libraries is quite limited. So we needed to organize the information minimizing the chance of getting out of space.

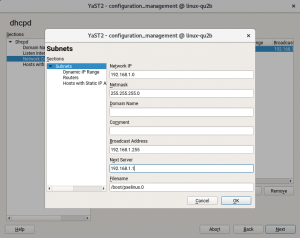
Configuring the dhcpd formula

The screenshot above belongs to a fairly complex dhcp formula. At the left side, there is a tree that you can use to browse through the formula. At the right, YaST displays a set of form controls that you will use to enter the formula parameters.

When dealing with collections, YaST displays the information in pop-up dialogs as you can see below.

Managing collections

Do you want to try it by yourself? No problem, but bear in mind that it may modify your system configuration, so it would be wiser to do such experiments in a virtual machine.

Having said that, the easiest way to try the module is to grab some formulas from OBS, install them and start the module from the YaST control center by clicking on YaST2 Configuration Management under the Miscellaneous section. If you are a console lover, you can just run yast2 configuration_management.

Adding Firstboot Support

YaST Firstboot is a module that allows the user to configure a pre-installed system during the first boot (hence the name). It implements a set of YaST clients to perform different stuff like setting the language, configuring the timezone, etc.

If you need to configure something which is not supported by YaST Firstboot, you could write your own client having the power of YaST under your fingers. Or, if you prefer, you could use YaST Configuration Management to run a configuration management system. Of course, you can combine this feature with the support for SUMA Salt Parametrizable Formulas to offer a nice UI.

Now let’s see an example. YaST Firstboot configuration lives in /etc/YaST/firstboot.xml. That file contains the list of clients to use, among other settings. So if you want to use the YaST Configuration Management module, you only need to add the firstboot_configuration_management client to the workflow.

<workflows config:type="list">
  <workflow>
    <stage>firstboot</stage>
    <label>Configuration</label>
    <mode>installation</mode>
    <modules  config:type="list">
      <!-- other modules -->
      <module>
        <label>Finish Setup</label>
        <name>firstboot_configuration_management</name>
      </module>
    </modules>
    <!-- and more modules -->
  </workflow>
</workflows>

Additionally, you might be interested in modifying the firstboot_configuration_management behaviour. In that case, you can add a <configuration_management/> section with the relevant settings. The nice thing is that it uses the same options that are supported by AutoYaST. Let’s say that we want to run some Salt formulas:

<configuration_management>
  <type>salt</type>
  <!-- Default Salt Formulas root directories -->
  <formulas_roots config:type="list">
    <formulas_root>/usr/share/susemanager/formulas/metadata</formulas_root>
    <formulas_root>/srv/formula_metadata</formulas_root>
  </formulas_roots>
</configuration_management>

Or do you prefer to run Salt against a master server?

<configuration_management>
  <type>salt</type>
  <master>linux-addc</master>
  <auth_attempts config:type="integer">5</auth_attempts>
  <auth_time_out config:type="integer">10</auth_time_out>
  <keys_url>http://keys.example.de/keys</keys_url>
</configuration_management>

Asking for Help

YaST Configuration Management has been greatly improved during these weeks and the new SUMA formulas support opens a lot of possibilities. However, now we need your help: if you are interested in this module, please, check it out and try to report as many bugs as possible. We now they are there just waiting for you to find them ;-).

Thanks!

Recapping the Bcache support in the YaST Partitioner

February 27th, 2019 by

Usual readers of the YaST Team development sprint reports on this blog already know we have been working steadily on adding support for the Bcache technology to the YaST Partitioner. We have already reached a point in which we consider such feature to be ready to be shipped with openSUSE Leap 15.1 and SUSE Linux Enterprise 15 SP1. That sounds like a nice occasion to offer the full picture in a single blog post, so our beloved users don’t need to dig into several blog posts to know what the future releases will bring regarding Bcache in YaST. Needless to say, all this is already available for openSUSE Tumbleweed users, or will be available in the following weeks.

Bcache 101

But, to begin with, what is Bcache? It’s a Linux technology that allows to improve the performance of any big but relative slow storage device (so-called “backing device” in Bcache terminology) by using a faster and smaller device (so-called caching device) to speed up read and write operations. The resulting Bcache device has then the size of the backing device and (almost) the effective speed of the caching one.

In other words, you can use one or several solid state drives, which are typically fast but small and expensive, to act as a cache for one or several traditional rotational (cheap and big) hard disks… effectively getting the best of both worlds.

How does it all look in your Linux system? Let’s explain it with some good old ASCII art:

(slow hard disk)   (faster device, SSD)
    /dev/sda            /dev/sdb
      |                     |
[Backing device]    [Caching device]  <-- Actually, this is a set of
      |                     |             caching devices (Caching Set)
      |__________ __________|                   
                 |
              [Bcache]
           /dev/bcache0

Take into account that the same caching device (or the same “caching set”, sticking to Bcache terminology) can be shared by several Bcache devices.

If you are thinking about using Bcache later, it is also possible to setup all your slow devices as Bcache backing devices without a cache. Then you can add the caching device(s) at a later point in time.

(slow hard disk)   
    /dev/sda            
      |                     
[Backing device]    
      |                     
      |__________ __________|                   
                 |
              [Bcache]
           /dev/bcache0

Last but not least, the Bcache technology allows to create virtual devices on top of an existing caching set without an associated backing device. Such a device is known as Flash-only Bcache and is only useful in some very specific use cases.

                   (faster device, SSD)
                        /dev/sdb
                            |
                    [Caching device]
                            |
      |__________ __________|                   
                 |
         [Flash-only Bcache]
           /dev/bcache0

You may be thinking: “hmm, all that sounds interesting and daunting at the same time… how can I get started with it in an easy way?“. And sure you are already figuring the answer. 😉

Bcache in the YaST Partitioner

When running on an x86 64 bits system, the YaST Partitioner will offer a Bcache entry in its usual left tree. There you can see two tabs. The second one lists the Bcache caching sets available in the system and its purely informative. But the first one is your entry door to all the power of the Bcache world. That tab allows to visualize, modify and delete the existing Bcache devices. And, of course, it also enables you to create new Bcache devices on top of any of your not-so-fast existing block devices.

Bcache devices in the Partitioner

All Bcache devices can be formatted, mounted or partitioned with the same level of flexibility than other block devices in the system. See the previous screenshots, in which some devices contains partitions while others are formatted directly.

The creation and edition of Bcache devices allow to select which devices to use as backing and as caching, and also to choose one of the available cache modes (more on this below). Any available block devices (like a disk, a partition or an LVM logical volume) can be used as backing device or as caching one. But a screenshot is worth a thousand words.

Screen for creating and editing a Bcache

The backing device is mandatory. Flash-only Bcaches cannot be created and there are no plans to include support for them in the future. But as you can see in the previous screenshot, the caching device can be specified as “without caching”. That allows to create Bcache devices that will get their caching devices in the future, as explained at the beginning of this post.

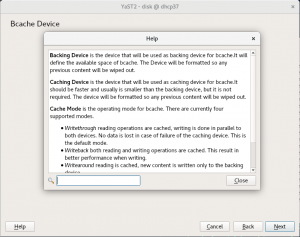
As mentioned, the third field allows to choose one of the cache modes offered by Bcache. If you are not sure what a particular cache mode means, YaST also provides a quite extensive help text explaining them.

Help about Bcache

Moreover, when modifying a device, the Partitioner will limit risky combinations, preventing data loss and avoiding operations that can result in unreliable results. For example, it prevents modifying Bcache devices with a caching device that is being already used by the system, because that would require a detaching action. That could take a very long time in some situations and interfere with other operations performed by the Partitioner.

Only safe operations allowed

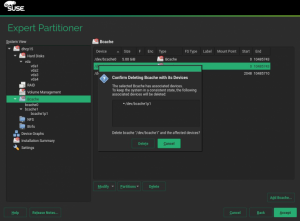
Of course the operation to delete a Bcache device offers the usual checks and information available in other parts of the YaST Partitioner, like shown in the following screenshot (this time using the look and feel of the SLE installer).

Deleting a Bcache device

Bcache for everyone?

With all the functionality explained above, we could say the YaST Partitioner lowers the entry barrier enough for all the (open)SUSE users to begin enjoying the bells and whistles of the Bcache technology. Unfortunately, that’s not exactly true for all the hardware architectures supported by our beloved distributions.

Bcache is only considered stable and mature enough in x86_64 systems (i.e. x86 architecture of 64 bits). If you don’t know whether your computer fits into that description, then almost for sure it does. 😉 We have no evidence of anyone using Bcache successfully in 32 bits systems or in any ARM platform. Moreover, we know for sure the technology is unreliable in the PPC64LE and S390x architectures.

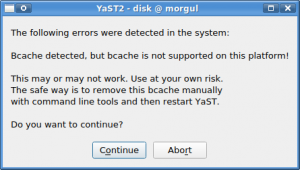
As a result, the YaST Partitioner will only present the “Bcache” section in the left tree when running in a x86_64 system, even in the highly unlikely case of an unsupported system in which a Bcache device is found. If that would even happen, YaST will alert the users about the dangers of using Bcache in such unsupported scenario and will urge them to use manual procedures to modify the existing setup.

Warning: Bcache not supported!

What’s next?

Obviously, as it always happens when a new technology is added to YaST, there is still a lot of room for improvement regarding the Bcache management in the Partitioner. But now it’s the turn for our users to test it and come with bug reports and ideas for further improvements and use cases. Profit!