Apart from our usual development sprint reports, we (the YaST Team) sometimes publish separate blog posts to summarize a new feature or to present an idea we are working on. Lately, several of those posts have been focused on new features of the YaST Partitioner, like the support for Bcache or the new Btrfs capabilities. But today it’s the turn of another part of yast2-storage-ng: the partitioning proposal, also known as the Guided Setup.
As you may know, YaST is an universal installer used to configure all the (open)SUSE and derivative products. Moreover, the installer options and steps can be refined even further by each of the system roles available for each product. The goal of this blog post is to present some ideas aimed to add new possibilities in the area of the storage guided proposal for those who configure the installer for a certain product or system role. With that we hope to ease the life for the creators of SUSE Manager, the SUSE’s purpose-specific distribution to manage software-defined infrastructures.
Although many of the presented capabilities will land soon in openSUSE Tumbleweed they will not be used by default. Not only because they are not targeted to the openSUSE use-case, but also because so far this is just a prototype. That means all texts are subject to change and most screens will get some adaptations before being used in a final product… or maybe they will even be completely revamped.
One Guided Proposal to Rule them All
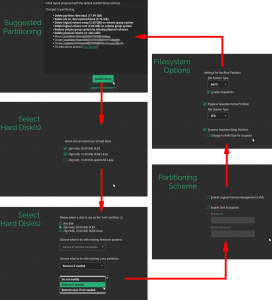
Although the Expert Partitioner can be used to tweak the storage configuration of any SUSE or openSUSE distribution during installation, the installer always tries to offer a reasonable proposal about it. Moreover, the “Guided Setup” button in the “Suggested Partitioning” screen leads to a wizard that can be used to configure some aspects of such a proposal, as shown in the following diagram (some actions have been blurred just to emphasize the fact that the concrete list of actions will change after each execution of the wizard).
The exact behavior of the Guided Setup is different in every product and, potentially, in every system role. Many things can be adjusted by the creators of the product or the role, like the partitions and LVM volumes to be proposed, the options to be offered in the wizard, the default value for every option and much more. But all those possibilities were still not enough in the case of SUSE Manager and its unique approach to organize the storage devices.
The Strange Case of SUSE Manager
First of all, the SUSE Manager documentation suggests to allocate each of several data directories (/var/spacewalk, /var/lib/pgsql, /var/cache and /srv) in its own dedicated disk when installing in a production environment. For such setup to make sense, it’s absolutely crucial to choose the right disk for every data directory taking into account both the size and the speed of the disks.
The documentation also suggests to use LVM in production environments. In order to achieve a clear separation of disks when using LVM, the recommended approach is to set up a separate LVM volume group for each relevant data directory instead of allocating all the logical volumes in the usual single shared “system” group.
So, although it may look overkill when installing SUSE Manager just for evaluation purposes, the preferred setup for a final deployment of the product spreads over up to five disks – one containing an LVM volume group with the usual logical volumes of any Linux system (like the root system and the swap space) and each of the other disks containing additional LVM groups, each one dedicated to a particular data directory.
Last but not least, the SUSE Manager guided setup should never offer the possibility of keeping the preexisting partitions in any of the disks. So the usual questions “Choose what to do with existing Linux/Windows/other partitions” (see the image above) should not even be displayed to the user. The answer is always “remove even if not needed”. Period. 😉
Breaking Down the Problem into Smaller Pieces
We didn’t want to implement a completely different guided proposal for SUSE Manager. Instead, we wanted to merge the main ideas behind its approach into the current configurable system, so other products and roles could use them. We identified three different features that we turned into the corresponding optional configuration settings at disposal of anyone defining a new system role. All the new settings are independent of each other and can be combined in any way to provide a fully customized user experience.
First Piece: Explicit Selection of Disks per Volume
First of all, it was necessary to support letting the user explicitly choose a disk for every partition or LVM volume, unlike the default guided setup which automatically finds the best disk to allocate every partition given the requirements and a set of “candidate disks”. To enable that, now the product or role can choose between two values for the new allocate_volume_mode setting. A value of auto (which is the default to keep backwards compatibility) will result in the already known wizard with up to 4 steps.
- Select the candidate disks
- Decide what to do with existing partitions
- Configure the schema (LVM and/or encryption)
- Configure each file system
As always, the steps in which there is nothing for the user to decide are skipped so the wizard is usually shorter than four steps.
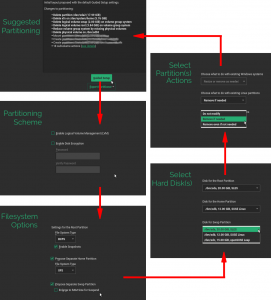
No surprises so far. But allocate_volume_mode can also be set to device, which will result in the alternative wizard displayed in the following image.
As you can see, there is no initial step to select the set of disks to be used by the system to automatically allocate the needed partitions. Instead, the following screen allows to explicitly assign a disk to every partition or LVM volume group.
Second Piece: Enforcing a Behavior about Previous Partitions
No matter which allocate mode is configured (auto or device), there is always one step in which the user is asked what to do with the preexisting partitions in the affected disks. So far, the product defined the default answer for those questions, but the user always had the opportunity to change that default option.
Now, the creator of the product or the system role can disable the setting called delete_resize_configurable which is enabled by default in order to prevent the user from modifying the default behavior. The wizard will include no questions about what to do with existing Windows/Linux/other partitions. In most cases, that will imply a whole step of the wizard to be simply skipped.
Third Piece: Separate Volume Groups for some Directories
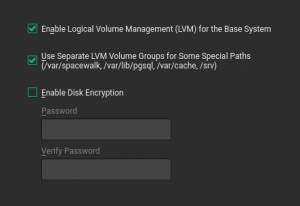
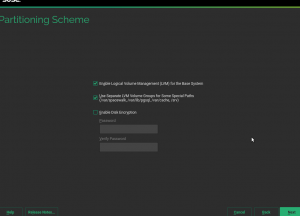
The most important setting configured by every system role is the list of so-called volumes. That list includes all the file systems (both mandatory and optional ones) that the guided setup should create as separate partitions or LVM logical volumes. Now it’s possible to specify that a volume could be created in its very own separate LVM volume group using the new attribute separate_vg_name. If any of the volumes defined for the current product and role contains such attribute, the screen for selecting the schema will contain an extra checkbox below the usual LVM-related one.
Putting the Pieces Together for SUSE Manager
With all the above, we expanded the toolbox for anyone wanting to configure the (open)SUSE installation experience. Which means now we can fulfill the requirements of SUSE Manager maintainers by just adding separate_vg_name to some volumes, setting delete_resize_configurable to false and adjusting the allocate_volume_mode. With all that, the new SUSE Manager workflow for the guided setup will look like this.
First of all, the user will be able to specify the creation of separate LVM volume groups as suggested in the product documentation.
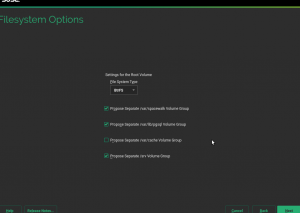
Then a second screen to select which separate file systems should be created and to fine-tune the options for every one of them, if any.
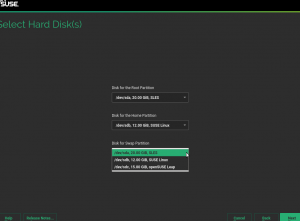
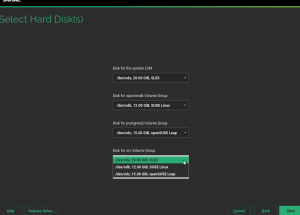
And finally a last step to assign the correct disk for every partition or separate volume group, depending on the selections on previous screens. With this step the user can optimize the performance by distributing the disks as explained in the SUSE Manager documentation, allocating the areas that need intensive processing to the faster disks and the greedy directories to the bigger devices.
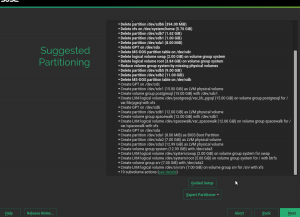
As usual, the list of actions will reflect the selections of the user creating as many LVM structures as requested.
Beyond SUSE Manager
As already mentioned, all the guided proposal features can be combined within a given product in any way. For example, one product could adopt the approach of creating separate LVM volume groups while still sticking to the traditional auto allocate mode. Or a given system role could enforce to never delete any existing partition without allowing the user to change that.
But beyond the “Guided Setup” button, the availability of two different allocate modes brings back one idea that has been floating around since the introduction of Storage-ng – adding a section “Wizards” to the Expert Partitioner. That would allow to combine some manual steps with the execution of any of the two available allocate modes of the guided proposal… or with any other workflow that can be implemented in the future.
As always, we are looking forward any feedback about the new features or the guided partitioning proposal in general. And stay tuned for more news!
