 Today, we’ve got for you an introduction of the teams’ work on openQA by Alberto Planas Domínguez.
The last 12.3 release was important for the openSUSE team for a number of reasons. One reason is that we wanted to integrate QA (Quality Assurance) into the release process in an early stage. You might remember that this release had UEFI and Secure Boot support coming and everybody had read the scary reports about badly broken machines that can only be fixed replacing the firmware. Obviously openSUSE can’t allow such things to happen to our user base, so we wanted to do more testing.
Testing is hard
Testing a distribution seems easy at first sight:
- Take the ISO of the last build and put it on the USB stick
- Boot from the USB
- Install and test
- …
- Profit!
But look a bit further and you will see that, actually, only the installation process itself is already a combinatorial problem. In openSUSE we have different mediums (DVD, KDE and Gnome Live images, NET installation image and the new Rescue image), three official architectures (32 and 64 bits and ARMv7), a bunch of different file systems (Ext3 / Ext4, Btrfs, LVM with or without encryption, etc.), different boot loaders (GRUB 2, LILO, SHIM). Yeah… Even without doing the math you see that for only this small subset of variables we have hundreds of possible combinations. And this is just the installation process, we are not talking about the various desktops and applications or hardware like network interfaces or graphics cards here.
And we want continuous testing
And that is only the final testing round! If we want to be serious about QA and testing, we need to run the full test battery for every build that OBS generate for us, with extra attention to the Milestones, Betas and RC which are scheduled in the release road-map.
We can of course attempt to optimize our testing approach. For example, if I am the maintainer of a package and I sure that my last version is working perfectly in Factory (because I tested it in my system, of course), do I really need to test this application again and again when a new ISO build is released? Unfortunately, we can not take a shortcut here. As Distribution, our job is integration and so we need to test the entire product again for every build. A single change in an external library or in any other package which I depend on can break my package. The interdependencies for a integration project of the size of openSUSE are so intricate that is faster to run the full test again. With this approach we are avoiding regressions in our distribution, important during development. But also a lot of work – who has time for all this testing?
OpenQA as a solution
For us, there’s no doubt about it: openQA is the correct tool for this. openQA is already used to test certain parts of openSUSE, and has shown itself as a competent tool to test other distributions like Fedora or Debian.
To experiment with openQA, the openSUSE team decided to launch a local implementation of the tool and start feeding it with 12.3 builds. But we soon ran into some limitation in the way we can express desired test outcomes in openQA and we got ideas on how to improve the detection of failed and succeeded tests. We also discovered that some tests in openQA had the bad habit of starting to work in “monkey mode” by simply sending commands and events to the virtual machine without checking if those interaction have expected behavior or not, losing track of the test progress.
openQA has the great benefit of being open source so we can improve its usefulness for testing Factory. Moreover, the original author of openQA, Bernhard M. Wiedemann, is a very talented developer and works for SUSE so upstream is very close to us. So we decided to start hacking!

openQA work
After the 12.3 release we decided to spend some quality time improving openQA as a team project. This was managed using the public Chili (a Redmine fork) project management web application. We published all the milestones, tasks, goals and documentation in the “openQA improvement project”. The management side of this project perhaps needs a different post, but for now we can say that we tried to develop it as open as possible. Of course you can get the full code from the openSUSE github account.
Major changes
The main architectural changes implemented during our 10 weeks of coding on openQA can be summarized as follows:
- Integration with openCV
- Replacement of PPM graphic file format with PNG
- Introduced needles; test with better control of the state
- A proper job dispatcher for new test configurations
- Better internal scheduler, with snapshots and a way to skip tests
- Improvement in the communication between webUI and the virtual machine
openCV brings robust testing
The tests in openQA need to check what is happening in the virtual (or real) machine to verify results, and the main source of information is the output of the screen. This information is usually a graphical information: we can instruct QEMU (or Vbox) to retry screenshots in a periodic basis. To properly evaluate a test outcome we need to find some kind of information in those pictures, and for that we use the computer vision library openCV.
With this library we can implement different methods to find relevant sections of the image, like buttons, error messages or text. These are then used for the test to get information about the actual environment of the installation process and to find out if the test passed or not. Previously, checksums on the images were used to determine outcomes. This led to many false positives (tests failing too often) due to simple theming and layout changes – a single pixel changing broke the test. openCV support was introduced earlier by Dominik Heidler to enable testing with noisy analogue VGA capture and we extended the usage of openCV matching to be more versatile, powerful and easier to use (both for test-module-writers and for maintainers).

Introducing needles
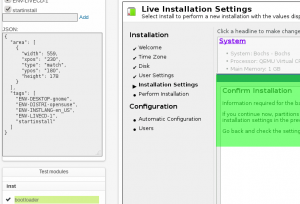
openQA has been modified to use PNG instead of PPM files to store images to test against, improving performance but also enabling openQA to store certain meta-data within the images. This brings us to the most important improvement in openQA: the introduction of the needle. A needle is an PNG image with some meta-data associated (a JSON document). This meta-data describes one or multiple ‘regions of interest’ (RoI) in the original image which can be used by the test to match the current screenshot. For example, if the installation is in the partition manager and we send the expected keystrokes to set Btrfs as our default file system, we can assert that this option is currently set using a needle where the RoI has the correct check box marked. In other words: we create a needle with an area covering the check box. The system will search this area in the current screen to assert that there is, somewhere, a check box with this label correctly marked. And will use openCV to make sure that slight changes in theming or layout will not result in a failed test.
The needle concept is really powerful. When a test uses needles with multiple RoI’s, the system will try to match every area in the current screenshot, in whatever position. There are areas that can be excluded, and areas that can be processed using an OCR (Tesseract) to extract and match text from them.
Thanks to needles we can now create tests that are always in a known state and they can inform complex decisions about the next step to take. For example, we can have tests that can detect and respond correctly when a sudo prompt appears suddenly, or where an error dialog appears when is not expected. More important, we can detect errors more quickly, aborting the installation process and pointing the developer to the exact error.
Faster testing with snapshots
We also implemented a way to create snapshots of the virtual machine status. This is useful if we want to retry some tests, or start the test-set from a specific test. For example, if we are testing the Firefox web browser, we want to avoid all the installation tests, and maybe some of the tests related with other applications. With this snapshot feature, we can load the virtual machine in the state where Firefox can be tested immediately.
Improved web UI
The final major area of focus has been on the web interface. We designed a set of dialogs to create and edit needles. Using this editor we can also see why the current tests are failing, comparing the current screenshot with the different expected needles from the tests.
Also, from the web interface we can control the execution of the virtual machine: signaling to stop or continue the execution. This is a feature that is useful when we want to create needles in an interactive way.
Upstream
We’re very happy that Bernhard has helped us, both with work and advice, to get these changes implemented. Several improvements were integrated in the current production version of openQA and most of the more invasive ones are part of the V2 branch of openQA. We plan to sit together with Bernhard to see about deploying V2 to openqa.opensuse.org for testing factory as soon as possible.
There is still work to be done. For example, for full integration testing we need to expand on the current ability which allows to run the tests on real hardware. This will for example allow testing graphics and network cards. Also, writing proper documentation is on the todo list. For those interested in helping out putting openQA to work and keeping the quality of our distribution high, the openSUSE Conference will feature a workshop on creating tests for Factory.
Both comments and pings are currently closed.


I found that article really interesting
Glad you liked it!
What does all this means for packagers?
Should I look into OpenQA and submit a test verifying mkvtoolnix creates a Matroska file with the expected MD5 from a sample avi file? Or are test for every package overkill and we lack the CPU power to test all our software anyway?
This is really cool. With the abundance of system configurations out there, I often wondered how it is that we can effectively support every possible combination. Now I have a better understanding.