Home Home > 2017 > 03
Sign up | Login

Deprecation notice: openSUSE Lizards user blog platform is deprecated, and will remain read only for the time being. Learn more...

Archive for March, 2017

Highlights of YaST development sprint 32

March 22nd, 2017 by

To make sure you didn’t missed us too much, in our latest blog post we summarized all the YaST-related projects worked during Hack Week 15. But after all the fun, it was time for… more fun! So let’s take a look to what the team has delivered on this first sprint after Hack Week 15.

Storage reimplementation: encrypted proposal without LVM

One of the known limitations of the current installer is that it’s only able to automatically propose an encrypted schema if LVM is used. For historical reasons, if you want to encrypt your root and/or home partitions but not to use LVM, you would need to use the expert partitioner… and hope for the best from the bootloader proposal.

But the new storage stack is here (well, almost here) to make all the old limitations vanish. With our testing ISO it’s already possible to set encryption with just one click for both partition-based and LVM-based proposals. The best possible partition schema is correctly created and everything is encrypted as the user would expect. We even have continuous tests in our internal openQA instance for it.

The part of the installer managing the bootloader installation is still not adapted, which means the resulting system would need some manual fixing of Grub before being able to boot… but that’s something for an upcoming sprint (likely the very next one).

Improved add-ons listing for SLE12-SP1

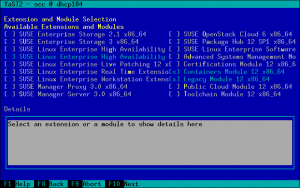
The dialog in SLES-12-SP1 for selecting the add-ons after registering the system was originally designed just for a small list of add-ons. Unfortunately (or fortunately, depending on how you look at it), the number of add-ons grew over the time and it exceeded the original limit for the text mode UI.

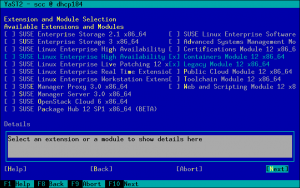
The equivalent screen in SLE-12-SP2 is not affected by the problem because it uses a different layout with scrollable list. But the SP1 dialog looks like this.

Broken add-ons list in SP1

If you look carefully at the screenshot you will see that the Web and Scripting Module is missing in the list and the Back, Next and Abort buttons at the bottom are also not displayed.

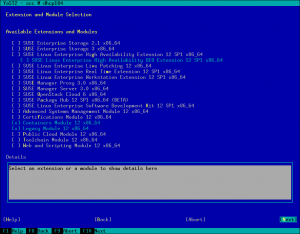
The fix decreased the size of the Details widget and allowed displaying more items in each column. Now there is even free space for three more add-ons.

Fixed addons list in SP1

Moreover the dialog is now dynamic and checks the current size of the screen. If there is enough free space then the list is displayed in one column so the labels are not truncated and the Details widget size is increased back to the original size.

Add-ons list in SP1 with enough space

Storage reimplementation: Btrfs subvolumes

The management of subvolumes is one of those features that make Btrfs rather unique and that need special handling when compared to more traditional file systems. That was indeed one of the several reasons to rewrite libstorage – Btrfs subvolumes never fully fitted the philosophy and data structures on the old (current) libstorage and yast2-storage.

In this sprint we introduced support for subvolumes in libstorage-ng from the ground up, taking into consideration all the specificities, use cases and scenarios found in the past. And, hopefully, in a way that is also prepared for whatever the future brings.

The new functionality is already working and tested and it’s included in the latest versions of libstorage-ng, but is still not used in the proposal or any other part yast2-storage. You will have to wait another sprint to see more visible results. At least if “more visible” means screenshots. Meanwhile, if you like images you can always enjoy the graphs generated from the internal structures managed by libstorage-ng.

Internal subvolumes representation in libstorage-ng

Storage reimplementation: system upgrade

The new storage stack has been able to install an openSUSE system for quite some time already. While we keep improving that area, the next challenge was to make the upgrade from a previous openSUSE version also possible using our testing ISO.

That implies scanning the hard disks looking for previous installations, allowing the user to select one, mounting the corresponding partitions or LVM volumes, performing the update of every package and doing some final tasks like updating the bootloader configuration.

Following the iterative approach encouraged by Scrum, we focused in the first three steps, which is something that a user (or openQA, for that matter) can test and verify. So now we are able to detect and list pre-existing systems and start the upgrade process on the selected one. And we have automated tests in openQA to ensure it works across all the combinations of partition-based vs LVM-based layout and UUID-based vs name-based fstab file.

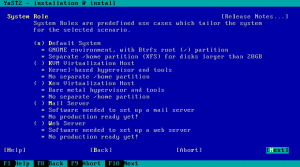
Add-ons can define new system roles

YaST is pretty customizable when it comes to adapt/modify the installation workflow. Among other things, add-ons are allowed to adapt the workflow (adding/removing steps), define new proposals, etc. And starting now, they can also define new system roles.

Let’s see an example of adding a new mail server role:

<update>
  <system_roles>
    <insert_system_roles config:type="list">
      <insert_system_role>
        <system_roles config:type="list">
          <system_role>
            <id>mail_role</id>
            <software>
              <default_patterns>base Minimal mail_server</default_patterns>
            </software>
          </system_role>
        </system_roles>
      </insert_system_role>
    </insert_system_roles>
  </system_roles>
</update>

<!-- Don't forget to add the texts -->
<texts>
  <mail_role>
    <label>Mail Server</label>
  </mail_role>
  <mail_role_description>
    <label>• Software needed to set up a mail server
• No production ready yet!</label>
  </mail_role_description>
</texts>

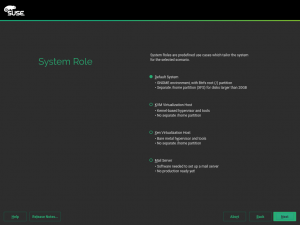
And now let’s see how it looks:

A role added by an addon

Which leads us to the next section…

The list of roles becomes responsive in text mode

A really nice thing about YaST is that it’s able to run in textmode, so you don’t need a graphical interface to install or configure your system. As a consequence, YaST developers need to keep certain limitations in mind when working in the user interface.

Now that add-ons can add new system roles, we noticed a potential problem in the dialog selection screen: we eventually will get out of space if more than one system role is added. So we decided to improve how system roles are displayed to make them fit in a 80×25 mode (that is, only 25 lines of text). Let’s see the changes with some examples.

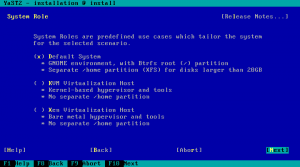
This is how the screen looks by default, with a reasonably small set of roles.

Default system roles list

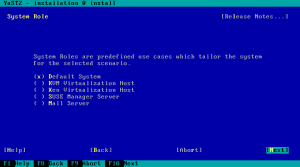
If the system detects there is no space to present all the information in such a convenient way, it removes all the spaces so at least the information is all there, even if it looks a little bit packed.

Roles list with no extra space

If even that is not enough, the extra descriptions are omitted, which gives us way more room.

Compact roles list

If roles don’t fit even without the descriptions, the introductory text will be also omitted which means we can present up to eighteen (yes, 18!) roles in the screen.

Storage reimplementation: guided setup mock-up

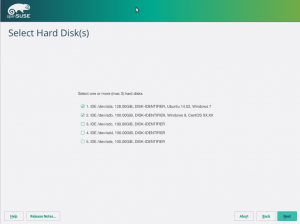
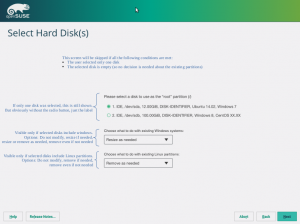
As explained in several previous reports, we are collaborating closely with SUSE UX experts to design the revamped interfaces of the installer’s partitioning proposal and the expert partitioner. We already showed you the document we used as a base to discuss the partitioning proposal, including the conclusions, and the first very simple prototype of the so-called Guided Setup.

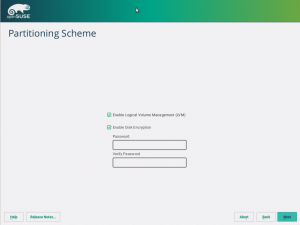
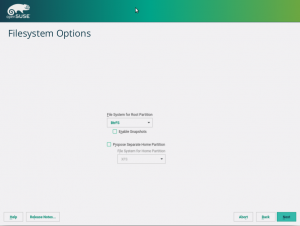
During this sprint, that collaborative effort focused on defining exactly how every step of that wizard should work and look like. The goal was to get some interface mock-ups to be used as starting point for the upcoming sprint. More than ever, a picture (well, four of them) is worth a thousand words.

First step of the guided partitioning setup mock-up

Second step of the guided partitioning setup mock-up

Third step of the guided partitioning setup mock-up

Fourth step of the guided partitioning setup mock-up

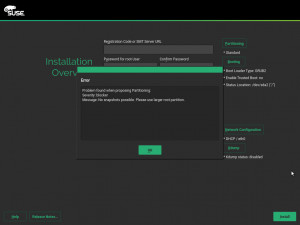
Prevent the installation of CaaSP if Btrfs snapshots are not possible

CaaSP is a single purpose system, and having snapshots enabled is essential. So there’s now a check in place that will simply prevent you from going on with the installation if snapshots are disabled (for example, if the disk is too small).

Blocked CaaSP installation

Storage reimplementation: better handling of /etc/fstab and /etc/cryptab

For the new storage stack, we refactored the classes to handle /etc/fstab. While this would normally not be anything to write much about, we included intelligent handling for existing comments based on this standalone GitHub project.

This means that existing comment blocks at the start and at the end of the file remain untouched, and comments before any content entry remain attached to that entry; i.e. when that entry is moved around in the file (e.g. because of mount dependencies), that comment is moving along with the entry it belongs to. While this is not 100% fool proof, it is much better than the usual strategy to simply discard such comments when the file is rewritten.

Quite some adaptations and bugfixes for CaaSP

As you already know from previous reports and other sources, a considerable part of SUSE’s development firepower is focused on building the upcoming CaaSP. As part of that heavy development process, the YaST team invested a significant part of the sprint adapting YaST for CaaSP and fixing bugs introduced by previous adaptations. A large collection of changes here and there that are hard to summarize here but that help CaaSP to be a couple of steps closer to the final goal.

Keep it rolling!

We have already planned our next sprint which will hopefully bring more features to the new storage stack, CaaSP-related improvements, a surprise about AutoYaST and more stuff. And, of course, it will be followed by its corresponding report.

So see you in three weeks. Stay tuned and have a lot of fun!
Fun things to do with driver updates

March 16th, 2017 by

Today: But what if I need a new kernel?

A driver update (DUD) can of course update a single driver. But if that’s not enough and you need a whole new kernel to run an installation?

There are two parts to solve:

  1. replace the kernel used during installation and
  2. get the new kernel installed

We’ll need two tools for this (both available in Tumbleweed or here: mksusecd and mkdud).

1. Replace the kernel used during installation

For this it’s important to know which kernel packages you’ll actually need. Typically it will be kernel-default and kernel-firmware. But older SUSE distributions (SLE 11 comes to mind) had the kernel packages split into kernel-default and kernel-default-base – you’ll need them both.

To make things confusing, modern SUSE distributions also have kernel-default-base – but it’s an alternative to kernel-default. In this case we don’t need it.

If unsure, check kernel-default. If it contains the actual kernel (e.g. /boot/vmlinuz) then you don’t need kernel-default-base.

On some architectures modules are also taken from xen-kmp-default. If that’s important for you, you can add this package to the kernel list as well.

In fact you can add any number of kernel packages or kmps you like.

In the past, sometimes a different kernel flavor was used. For example PowerPC had kernel-ppc64 for a while. Simply use the flavor you need.

It’s a good idea to gather all the kernel rpms into a single directory for easier use:

> mkdir k
> cp kernel-default.rpm kernel-firmware.rpm k
> cp kernel-default-base.rpm k    # only if needed
# add any kernel-related rpms you need

Then, take your SUSE installation iso and run

> mksusecd --create new.iso \
  --kernel k/* -- \
  original_dvd1.iso

Note that the --kernel option accepts a variable number of arguments, so you have to add an isolated -- to terminate the argument list properly.

The output could look like this:

> mksusecd --create new.iso \
  --kernel k/* -- \
  SLES-11-SP4-DVD-ppc64-GM-DVD1.iso
kernel version: 3.0.101-63-ppc64 --> 3.0.101-94-ppc64
CHRP bootable (ppc64)
building: 100%
calculating sha1...

The command above will actually get the list of required modules from the old installation iso. If you are missing some driver or the new kernel comes with some additional driver, the module will not be added to the new iso.

But there’s the --modules option. It will add the listed modules together with any implicitly required modules via module dependencies.

For example, let’s add the airport wifi-module to our PowerPC iso:

> mksusecd --create new.iso \
  --kernel k/* \
  --modules airport -- \
  SLES-11-SP4-DVD-ppc64-GM-DVD1.iso
kernel version: 3.0.101-63-ppc64 --> 3.0.101-94-ppc64
kernel modules added:
  airport, cfg80211, orinoco
CHRP bootable (ppc64)
building: 100%
calculating sha1...

As you can see, it automatically adds orinoco and cfg80211 as well.

2. Get the new kernel installed

This is relatively simple. A driver update can do this:

> mkdud --create foo.dud \
  --dist sle11 \
  --install repo \
  k/*

This creates a driver update for SLE 11 (which also applies to SP4) and the kernel rpms are installed via an auto-generated add-on repo (--install repo).

Now we have the driver update that installs our kernel packages. But how do we use it?

We integrate it into our iso above!

> mksusecd --create new.iso \
  --initrd foo.dud \
  --kernel k/* -- \
  SLES-11-SP4-DVD-ppc64-GM-DVD1.iso

mksusecd has an --initrd option that directly accepts driver updates and integrates them into the iso.

3. Can I have a choice?

Maybe you just want to test this new kernel or sometimes need the old one and sometimes the new one. Can you make an installation iso that lets you choose the kernel?

Oh yes! 🙂

> mksusecd --create new.iso \
  --add-entry 3.0.101-94 \
  --initrd foo.dud \
  --kernel k/* -- \
  SLES-11-SP4-DVD-ppc64-GM-DVD1.iso

This does not replace the old kernel but adds a new boot entry Installation - 3.0.101-94.

So you can install with old or the new kernel.

YaST development during Hack Week 15

March 7th, 2017 by

During this Hack Week, some of our team members invested quite some time working in YaST related projects. But, what’s even better, some people from outside the team worked also in YaST projects. Thank you guys!

So let’s summarize those projects and also some extra ones from our team members.

Let’s Encrypt made easy in openSUSE

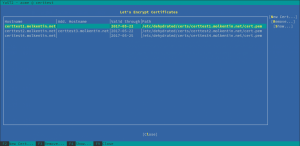
Daniel Molkentin enjoyed his first Hack Week working together with Klaas Freitag to bring Let’s Encrypt integration to openSUSE. Although they didn’t had experience with YaST development, they followed the YaST tutorial and created a new brand yast-acme module. It’s still a work in progress, but it looks promising.

Managing certificates

You can get more details reading the Daniel Molkentin’s blog post about the project.

Removing perl-apparmor dependency

Goldwyn Rodrigues worked to remove the dependency of yast-apparmor on (now obsolete) perl-apparmor. There’s quite some work to do, but he’s heading in the right direction.

Find out more about the project in the Hack Week page and in Goldwyn’s fork.

gfxboot for grub2

Steffen Winterfeldt was working in gfxboot2, an attempt to provide a graphical user interface for grub2. Although it’s still a work in progress, it looks really good: module works for grub2-legacy and grub2-efi, basic font rendering is in place, language primitives are partly implemented, the integrated debugger already works…

You can find further information in the projects page.

YaST Integration Tests using Cucumber

The YaST team is always trying to improve their testing tools so Ladislav Slezák has been working in a proof of concept to use Cucumber to run YaST integration tests and the results are pretty impressive. The prototype is able to test YaST in an installed system, during installation and it can be used even for plain libyui applications outside YaST.

Test adding repository

Check out the details at project’s page and at Ladislav’s blog.

Keep working on libstorage-ng

If you follow YaST development, you know that the team is making good progress towards replacing the old libstorage. And even during Hack Week, libstorage-ng got some love from our hackers.

Arvin Schnell implemented support for more filesystems in libstorage-ng: ext2, ext3, ReiserFS, ISO 9660, UDF and basic support for NFS.

Iván López invested his first Hack Week improving yast2-storage-ng. Read this description to find out more information about the changes.

And last but not least, apart from helping Iván with his project, Ancor González worked in a new approach for yast2-storage-ng: instead of just extending the API offered by libstorage-ng, the idea is to wrap the library so the Ruby code using yast2-storage-ng does not have direct visibility on the libstorage-ng classes and methods.

More Ruby in YaST

Josef Reidinger is trying to reduce the amount of code in other languages different than Ruby. He successfully replaced the binary y2base with a Ruby version (not merged yet) and reduced the amount of Perl code in the yast2 package.

You can check the progress in yast-ruby-bindings#191 and yast-yast2#540 pull requests.

Support for Salt parametrizable formulas

YaST2 CM was born in 2016 as a proof of concept to somehow integrate AutoYaST with Software Configuration Management systems like Salt or Puppet.

During this Hack Week, Duncan Mac Vicar and Imobach González were working to implement support for Salt parametrizable formulas. You can find out more information in this post at Imobach’s blog.

Other non-YaST projects

Hack Week allows us to work in any project we want, so there’re also some non-YaST related projects that we would like to mention.

Improved QDirStat

QDirStat is a Qt-based tool which offers directory statistics. His author, Stefan Hundhammer,implemented some new features (like a better behavior when hovering over a tree map or improved logging) and fixed some bugs. Find out more details in the project’s README and the version 1.3 release notes.

He also wrote an article about how to use the application in headless systems (no X server, no Xlibs).

Current version is already available at software.opensuse.org so you could consider giving it a try.

Learning new things

Hack Week is a great opportunity to play with new stuff. With that idea in mind, Martin Vidner learned about Android development and wrote detailed instructions for starting with that: Getting Started in Android Development: Part 1: Building the First App, Part 2: Publishing the First App and Part 3: Reducing Bloat.

Knut Anderssen decided to try also some mobile development and enjoyed playing around with the Ionic.

And that’s all! After Hack Week, we’re back to SCRUM and we’re now working sprint 32. We’ll give you additional details in our next “Highlights of YaST development” report.

Stay tunned!