Home Home > 2019 > 10 > 09
Sign up | Login

Deprecation notice: openSUSE Lizards user blog platform is deprecated, and will remain read only for the time being. Learn more...

Archive for October 9th, 2019

openSUSE WSL images in OBS

October 9th, 2019 by

A fundamental concept of all openSUSE packages as well as any image offered for download is a fully transparent, reproducible and automatic build and development process based on sources.

In openSUSE developers do not perform manual builds on some specially crafted machine in their basement and then upload the result somewhere. Instead all sources are stored in a version control system inside the open build service (OBS) instance at build.opensuse.org. OBS then automatically builds the sources including all dependencies according to defined build instructions (eg spec files for rpms). OBS also automatically adds cryptographic signatures to files that support it to make sure nobody can tamper with those files.

The WSL appx files are basically zip files that contain a tarball of a Linux system (like a container) and a Windows exe file, the so called launcher. Building a container is something OBS can already do fully automatic by means of Kiwi. The launcher as well as the final appx however is typically built on a Windows machine using Visual Studio by the developer.

Since the goal of the openSUSE WSL offering is to have the appx files officially and automatically be produced along with other images such as the DVD installer, Live images or containers, the appx files have to be built from sources in OBS.

Fortunately there’s already a MinGW cross toolchain packaged as rpms OBS and a tool to generate appx files on Linux.

Combining that all together OBS can actually build the WSL appx from sources. The current state of development can be found in the Virtualization:WSL project in OBS. The generated appx files are published on download.opensuse.org.
The current images for Leap 15.2 Alpha and Tumbleweed there are good enough for some testing already so please go ahead and do so, feedback welcome!
Note that since the appx files are signed by OBS rather than Microsoft, there are a few steps required to install them.

Going forward there is still quite some work needed to polish this up. Kiwi for example can’t build the appx directly itself but rather the fb-util-for-appx is called by a spec file. That requires some hacks with the OBS project config to work. On Linux side there’s currently no password set for the root user, so we need a better “first boot” solution. More details on that in a later article. Meanwhile, remember to have a lot of fun…

Highlights of YaST Development Sprint 86

October 9th, 2019 by

Now that you had a chance to look at our post about Advanced Encryption Options (especially if you are an s390 user), it is time to check what happened during the last YaST development sprint, which finished last Monday.

As usual, we have been working in a wide range of topics which include:

  • Improving support for multi-device file systems in the expert partitioner.
  • Fixing networking, secure boot and kdump problems in AutoYaST.
  • Stop waiting for chrony during initial boot when it does not make sense.
  • Preparing to support the split of configuration files between /usr/etc and /etc.
  • Using /etc/sysctl.d to write YaST related settings instead of the /etc/sysctl.conf main file.

Expert Partitioner and Multi-Device File Systems

So far, the Expert Partitioner was assuming that Btrfs was the only file system built on top multiple devices. But that is not completely true because some file systems are able to use an external journal to accomplish a better performance. For example, Ext3/4 and XFS can be configured to use separate devices for data and the journaling stuff.

We received a bug report caused by this misunderstanding about multi-device file systems. The Expert Partitioner was labeling as “Part of Btrfs” a device used as an external journal of an Ext4 file system. So we have improved this during the last sprint, and now external journal devices are correctly indicated in the Type column of the Expert Partitioner, as shown in the screenshot below.

External Journal Type

Moreover, the file system information now indicates which device is being used for the external journal.

External Journal Device Details

And finally, we have also limited the usage of such devices belonging to a multi-device Btrfs. Now, you will get an error message if you try to edit one of those devices. In the future, we will extend this feature to make possible to modify file systems using an external journal from the Expert Partitioner.

AutoYaST Getting Some Love

During this sprint, we have given AutoYaST some attention in different areas: networking, bootloader and kdump.

About the networking area, we have finished s390 support in the new network layer, fixing some old limitations in devices activation and udev handling. Apart from that, we have fixed several bugs and improved the documentation a lot, as we found it to be rather incomplete.

Another important change was adding support to disable secure boot for UEFI through AutoYaST. Of course, we updated the documentation too and, during the process, we added some elements that were missing and removed others that are not needed anymore.

Finally, we fixed a tricky problem when trying to get kdump to work on a minimal system. After some debugging, we found out that AutoYaST adds too late kdump to the list of packages to install. This issue has been fixed and now it should work like a charm.

As you may have seen, apart from writing code, we try to contribute to the documentation so our users have a good source of information. If you are curious, apart from the documents for released SUSE and openSUSE versions, you can check the latest builds (including the AutoYaST handbook). Kudos to our documentation team for such an awesome work!

Avoiding chrony-wait time out

Recently, some openSUSE users reported a really annoying issue in Tumbleweed. When time synchronization is enabled through YaST, the system might get stuck during the booting process if no network connection is available.

The problem is that, apart from the chrony service, YaST was enabling the chrony-wait service too. This service is used to ensure that the time is properly set before continuing with other services that can be affected by a time shift. But without a network connection, chrony-wait will wait for around 10 minutes. Unacceptable.

The discussion about the proper fix for this bug is still open, but for the time being, we have applied a workaround in YaST to enable chrony-wait only for those products that require precise time, like openSUSE Kubic. In the rest of cases, systems will boot faster even without network, although some service might be affected by a time shift.

Splitting Configuration Files between /etc and /usr/etc

As Linux users, we are all used to check for system-wide settings under /etc, which contains a mix of vendor and host-specific configuration values. This approach has worked rather well in the past, not without some hiccups, but when things like transactional updates come into play, the situation gets messy.

In order to solve those problems, the plan is to split configuration files between /etc and /usr/etc. The former would contain vendor settings while the latter would define host-specific values. Of course, such a move have a lot of implications.

So during this sprint we tried to identify potential problems for YaST and to propose solutions to tackle them in the future. If you are interested in the technical details, you can read our conclusions.

Writing Sysctl Changes to /etc/sysctl.d

In order to be able to cope with the /etc and /usr/etc split, YaST needs to stop writing to files like /etc/sysctl.conf and use an specific file under .d directories (like /etc/sysctl.d).

So as part of the aforementioned research, we adapted several modules (yast2-network, yast2-tune, yast2-security and yast2-vpn) to behave this way regarding /etc/sysctl.conf. From now on, YaST specific settings will be written to /etc/sysctl.d/30-yast.conf instead of /etc/sysctl.conf. Moreover, if YaST founds any of those settings in the general .conf file, it will move them to the new place.

What’s next?

Sprint 87 is already running. Apart from fixing some bugs that were introduced during the network refactoring, we plan to work on other storage-related stuff like resizing support for LUKS2 or some small snapper problems. We will give your more details in our next sprint report.

Stay tunned!

Advanced Encryption Options Land in the YaST Partitioner

October 9th, 2019 by

Welcome to a new sneak peek on the YaST improvements you will enjoy in SLE-15-SP2 and openSUSE Leap 15.2… or much earlier if you, as most YaST developers, are a happy user of openSUSE Tumbleweed.

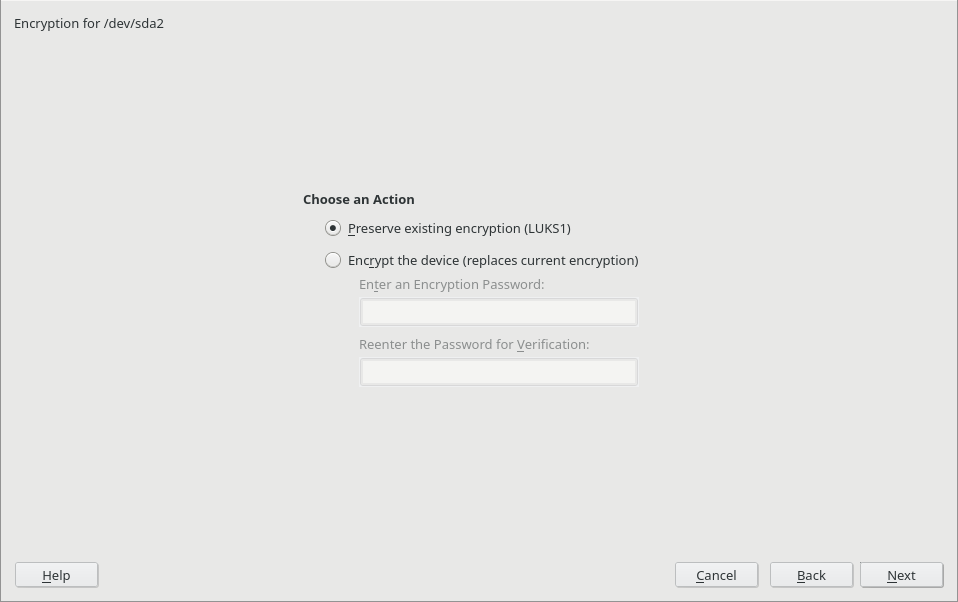
In our report of the 84th sprint we mentioned some changes regarding the encryption capabilities of the YaST Partitioner, like displaying the concrete encryption technology or the possibility to keep an existing encryption layer.

Keeping the previous encryption layer

And the report of sprint 85 contained a promise about a separate blog post detailing the new possibilities we have been adding when it comes to create encrypted devices.

So here we go! But let’s start with a small disclaimer. Although some of the new options are available for all (open)SUSE users, it’s fair to say that this time the main beneficiaries are the users of s390 systems, which may enjoy up to four new ways of encrypting their devices.

Good Things don’t Need to Change

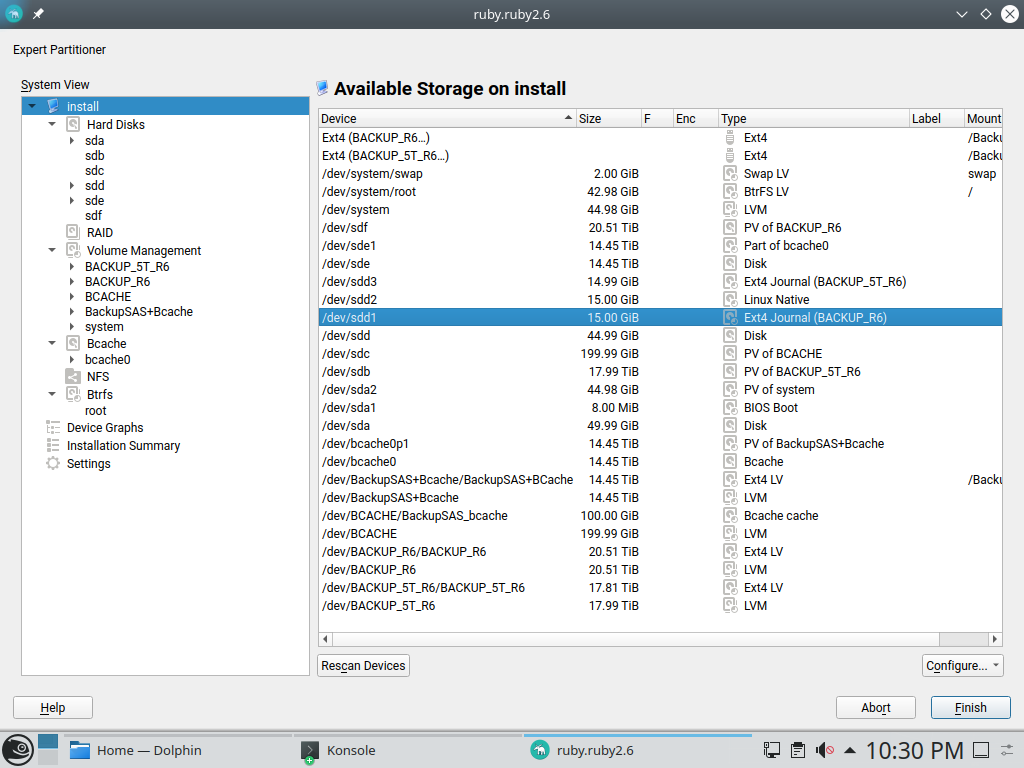
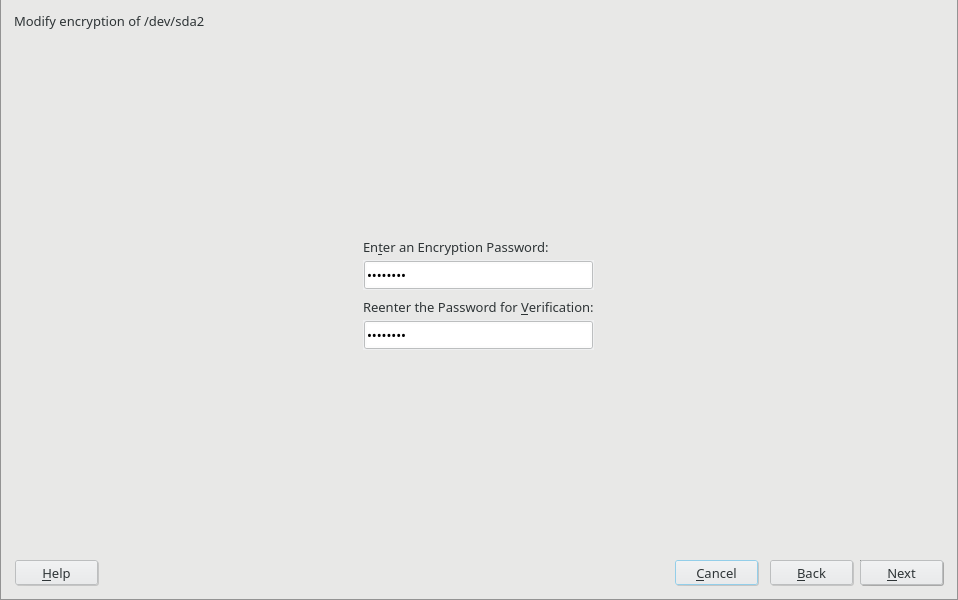
As you may know, so far the YaST Partitioner offered an “Encrypt Device” checkbox when creating or editing a block device. If such box is marked, the Partitioner asks for an encryption password and creates a LUKS virtual device on top of the device being encrypted.

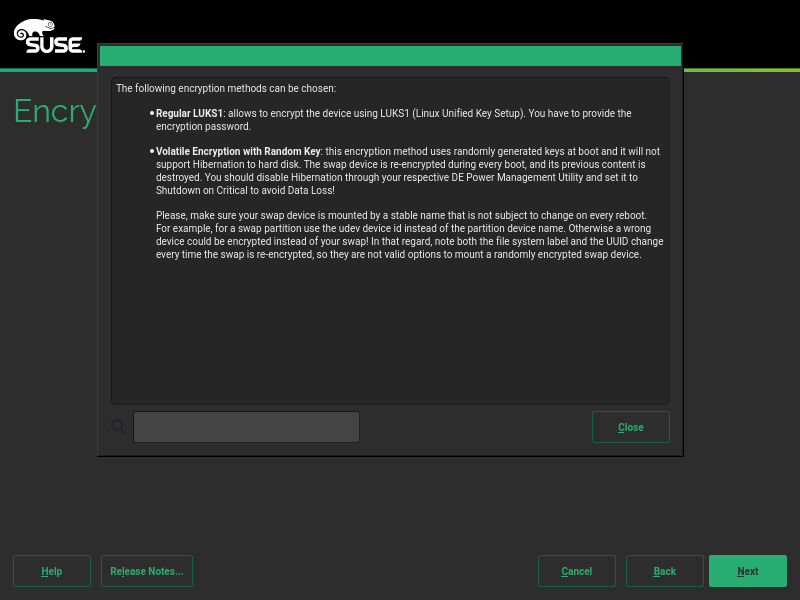
LUKS (Linux Unified Key Setup) is the standard for Linux hard disk encryption. By providing a standard on-disk-format, it facilitates compatibility among distributions. LUKS stores all necessary setup information in the partition header, enabling to transport or migrate data seamlessly. So far, there are two format specifications for such header: LUKS1 and LUKS2. YaST uses LUKS1 because is established, solid and well-known, being fully compatible with the (open)SUSE installation process and perfectly supported by all the system tools and by most bootloaders, like Grub2.

You should not fix what is not broken. Thus, in most cases, the screen for encrypting a device has not changed at all and it still works exactly in the same way under the hood.

Editing an encrypted device

But using an alternative approach may be useful for some use cases, and we wanted to offer an option in the Partitioner for those who look for something else. So in some special cases that screen will include a new selector to choose the encryption method. Let’s analyze all those new methods.

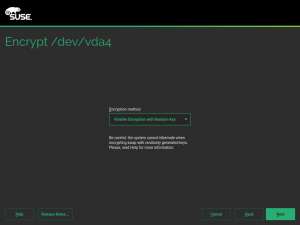
Volatile Swap Encryption with a Random Key

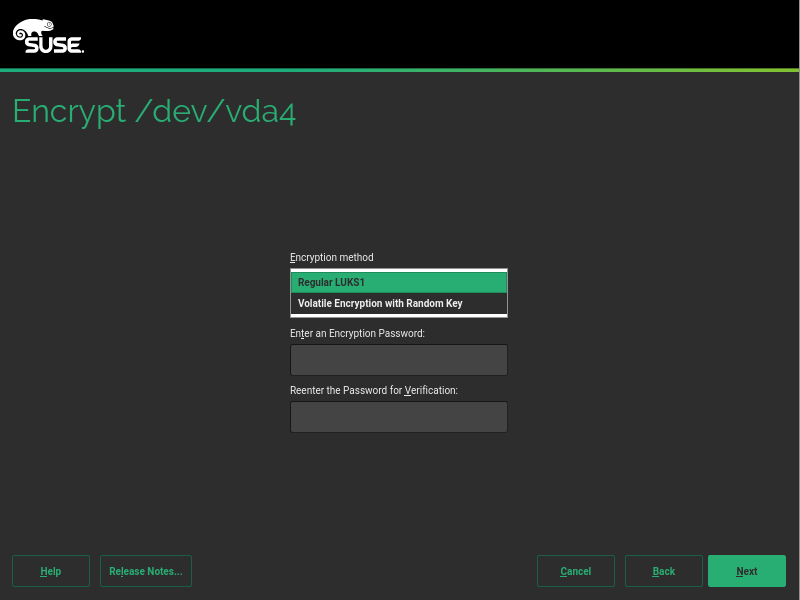
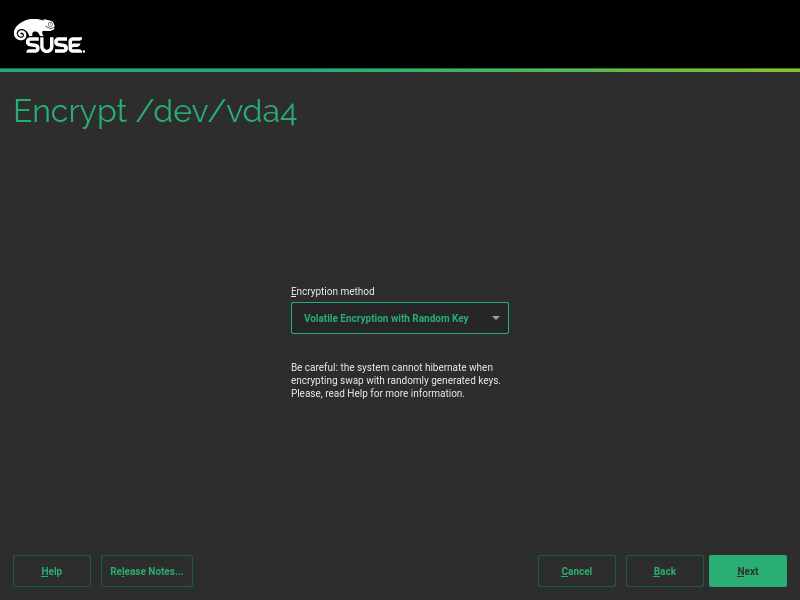
When a swap device has been marked to be encrypted, the user will be able to choose between “Regular LUKS1” and “Volatile Encryption with Random Key”. Both options will be there for swap devices on all hardware architectures. The first option simply uses the classical approach described above.

Selecting the encryption method

The second one allows to configure the system in a way in which the swap device is re-encrypted on every boot with a new randomly generated password.

Encrypt swap with a random password

Some advanced users may point that configuring such a random encryption for swap was already possible in versions of openSUSE prior to Leap 15.0. But the procedure to do so was obscure to say the least. The encryption with a random password was achieved by simply leaving blank the “Enter a Password” field in the encryption step. The exact implications were not explained anywhere in the interface and the help text didn’t mention all the risks.

Now the same configuration can be achieved with a more explicit interface, relevant information is provided as you can see in the screenshot below and some extra internal controls are in place to try to limit the potential harm.

Help text for the random swap method

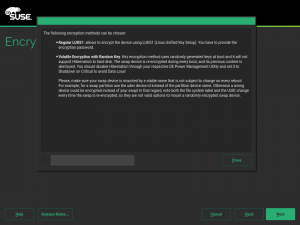
With this approach, the key used to encrypt the content of the swap is generated on every boot using /dev/urandom which is extremely secure. But you can always go a bit further…

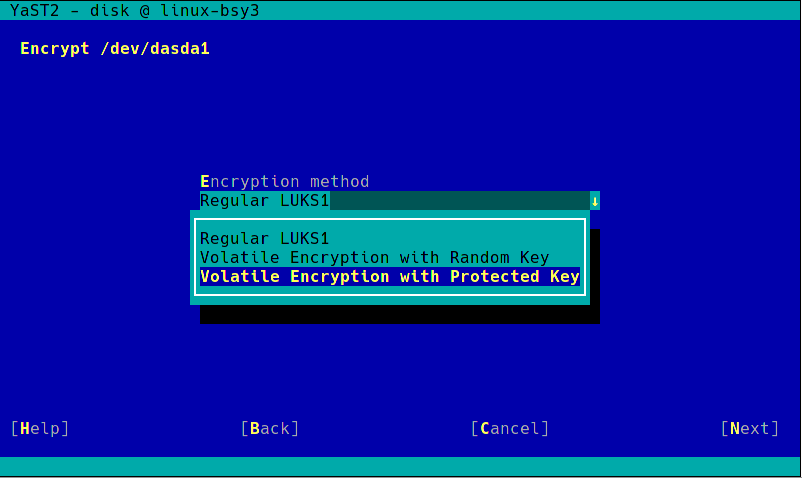
Swap Encryption with Volatile Protected AES Keys

One of the nice things about having a mainframe computer (and believe us there are MANY nice things) is the extra security measures implemented at all levels. In the case of IBM Z or IBM LinuxONE that translates into the so-called pervasive encryption. Pervasive encryption is an infrastructure for end-to-end data protection. It includes data encryption with protected and secure keys.

In s390 systems offering that technology, the swap can be encrypted on every boot using a volatile protected AES key, which offers an extra level of security compared to regular encryption using data from /dev/urandom. This document explains how to setup such system by hand. But now you can just use YaST and configure everything with a single click, as shown in the following screenshot.

Encrypting swap with volatile protected keys

The good thing about this method is that you can use it even if your s390 system does not have a CCA cryptographic coprocessor. Oh, wait… you may not know what a cryptographic coprocessor is. Don’t worry, just keep reading.

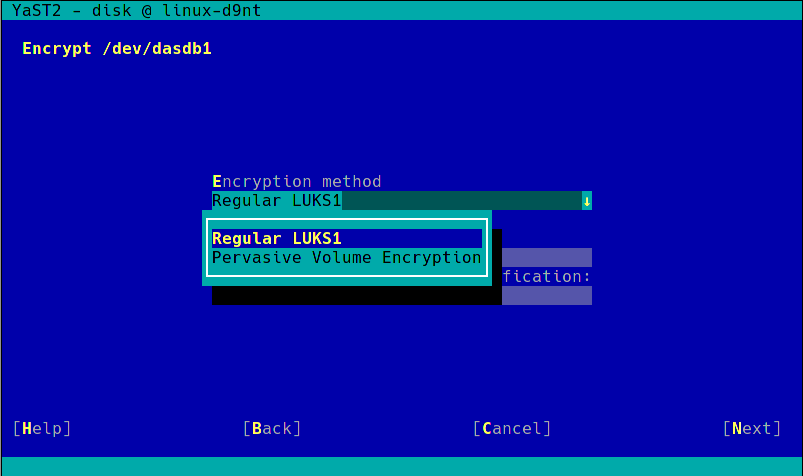
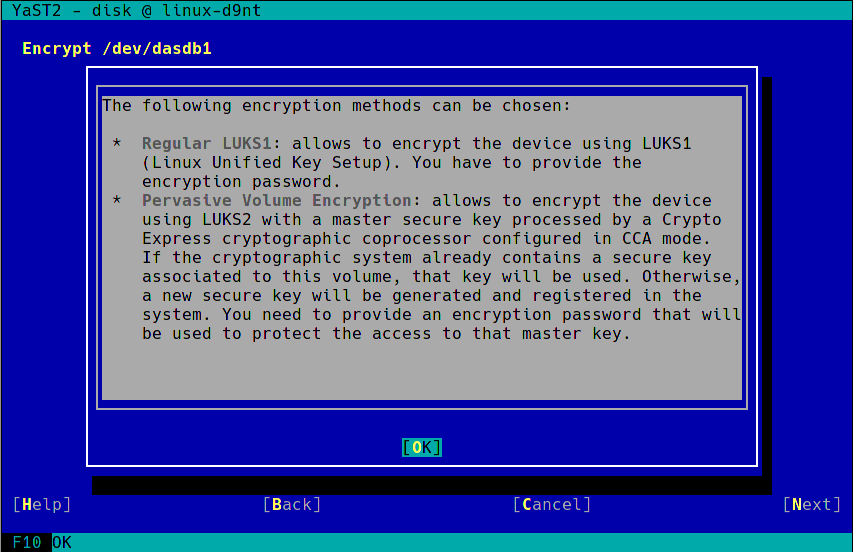
Pervasive Encryption for Data Volumes

Have you ever wondered how James Bond would protect his information from the most twisted and resourceful villains? We don’t know for sure (or, at least, we are supposed to not disclosure that information), but we would bet he has an s390 system with at least one Crypto Express cryptographic coprocessor configured in CCA mode (shortly referred as a CCA coprocessor).

Those dedicated pieces of hardware, when properly combined with CPU with CPACF support, make sure the information at-rest in any storage device can only be read in the very same system where that information was encrypted. They even have a physical mechanism to destroy all the keys when the hardware is removed from the machine, like the self-destruction mechanisms in the spy movies!

As documented here, the process to enjoy the full power of pervasive encryption for data volumes in Linux can be slightly complex… unless you have the YaST Partitioner at hand!

Pervasive volume encryption

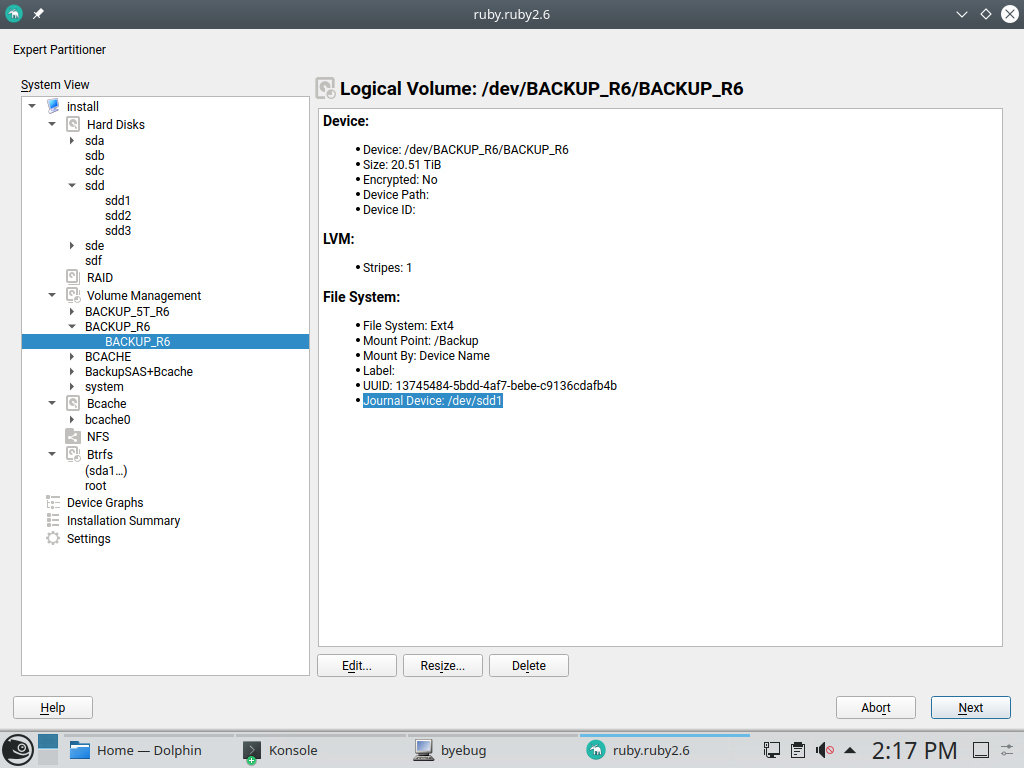
As you can see in the screenshot above, the process with YaST is as simple as choosing “Pervasive Volume Encryption” instead of the classic LUKS1 that YaST uses regularly for non-swap volumes. If YaST finds in the system a secure AES key already associated to the volume being encrypted, it will use that key and the resulting encryption device will have the DeviceMapper name specified for that key. If such secure keys don’t exist, YaST will automatically register a new one for each volume.

Help for pervasive volume encryption

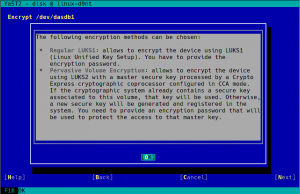
Pervasive encryption can be used on any volume of the system, even the root partition.
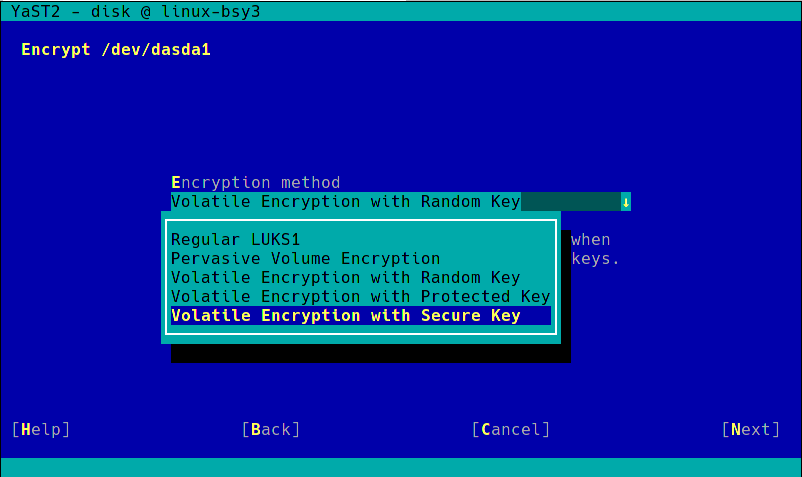
I want it all!

So far we have seen you can use protected AES keys for randomly encrypting swap and registered secure keys for protecting data volumes. But what if you want your swap to be randomly encrypted with a volatile secure AES key? After all, you have already invested time and money installing those great CCA coprocessors, let’s use them also for the random swap encryption!

If your hardware supports it, when encrypting the swap you will see a “Volatile Encryption with Secure Key” option, in addition to the other four possibilities commented above. As easy as it gets!

All possible methods for encrypting a swap

More Booting Checks in non-s390 Systems

As described in the help for pervasive volume encryption showed above, that encryption method uses LUKS2 under the hood. So we took the opportunity to improve the Partitioner checks about encryption and booting. Now, in any architecture that is not s390 the following warning will be displayed if the expert partitioner is used to place the root directory in a LUKS2 device without a separate plain /boot.

New check for booting

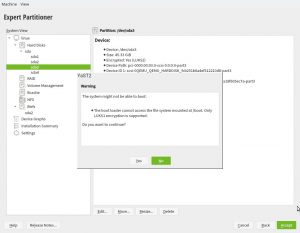
As mentioned, that doesn’t apply to s390 mainframes. The usage of zipl makes possible to boot Linux in those systems as long as the kernel supports the encryption technology, independently of the Grub2 (lack of) capabilities.

What’s next?

We are still working to smooth off the rough edges of the new encryption methods offered by YaST and to add AutoYaST support for them. You may have noticed that most of the improvements currently implemented will only directly benefit s390 systems… even just a subset of those. But at the current stage, we already have built the foundation for a new era of encryption support in YaSTland.

We are thinking about adding more encryption methods that could be useful for all (open)SUSE users, with general support for LUKS2 being an obvious candidate. But that’s not something we will see in the short term because there are many details to iron up first in those technologies to make then fit nicely into the current installation process.

But hey, meanwhile you can play with all the other new toys!