Home Home > 2019
Sign up | Login

Deprecation notice: openSUSE Lizards user blog platform is deprecated, and will remain read only for the time being. Learn more...

Archive for 2019

Recapping the Bcache support in the YaST Partitioner

February 27th, 2019 by

Usual readers of the YaST Team development sprint reports on this blog already know we have been working steadily on adding support for the Bcache technology to the YaST Partitioner. We have already reached a point in which we consider such feature to be ready to be shipped with openSUSE Leap 15.1 and SUSE Linux Enterprise 15 SP1. That sounds like a nice occasion to offer the full picture in a single blog post, so our beloved users don’t need to dig into several blog posts to know what the future releases will bring regarding Bcache in YaST. Needless to say, all this is already available for openSUSE Tumbleweed users, or will be available in the following weeks.

Bcache 101

But, to begin with, what is Bcache? It’s a Linux technology that allows to improve the performance of any big but relative slow storage device (so-called “backing device” in Bcache terminology) by using a faster and smaller device (so-called caching device) to speed up read and write operations. The resulting Bcache device has then the size of the backing device and (almost) the effective speed of the caching one.

In other words, you can use one or several solid state drives, which are typically fast but small and expensive, to act as a cache for one or several traditional rotational (cheap and big) hard disks… effectively getting the best of both worlds.

How does it all look in your Linux system? Let’s explain it with some good old ASCII art:

(slow hard disk)   (faster device, SSD)
    /dev/sda            /dev/sdb
      |                     |
[Backing device]    [Caching device]  <-- Actually, this is a set of
      |                     |             caching devices (Caching Set)
      |__________ __________|                   
                 |
              [Bcache]
           /dev/bcache0

Take into account that the same caching device (or the same “caching set”, sticking to Bcache terminology) can be shared by several Bcache devices.

If you are thinking about using Bcache later, it is also possible to setup all your slow devices as Bcache backing devices without a cache. Then you can add the caching device(s) at a later point in time.

(slow hard disk)   
    /dev/sda            
      |                     
[Backing device]    
      |                     
      |__________ __________|                   
                 |
              [Bcache]
           /dev/bcache0

Last but not least, the Bcache technology allows to create virtual devices on top of an existing caching set without an associated backing device. Such a device is known as Flash-only Bcache and is only useful in some very specific use cases.

                   (faster device, SSD)
                        /dev/sdb
                            |
                    [Caching device]
                            |
      |__________ __________|                   
                 |
         [Flash-only Bcache]
           /dev/bcache0

You may be thinking: “hmm, all that sounds interesting and daunting at the same time… how can I get started with it in an easy way?“. And sure you are already figuring the answer. 😉

Bcache in the YaST Partitioner

When running on an x86 64 bits system, the YaST Partitioner will offer a Bcache entry in its usual left tree. There you can see two tabs. The second one lists the Bcache caching sets available in the system and its purely informative. But the first one is your entry door to all the power of the Bcache world. That tab allows to visualize, modify and delete the existing Bcache devices. And, of course, it also enables you to create new Bcache devices on top of any of your not-so-fast existing block devices.

Bcache devices in the Partitioner

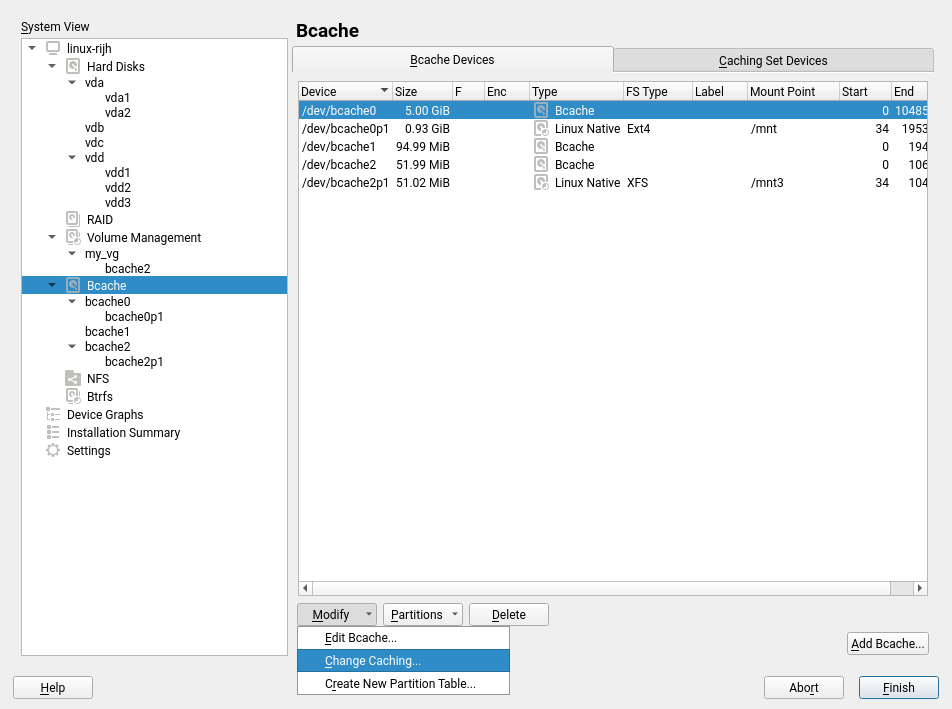
All Bcache devices can be formatted, mounted or partitioned with the same level of flexibility than other block devices in the system. See the previous screenshots, in which some devices contains partitions while others are formatted directly.

The creation and edition of Bcache devices allow to select which devices to use as backing and as caching, and also to choose one of the available cache modes (more on this below). Any available block devices (like a disk, a partition or an LVM logical volume) can be used as backing device or as caching one. But a screenshot is worth a thousand words.

Screen for creating and editing a Bcache

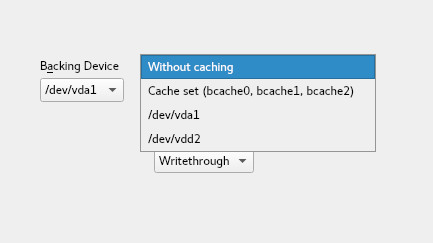
The backing device is mandatory. Flash-only Bcaches cannot be created and there are no plans to include support for them in the future. But as you can see in the previous screenshot, the caching device can be specified as “without caching”. That allows to create Bcache devices that will get their caching devices in the future, as explained at the beginning of this post.

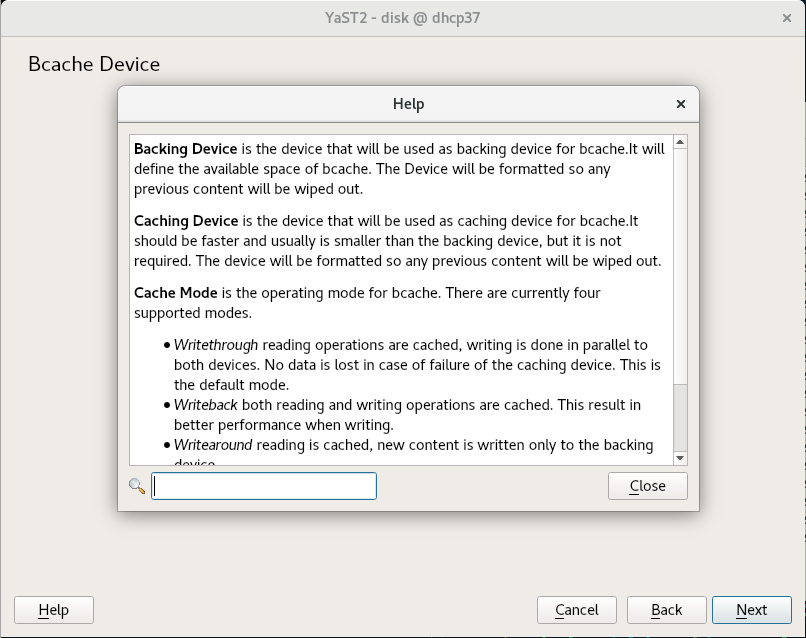
As mentioned, the third field allows to choose one of the cache modes offered by Bcache. If you are not sure what a particular cache mode means, YaST also provides a quite extensive help text explaining them.

Help about Bcache

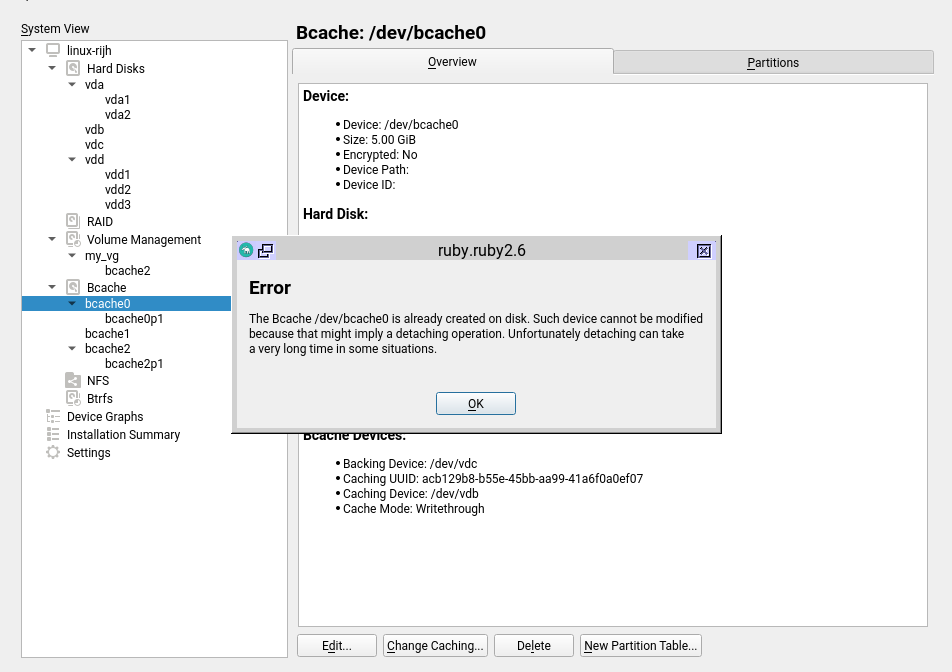
Moreover, when modifying a device, the Partitioner will limit risky combinations, preventing data loss and avoiding operations that can result in unreliable results. For example, it prevents modifying Bcache devices with a caching device that is being already used by the system, because that would require a detaching action. That could take a very long time in some situations and interfere with other operations performed by the Partitioner.

Only safe operations allowed

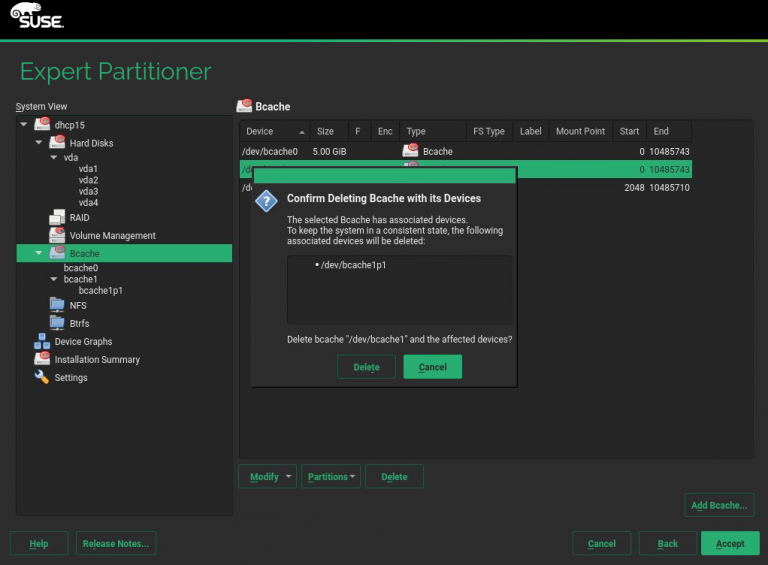
Of course the operation to delete a Bcache device offers the usual checks and information available in other parts of the YaST Partitioner, like shown in the following screenshot (this time using the look and feel of the SLE installer).

Deleting a Bcache device

Bcache for everyone?

With all the functionality explained above, we could say the YaST Partitioner lowers the entry barrier enough for all the (open)SUSE users to begin enjoying the bells and whistles of the Bcache technology. Unfortunately, that’s not exactly true for all the hardware architectures supported by our beloved distributions.

Bcache is only considered stable and mature enough in x86_64 systems (i.e. x86 architecture of 64 bits). If you don’t know whether your computer fits into that description, then almost for sure it does. 😉 We have no evidence of anyone using Bcache successfully in 32 bits systems or in any ARM platform. Moreover, we know for sure the technology is unreliable in the PPC64LE and S390x architectures.

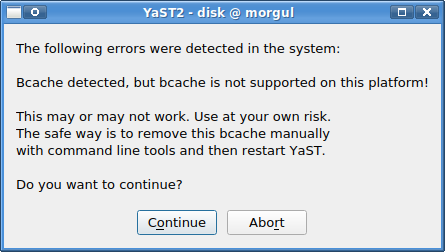
As a result, the YaST Partitioner will only present the “Bcache” section in the left tree when running in a x86_64 system, even in the highly unlikely case of an unsupported system in which a Bcache device is found. If that would even happen, YaST will alert the users about the dangers of using Bcache in such unsupported scenario and will urge them to use manual procedures to modify the existing setup.

Warning: Bcache not supported!

What’s next?

Obviously, as it always happens when a new technology is added to YaST, there is still a lot of room for improvement regarding the Bcache management in the Partitioner. But now it’s the turn for our users to test it and come with bug reports and ideas for further improvements and use cases. Profit!

zypper-upgraderepo 1.2 is out

February 23rd, 2019 by

Fixes and updates applied with this second minor version improved and extended the main functions, let’s see what’s new.

If you are new to the zypper-upgraderepo plugin, give a look to the previous article to better understand the mission and the basic usage.

Repository check

The first important change is inherent the way to check a valid repository:

  • the HTTP request sent is HEAD instead of GET in order to have a more lightweight answer from the server, being the HTML page not included in the packet;
  • the request point directly to the repodata.xml file instead of the folder, that because some server security setting could hide the directory listing and send back a 404 error although the repository works properly.

Check just a few repos

Most of the times we want to check the whole repository’s list at once, but sometimes we want to check few of them to see whether or not they are finally available or ready to be upgraded without looping through the whole list again and again. That’s where the –only-repo switch followed by a list of comma-separated numbers comes in help.

--only-repo switch

–only-repo switch

All repo by default

The disabled repositories now are shown by default and a new column highlights which of them are enabled or not, keeping their number in sync with the zypper lr output. To see only the enabled ones just use the switch –only-enabled.

Table view

Table view

Report view

Beside the table view, the switch –report introduce a new pleasant view using just two columns and spanning the right cell to more rows in order to improve the number of info and the reading quality.

Report view

Report view

Other changes

The procedure which tries to discover an alternative URL now dives back and forth the directory list in order to explore the whole tree of folders wherever the access is allowed by the server itself. The side effect is a general improvement also in repo downgrade.

The output in upgrade mode is now verbose and shows a table similar to the checking one, giving details about the changed URLs in the details column.

The server timeout error is now handled through the switch –timeout which allows tweaking the time before to consider an error any late answer from the server itself.

Final thoughts and what’s next

This plugin is practically completed, achieving all the goals needed for its main purpose no other relevant changes are scheduled, so I started thinking of other projects to work in my spare time.

Among them, there is one I am interested in: bring the power of openSUSE software search page to the command line.

However, there are some problems:

  • This website doesn’t implement any web API so will be a lot of scraping job;
  • There are missing packages while switching from the global research (selecting All distribution) to the specific distribution;
  • Packages from Packman are not included.

I have already got some ideas to solve them and did lay down several lines of code, so let’s see what happens!

Replacing Github Services with GitHub Webhooks

February 1st, 2019 by

The GitHub team announced some time ago that the so called GitHub Services will be obsolete and will be replaced with the GitHub web hooks.

We use the GitHub Services quite a lot in the YaST Team and, as we promised, we will try to summarize how replaced them.

Travis

Travis should add the new web hook automatically, just check if you can see a https://notify.travis-ci.org webhook configured for your repository. If it is missing then the easiest way to add them is just disabling the Travis builds for the repository and enabling it back. Doing this should add the new Travis web hook automatically.

Weblate

If your project uses Weblate for managing the translations then use the https://<weblate_server>/hooks/github/ webhook URL. If you use the openSUSE Weblate instance, then use the https://l10n.opensuse.org/hooks/github/ URL for the web hook.

See the Weblate documentation for more details.

RubyDoc.info

The RubyDoc.info service can be replaced by adding the https://www.rubydoc.info/checkout web hook (leave the other web hook options unchanged).

Read the Docs

The Readthedocs service uses unique web hook URL for each GitHub repository. You need to log into the Read the Docs site, select your project in the dashboard and in the Admin section select option Integrations. Then press Add integration and select the GitHub incoming webhook option. This will generate an URL address which can be used at GitHub as the web hook URL (again, leave the other options unchanged).

Email GitHub Service

The email service is automatically converted by GitHub to the new email notification setting so you should not need to do any change. If the notification emails are not delivered then check the Notifications section in the repository settings. In order to do that, you need the admin permission, see the GitHub documentation.

Bye GitHub Services!

Github Services has served well for quite some time but moving to a webhooks based approach looks like the correct decision. We have already completed the transition in all of our repositories. Kudos to Ladislav Slezak for taking care!

Highlights of YaST Development Sprint 69 & 70

January 31st, 2019 by

Almost two months has passed since our last sprint report but, except during the Christmas break, the team has been quite busy working on some features and bugfixes for the upcoming (open)SUSE releases.

But a post describing all that we have done would be quite long :), so let’s try to highlight a few of them.

  • YaST got a security audit and, although no real security problems were found, we were asked to introduce some improvements.
  • Now it is possible to run the installer through PXE Boot without any local repository. Pretty specific but cool stuff!
  • We are in the process of revamping SUSE Manager Salt Formulas support in the YaST2 Configuration Management module. Do not be fooled by the name, it is not limited to SUSE Manager.
  • YaST icons are now included in the package were they are used. We hope it will make things easier for icon designers.
  • The Firewall module got support for creating firewalld custom zones.
  • Performance when reading huge /etc/hosts files has been greatly improved.
  • CD/DVD sources are always disabled after installation.

YaST Security Hardening

Our SUSE security team did a security audit for YaST. The good news is that there were no real security problems that you should be concerned about. Still, we did some hardening to make the code even more secure.

This might have caused some breakages in Factory / Tumbleweed because many places in the code were touched. We apologize for any inconveniences that might have caused; but we are sure you prefer YaST to be more secure.

Most changes were centered around calling external commands, which YaST does a lot. Since YaST is running with root permissions in most cases, we want to make sure that this is as secure as possible. If you find any problems with it, please write bug reports.

What exactly we did and how we did it is summarized here: YaST Security Audit Fixes: Lessons Learned and Reminder

Installing via PXE Boot without any Installation Repository

In data centers and other big-scale enterprise environments, administrators rarely install new software via removable media such as DVDs. Instead, administrators rely on PXE (Preboot eXecution Environment) booting to image servers.

Installing Linux Enterprise in such environments typically requires two auxiliary servers in the local network:

  • The DHCP/TFTP server providing the minimal system used by PXE to execute the installer.
  • A server making the SLE DVD repository accessible in the local network via FTP, HTTP or any similar protocol.

Very often, the second one is more a requisite imposed by the installer than something really useful. In most cases, the system been installed will be registered in the SUSE Customer Center (or any of its proxy technologies like SMT or RMT) and will get all the software from there. Thus, we decided to save the administrators the extra steps of downloading the SLE ISO image and setting up an install server to serve the content of that ISO, for cases in which that was really not needed.

But the repositories are not only used to get the software been installed in the final system. As explained often in this blog, we have a single installer for all the products and flavors of SUSE and openSUSE, as different as the installation process looks for all of them. That generic installer uses the information in the installation repository to get its own configuration. That includes the available products (and its corresponding system roles), the steps and options to present to the user, the desired partitioning setup and many other aspects. Without that information, the installer is basically a musician without his score.

Starting with SLE-15-SP1, it will be possible to use the boot parameter NOREPO=1 to tell the installer to not expect (and more important, to not require) any local repository in the DVD or in the local network. In that case, the installer will be able to proceed up to the registration screen and get the information for the upcoming steps of the installation from the registration server. In the openSUSE case (where registration makes no sense), it will be able to reach the screen that allows to add more repositories.

Another step (and certainly not an easy one) to improve the installation experience for our users. Data center administrators, enjoy! 🙂

Revamping SUSE Manager Salt Formulas Support

Back in 2017, the YaST Configuration Management module got support to handle SUSE Manager Salt Formulas as part of a Hack Week project. If you do not know what this feature is about, you might be interested in checking the Forms are the Formula for Success presentation or the Hack Week project follow-up post.

Since then, the forms specification has evolved quite a lot and YaST support was basically outdated. So on November 2018 we started to work in order to bring the missing pieces to the YaST module. Basically, we rewrote the forms support and, although there are still rough edges, we are pretty close to release a new version with up-to-date support for this powerful feature.

Screenshot of how the dhcpd formula looks like

Managing Custom Zones Definitions in YaST Firewall

The new YaST UI for configuring firewalld was announced in the report of the sprint #63 (four months ago… time flies!) and, since then, we have continued improving it.

firewalld ships with some predefined zones. Although it covers most users needs, in addition it allows the user to define custom zones. During the last sprint we have added support in the new UI and also in AutoYaST to manage custom zones.

YaST2 Firewall custom zones definition dialog

During the development process some problems detected in the AutoYaST configuration were addressed too.

Updated YaST Branding and Icon Handling

In the past the YaST icons were included in the yast2-branding-openSUSE (openSUSE) and yast2-theme-SLE (SUSE Linux Enterprise) packages. The standard YaST icons were included in these packages, the standard YaST modules did not include any icons.

However, the disadvantage for the icon designer was that it was not clear which icons were really used.
If you wanted to update the icon theme you could potentially do a lot of useless work because some icons were not used anymore.

Now the icons are included in the respective YaST package, if the package is dropped the icon is dropped as well.

The package manager UI includes compiled-in fallback icons. That means if the branding package is broken or the icon files are accidentally deleted from disk then it will be still usable for emergency recovery.

The branding still works, the vendor can still provide specific icons which will override the included ones. So it is still possible to have a different look in the openSUSE and SLE products.

YaST2 Control Center new branding Screenshot

A big thank you goes to Stasiek Michalski and Noah Davis from the community who did the changes in the YaST code, designed the new icons and did a lot of cleanup!

Improving Performance when Loading Huge /etc/hosts Files

It might happen that you need to maintain a huge /etc/hosts file, especially when dealing with ads blockers. Such file with thousands of lines took an incredible amount of time to get loaded into YaST2. On some configurations it could even happen that loading a /etc/hosts with around 10.000 lines freezes the system completely. After some refactoring in YaST2 Host module, the performance has been significantly improved and loading a file with 10.000 lines now takes approximately 30s on the same configuration where it crashed before.

Disabling CD/DVD Repositories After Installation

If you install your system from a CD/DVD source it usually happens that this repository was not available for whole live of the system. In some use cases this was only uncomfortable because of some warnings but, in other cases, it caused serious complications, for instance, when trying to do a migration.

In the past, under some circumstances, those repositories were already disabled. But, from now on, they will be disabled always in order to avoid unwanted side effects.

Closing Thoughts

That’s all for the first report of 2019. In case you are wondering, the plan is to stick to the plan of publishing a report after each sprint, so expect the next one in about two weeks.

However, we recently had to migrate from the so called GitHub Services (now deprecated) to GitHub web hooks, so you might get an extra blog post about that very soon.

Stay tuned!