Home Home > 2019
Sign up | Login

Deprecation notice: openSUSE Lizards user blog platform is deprecated, and will remain read only for the time being. Learn more...

Archive for 2019

Getting further with Btrfs in YaST

June 19th, 2019 by

Since the YaST team rewrote the software stack for managing the storage devices, we have been adding and presenting new capabilities in that area regularly. That includes, among other features, the unpaired ability to format and partition all kind of devices and the possibility of creating and managing Bcache devices. Time has come to present another largely awaited feature that is just landing in openSUSE Tumbleweed: support for multi-device Btrfs file systems.

As our usual readers surely know, Btrfs is a modern file system for Linux aimed at implementing advanced features that go beyond the scope and capabilities of traditional file systems. Such capabilities include subvolumes (separate internal file system roots), writable and read-only snapshots, efficient incremental backup and our today’s special: support for distributing a single file system over multiple block devices.

Multi-device Btrfs at a glance

Ok, you got it. YaST now supports multi-device Btrfs file system… but, what that exactly means? Well, as simple as it sounds, it’s possible to create a Btrfs file system over several disks, partitions or any other block devices. Pretty much like a software-defined RAID. In fact, you can use it to completely replace software RAIDs.

Let’s see an example. Imagine you have two disks, /dev/sda and /dev/sdb, and you also have some partitions on the first disk. You can create a Btrfs file system over some devices at the same time, e.g., over /dev/sda2 and /dev/sdb, so you will have a configuration that looks like this.

        /dev/sda                /dev/sdb
            |                       |   
            |                       |   
     ---------------                |   
    |               |               |   
    |               |               |   
/dev/sda1       /dev/sda2           |   
                    |               |   
                    |               |   
                     ---------------
                            |   
                          Btrfs
                            |   
                            |   
                            @ (default subvolume)
                            |   
                            |   
                 -----------------------
                |       |       |       |   
                |       |       |       |   
              @/home  @/log   @/srv    ...

Once you have the file system over several devices, you can configure it to do data striping, mirroring, striping + mirroring, etc. Basically everything that RAID can do. In fact, you can configure how to treat the data and the Btrfs meta-data separately. For example, you could decide to do striping with your data (by setting the data RAID level to the raid0 value) and to do mirroring with the Btrfs meta-data (setting it as raid1 level). For both, data and meta-data, you can use the following levels: single, dup, raid0, raid1, raid10, raid5 and raid6.

The combination of this feature and Btrfs subvolumes opens an almost endless world of possibilities. It basically allows you to manage your whole storage configuration from the file system itself. Usage of separate tools and layers like software-defined RAID or LVM are simply dispensable when using Btrfs in all its glory.

Managing multi-device Btrfs with the YaST Partitioner

Interesting feature indeed, but where to start? As usual, YaST brings you the answer! Let’s see how the YaST version that is currently being integrated in openSUSE Tumbleweed will ease the management of this cool Btrfs feature. SLE and Leap users will have to wait to the next release (15.2) to enjoy all the bells and whistles.

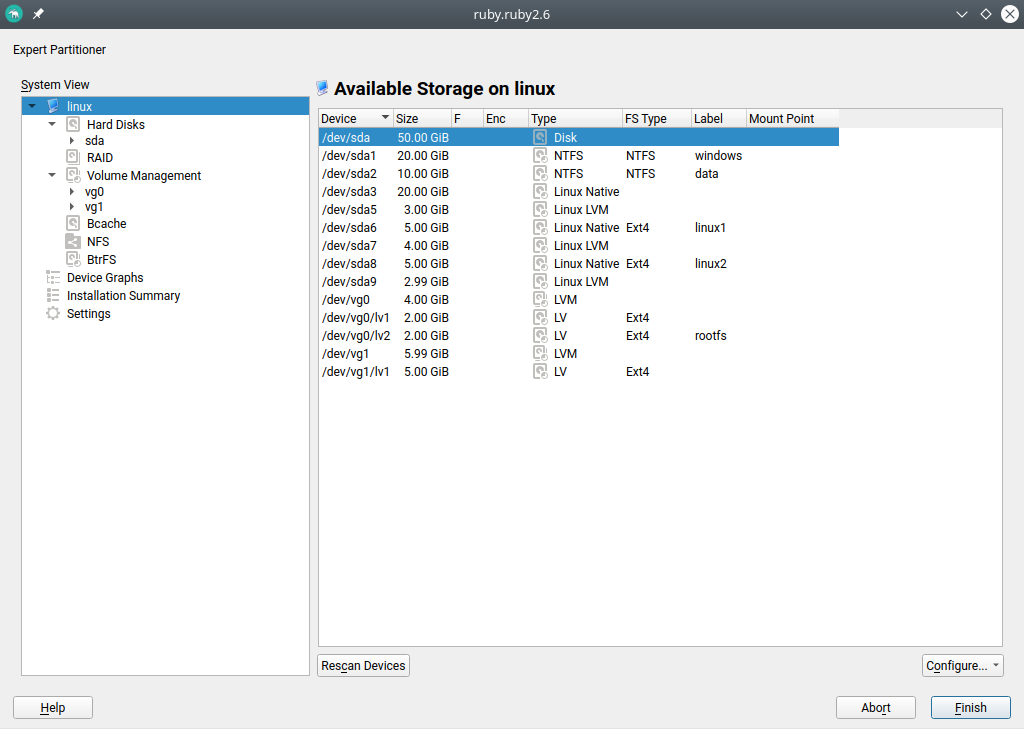
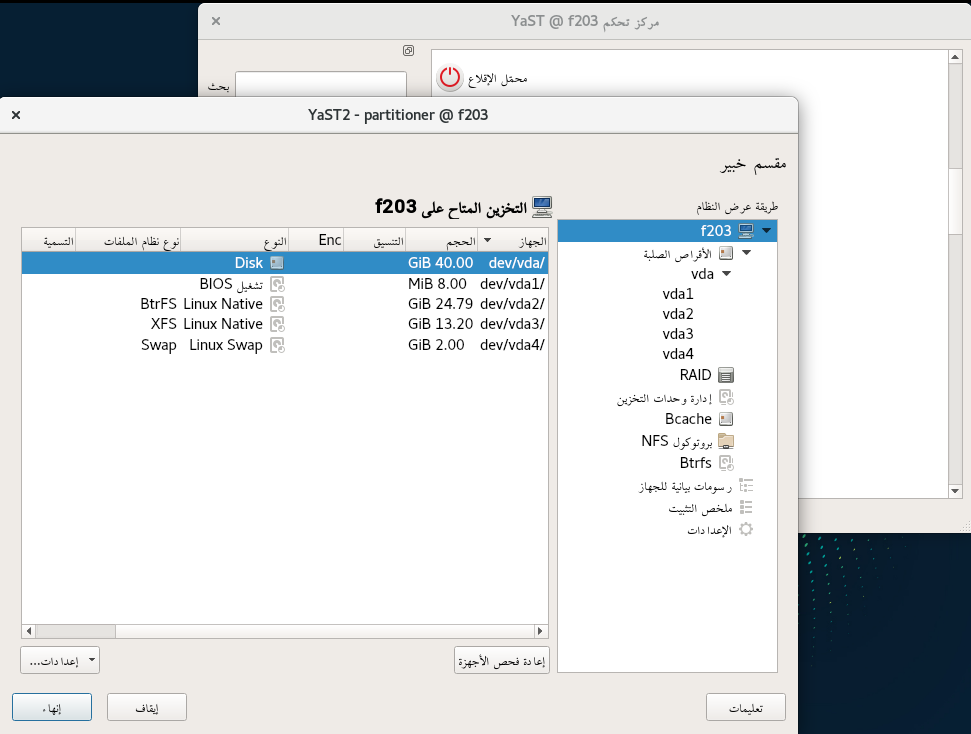
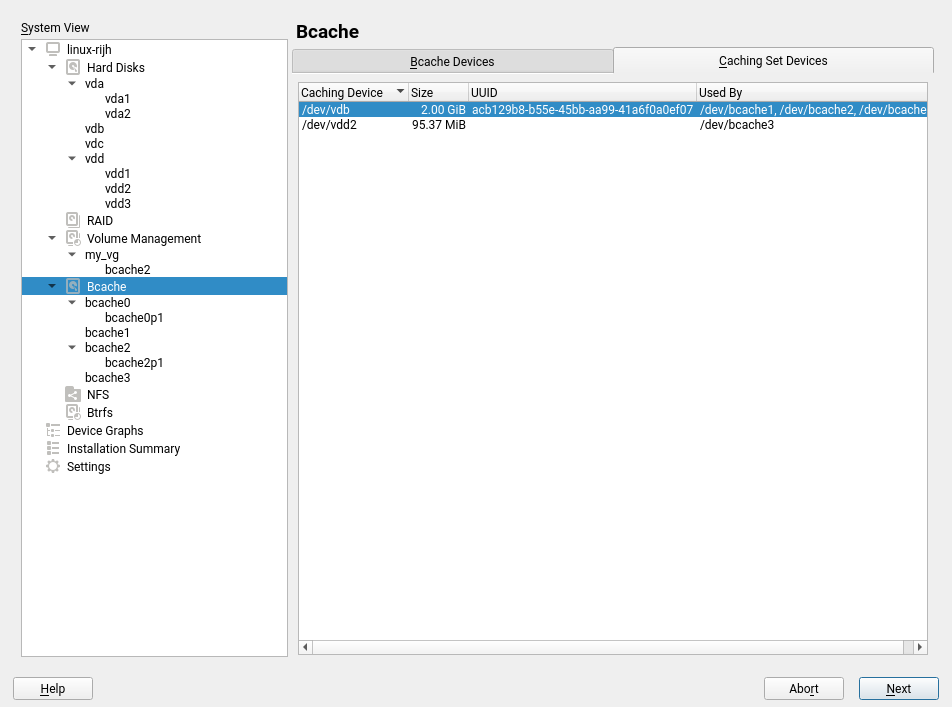
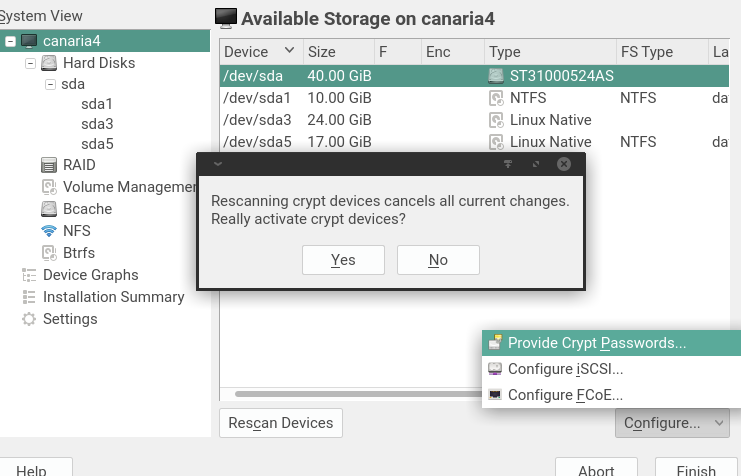
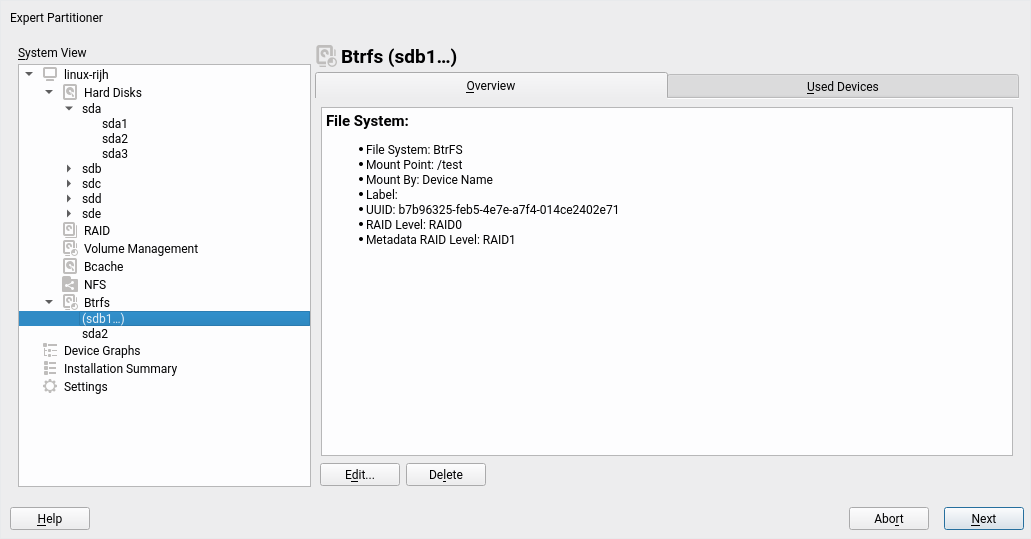
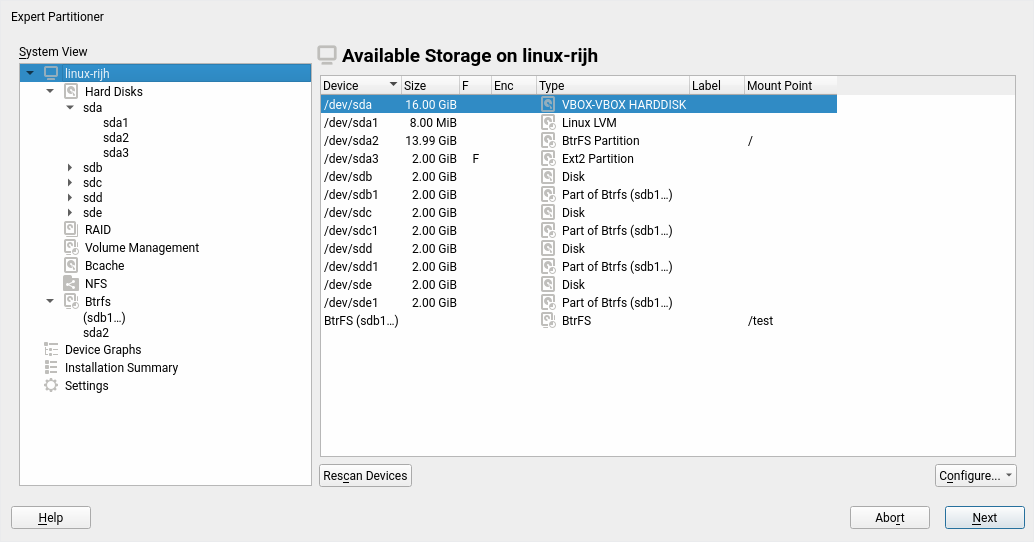
First of all, the Btrfs section of our beloved Expert Partitioner has been revamped as shown in the following picture.

New Btrfs section of the Partitioner

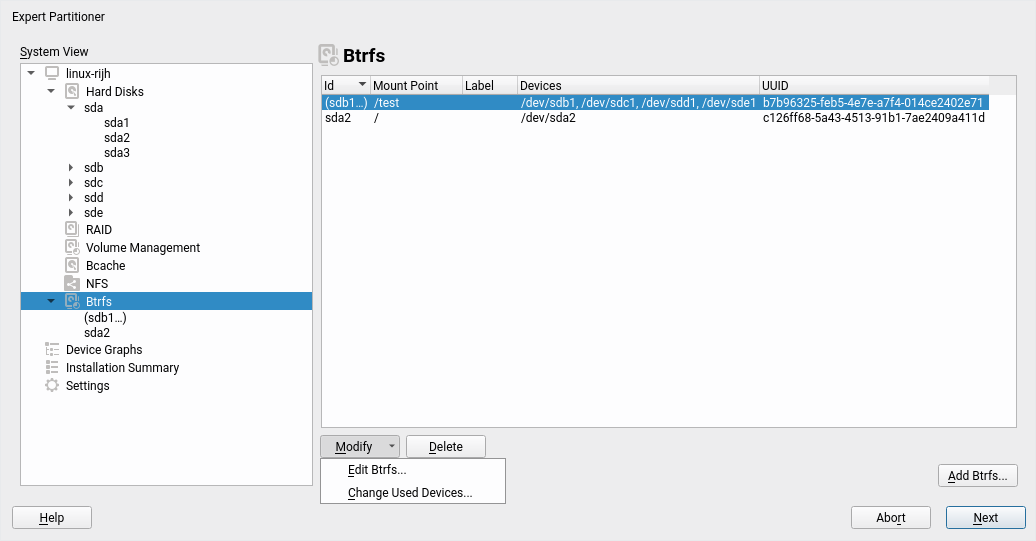
It lists all the Btrfs file systems, single- and multi-device ones. You can distinguish them at first sight by the format of the name. The table contains the most relevant information about the file systems, alongside buttons to add a new file system and to delete and modify the existing ones.

Existing Btrfs file system can be inspected and modified in several ways. The “Overview” tab includes details like the mount point, file system label, UUID, data and meta-data RAID levels, etc. The file system can be edited to modify some aspects like the mount options or the subvolumes.

Overview of a Btrfs file system

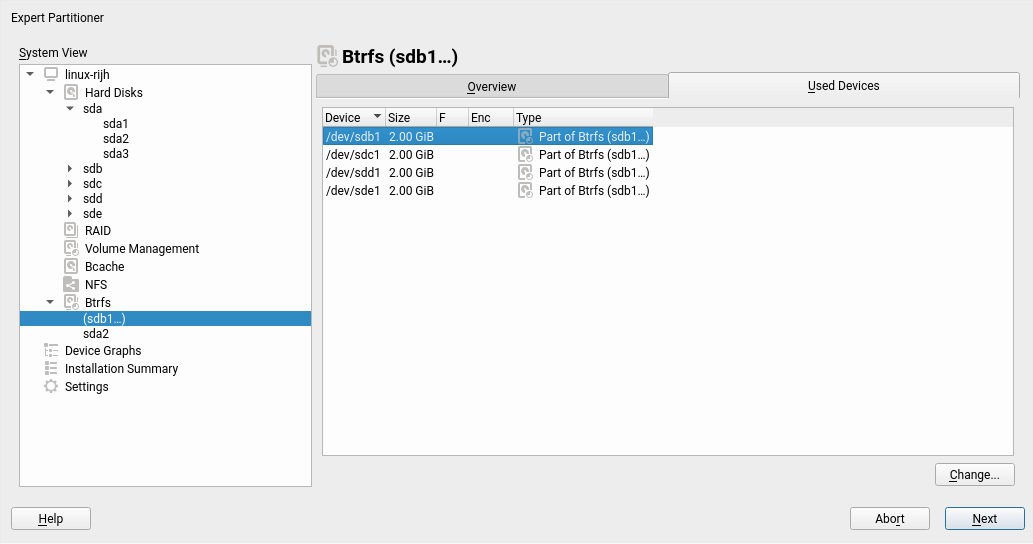
In addition, the tab called “Used Devices” contains a detailed list of the block devices being used by the file system. That list can also be modified to add or remove devices. Note such operation can only be done when the file system does not exist on disk yet. Theoretically, Btrfs allows to add and remove devices from an already created file system, but a balancing operation would be needed after that. Such balancing operation could take quite a considerable amount of time. For that reason it has been avoided in the Expert Partitioner.

Devices of a Btrfs file system

Of course, you can still format a single device as Btrfs in the traditional way (using the “edit” button for such device). But let’s see how the new button for adding a Btrfs file system opens new possibilities.

Adding a Btrfs file system

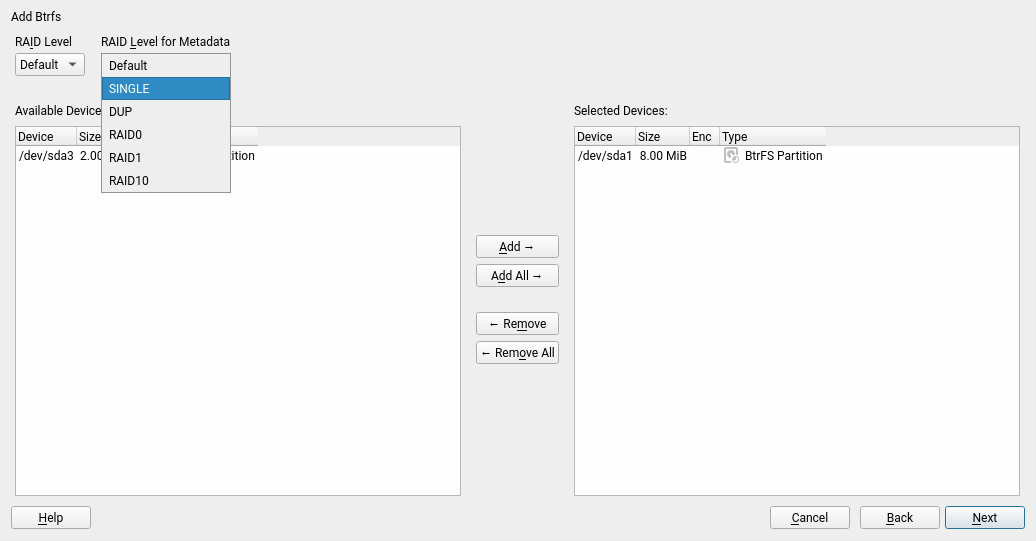
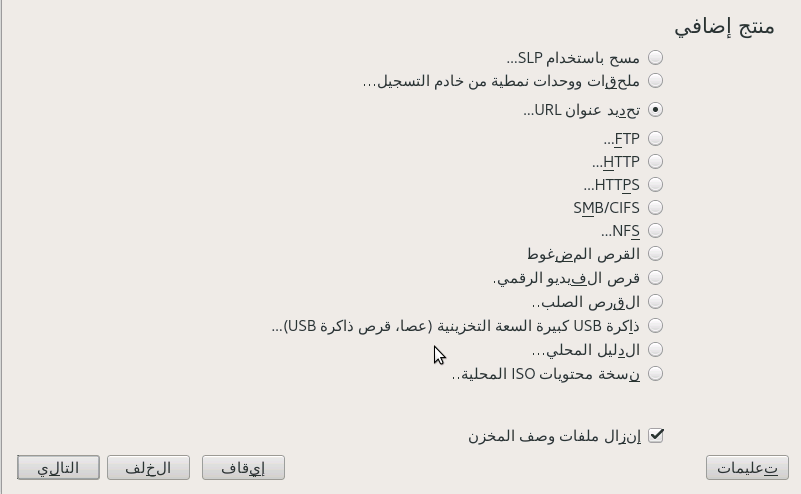
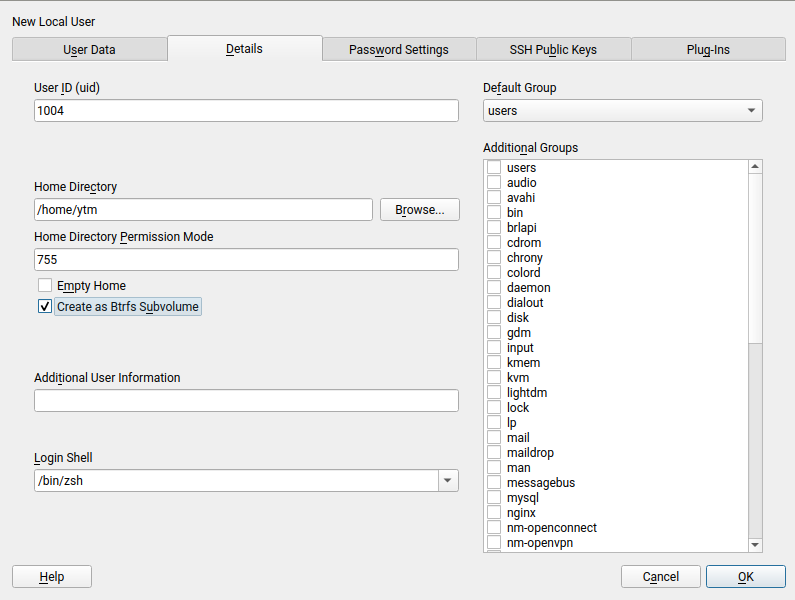
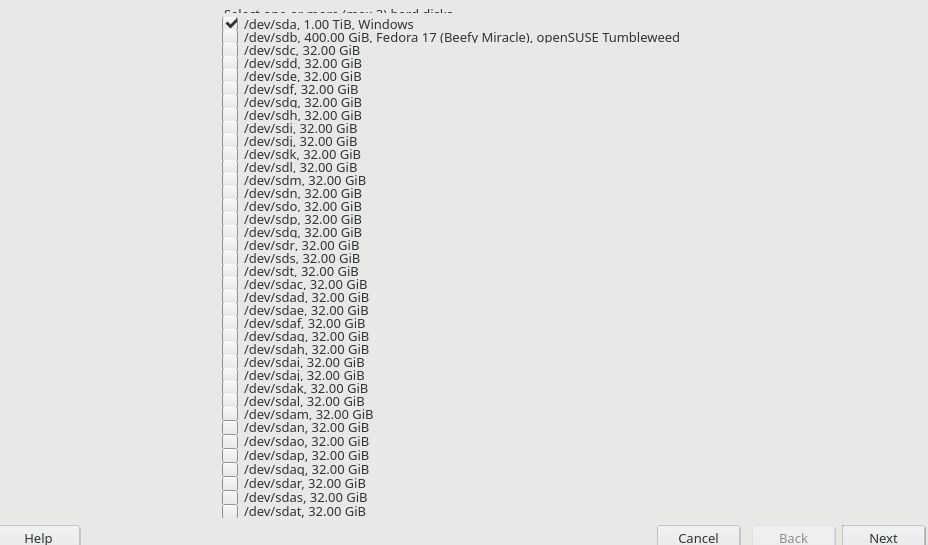
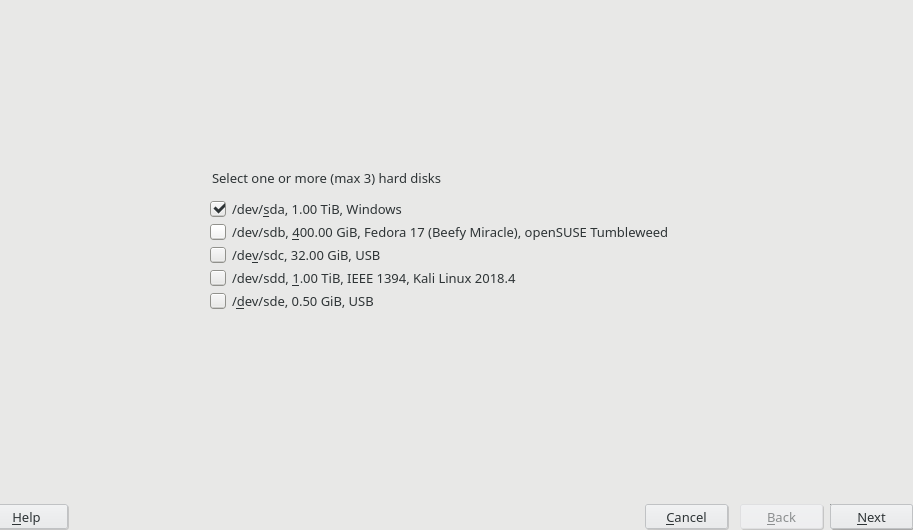
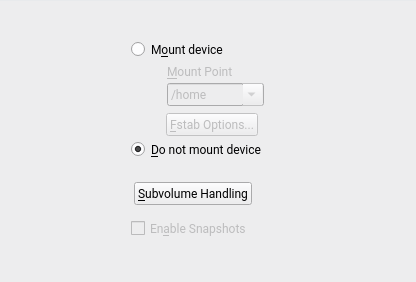
Similar to the RAID dialog, you have the available devices on the left and you can select the devices where you want to create the file system, and also you can indicate the data and meta-data RAID levels. Of course, the admissible RAID levels will depend on the number of selected devices. You will go to the second step of the Btrfs creation by clicking the “Next” button. In this second step, you can select the mount options and define the subvolumes, see the next image.

Options for a new Btrfs file system

And apart of all that, the Expert Partitioner has received several small improvements after including multi-device Btrfs file systems. Now that the multi-device Btrfs file systems are considered first class citizens, they are included in the general list of devices. Note the “Type” column has also been improved to show more useful information, not only for Btrfs but for all kind of devices.

Revamped list of devices

What else works?

But YaST goes far beyond the Partitioner. We have also ensured the storage proposal (i.e. the Guided Setup) can deal with existing multi-device Btrfs configurations when you are performing a new installation. Moreover, the upgrade process is also ready to work with your multi-device Btrfs file system.

Last but not least, AutoYaST can now also be used to specify that kind of Btrfs setups. The official AutoYaST documentation will include a specific section about advanced management of Btrfs file systems on top of several block devices. The content is being reviewed by the SUSE documentation team right now.

What does not work (yet)?

There is still one scenario that is not 100% covered. As described in bug#1137997, is still not possible to use the “Import Mount Points” button in the Partitioner to recreate a multi-device Btrfs layout. But fear not, it’s in our list of things to fix in the short term!

Get it while it’s hot

Free Software development is a collaborative process and now we need YOU to do your part. Please test this new feature and report bugs if something does not work as you expected. And please, come with your ideas and further improvements and use cases. And, of course, don’t forget to have a lot of fun!

Highlights of YaST Development Sprint 76

April 30th, 2019 by

While the openSUSE Conference 2019 is approaching, the YaST team is still busy not only fixing small bugs for the upcoming (open)SUSE releases but working on features and changes for later versions.

Although there is much more work behind this sprint, we will have a look at these changes in this report:

  • The first bits of the YaST Network refactoring have been submitted to factory.
  • AutoYaST gets support for specifying NFS shares in a sane way.
  • The Partitioner’s tree behaviour has been improved.
  • Libyui has been updated to support Qt 5.13 (do not miss the screenshots in this report).
  • The installer does not offer enabling autologin for text-only system roles.

But that’s not all. We have some pretty exciting news regarding the LibYUI Testing Framework which, hopefully, will reduce the hassle of maintaining YaST openQA tests in the future. If you are interested, we published a separate post a few days ago with all the details about this topic.

Submitting First Bits of the YaST Network Refactoring to Factory

yast2-network 4.2.2 is the first version which includes some code from the ongoing refactoring effort. As we announced in our last report, we have just started and there is a long road ahead of us, but you can see some results already in the routes management area.

Additionally to cleaning up and improving the codebase quality, we are fixing some bugs and introducing some minor enhancements along the process. For instance, version 4.2.2 permits to have multiple default routes and does not drop extra options for them.

New network routing dialog

If you want to know more details about the process, you might be interested in the kickstart meeting notes that we added to our repository a few days ago.

Auto-installation onto NFS Shares: the Sane Way

During the previous sprint, AutoYaST was powered again with the capability of installing onto an NFS share. That feature was available in SUSE Linux Enterprise 12 (and openSUSE 42.x) but, for several reasons, we did overlook it when the new storage stack was re-implemented for (open)SUSE 15.

The problem with this feature in older versions, apart of not being documented at all, is that it requires to use some hacks and a non-validating AutoYaST profile. For that reason, we have redesigned how NFS drives are described in the AutoYaST profile. With the new format, we have a drive section per each NFS share, for example,

<partitioning config:type="list">
  <drive>
    <device>192.168.1.1:/exports/root_fs</device>
    <type config:type="symbol">CT_NFS</type>
    <use>all</use>
    <partitions config:type="list">
      <partition>
        <mount>/</mount>
        <fstopt>nolock</fstopt>
      </partition>
    </partitions>
  </drive>
</partitioning>

Although the old format is still supported to keep backward compatibility, we encourage you to use the new one for now on. And of course, this feature will be appropriately documented in the official (open)SUSE 15 documentation.

No Longer Offering Autologin for Text-Only System Roles

Autologin is a feature that most modern display managers (KDM, GDM, SDDM, LightDM) offer as a convenience function for home users. Users reported that YaST also provided this for the “Server (text only)” system role where that does not make sense, so we fixed that.

Yet Another Qt Version

This is not actually a big deal; there is another version of the Qt libs which we use for the graphical version of YaST. Now it’s Qt 5.13, and we needed to adapt some functions that have become obsolete in the meantime. Fortunately, Qt always provides drop-in replacements for things they obsolete, so this was mostly a pretty mechanical task to go through the warnings about functions or classes that are now obsolete and replace them with the new counterpart.

But how long have we been doing that? Quite a while, actually; it all started with Qt 2.x in late 1999 for SuSE Linux 6.3. That was the first YaST2. It already came in both a Qt version with a graphical user interface and in a text-only (NCurses) version.

SuSE Linux 6.3 Installer

Back then we were more advanced than the KDE of that time: KDE 1.x was still using Qt 1.x, and the first version of YaST2 already used Qt 2.x. We kept upgrading throughout all the Qt 2.x versions and in SuSE Linux 9.0 we jumped to Qt3, which looked like this.

SuSE Linux Professional 9.0

And as you know, that’s not the end of the story. We have kept updating through all the Qt 3.x, Qt 4.x and now Qt 5.x versions, as you can see in the following screenshot of the upcoming openSUSE Leap 15.1. It’s been a while: almost 20 years of happy Qt usage, always up-to-date.

openSUSE Leap 15.1

Improving the Partitioner UX

When it comes to UX, the tree of our new and shiny partitioner needed some love. We fixed an annoying issue which caused all the branches to be expanded after every change on any device. Besides that, we also changed the initial view. See the screenshot below in which sections -levels with icons like “Hard Disks” or “RAID”- are initially expanded and items representing devices are collapsed, not displaying, for example, the full list of partitions until the user decides to expand those.

YaST Partitioner Screenshot

However, the bad news is that these changes will not be available in (open)SUSE 15.1, although you can give it a try as soon as they land in Tumbleweed.

Let’s Talk about Multi-device Btrfs

The improved behavior of the navigation tree is not the only enhancement in the Partitioner we are preparing for the future (where “future” means Tumbleweed and the 15.2 releases of both SLE and openSUSE Leap). We also want to make possible to use the YaST Partitioner to define Btrfs file-systems that spread over several disks and partitions. That’s a pretty unique feature of Btrfs that combines at file-system level certain characteristics usually offered by software RAID and LVM.

But that also implies a quite different way of organizing the storage devices, which is a challenge to represent in the already complex user interface of the Expert Partitioner. So, first of all, we have put together this document describing all the struggles of representing advanced Btrfs features in the Partitioner, together with some possible solutions for the short and mid terms.

Please, feel free to provide feedback about the proposed solutions and to offer new ones. Help us to shape the future of the YaST interface!

Conclusions

As we mentioned at the beginning of this report, we owe you a blog post about the Libyui Testing Framework status. But as you wait for it, you might want to register for the openSUSE Conference or check the schedule.

Announcing LibYUI Testing Framework

April 26th, 2019 by

The LibYUI framework brings enormous advantage when you need an application which can be used with X and ncurses. But while for Qt, integration testing is a solved problem, meaning there are multiple tools available, the situation is not that rose-colored in case of ncurses. On top, using different tooling would require additional efforts for the framework development. So everything started with openQA, which is using screen comparison with advanced fuzzy logic. This approach kept the costs of the tests development low, but maintenance is still painful when UI changes.

Considering all of the above, Ladislav Slezák and Rodion Iafarov has been working on a proper solution taking Ladislav’s proposal for Hack Week 15 as starting point. The idea is plain simple: provide an HTTP/JSON API which allows interacting with LibYUI by reading and setting different UI properties. Consequently, if some button was moved, resized or got new shortcut key assigned, we do not need to adapt the test code anymore.

Obviously, this functionality is not required in a production system, so we have created separate packages for this purpose. Here you can find GitHub repository containing some documentation.

Demo time!

As cool as it sounds, it is even better when you see it in action. In the screencast below you can see how the user can interact with YaST Host module using cURL from the command line.

LibYUI Testing Framework in Action

How to Test the New Packages

If you want to give it a try, you can use the packages we have prepared for you. However, it is recommended to use a virtual machine to not pollute (or accidentally break) your system. You have been warned. 🙂

First of all, you need to get new packages, which are currently available in YaST:Head project in OBS. Navigate to Repositories tab and get the repository which matches the distribution you are running. Afterwards you should be able to install libyui-rest-api package. Also, you need to update related packages and YaST2 modules were recompiled using latest LibYUI. To do that, simply run the following command, where YaST:Head is the repository added in the previous step:

zypper up --allow-vendor-change -r YaST:Head

With the required software in place, you need to start a YaST module setting the environment variable Y2TEST to 1:

xdg-su -c 'Y2TEST=1 YUI_HTTP_PORT=9999 yast2 host' # for Qt
sudo Y2TEST=1 YUI_HTTP_PORT=9999 yast2 host # for ncurses

To allow remote connections you can add YUI_HTTP_REMOTE=1. For security reasons, only connections from localhost are allowed by default.

Now you should be able to see something like the screenshot below by navigating with your browser to http://localhost:9999.

LibYUI Testing Framework Browser

Further steps

As you can see, we have not implemented a wrapper for the POST and GET requests to the HTTP server yet, although it will be the next step. We are trying to to find a solution which allows us running tests locally from the terminal, in CI using stable distribution versions, and finally in openQA for development builds.

Other things which are coming:

Security Notice

YaST is usually running with the root permissions, that means everybody who can connect to the HTTP/JSON API can read the values and send button clicks. And because there is no authentication yet, this is a big security problem. In a nutshell: do not use the API in production systems! It has been designed only for testing in a secure environment.

Closing Thoughts

We are pretty excited about this project for several reasons. On the one hand, because we expect it to reduce the maintenance burden of our integration tests. On the other hand, because it is a nice example of Hack Week benefits and cross-team collaboration.

If you are interested, we will try to keep you in the loop by posting information regularly as part of YaST sprints reports.

Highlights of YaST Development Sprint 75

April 10th, 2019 by

With the upcoming releases of openSUSE Leap 15.1 and SLE-15-SP1 approaching, the YaST Team at SUSE is investing a quite significant time in polishing details and fixing small (and not so small) bugs. But fortunately, that still leaves us enough time to also work in our mid term goals.

So welcome to our usual selection of selected bug-fixes (listing them all would be boring) and exciting new stuff. This edition includes:

  • A nice howto for reporting Snapper bugs
  • Tons of fixes for right-to-left languages like Arabic
  • Some adjustments and improvements in the storage area
  • A sneak peak into the future of the yast2-network code
  • Some contributor-oriented content: like our new pull request templates and revamped Docker images for testing

Snapper Bug Reporting Howto

During this sprint we fixed a bug that was causing Snapper to crash under very specific circumstances. The scenario was quite unusual so we had to request quite some information from the reporter of the bug to confirm what was happening. As a nice consequence, in addition to having now a more robust Snapper (one bug killed) you can also enjoy a new page in the openSUSE wiki listing the information you should attach to Bugzilla if you find a bug in Snapper while using (open)SUSE.

Which is also a nice excuse to remind you about the equivalent "Report a YaST bug" page.

YaST around the globe… in all directions

Many of the YaST users and of our blog readers are not native English speakers that surely appreciate the fact that YaST and (open)SUSE in general can be used in several languages. But have you ever thought about the implications of developing a multi-language software? Sure? In all of them? 😉

Human languages are so diverse as the human cultures and there are many details to take into account, from the usage of different alphabets to the various ways of dealing with genre or number (in English the words have just one form for singular and another for plural, but that can be way more complex in other languages). In today’s issue we will take a look to one of our favorite translation issues – languages that are written from right to left, like Arabic.

The installer summary in Arabic

Dealing with text that is a mixture of Latin and Arabic script is complex and sometimes we have to deal with interesting bugs. Fortunately we have our own weapon to fight those bugs. If in Star Wars they have protocol droids like C3PO, in the YaST team we have Martin Vidner, which is the closer human equivalent.

He fixed all the reported bugs and even created a tool to help debugging similar problems in the future. You can find the source code of that tool in Github. There is even a hosted instance of the tool to be used by translators or anyone who is curious.

Now, even complex interfaces like our Partitioner look correct enough in right-to-left languages, so we will not have to send mirrors to all our Arabic users.

The YaST Partitioner in Arabic

If you want to know more about this exciting but very complex problem of bidirectional texts, you can start with the following documents.

  • Martin’s great summary of the types problems found in YaST and their respective solutions.
  • Wikipedia: Bi-directional text, an overview of the concepts
  • Unicode Standard Annex #9: Unicode Bidirectional Algorithm, the gory details, 50 pages of them
  • More Arabic YaST

    On related news, we got also some reports about some problems visualizing bullet-points in Korean with the beta versions of the future SLE-15-SP1. But as we could verify, all those problems are gone now.

    SLES installer in Korean

    Storage Fixes

    Other area that has received some attention in this sprint is the storage management. Three related features needed adjustments before the upcoming (open)SUSE releases:

    • Fixed the detection of the boot disk in the Partitioner warnings.
    • The Guided Setup now works better when doing several attempts in different disks.
    • AutoYaST can now install over NFS.

    One of the last storage features that the YaST Team has developed is the support for Bcache devices in the Expert Partitioner. While our QA team was testing it, they found a bug. The Partitioner was complaining because the boot disk did not contain a partition table, which is a mandatory condition for a Legacy (non-UEFI) x86 system. But it was a bogus warning, since they had actually defined a /boot partition in another disk.

    That’s how we found that our Partitioner gets confused if there is a separate partition mounted at /boot and located in a different disk than the root file-system. The Partitioner insisted in considering the disk containing / to be the one that would be using for booting, instead of checking the structure of the disk containing /boot. Now that is fixed and the improvement will be available for the upcoming SLE 15 SP1, Leap 15.1 and, of course, openSUSE Tumbleweed.

    But that was not the only storage bug fixed just in time for the upcoming releases. Some sprints ago, the Storage Proposal algorithm for the initial proposal was modified to try installing on each of the individual disks. If the installation was not possible over a given disk, even after disabling all optional configurations (e.g., snapshots and separate /home), a new proposal is tried over the next disk and so on. The problem was that the disabled options in the previous attempt were not restored back when switching to the next disk. This caused some ugly side effects, for example, if the swap partition was disabled when trying over the first disk, then the proposal did not try to create a swap when it was performing the proposal over the next disk. But now this is also fixed and it will work as expected.

    And last but not least, AutoYaST now supports to install over a Network File System (NFS). This feature was left back when the new YaST storage stack was re-implemented for SLE 15 GA. Actually, this is a non documented feature. That’s why we overlooked that SUSE 12 was able to do it using some hacks and a non-validating AutoYaST profile. But no worries, the feature is available again and such profile will work now in any updated SLE-15 or Leap 15.0. Of course, it will also work while installing SLE-15-SP1 or openSUSE Leap 15.1 and Tumbleweed.

    Nevertheless, we are working on a better and documented way of supporting that scenario in the future, with no need to twist the specification of the AutoYaST profile. Stay tuned for more information.

    Rethinking the Location of Special Boot Partitions

    And now that the storage layer looks sane and healthy for the upcoming releases, we also took some time to think about future improvements. As you know, the storage Guided Setup always proposes to create special boot partitions as needed on each case. That can be a BIOS BOOT (for Legacy x86 systems with GPT), an ESP (for UEFI systems), PReP (for PPC systems) or zipl (for S/390 systems). Strictly speaking those partitions doesn’t have to always be in the same disk than the root partition and in some cases having it on a separate one can have some advantages (like sharing the ESP partition with another operating systems).

    But we have been reconsidering all the cases, the expectations of most users and of the majority of BIOS vendors and the known bugs in other operating systems about sharing boot partitions. We have decided to be more strict in the future about the location of those partitions. Starting today with openSUSE Tumbleweed and in the 15.2 releases of openSUSE Leap and SLE, the Guided Setup will always propose those partitions in the system disk. That is, in the disk containing /boot and the root filesystem.

    The future of YaST Network is here

    Those who follow this blog know that we invested quite some time on the last couple of years rewriting the part of YaST that was more buggy and harder to modify – the storage stack. And surely you have already noticed that since we did it we are introducing new features at a very good pace (like bcache, more powerful Partitioner, Raspberry Pi support, etc.) and fixing the reported bugs in a matter of days or even hours.

    The next in our list of YaST areas to revamp is the networking support. And we are happy to announce that we are starting to have some visible results in that. There is still a very long road ahead and we will provide more information in upcoming reports. But at least we have already a preview of a fully rewritten management of network routes. It’s still not available in openSUSE Tumbleweed. But for those who can’t wait, here you can see the first screenshot. All based in new and clean code backed by automated tests.

    New network routing dialog

    Activating Online Repositories in openSUSE Leap 15.1

    The openSUSE Tumbleweed installer asks at the beginning of the installation whether to activate and use the online repositories when a network connection is available.

    The reason is that the installation DVD does not contain all available packages because of the limited media size. Another advantage is that the installer might directly install newer packages than on the media, this avoids installing the older versions first and then upgrading them to the latest version.

    However, in some case you might not want to use the online repositories, for example if the network connection is slow or is paid.

    We got a bug report that this question was missing in the Leap 15.1. It turned out that the control.xml file which drives the installer did not contain this step. After adding few lines into the file you can now enjoy the online repositories also in Leap 15.1!

    Online repositories in Leap 15.1

    Why are we writing about this? The reason for the missing step in the Leap 15.1 was a bit surprising. Normally all YaST packages are developed in the Git master branch for both Tumbleweed and Leap. However, in this case the Leap 15.1 has been already branched and was developed separately, the changes in the master went only to the Tumbleweed. And we overlooked that small difference when adding this step.

    To avoid this in the future we added a pull request template with a reminder which informs the developers about this difference in the Git setup when opening a pull request.

    If your project also has some unusual setup then the pull request template might a good reminder for you as well.

    Building the Docker Images in OBS

    But the reminders about the correct branches and procedures is not the only news we have for YaST contributors and main developers. As you may remember, few years ago we switched to using Docker at Travis. That works well but we found some disadvantages of that initial setup.

    • You need extra account at the Docker Hub to manage the images.
    • There is no link between OBS and the Docker Hub, we cannot easily trigger image rebuild when a package is updated in OBS.
    • We only blindly triggered the rebuild every 2 hours (in some cases the rebuild is not necessary, in some cases it took too much time).
    • The Docker Hub can use the new OBS packages only after they are published by OBS.
    • The build at the Docker Hub is quite slow (~20 minutes in our case), if an image is currently being built the build is added into the queue and it will start after the previous builds are finished.

    The result is that a new package can be available in Travis several hours after merging the pull request. And even after triggering the build manually it still might take more than one hour.

    We needed a faster cycle and the solution, as usually happens, was in the openSUSE ecosystem. As you may know, the Open Build Service is able of much more than just building packages. So we decided to make use of the OBS capacity of building Docker images.

    Building both our packages and our Docker images in OBS comes with many advantages:

    • The image build is started immediately when the new packages are built, it does not wait for publishing the packages and does not wait for full rebuild (only for the needed packages).
    • No extra accounts/permissions (just use your OBS account).
    • The build in OBS is faster (6-7 minutes).
    • No need for extra Jenkins jobs periodically triggering the image rebuilds.

    This means the new packages should be available in the Docker image in about 10-15 minutes after merging a pull request (for leaf packages, changing a core package which triggers a complete YaST rebuild will of course take more time).

    If you want to learn more about this topic, take a look to the following links:

    And that was not all!

    As usual, the content of this report is just a small subset of all the work the YaST Team does in two weeks. In this sprint, most of that work went to fixing all kind of bugs in preparation for the next releases. Big bugs, small ones, hidden bugs and embarrassingly obvious ones. Hopefully, you got a fix for your reported bug. If not, you can always stay tuned for more news after the next sprint. And don’t forget to have a lot of fun!

experimental openSUSE mirror via IPFS

April 3rd, 2019 by

The InterPlanetary File System (IPFS) can be used to provide files in a more efficient and distributed way than HTTP.

Our filesystem repo already has the go-ipfs client.

You use it with
ipfs daemon --init

And then you can add my Tumbleweed mirror with
zypper ar http://127.0.0.1:8080/ipns/opensuse.zq1.de./tumbleweed/repo/oss/ ipfs-oss

You can also browse the content online at
http://opensuse.zq1.de./tumbleweed/repo/oss/ . During my testing I found that the results are sometimes inappropriately cached on the Cloudflare CDN, so if you used it under this URL without the ipfs client, this might throw signature errors in zypper.

On the server side, the mirror is updated using the syncopensuse script from
https://github.com/bmwiedemann/opensusearchive and consistency of the repo is verified with checkrepo

When a complete repo was synced, dynaname updates a DNS entry to point to the new head:

> host -t txt _dnslink.opensuse.zq1.de.
_dnslink.opensuse.zq1.de is an alias for tumbleweedipfs.d.zq1.de.
tumbleweedipfs.d.zq1.de descriptive text “Last update: 2019-04-03 12:23:43 UTC”
tumbleweedipfs.d.zq1.de descriptive text “dnslink=/ipfs/QmSXEVuU5z23rDxMyFYDhSAUaGRUPswuSXD3aVsBEzucjE”

If you got spare bandwidth and 300 GB disk on some public server, you could also host a mirror of today’s version, simply by doing ipfs pin add QmSXEVuU5z23rDxMyFYDhSAUaGRUPswuSXD3aVsBEzucjE

This is a permalink: http://127.0.0.1:8080/ipfs/QmSXEVuU5z23rDxMyFYDhSAUaGRUPswuSXD3aVsBEzucjE also browsable via any public IPFS gateway. This means, it will always remain on the 20190401 version of Tumbleweed and no changes in content are possible – similar to how a git commit ID always refers to the same data.

So why did I create this IPFS mirror? That is related to my work on reproducible builds for openSUSE. There it regularly happened that published Tumbleweed binaries were built with libraries, compilers and toolchains that were no longer available in current Tumbleweed. This prevented me from verifying that the published binaries were indeed built correctly without manipulation on the OBS build workers.

Now, with this archive of rpms easily available, it was possible to verify many more Tumbleweed packages than before. And most importantly, it remains possible to independently verify even after Tumbleweed moves on to newer versions. This data is going to stay available as long as anyone pins it on a reachable server. I’m going to pin it as long as it remains relevant to me, so probably a bit until after the next full Tumbleweed rebuild – maybe 6 to 12 months.

Thus, it now is even less easy to sneak in binary backdoors during our package build process.

Żegnamy forum.suse.pl i witamy forums.opensuse.org

March 31st, 2019 by

Witajcie,

10 września 2004 roku cyberluk wysłał do mnie i do Mirona taką wiadomość:

Witam,

Od początku istnienia Forum uważnie obserwujemy użytkowników i ich wypowiedzi. Wczoraj padła propozycja, żeby zaoferować dwom osobom moderowanie Forum. Dzisiaj po dyskusji na ten temat ustaliliśmy, że faktycznie te osoby dostana status moderatora, oczywiście o ile się na to zgodzą. Jedna z tych osób jest Pan. Czy pasuje Panu status moderatora?
Drugiej osoby na razie nie ujawniamy. Dostanie takiego samego maila.
Oczywiście cala załoga będzie nadal patrzeć, co się dzieje z Forum, ale praca jest pracą i czasami nie ma czasu na zajmowanie sie Forum.
Liczymy na pozytywna odpowiedz. Na razie jest to status moderatora Forum, ale zaczęliśmy się również zastanawiać nad FAQiem, który byłby zbiorem problemów z Forum “w pigułce”. Oczywiście status moderatora wiązałby się z odpowiednimi uprawnieniami przy takim FAQu.

cyberluk

Oczywiście pod domeną forum.suse.pl już wcześniej był dostępny skrypt phpBB. Jednak to połowa 2004 roku spowodowała, że Forum otworzyło się na zwykłych użytkowników. To właśnie zwykli użytkownicy zdominowali Forum, tworzyli jego kontent, zarządzali nim i warto to podkreślić. Początkowo Novell Professional Services, a ostatecznie SUSE Polska, udostępniało nam, polskiej społeczności, zasoby i przestrzeń, z których z pożytkiem dla każdego z nas korzystaliśmy.

W ten sposób przez piętnaście lat zwykli użytkownicy, power userzy, a także ludzie zawodowo związani z branżą IT dzielili się między sobą doświadczeniem na Oficjalnym Polskim Forum SUSE Linux. Czas je pożegnać.

Obecnie przestrzenią dla nas będzie forums.opensuse.org. Będąc bliżej Projektu openSUSE, będzie nam łatwiej włączyć się w różnego rodzaju aktywności i koordynować je. Natomiast zwykli użytkownicy zyskają dostęp do znacznie większej społeczności.

Polska sekcja jest widoczna jako subforum pod adresem forums.opensuse.org lub bezpośrednio forums.opensuse.org/forumdisplay.php/936-Polski

W przypadku problemów z rejestracją, proszę o kontakt: pbojczuk@opensuse.org.

Poradnik przetrwania:
forums.opensuse.org/showthread.php/531844-Poradnik-przetrwania-na-forums-opensuse-org?p=2871109

Dostęp do forum.suse.pl będzie ograniczany, a samo Forum wkrótce zamknięte.

Love & bruises,
Przemysław “Stefan” Bojczuk

Highlights of YaST Development Sprint 74

March 29th, 2019 by

It took only 73 sprints to complete all YaST features, and there are none left to do. That’s what you might think after reading this article, because we worked on no features, just bug fixes.

It might be related to an upcoming release of SLE 15 SP1. For its openSUSE sibling we have put together a recap of YaST features in the upcoming openSUSE Leap 15.1 (scheduled for May 2019), since Leap 15.0 (May 2018).

No more locale errors during Kubic runtime

Did you know that an installed Kubic (the certified Kubernetes distribution & container-related technologies built by the openSUSE community) only has the American English locale (en_US) available? That is because it intends to be as small as possible (you can run du -h /usr/share/locale if you are curious enough).

However, YaST allows you to change the language and the keyboard layout at the very beginning of the installation process, which will be persisted as the default locale in the installed system. This is the reason for those locale errors mentioned above. Until now. Because we introduced some changes during this sprint to allow that the chosen language will be used only during the installation in case the product needs it.

So, from now on you can go through the installation of Kubic in your preferred language without those errors in the final system and, of course, preserving the selected keyboard layout. Not bad, huh? 😎

Various Fixes

Repositories for add-ons would be marked as disabled after the installation has finished. We have fixed this bug#1127818.

When registering your SUSE Linux Enterprise with the SUSE Customer Center or its proxy such as the SUSE Subscription Management Tool, a network timeout can occur. Formerly you had to use the Back and Next buttons to try again but we have added a Retry button for that.

When creating a new partition or editing an existing one, the widget for the partition type would list the types in a seemingly random order. We have made this widget more boring.

Highlights of YaST Development Sprint 73

March 14th, 2019 by

As (open)SUSE releases are approaching, the YaST team is basically in bug squashing mode. However, we are still adding some missing bits, like the bcache support for AutoYaST. Additionally, there are some interesting improvements we would like to let you know about:

  • AutoYaST support for using Btrfs subvolumes as user home directories.
  • Improved Certificates management in the registration module.
  • Correct detection of DASDs when using virtio-blk.
  • Proper handling of the resume option in the bootloader module.
  • Display fonts and icons properly during installation.

And, as a bonus, some insights about a YaST font scaling problem on the GNOME desktop (spoiler: not a YaST bug at all).

Adding bcache support to AutoYaST

A few days ago, support for bcache landed in the YaST Partitioner. In a nutshell, bcache is a caching system that allows to improve the performance of any big but slow disk (so-called backing device) by using a faster and smaller disk (caching device).

The way to describe a bcache in AutoYaST is pretty similar to how a RAID or a LVM Volume Group is described. On one hand, you need to specify which devices are going to be used as backing and caching devices by setting bcache_backing_for and bcache_caching_for elements. And, on the other hand, you need to describe the layout of the bcache device itself. As you would do for a RAID, you can partition the device or use it as a filesystem.

The example below creates a bcache device (called /dev/bcache0) using /dev/sda to speed up the access to /dev/sdb.

<partitioning config:type="list">
    <drive>
      <type config:type="symbol">CT_DISK</type>
      <device>/dev/sda</device>
      <disklabel>msdos</disklabel>
      <use>all</use>
      <partitions config:type="list">
        <partition>
          <!-- It can serve as caching device for several bcaches -->
          <bcache_caching_for config:type="list">
            <listentry>/dev/bcache0</listentry>
          </bcache_caching_for>
          <size>max</size>
        </partition>
      </partitions>
    </drive>

    <drive>
      <type config:type="symbol">CT_DISK</type>
      <device>/dev/sdb</device>
      <use>all</use>
      <!-- <disklabel>none</disklabel> -->
      <disklabel>msdos</disklabel>
      <partitions config:type="list">
        <partition>
          <!-- It can serve as backing device just for one bcache -->
          <bcache_backing_for>/dev/bcache0</bcache_backing_for>
        </partition>
      </partitions>
    </drive>

    <drive>
      <type config:type="symbol">CT_BCACHE</type>
      <device>/dev/bcache0</device>
      <bcache_options>
        <cache_mode>writethrough</cache_mode>
      </bcache_options>
      <use>all</use>
      <partitions config:type="list">
        <partition>
          <mount>/data</mount>
          <size>20GiB</size>
        </partition>
        <partition>
          <mount>swap</mount>
          <filesystem config:type="symbol">swap</filesystem>
          <size>1GiB</size>
        </partition>
      </partitions>
    </drive>
  </partitioning>

Using Btrfs Subvolumes as User Home Directories in AutoYaST

In our last report we presented a new feature to allow using Btrfs subvolumes as user’s home directories. However, the AutoYaST support for that feature was simply missing.

Now you can use the home_btrfs_subvolume to control whether a Btrfs should be used as home directory.

<user>
   <encrypted config:type="boolean">false</encrypted>
   <home_btrfs_subvolume config:type="boolean">true</home_btrfs_subvolume>
   <fullname>test user</fullname>
   <gid>100</gid>
   <home>/home/test</home>
   <shell>/bin/bash</shell>
   <uid>1003</uid>
   <user_password>test</user_password>
   <username>test</username>
</user>

Tuning the Bootloader’s resume parameter

The resume parameter is used by the bootloader to tell the kernel which swap partition should be used for the suspend to disk feature. If you are curious enough, you can find the value for your system in the Kernel Parameters tab of the YaST bootloader module. Now that we know what the resume parameter is, it is time to talk about the two issues we have solved recently.

The first problem was related to the way in which YaST determines which swap partition should be used. The bug report mentioned that YaST was taking a swap partition not used by the system that, in addition, was located in a removable device. After checking the code, we found out that we were using a simplistic heuristic which just selected the biggest swap partition available. We improve that logic to use the biggest swap partition which is being used by the system. However, if no suitable partition is found, YaST will fall back to the old behaviour.

The second problem was related to AutoYaST not handling the noresume option properly. When a user specified that option, AutoYaST just blindly added it to the kernel command line keeping the conflicting resume parameter too. Of course, that caused troubles. Now when noresume is given, AutoYaST simply removes all occurrences of the resume parameter.

Registration, OpenSSL and Debugging

These days, handling the SSL certificates in a proper way is key to keep our systems secured. So during this sprint, we invested quite some time improving how certificates are used in our registration module. Basically, we have improved YaST behaviour in these scenarios:

  • Using self-signed certificates.
  • Handling with unknown certificate authorities.

When the custom registration server (the new RMT or the older SMT) use a self-signed certificate, YaST offers to import the server certificate and make it known to the system.

Self-signed Certificate Dialog

On the other hand, when the server SSL key was signed by an unknown key, YaST used to just display an error popup. That was not much helpful as it was not obvious what to do. Now a new popup which contains some hints about how to import the CA certificate manually is displayed. In this case it cannot be imported automatically as YaST does not know where to obtain it, it is not present in the server response.

Unknown Certificate Authority Dialog

The work of importing and activating the certificate is now performed by a YaST script, preventing the user from having to run some complicated (and error prone) commands manually.

These improvement and some other OpenSSL details have been documented in the OpenSSL Certificates documentation. Additionally, if you ever need to debug some SSL related issue, this new OpenSSL Debugging Hints documentation might be useful for you. It covers basic topics, like displaying PEM certificate details, running a testing HTTPS server, creating a self-signed certificate, etc.

Detecting DASDs when using virtio-blk in zKVM

IBM’s S/390 platform has some special features that you will not find in conventional architectures like x86. One of them are DASD hard disks. These devices can be accessed in zKVM using the virtio-blk backend, but DASDs need special handling. For instance, the most common DASD type (CDL ECKD) cannot be used with an MS-DOS partition table nor a GPT, instead a DASD partition table is required. Having this requirement in mind, YaST now detects DASDs using virtio-blk properly and uses the correct DASD partition table.

Improving Fonts and Icons Handling in the Installer

Back some time ago, Stasiek Michalski (a.k.a. as hellcp), one of our very active openSUSE community contributors, spent quite some work for better artwork in YaST. As a result, icons are now used from the desktop’s icon theme whenever possible, and the installer font was changed.

One fallout of the latter was that the font size was now too small for users with diminishing eyesight: That new font has different font metrics, so the default font size was too small. We fixed that during this sprint. See also openSUSE/branding#107.

By the way, the disappearing icons issue was solved too. See libyui/libyui-qt#100 if you are interested in the details.

And just to get this straight: We are welcoming active community members to contribute (thanks again, @hellcp!). There will be some bugs; that’s just natural. We need to cooperate to fix them.

YaST Font Scaling Problem on the GNOME Desktop

This is not really a YaST problem, but of course it was still the natural thing to write a bug report against YaST for this bsc#1123424. And it took us quite a while to figure out what went wrong here.

Basically, when you use the GNOME Tweak Tool to set a Font Scaling Factor that is not a multiple of 0.25, this is completely ignored, and so all Qt5 applications (including the YaST Qt Control Center and all YaST modules) appear with unscaled fonts.

The problem is this GNOME Tweak Tool setting non-integer DPI values (which is already out of spec and thus a bug) and the Qt5 libraries consequently completely ignoring that DPI value. So that GNOME tool should do it correctly, but the Qt5 libs could also handle this more gracefully.

Unfortunately, there is nothing that we can do about this from the YaST side, even though we are aware that this might become reported as a YaST bug again in the future 🙂

Closing Thoughs

As we stated at the beginning of this post, we are basically in bug squashing mode. So, please, if you have some time, give the testing versions of (open)SUSE a try and report as many bugs as you can.

Thanks!

Highlights of YaST Development Sprint 71 & 72

February 27th, 2019 by

We know we owe you a report for the previous development sprint (namely the 71th). But we also know how to compensate that. This week we have not only one, but up to three blog posts to keep you tuned to the YaST evolution.

So let’s start with the summary of what have been implemented and fixed lately. That includes

  • Improvements in the Bcache support in the Partitioner
  • Users home as Btrfs subvolumes
  • Better visualization of Salt formulas in YaST Configuration Management
  • Automatic selection of the needed driver packages
  • Improvements in many other areas like AutoYaST, bootloader, the Partitioner and the storage Guided Setup

You will find links to the other more exhaustive blog posts, about the recently added Bcache support and the revamped Configuration Management module, in the corresponding sections of this report.

Final Improvements in the Bcache Support

During several sprints, we have been detailing our efforts to offer a decent support for the Bcache technology in the YaST partitioner. During this sprint we have implemented what we consider the three final bits:

  • Bache devices without caching
  • Modifying Bcache devices
  • Listing all caching sets

We will now detail this three improvements. But to celebrate that Bcache support looks complete now in the Partitioner, we have published a separate blog post explaining what Bcache is and how to take advantage of that technology using the YaST Partitioner. Enjoy!

And back to the topic of recent improvements, we should mention that the Bcache technology allows to create a Bcache device without an associated caching one. This is useful if you are considering to use Bcache in the future. In that case you can setup all your slow devices as Bcache backing devices without a cache, leaving open the possibility of adding caching devices later. That is now possible by selecting the new option labeled “without caching” during creation, as shown in the following screenshot.

No caching device in Bcache

Of course, that’s not much useful without the possibility of modifying a Bcache device. So in the latest sprints we also added a new “Change Caching” button.

New option to modify a bcache

This option will only work for bcaches that do not exist in your system yet (e.g., a bcache that you are creating right now). For existing bcache devices, this option is only available when the bcache has no associated caching device yet. Otherwise, a detaching action would be required, and that could take very long time in some situations.

Avoiding detach operations in bcache

And last but not least (regarding Bcache), now the Expert Partitioner also shows the list of all caching sets in a separate tab (unsurprisingly) titled “Caching Set Devices”. It is only an informative tab, but thanks to it you will be able to check all devices currently used for caching at a quick glance.

List of caching sets

Create the User’s Home as a Btrfs Subvolume

As many (open)SUSE users know, Btrfs offers several advantages over traditional Linux file-systems. One of them is the possibility of using subvolumes to customize the configuration and features of different parts of the same file-system.

From now on, the YaST Users module allows to create the home path of new users as a subvolume instead of a plain directory, as long as a Btrfs file-system could be found in the system, of course. As simple as checking the “Create as Btrfs Subvolume” option that you will find just below the “Home Directory” field.

Using a Btrfs subvolume as home

In a multi-user system, using Btrfs subvolumes for the home paths of the users can open a world of possibilities. The system administrator can decide to give some users the ability to create snapshots of their corresponding home directories, even automated on every login and/or logout using PAM Snapper. Similar ideas can be applied to a Samba deployment. Moreover, using subvolumes as homes can also be useful to implement per user quotas.

Beyond multi-user systems, fine-tuning the mount options or customizing snapshots and quotas can also be useful for some special system users (e.g. the user associated to a database system).

And all that, as always in YaST, equally easy to configure with the graphical interface and with the text-based one.

Moreover, using subvolumes as homes can also be useful to implement per user quotas, ncurses version

Better Visualization of SUSE Manager Salt Formulas

As we announced on January, we have been working on updating the SUSE Manager Salt Formulas support in YaST Configuration Management to comply with the latest forms specification. As it happens with the Bcache support, we feel we have reached a point in which the feature is polished enough to be shipped in the next (open)SUSE stable releases and to deserve its own separate blog post. So go and enjoy our third blog post of this week, a sneak peak into the marriage of SUSE Manager and YaST, thanks to the magic of Salt Formulas.

In that regard, we have been recently improving how the forms look like to make them as easy to use as possible. Bear in mind that a form can be quite long and the support for scrolling in YaST2 is quite limited. In order to workaround this problem, YaST2 will display a tree at the left side outlining the structure of the form.

Tree view of long salt formulas

Apart from that, we have solved some known problems, like exporting date/time and numeric values in a correct way or handling missing and default values properly.

Sure there are some details that we like to improve but, for now, what we need is feedback from you. So, if you are interested in such a functionality, please check the mentioned dedicated blog post about the topic and have a look to yast2-configuration-management 4.1.5.

Automatically Selecting the Driver Packages in Installed System

In openSUSE Leap 15.0 and SUSE Linux Enterprise 15, the packages containing drivers needed by the system are installed automatically if they are available during the installation. However, if a repository with driver packages is added later in the installed system then the drivers are not automatically selected to install.

Fortunately, in Leap 15.1 and SLE-15-SP1 the package solver implements a new solver mode in which it selects for installation only the recommended driver packages, without also dragging other non-driver recommended packages into the system.

For example, after adding the nVidia driver repository in Leap 15.1 (YaST ➝ Software Repositories ➝ Add ➝ Community Repositories, select “nVidia Graphics Drivers”) and starting the package manager (YaST ➝ Software Management), the respective nVidia driver packages are automatically selected to install if there is a supported nVidia graphics card present in the system. This of course works also for the other driver packages and hardware devices.

Just a last note about automatic selection of recommended driver packages. When running the package manager for the first time in a recently installed openSUSE Leap 15.1, it might automatically select some additional packages to install coming from the Leap OSS on-line repository (which is added automatically the end of the installation). Do not be surprised, that’s actually desired. If you do not want to install those packages simply deselect them, YaST will remember that and it will not select them next time.

See more details in the corresponding documentation.

Improved Disk Selection Screen in the Storage Guided Setup

Although it may sound surprising for some users, it’s not uncommon to install SUSE Linux Enterprise on systems with dozens or even hundreds of disks. Of course, in those advanced scenarios the automatic partitioning proposal is not much useful and users are expected to use the Expert Partitioner. But, what if someone tries to use the partitioning Guided Setup in a system with 30 disks? In SLE-15 (or Leap 15.0, in the case of this concrete screenshot) they will see a screen as unusable as this.

Broken Guided Setup screen

Of course, it only gets worse if the number of disks increases or if the text-mode interface is used. So we improved the disk selection screen, taking also the opportunity to include additional information to make easier to identify removable devices like USB and IEEE 1394 ones. In future releases, the screen will normally look pretty much as it looks in the previous version, just with the extra information about USB.

Normal Guided Setup screen

But if the system contains more than 10 disks to choose from, then a different widget that makes scrolling possible will be used, ensuring the user interface remains usable enough in both graphical and text-based modes.

Guided Setup screen with more than 10 disks

YaST Bootloader Becomes Less Whinny

When the installation of the system is spread over multiple physical disks, YaST Bootloader always tries to setup the bootloader in all those disks. This helps for example when MD RAID is used to achieve redundancy and some disk fails. Then the system can still boot from any of the other disks, since they also contain a proper bootloader.

But in some cases the installation can be spread over multiple disks but with only one of them being prepared to host the bootloader (e.g. containing the needed partitions). YaST bootloader used to complain about it while generating its proposal, which resulted in an error shown during installation.

In this sprint we have relaxed the YaST Bootloader expectations a bit. It still tries to create a fail-over setup, but the proposal does not complain if at least one disk looks bootable. Additionally if Grub2 is properly installed to at least one device, then possible failures in other disks will not result in an error pop-up, but just logged for future reference.

Device Order for MD RAIDs in AutoYaST

During the development of storage-ng, the feature to specify the device order for MD RAIDs with AutoYaST was lost. The feature can be useful for RAID level 10 to ensure that one full half of the RAID will only reside on one disk subsystem and the other half on the other subsystem. Only then a complete failure of a single subsystem keeps the RAID working.

Now the feature has been re-implemented for Leap 15.1 and SLE-15-SP1 and the “device_order” tag of the AutoYaST profile works as expected. For further information about configuring RAID with AutoYaST, consult the AutoYaST documentation.

Improvements in the Partitioner

That AutoYaST feature was not the only thing that temporarily disappeared with the replacement of the old storage components by storage-ng. The “Provide Crypt Passwords” button in the Partitioner was also not there in the early versions included in openSUSE Leap 15.0. But it was not really an omission, but a consequence on how the activation of logical devices works now in YaST.

During installation, all pre-existing logical devices that need some initialization are always activated to make possible to use them. That includes LVM, Multipath devices (for which a user confirmation is requested) and encrypted devices (for which the password is asked to the user). But triggering such activations in an already installed and running system cannot be done so lightly, since it affects the execution of the whole system.

Still, there are cases in which a user executing the YaST Partitioner in an already installed system may desire to activate currently inactive devices. To allow that we brought back the “Provide Crypt Passwords” button, but with two small changes compared to its historical behavior.

  • It activates all kind of devices, not only the crypt ones.
  • It refreshes all the Partitioner information, reading again the status of all the storage devices.

Provide Crypt Passwords button

Of course, any change in behavior is a nice opportunity to revisit and expand the help texts.

The button explained

Another change that was intentionally introduced in the first versions of the rewritten Partitioner was the fact that new file-systems always got an empty label by default, independently of the previous content of the partition being formatted.

But the old Partitioner used to do things differently when reformatting a partition. In that case, it actually copied the label of the previous file-system into the new one. Some users told us (via bug reports) they wanted the old behavior back, so now the Partitioner preserves the old label when a partition is reformatted.

Wow, that was a lot!

As usual, this report only covers a small portion of what the YaST Team has been doing. But definitely this time our readers will have enough material to keep themselves entertained for quite some time. Specially combining this with the two already mentioned monographic posts about the Bcache support and about the compatibility with SUSE Manager Salt Formulas.

Have a lot of fun reading!

Getting YaST Configuration Module up-to-date

February 27th, 2019 by

An Introduction to the YaST Configuration Management Module

YaST Configuration Management is a relatively unknown module that was born back in 2016 during a workshop and was developed further during Hack Week 14. The idea was to enable AutoYaST to delegate part of its duties to a configuration management system like Salt or Puppet. Therefore, AutoYaST would take care of the initial installation (partitioning, software installation, etc.) and it will hand the control over to one of those systems for further configuration.

During Hack Week 15 the module got support for SUMA Salt Parametrizable Formulas and later it was adapted to
run during the 1st stage of the installation. Apart from that, the module received fixes and minor updates as needed.

But by the end of 2018, we started to work on the module again in order to:

  • Update the SUMA Salt Parametrizable Formulas support.
  • Add support for YaST Firstboot
  • Improve the documentation (the README was basically rewritten).

In this article, we will review these changes including, of course, some screenshots. If you want to try this features by yourself, you will need to install yast2-configuration-management 4.1.5 and yast2-firstboot 4.1.5 (or later).

Updating the SUMA Salt Parametrizable Formulas Support

Since the initial implementation of the SUMA Salt Parametrizable Formulas support, the forms specification evolved quite a lot, rendering the module outdated. Support for new data types, collections, conditions, etc. was simply missing.

When it comes to the new UI design, the main problem we faced is that, in YaST, we must take 80×24 interfaces into account and the support for scrolling in our libraries is quite limited. So we needed to organize the information minimizing the chance of getting out of space.

Configuring the dhcpd formula

The screenshot above belongs to a fairly complex dhcp formula. At the left side, there is a tree that you can use to browse through the formula. At the right, YaST displays a set of form controls that you will use to enter the formula parameters.

When dealing with collections, YaST displays the information in pop-up dialogs as you can see below.

Managing collections

Do you want to try it by yourself? No problem, but bear in mind that it may modify your system configuration, so it would be wiser to do such experiments in a virtual machine.

Having said that, the easiest way to try the module is to grab some formulas from OBS, install them and start the module from the YaST control center by clicking on YaST2 Configuration Management under the Miscellaneous section. If you are a console lover, you can just run yast2 configuration_management.

Adding Firstboot Support

YaST Firstboot is a module that allows the user to configure a pre-installed system during the first boot (hence the name). It implements a set of YaST clients to perform different stuff like setting the language, configuring the timezone, etc.

If you need to configure something which is not supported by YaST Firstboot, you could write your own client having the power of YaST under your fingers. Or, if you prefer, you could use YaST Configuration Management to run a configuration management system. Of course, you can combine this feature with the support for SUMA Salt Parametrizable Formulas to offer a nice UI.

Now let’s see an example. YaST Firstboot configuration lives in /etc/YaST/firstboot.xml. That file contains the list of clients to use, among other settings. So if you want to use the YaST Configuration Management module, you only need to add the firstboot_configuration_management client to the workflow.

<workflows config:type="list">
  <workflow>
    <stage>firstboot</stage>
    <label>Configuration</label>
    <mode>installation</mode>
    <modules  config:type="list">
      <!-- other modules -->
      <module>
        <label>Finish Setup</label>
        <name>firstboot_configuration_management</name>
      </module>
    </modules>
    <!-- and more modules -->
  </workflow>
</workflows>

Additionally, you might be interested in modifying the firstboot_configuration_management behaviour. In that case, you can add a <configuration_management/> section with the relevant settings. The nice thing is that it uses the same options that are supported by AutoYaST. Let’s say that we want to run some Salt formulas:

<configuration_management>
  <type>salt</type>
  <!-- Default Salt Formulas root directories -->
  <formulas_roots config:type="list">
    <formulas_root>/usr/share/susemanager/formulas/metadata</formulas_root>
    <formulas_root>/srv/formula_metadata</formulas_root>
  </formulas_roots>
</configuration_management>

Or do you prefer to run Salt against a master server?

<configuration_management>
  <type>salt</type>
  <master>linux-addc</master>
  <auth_attempts config:type="integer">5</auth_attempts>
  <auth_time_out config:type="integer">10</auth_time_out>
  <keys_url>http://keys.example.de/keys</keys_url>
</configuration_management>

Asking for Help

YaST Configuration Management has been greatly improved during these weeks and the new SUMA formulas support opens a lot of possibilities. However, now we need your help: if you are interested in this module, please, check it out and try to report as many bugs as possible. We now they are there just waiting for you to find them ;-).

Thanks!