Home Home > Base-system > Network
Sign up | Login

Deprecation notice: openSUSE Lizards user blog platform is deprecated, and will remain read only for the time being. Learn more...

Archive for the ‘Network’ Category

new package squidview available

July 17th, 2011 by

squidview

squidview is one of the software, I’ve always build and installed on each squid proxy server I build for me or customers. It’s small, stable, and usefull. So it was a clear real nice candidate to be use to improve my obs and packager skiil.
I would like to thanks T1loc, yaloki, mrdocs, coolo, alin, and all others great packagers around, for helping and teaching me during the process.

Introduction

Squidview is an interactive console program which monitors and displays squid logs in a nice fashion, and may then go deeper with searching and reporting functions.

(If you don’t know what squid is or does this program is probably not for you.)

To use squidview you must at least have read access to squid’s access.log file. You may need to see your administrator for this. Squidview uses this text log file for all operations. It does not generate its own database for tasks.

homepage www.rillion.net/squidview

Features

Squidview has a number of functions. Navigate the log file with the cursor pad keys, jump to a certain day or switch to a different log file. Search for text or large http/ftp requests.

Put squidview into monitor mode: see the latest activity updated every 3 seconds (this is light on cpu load).

Reports can be generated listing the heavist Internet users and the most popular visited sites. See how many cache hits squid makes to save network traffic.

Squidview is released under the GPL.

Examples / Usage

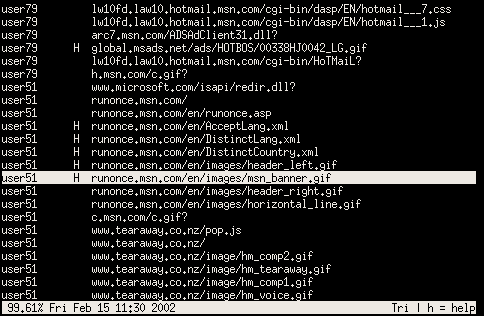
The selected line shows a request made for a .gif at the shown time. As luck would have it, the 'H' indicates a cache hit 🙂 In this mode user traffic can scroll by.

What the above would be if viewed with less.

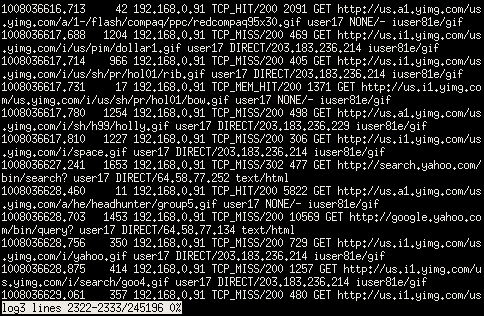
A tally of all users against the bandwidth they used. Kept current in near real time.

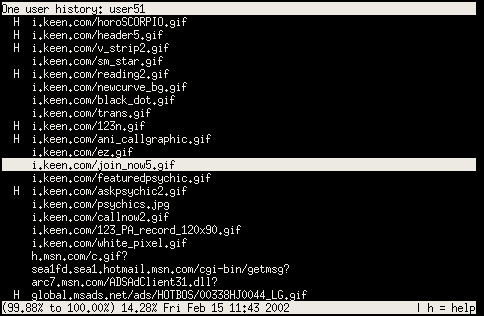
A quick investigation into the recent history of one user.

Installation / Repositories

I’ve just made a submit request against openSUSE_Factory to get it included directly, but in the meantime, you could install it from the repository server:proxy as many other useful & related packages

For example adding the repository under openSUSE_Factory

zypper ar -c -f -n "server:proxy" http://download.opensuse.org/repositories/server:/proxy/openSUSE_Factory "server:proxy"
zypper in squidview

Builds available for :

The package is build successfully against : SLES10, SLES11, openSUSE 11.3 to Factory

Have Fun!

Securing SSH (Secure Shell) from attacker

March 22nd, 2011 by

Secure Shell or SSH is a network protocol that allows exchange of data through secure channels between two network devices.

Particularly widely used on Linux and Unix-based system to access your shell, SSHwas designed as a substitute for Telnet and other insecure remote shells, which sentinformation, especially passwords, in the form of simple text that makes it easy to be intercepted. Encryption used by SSH provides confidentiality and integrity of dataover an insecure network like the Internet.

For the Security Server We From Attacks The attacker who usually Always Use SSHAs a door Early Entry Into System To us, of course, become an admin obligation todispel various Efforts That.

There are several ways which ordinary people do to secure SSH from a variety ofattacks which one of them is by editing the file / etc / ssh / sshd_config.

before doing the configuration in the file / etc / ssh / sshd_config make sure SSH isinstalled on your linux distribution, and for openSUSE that I use it already automatically installed.

#vim /etc/ssh/sshd_config

change options, as below :

LoginGraceTime 2m
PermitRootLogin no
MaxAuthTries 3

LoginGraceTime which option is used to give a time limit of user logins, so please change these options according to your wishes.

PermitRootLogin is no option to allow the root user can login to ssh or not to give yes or no value on the options tersebut.sebaiknya give no value, so that users can not loginas root into your ssh.

MaxAuthTries 3 to give the limit on the number of errors allowed when the user logs in,this is very useful to avoid attackers do brute force on the server anda.dimana usersonly allowed to make a mistake typing the password in accordance with that alreadyset on the options.

If you want only certain users who may log into your ssh add AllowUsers option at the end of the line followed by a distinguished user name in the allowed login.

otherwise, you can install software, denyhost, for your ssh security

NB:do not enable the root user, for ssh login

Similarly, a fairly simple tutorial .. hopefully this can be useful.

Best Regards
Saydul Akram
Email : idulk@opensuse.org

Configuring an IPv6 DSL connection

January 19th, 2011 by

The German company rh-tec offers free IPv6 internet connections for people that already have T-DSL. Configuring such a connection on openSUSE 11.3 is not as straight forward as with IPv4. It’s not hard either if you know where to put the settings though.

  1. start the yast2 DSL module
  2. follow the instructions of the wizard to set up a new PPPoE device. Enter your user name and password at the provider screen.
  3. At the “Connection Parameters” screen uncheck “Automatically Retrieve DNS”. Enter an arbitrary IPv4 address as first DNS server (yast doesn’t accept IPv6 there yet, bug 665516).
  4. finish the wizard and leave yast
  5. open /etc/sysconfig/network/providers/provider0 (or whatever name was chosen by yast) in an editor
  6. change DNS1 and DNS2 to the actual IPv6 addresses of your provider’s name servers
  7. add the following line to the file:
    PPPD_OPTIONS="noip +ipv6 ipv6cp-accept-local"
  8. save and quit
  9. Done! You may now use cinternet or qinternet to dial in and enjoy the (rather empty) IPv6 internet.

Hackweek V: Local caching for CIFS network file system

June 14th, 2010 by

Hackweek

It’s that time of the year when SUSE/Novell developers use their Innovation Time-off to do a project of their interest/wish – called as Hackweek. Last week was Hackweek V. I worked on making the Common Internet File System (CIFS) cache aware, i.e. local caching for CIFS Network File System.

Linux FS-Cache

Caching can result in performance improvements in network filesystems where access to network and media is slow. The cache can indirectly improve performance of the network and the server by reduced network calls. Caching can be also viewed as a preparatory work for making disconnected operation (Offline) work with network filesystems.

The Linux Kernel recently added a generic caching facility (FS-Cache) that any network filesystem like NFS or CIFS or other service can use to cache data locally. FS-Cache supports a variety of cache backends i.e. different types of cache that have different trade-offs (like CacheFiles, CacheFS etc.) FS-Cache mediates between cache backends and the network filesystems. Some of the network filesystems such as NFS and AFS are already integrated with FS-Cache.

Making CIFS FS-Cache capable

To make any network filesystem FS-Cache aware, there are a few things to consider. Let’s consider them step by step (though not in detail):

* First, we need to define the network filesystem and it should be able to register/unregister with the FS-Cache interface.
* The network filesystem has to define the index hierarchy which could be used to locate a file object or discard a certain subset of all the files cached.
* We need to define the objects and the methods associated.
* All the indices in the index hierarchy and the data file need to be registered. This could be done by requesting a cookie for each index or data file. Upon successful registration, a corresponding cookie is returned.
* Functions to store and retrieve pages in the cache.
* Way to identify whether the cache for a file is valid or not.
* Function to release any in-memory representation for the network filesystem page.
* Way to invalidate a data file or index subtree and relinquish cookies.

Implementation

I wanted to get the prototype working within a week. So the way I have implemented it is rudimentary and has lot of room for improvement.

The index hierarchy is not very deep. It has three levels – Server, Share and Inode. The only way that I know of identifying files with CIFS is by ‘UniqueId’ which is supposed to be unique. However, some server do not ensure that the ‘UniqueId’ is always unique (for example when there is more than one filesystem in the exported share). The cache coherency is currently ensured by verifying the ‘LastWriteTime’ and size of the file. This is not a reliable way of detecting changes as some CIFS servers will not update the time until the filehandle is closed.

The rudimentary implementation is ready and the cumulative patch can be found here:

http://www.kernel.org/pub/linux/kernel/people/jays/patches/

[WARNING: The patch is lightly tested and of prototype quality.]

Here are some initial performance numbers with the patch:

Copying one big file of size ~150 MB.

$time cp /mnt/cifs/amuse.zip .
(Cache initialized)

real 1m18.603s
user 0m0.016s
sys 0m8.569s

$time cp /mnt/cifs/amuse.zip /
(Read from Cache)

real 0m28.055s
user 0m0.008s
sys 0m1.140s

Hacking for Freedom

June 7th, 2010 by

Hi developers!

These are first hours of hackweek. A lot of people in Novell and in the community are starting to work on different projects. What can I give for free software in this week? Sure, my favorite project is NetworkManagement.

As you can see, NetworkManagement don’t work well. For example, it can’t see WiFi connection and don’t show wired connetcion. Yes, right now we have one bug with module “networkmanagement”.

This module must be loaded after start NetworkManagement, but this is not happening 🙁

If you check it, you will see:

anaumov@pizza:~/plasma/networkmanagement> qdbus --system org.freedesktop.NetworkManagerUserSettings
Service 'org.freedesktop.NetworkManagerUserSettings' does not exist.

Why it’s happening? Problem is in connection between plasmoid and deamon NM (via DBus).

anaumov@pizza:~/plasma/networkmanagement> qdbus org.kde.kded /kded loadModule networkmanagement
true
anaumov@pizza:~/plasma/networkmanagement> qdbus --system org.freedesktop.NetworkManagerUserSettings
/
/org
/org/freedesktop
/org/freedesktop/NetworkManagerSettings
/org/freedesktop/NetworkManagerSettings/0
/org/freedesktop/NetworkManagerSettings/1
/org/freedesktop/NetworkManagerSettings/2
/org/freedesktop/NetworkManagerSettings/3
/org/freedesktop/NetworkManagerSettings/4
/org/freedesktop/NetworkManagerSettings/5
/org/freedesktop/NetworkManagerSettings/6
/org/freedesktop/NetworkManagerSettings/7
/org/freedesktop/NetworkManagerSettings/8
anaumov@pizza:~/plasma/networkmanagement>

So, now we can see WiFi interface:

And WiFi interface can see WiFi connections:

Good, but this works not automaticly. It’s first what I want to hack on this week.

And what do you want to do on this week? 😉

Novell Client on openSUSE 11.2

April 20th, 2010 by

This has been covered on a couple of forums out there, but I’ve yet to find a decent comprehensive post. This is for 32bit systems, it’s easily modified for 64bit setups.

First off, search your favorite RPM repo for binutils-2.19-9.3. I like to use http://rpm.pbone.net, but at the time of writing, they happen to be down.

Get a copy of the Novell Client ISO from http://download.novell.com and mount it:

sudo mount -o loop novell-client-2.0-sp2-sle11-i586.iso /mnt

Extract the files from the RPM:

rpm2cpio binutils-2.19-9.3.i586.rpm | cpio -idv

This should create a “usr” directory in your present working directory. Go ahead and copy it’s contents to your filesystem:

sudo cp -R usr/* /usr/

Change directories to wherever you mounted your ISO (in this case “/mnt”) and run the installer:

cd /mnt && sudo ./ncl_install

As the packages attempt to install, you’ll be given options and warnings concerning libbfd and several other packages. Choose option “2” for everything (“Break dependencies”). Don’t worry about actually breaking anything, just roll with option 2.

Lastly, issue ldconfig as root and reboot:

sudo /sbin/ldconfig
sudo /sbin/reboot

That should get you up and running. You can run “ncl_tray” directly from the command line, or create a shortcut to the client. If you’re having connection issues, make sure that openSLP is configured.

The only issues I’ve had so far is the inability to browse trees, which turned out to be a DNS problem on my end. Occasionally I get warnings on login about novfs kernel modules not being properly loaded, but this appears to be benign.

Solving typical problems of BCM4312 802.11b/g

March 22nd, 2010 by

The problem 1: I have a new Broadcom Wireless that doesn’t work with the driver B43, even when I download the firmware.

The problem 2: I don’t wanna use the Broadcom WL driver because its buggy, closed source, and doesn’t support aircrack.

The solution:

After a while working with this solution, i must say that the wireless range its improve and everything else working perfectly.

So, this works for some of those BCM4311-, 12- and those weird cards that don’t work with only the B43 and the Firmware.

  1. Install build essentials with: sudo zypper in -t pattern devel_basis devel_kernel
  2. Download the package compat-wireless from http://wireless.kernel.org/
  3. Unpack the package somewhere: tar xvzf compat-wireles.tar.gz
  4. Enter in the new directory, and execute: make && make install
  5. Wait for a while, and when it ends should say something like “do make unload” DON’T DO THAT.
  6. As root exec: install_bcm43xx_firmware, this script should be in your system path, but only as root. This will download the firmware to /lib/firmware/b43.
  7. Reboot. I found that its more safe to do a clean reboot than write make unload, because i got a kernel panic if i do that. So reboot and your wireless card should be working now with b43. Remember to remove the WL driver so you don’t have conflict between them.

I did this for my Aspire One D150 and some HP Laptops and works without problems.

I hope this information is useful.

Cheers.

Tokamak4

February 27th, 2010 by

On this week the leading KDE developers met together again. This time it was held in Nürnberg, in the openSUSE premises and was kindly made possible by Novell and KDE e.V.
26 hackers, who make KDE better.

For me it was first time, where I met hackers not for drinking a cup of beer, but for working, for hacking, for learning… and I think in this time I got much more fun.

We started at 9-10 am and finished it at 1-2 am. Yes, these two days we hacked like crazy. I’m not so good in KDE, I mean – I’m just trainee in SUSE/Novell, but in these two days I took a lot of information about KDE (arhitecture), Solid, Plasma, methods of project’s buildings (cmake), etc.

I have uploaded photos. You can find these here.

I have worked before on KNetworkManager. It was just a couple of patches (Qt/KDE3 based), and KNM has another aspects of integration with hardware as we have now in KDE4. In KDE4 we have SOLID, and this makes more easy to asking for such things like, for example, wired connection or to find hidden SSID wi-fi…

Yes, my current project is Network Management plasma applet.

With Sebastian Kügler and Will Stephenson, we worked together on functionality to easily connect to wired, wireless and mobile broadband networks and also to VPNs. As I said, I don’t did so much, but I started working on support for connection. Maybe next month I will be able to show that I did.

I would like to thank everyone with whom I spent those 2 days. Especially Will, who always supports and helps me to become a KDE developer.

Firewall Zone Switcher Updated

August 28th, 2009 by

I have updated the Firewall Zone Switcher.
It now starts with a main window by default instead of
directly going to the system tray. There’s a settings dialog that
allows to enable the system tray icon and optionally also enables
starting the applet on log-in. Furthermore the daemon now uses
PolicyKit for access control and the applet supports i18n.
(more…)

Firewall Zone Switcher

July 10th, 2009 by

So you got that shiny new Netbook, installed Linux on it and carry
it along everywhere you go. The default enabled Firewall blocks
incoming traffic so you feel safe when connecting to that anonymous
WiFi network at your favorite fastfood restaurant. Unfortunately the
very same Firewall becomes quite annoying at home where it prevents
your system from discovering printers or blocks ssh.
(more…)