Home Home
Sign up | Login

Deprecation notice: openSUSE Lizards user blog platform is deprecated, and will remain read only for the time being. Learn more...

bmwiedemann

coder, tester, poet

Author Archive

Making different openSUSE liveCDs

December 29th, 2012 by

In my last post I explored the various liveCD creation methods out there, and I really wanted to try one of the others for openSUSE.
Thus I did so today in less than two hours.
I used Debian’s liveCD as basis and replaced the userspace with an openSUSE-11.4-GNOME-liveCD one (later ones likely do not work as systemd is not compatible with old 2.6.32 kernels).
And it worked like a charm. If you want to try it yourself, you need openSUSE and an empty directory with 5GB free space. Then you do as root:

zypper -n in clicfs squashfs cdrkit-cdrtools-compat
wget -O Makefile http://lsmod.de/bootcd/Makefile.aufslive.11.4
make

This will take a while to download the two isos and then at least another 3 minutes for the processing.
If that seems too hard for you, you can just download the finished iso and try it with qemu-kvm -m 1000 -cdrom xxx.iso

Do not let the debian logo in the bootloader confuse you. Just press enter there.
When running in KVM from RAM, this boots up in 18 seconds, while the original iso took 33 (measured from pressing enter in bootloader to the time the CPU load goes down). However, with physical media the difference will be less pronounced. Some of the difference comes from the faster gzip decompression. Unfortunately debian’s kernel does not support squashfs-xz, so I could not try that.

I hope in the future, we will have aufs patches in our normal openSUSE kernels and add an aufs-live mode to kiwi. That would help with the problems we hit with clicfs when memory runs out (and it can not be freed by deleting files either).

LiveCDs

December 27th, 2012 by

As few of you might know, I made my own SUSE-based LiveCDs a while ago, using (like Knoppix) cloop compression with iso9660 and my own kernel code for file-based overlay to make it writeable. You might be amazed at how fast it runs in KVM. However, the kernel part has bit-rotten and there are other techniques out there today, so I took a look around at how others do their LiveCDs.

But first some broader overview. To make a LiveCD, the biggest problem is that CDs are not writeable (and even modern Flash devices do not want to be written too much). Embedded devices using flash had the same problem. Various approaches have been used in the past to solve this:

  • adapt all software to write into ram-disks e.g. by having symlinks (hard to create and maintain)
  • load all software into RAM (only for small distributions)
  • use file-based overlaying such as unionfs or aufs to have software write into RAM (lsof, pwd, and hardlinks can be tricky)
  • use block-based overlaying (problem: can not easily free disk space again)

Also compression is used to fit more onto a CD. And interestingly, this usually also speeds up booting because it is faster to read 10MB off a CD and decompress it into the original 30MB than to read 30MB from such a slow medium.

Now, to the distributions.

  • openSUSE has the classic DVD installs that use special installation-images and run in RAM and then there are the real LiveCDs that are created by our kiwi tool, use block-based overlaying and LZMA compression of a ext3 by means of our FUSE-based clicfs.
  • All of the other distributions use squashfs for compression. Mageia employs dracut for initrd and unionfs for file-based overlaying
  • Debian uses aufs for file-based overlaying
  • Ubuntu uses overlayfs for file-based overlaying
  • Fedora uses an ext4 filesystem image contained in a squashfs with dm-snapshot for block-based overlaying, thus being most similar to openSUSE

I also spent some time benchmarking (on my AMD A10-5800K) the various technologies with a simple script using Debians uncompressed rootfs of 495132 KiB as data.
squashfs supports three different compression methods: lzo, gzip and xz (aka LZMA).

  • squashfs-lzo: size:220992 compression:11.1MB/s decompression:134.4MB/s
  • squashfs-gzip: size:203328 compression:15.5MB/s decompression:88.9MB/s
  • squashfs-xz: size:176064 compression:6.5MB/s decompression:22.5MB/s
  • cloop(gzip): size:213348 compression:16.2MB/s decompression:49.6MB/s
  • clicfs(xz): size:185300 compression:16.7MB/s decompression:18.2MB/s

This has some surprises: even when using the same compression method, sizes can differ by 5% and speed can differ even more.

If you want to compare numbers on your system, memory throughput is also interesting:
# dd if=/dev/zero of=/dev/null bs=1M count=100000
104857600000 bytes (105 GB) copied, 12.4499 s, 8.4 GB/s

Overall, clicfs is performing OK, considering that it already takes care of the overlaying, but for my own LiveCD I would prefer Debian’s method and I am wondering how it would work.

How to peek into remote isos

July 17th, 2012 by

When people want to provide a collection of files, they sometimes choose to do so by providing a .iso image file. But if you only want to look what files are in there or only need a few files, e.g. kernel and initrd for PXE-booting, you still had to download the whole thing to loop-mount it.

But you don’t have to anymore. Because modern web servers support delivering only parts of a file (using the “Range” header field), that allowed me to implement curlwwwfs that mounts remote HTTP directories into your local filesystem. And then you can use fuseiso on top to access the actual content within the .iso. All without root access.

This is how it works:

First you have to install the required packages (replace 12.2 with your version of openSUSE (or if you use a different Linux distribution, do git clone git://github.com/bmwiedemann/curlwwwfs and “make install” in there)):

zypper ar http://download.opensuse.org/repositories/home:/bmwiedemann/openSUSE_12.2/home:bmwiedemann.repo

zypper in curlwwwfs fuseiso

# Then you start it:

mkdir mnthttp mntiso

curlwwwfs http://zq1.de/bootcd mnthttp &

ls -la mnthttp/

fuseiso mnthttp/bmwinux-8.2-040808.iso mntiso

cat mntiso/isolinux/isolinux.cfg

# and later you clean it up with

fusermount -u mntiso

fusermount -u mnthttp

openSUSE ARM image

January 21st, 2012 by

When I wrote this week, how I ran openSUSE on my genesi smarttop some people asked for a ready-to-use image. After spending less than 8 hours fiddling with u-boot-scripts, partition tables, tuning ext3 and initrds, it was done… and is now so easy:

wget http://www.zq1.de/efika.img.xz # 83MB
xz -cd efika.img.xz | dd of=/dev/sdX bs=1M

with sdX being the device name of your SD-card (e.g. “mmcblk0” on the smarttop itself) with at least 1GB (actually 1024000000 bytes) of free space.

When inserted at boot, it should just boot up within 23 seconds and let you login as root with password “linux” on SSH, serial and with a USB-keyboard on HDMI. I spent some effort on putting as few packages as possible into it. Still, you have zypper to install packages and nano to edit files.

There is still a known hangup when you try to reboot. Workaround is: init 2 ; sleep 12 ; killall rsyslogd ; umount /boot/ ; mount -o remount,ro / ; reboot

As it still uses the original linux-2.6.31 kernel, it has another bug that also happens with pre-installed Ubuntu: sometimes (in ~40% of cases), boot stopps early, before graphics is initialized, when the last line on serial is “console handover: boot [ttymxc0] -> real [tty1]”. Try turning it off and on again.

This should allow you to have a whole lot of fun…

running openSUSE on ARM

January 19th, 2012 by

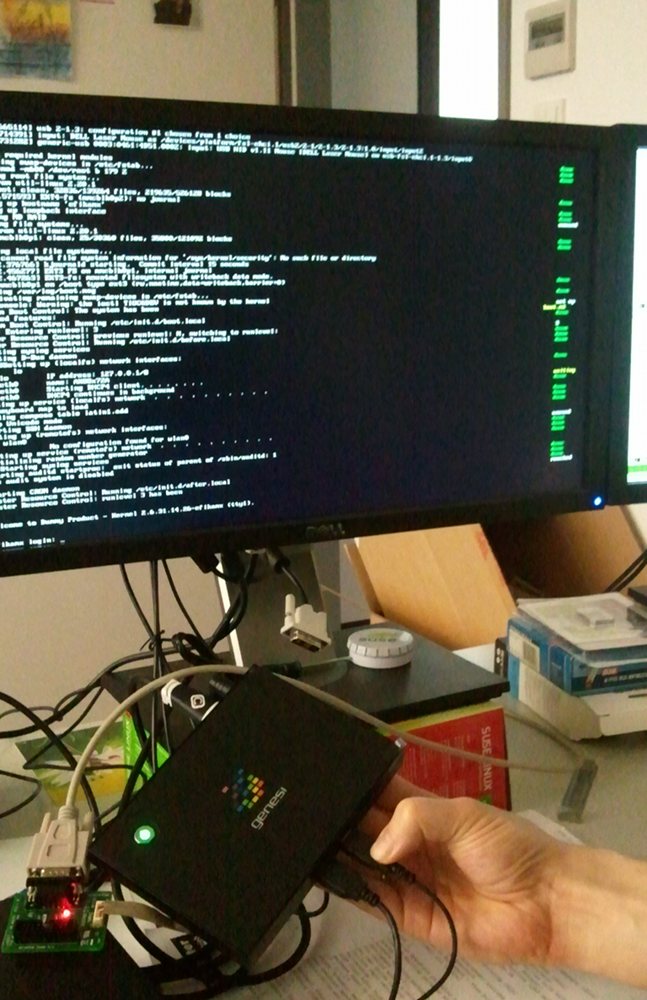
This week I finally got my genesi efika MX box. By default it has on old Ubuntu version installed on its internal IDE-attached 8GB SSD. It features 512 MB RAM and a 800 MHz ARMv7 CPU.

Using a HDMI-cable and an HDMI-DVI-Adaptor I got it connected to a monitor, plugged in a USB keyboard+mouse and it pretty much worked out of the box with WLAN,Ethernet,X11 (except for a bug that causes it to force you to change PW on every console login). How boring.

Having read about recent progress with openSUSE on ARM I wanted the excitement of running it on this box.

Michal’s image and script (now in alpha) was very helpful to get me started within 15 minutes.

If you have any (e.g. x86) openSUSE system running, there is another easy way to create a working ARM chroot-environment:

zypper ar http://download.opensuse.org/repositories/openSUSE:/Tools:/Unstable/openSUSE_12.1/openSUSE:Tools:Unstable.repo
zypper install qemu osc
osc co openSUSE:Factory:ARM bash
cd openSUSE:Factory:ARM/bash
edit bash.spec # add lines with your packages like BuildRequires: zypper,vim
osc build –no-verify –clean standard armv7l

If it worked well, /var/tmp/build-root/ should contain a chroot environment. E.g. you can run

file /var/tmp/build-root/bin/bash
/var/tmp/build-root/bin/bash: ELF 32-bit LSB executable, ARM, version 1 (SYSV), dynamically linked (uses shared libs), for GNU/Linux 2.6.16, BuildID[sha1]=0xed9ca12f44c8591560d780cf807b6b6cf8ca8873, stripped

I partitioned my SD-card into two partitions. The first one for /boot with ext2 (needs only 150MB) and the second one for / to contain the rootfs. Be sure to have barrier=0 in your fstab for all ext[34] partitions so that writing to SD will not be as slow. The default U-Boot configuration first checks on the first partition of an SD-card for boot.scr which is a uImage-formatted version of a U-boot script. I copied all of Ubuntu’s /boot and /lib/modules/, slightly adapted their boot.script file to have root=/dev/mmcblk0p2 and uImage/uInitrd-2.6.31.14.26-efikamx as kernel/initrd, dropped “quiet splash” and added “console=ttymxc0,115200” to see more of the boot and ran a line from another helpful site:

mkimage -A arm -O linux -T script -C none -a 0 -e 0 -n “my boot script” -d boot.script boot.scr
echo mxc0:S12345:respawn:/sbin/agetty -L 115200 ttymxc0 vt102 >> /etc/inittab # for serial console

However, this failed to boot. Using the serial debug console, I could see U-boot trying to load the boot.scr but it was thinking it was zero bytes for some strange reason. Re-creating my /boot partition as a raw copy of /dev/sda1 with my adaptions ontop finally gave me an SD-card that just boots openSUSE Factory on ARM with framebuffer console on HDMI/DVI.

Find more ARM-related info on our openSUSE ARM Portal

Where our bugzilla needs improvement

April 15th, 2011 by

update 2012-02-07: Success: after bnc#732504 you can now open Advanced Search and find RESOLVED/DUPLICATE bugs by default. When bugs are finally solved and fixes released, those can then be moved to CLOSED state to no more appear in search results.


bugzilla.novell.com aka bnc is the central tool to track bugs of openSUSE.

It has a guided bug submission form that helps & encourages reporters to search for existing reports on an issue.

However, the integrated search function only shows open bugs. In principle that is nice, but bugs marked as duplicates of open bugs do not count as open. Also it is common that developers mark a bug as RESOLVED/FIXED as soon as they uploaded a patch into the OBS devel-project. Such a patch then needs some days until it gets into Factory or the Update repos where normal users would benefit from the fix. During that time, there will still be people with all regular updates installed hitting the bug and not finding it on bugzilla because it is no more marked open. Of course, one could also search for RESOLVED bugs, but this brings up a huge list of issues that are long solved, but never were marked CLOSED (e.g. openSUSE-11.3 has 453 CLOSED vs 2727 RESOLVED).

This wastes time of reporters writing a duplicate bug-report and wastes time of developers having to figure out that it really is a dup. This is probably why other projects recommend setting bugs to ASSIGNED/FIXED until the patch is released. Unfortunately bnc lacks this state.

Also bugzilla has an UNCONFIRMED state for new bugs that need triaging to get into the NEW state (named “Reproducible but not assigned” in other projects). Such a state is unavailable on bnc, so that people can not tell apart bugs that have been forgotten from bugs that are known to exist, but just wait for a developer to fix.

There was also little integration between OBS and bnc. I have therefore written scripts to update bugzilla entries with links to submit requests on OBS mentioning e.g. bnc#685133 (<=see link for how it looks like). But it still could be made a lot more useful.

Overall, there is some room for improvement to make people’s lives easier, and allow us having a lot of fun…

openQA is testing for you

January 20th, 2011 by

You might have read the announcement of the factory-tested repo (or not, because it did not go on planet.o.o). There have been many additions to the testing during the last eight weeks.

openQA.o.o is a machine running automated software tests all the time to decide if factory-tested can be updated. If you think, this was boring, you might find out that it is not, since every testrun generates a video of approx 4 minutes that can be conveniently viewed in firefox.

You can view those test results on the openQA page.

And those are the updates:

  • I have added testing of development repos, so that it is now possible to detect bugs before they even get into Factory (most of those tests have “devel” at the end of their name). In fact, this has already found two such bugs.
  • The test system’s hardware was upgraded with a sponsored SSD and the software adapted to allow running multiple tests in parallel (using make -j3)
  • I have updated the web-interface to use the nice Bento theme
  • And I found yet another cool use-case for automated testing: it allows to bisect bugs. I did a binary search in old results for a live-installer bug which made it really easy to find the causing commit. However, seeing how long such a bug went unnoticed, made me think, that it would be nice if more people would check the results for anomalies, since not all of those can easily be auto-detected. As this just needs a firefox and little time, this is pretty easy to do. Much easier than to actually setup a test-system in any case.
  • An IRC notification bot was added, keeping #opensuse-openqa updated with new test results
  • Then, I am looking for additional automatic test-scripts, that also work standalone on an openSUSE install. It is especially important to test high-impact things. Things that break often or block many users if they break. And it would be nice to have a small result range such as OK|fail|unknown or it should at least be mappable to such.
  • Jürgen Weigert has packaged sikuli, so it is easy to create GUI tests with it, that could then be included in the test-suite.

Then there are still some things on the ToDo list…

  • Hermes integration to get email alerts and RDF feeds for newsreaders
  • Have more test variants auto-scheduled (-live and -dup)
  • Find a way to have Add-On-Repos with custom priority (otherwise Factory packages might be used, as happened for kernel-default-2.6.37-rc7) – using linuxrc’s driverupdate feature could be one way.

your input is highly appreciated

Announcing factory-tested

November 29th, 2010 by

Good news everyone! There is something new that is better than Factory and Milestones.

You might have heard users complaining about openSUSE Milestones being alpha quality and RCs/GMs being beta quality only.

You might also have heard developers complaining that people only start testing RCs, which is too late to fix most bugs (some users don’t know that).

You might also have heard geeks calling for rolling releases to always have bleeding edge software.

Luckily, all of the above can be helped.

I have been thinking about this situation and how to improve it.
The main problem is, that Factory is sometimes broken. So how can we make testing new software safer, even between milestone-releases (which are manual factory-snaphots)?

There is now a factory-tested repository that only gets updated when tests show that factory meets the following minimum requirements:

  • The system can be installed,
  • Zypper can install software,
  • And X11 can be started – at least on KVM

While this can not save users from all major bugs, it is already a big improvement to current Factory which gets released whenever it builds. So, why don’t you give it a try?

For more info on test-results (including videos), you can also have a look at the openQA page.

Improve Software Quality

June 12th, 2010 by

Today I and some hundred others on LinuxTag in Berlin attended a keynote by Mark Shuttleworth, the “head dreamer” of the ubuntu Linux distribution.

He had pretty few slides with hardly any words on it. The headlines were “Cadence”, “Quality” and “Design”. As I have been working towards openSUSE quality, this interested me most – so this is what this text is going to be about. His thoughts were mostly what I was thinking anyway.

Quality works like this: if Factory (equivalent of Debian/sid or whatever it is called in ubuntu) breaks horribly every other week, few people will feel inclined to keep running on Factory or even on factory-snapshot. Mark spoke about a difference in number of testers of “one or two orders of magnitude” (which would mean a factor of 10-100 in mathematical terms). And having fewer testers during development can only mean lower quality for the final release.

This is why efforts should be taken to ensure a working Factory. Automated testsuites and reviews were specifically mentioned, among others. Some packages like gcc include own test-suites, but most do not. When asked how that was handled in ubuntu, he described an approach with scripts using computer vision, recognizing/clicking buttons which most likely referred to sikuli which has many similarities to what I did, just with a different focus (more user-friendliness) and quite some sophistication. Also for text-mode there is still good old “expect”.

Another thing that was not mentioned there, but which I was always thinking of as an odd shortcoming of openSUSE is that Debian has a “testing” distribution which is not like factory-snapshot. Debian/testing contains only packages migrated from sid after a certain time with no bugs above a certain criticality threshold. Of course, this needs a way to track automatically which bug applies to which package (something that ubuntu does in launchpad).

Launchpad is also nicely integrated with bazaar, so that adding “(LP: #12345)” into a changelog will cause the bug to have a link to the proposed fix and later be automatically closed, once the branch was merged into the main trunk.

This is not only cool, but plain useful. It can save a lot of work and frustration. I think Adrian Schröter will be working into that direction with better integration of buildservice into bugzilla and other openSUSE tools.

There is also a big human component. Especially with testers which are non-technicians. It is not so much about motivating them, but about not demotivating them (which can happen surprisingly easy in some cases). I have seen crash messages along the lines of “xxx has crashed. This is in no way your fault. You could help us by …” which is a very good thing in this regard.

Yet another related note: there are openSUSE-Promo and openSUSE-Biarch DVD iso variants which are so well hidden, that few people even know about their existence, so that there can not be much public testing. However, those are the variants that are given away to hordes of interested people at openSUSE booths around the world, but those are also the variants that are least tested. I still have bad memories of the 11.1 or 11.0 one which was degraded to coaster after three unsuccessful tries on different machines. If bandwidth or mirror-space is a problem, offering them only via bittorrent could be a solution.

Overall, still some way to go, but IMHO we are moving into the right direction.
automated openSUSE testing

May 25th, 2010 by

Testing is an important task. But testing daily openSUSE-Factory snapshots would mean testing the same things every day. This would be pretty tiresome to people.
And there is a lot of software to test, including software unknown to most testers or new versions of known software, so how should the tester know if the results were the intended results?
My answer is: leave as much as possible to computers. Computers do not get tired. Computers do not stop testing something after a dozen identical results. Computers do not forget.

The following assumes that you have read my text on making openSUSE install videos.

So far, I am rather satisfied with my automated installations.
At the end of those, I added some basic application testing, which already showed in MS7
openSUSE-KDE-LiveCD-x86_64-Build0625a.ogv dated 2010-05-21 16:08
an issue filed 28 hours later at bnc bug 608087

Only that it currently still needs a human to look at the results.
I was thinking to improve upon that by scanning (rectangular) parts of the screenshot for known good or bad images. If either is found, the test could be automatically marked as passed or failed.
On unknown images, a human would still need to decide which part of the image is relevant and if it is good or bad. This decision can then be used to avoid human interaction (hard work) in further runs of that test.
If we push this further, it could be similar to nagios for network monitoring. Telling when something breaks and telling when something is back working. It could have an overview page about automated test status, giving totals e.g. “50 working, 10 unknown, 3 failing”. With links to more details.

The advantage in adding the application tests after the install test is that the system starts out in a clean, reproducible way. One disadvantage I see is that a newly failing test could prevent following tests to work.

I have also been working to enable others to run my isotovideo script. For that I have cleaned up my code so that it no more contains paths from my system. The other thing is that I documented how to get it working at http://www3.zq1.de/bernhard/git/autoinst/INSTALL

MS7 installation videos:

openSUSE-KDE-LiveCD-x86_64-Build0625c.ogv
openSUSE-KDE-LiveCD-i686-Build0625a.ogv
openSUSE-GNOME-LiveCD-x86_64-Build0625b.ogv
openSUSE-NET-x86_64-Build0623b.ogv
openSUSE-NET-i586-Build0623b.ogv
openSUSE-DVD-Build0625-x86_64b.ogv
openSUSE-DVD-Build0625-i586b.ogv