Home Home > Base-system > Architectures
Sign up | Login

Deprecation notice: openSUSE Lizards user blog platform is deprecated, and will remain read only for the time being. Learn more...

Archive for the ‘Architectures’ Category

Highlights of YaST Development Sprint 80

July 19th, 2019 by

After our (really long) sprint report, which featured information from 3 different sprints together, we are back to our regular schedule of publishing a blog post after each sprint.

In a nutshell, these are the highlights from the previous one:

  • A new version of yast2-network will be submitted to Tumbleweed shortly, including quite some internal changes as part of the refactoring effort.
  • The support for offline installation of SUSE Linux Enterprise products has been improved to handle modules and extensions dependencies automatically, among other goodies.
  • The partitioning proposal has been adapted to support SUSE Manager special needs.
  • The guided partitioning ignores now the adjust_by_ram parameter in IBM z Systems, where it is basically useless.
  • Some (open)SUSE 15 features have been backported to 5th Service Pack of SUSE Linux Enterprise.

And last but not least, we have some words to say about the feedback we get from you (that we really appreciate!) and the future of YaST.

Shipping Another Round of Network Refactored Code

One of the problems we wanted to avoid while refactoring yast2-network is diverging too much from the version shipped in Tumbleweed. As we mentioned in our last report, we have done quite some work, especially when it comes to the internals of the user interface, and codebases are starting to look quite different.

For that reason, we decided to merge the new code into the master branch so it can be included in Tumbleweed shortly. We are talking about a pull request which contains more than 340 commits, adds 9000 lines, removes 5000 and modifies 197 files. So, what could possibly go wrong? To be honest we did quite some testing but there is a chance that you can find some issues. In that case, please, open a bug report and we will happily fix it.

About the technical details, we put most of our efforts into drawing a clear line between the user interface and the business logic. In parallel, we are still working on the new data model which enables us to read/write the network configuration using different backends, although at this time we are only supporting sysconfig. We have made some progress during this sprint (you can check the pull request if you are interested), but we will not merge this code into our master branch yet. You can find more details in the updated documentation.

After reading this status update about the yast2-network refactoring, you might be wondering about our plans. Basically, we would like to finish the support to read/write network interfaces configuration and start using it through all the code, killing some rather old and buggy modules like LanItems.

Offline Media Support

For SUSE Linux Enterprise 15 products, there are two installation media:

  • The installer media, which contains only basic packages for a minimal system.
  • The so-called Packages DVD, which contains several modules and extensions, like the Development Tools Module or the Server Application Module.

The main use case of the Packages DVD is allowing to install the systems without an Internet connection. However, YaST support for such a scenario is pretty simplistic. For instance, dependencies between modules are not evaluated and the user has to select them manually. This approach is error-prone and user-unfriendly.

Fortunately, these shortcomings will be addressed in SLE 15 SP2. YaST is now able to solve modules and extensions dependencies, so the user does not have to worry about them anymore. For instance, if you select the Web and Scripting Module, the Basesystem Module and Server Application Module will be automatically selected.

At first, solving dependencies through the 25 repositories which are included in the Packages DVD might be time-consuming, but the current implementation takes advantage of libsolv to reduce it to about 2 seconds in our testing machine.

Improved Extensions and Modules Selection

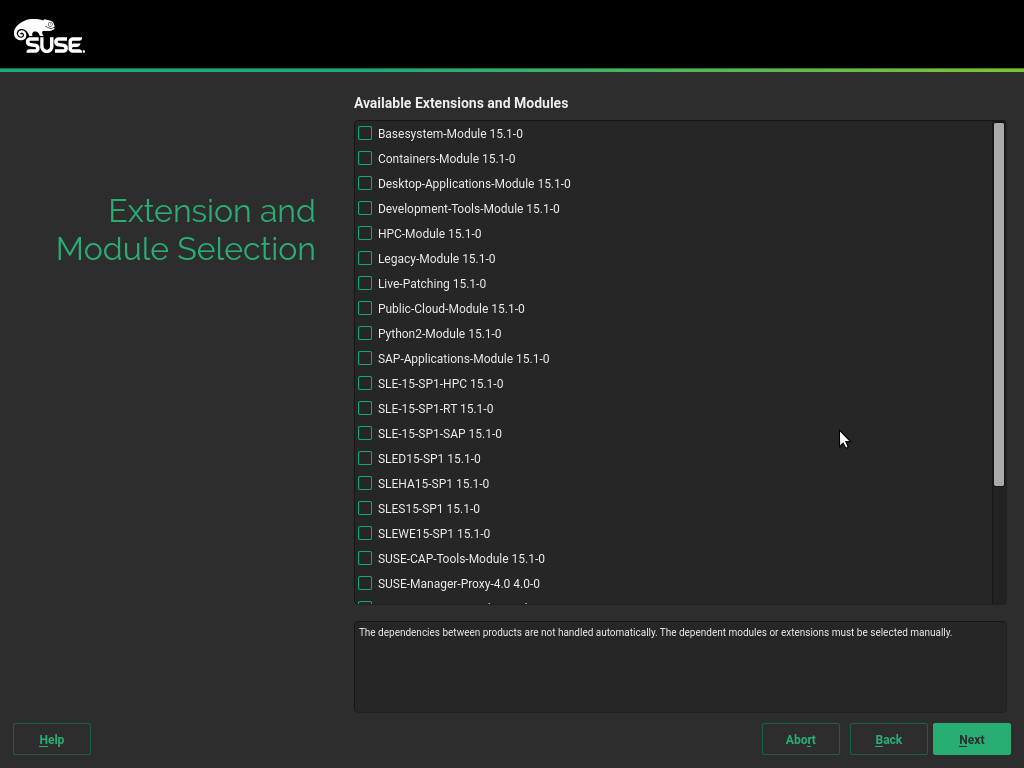
Additionally, other improvements have been included, like displaying additional information about each module/extension or filtering out base products from the list.

SUSE Manager and the Partitioning Guided Setup

As you know, YaST is a very flexible Linux installer. The creators of each (open)SUSE product or role can define the particular sequence of steps presented to the user and configure many of the options on each of those step. But that was still not enough for the maintainers of SUSE Manager, the purpose-specific distribution to manage software-defined infrastructures.

SUSE Manager follows a pretty specific approach regarding the management of the storage devices. So we had to add some extra configuration options to our partitioning guided proposal to fulfill their needs. We felt the topic deserved its own separate blog post. So follow the link and enjoy the love story of SUSE Manager and the Partitioning Guided Setup.

Taking care of IBM z Systems

For many reasons, IBM z System architecture (s390) is one of those special cases where YaST flexibility is crucial. One of the many options that YaST offers to products and roles creators is called adjust_by_ram, which instructs YaST to make sure that a given volume size is, at least, as big as the RAM of the system. Obviously, this option is especially useful for the swap volume when we want to be able to suspend the system to disk.

However, on the 64-bits s390 architecture, resuming from a swap device is not supported, which renders this option useless. For that reason, YaST will take this situation into account, and it will not enlarge the swap volume bye default for s390 machines, even if adjust_by_ram was set in the control file. Of course, the user will be able to enlarge the volume by activating the corresponding checkbox in the Guided Setup options.

Guided Partitioning Filesystem Options

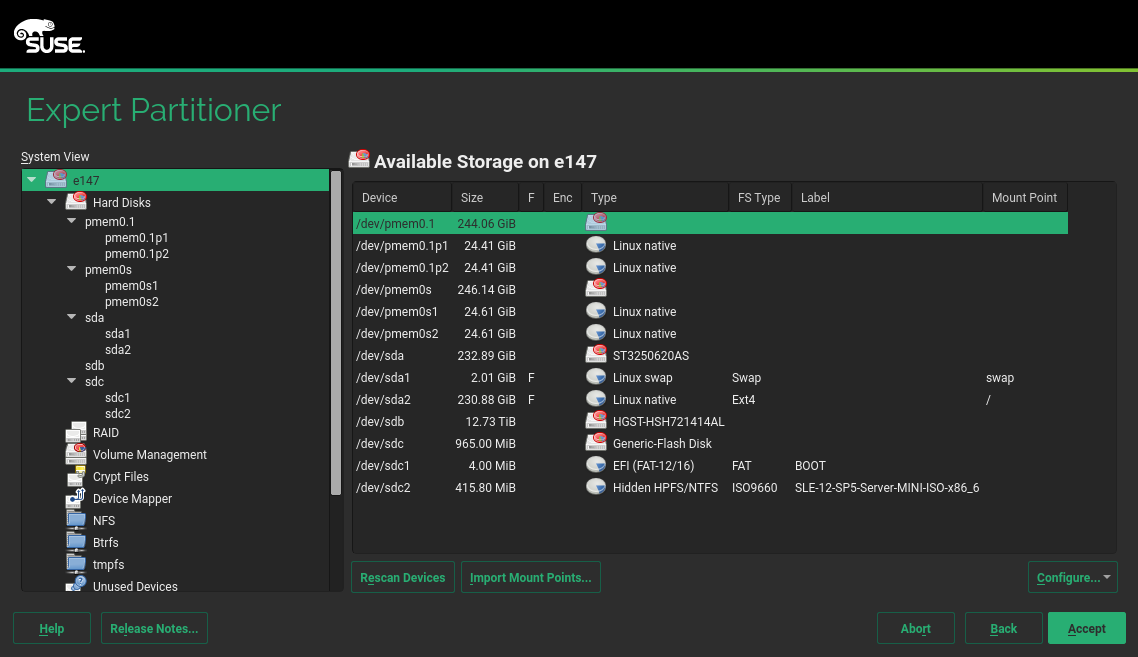
Backporting Stuff to SLE 12 SP5

Although most of the development effort is focused on SLE 15 SP2 and openSUSE Leap 15.2, we do not forget about SLE 12. SUSE is working on the 5th Service Pack of this release and the YaST team is no exception.

During this sprint, SLE 12 got two interesting features that were backported from SLE 15. The first one is the ability to specify kernel mitigations settings, as you already can do in Tumbleweed. And the second one is the support for PMEM devices, that you can see in the screenshot below.

YaST2 Partitioner PMEM Support

Recently, there was an interesting discussion about the openSUSE installer on Reddit, continued as a thread on our yast-devel mailing list.

This is just a quick heads-up to confirm that we hear you. Some of the issues discussed there were already known to be sore points, some others may need more clarification on why and how things are as they are.

We are taking your feedback and criticism seriously. But we also have to consider all the requirements, and we try to avoid making unrealistic promises. So please bear with us until we had some further discussions first about what we can do and in what time frame.

Conclusions

In addition to what we have described in this report, we have been working on fixing bugs and making other small improvements here and there. And sprint 81th will not be different: part of the team will keep working on yast2-network while the rest squashes as many bugs as possible.

Announcing Li-f-e 42.1

December 21st, 2015 by

The best Linux distribution for education got a whole lot better, your Li-f-e(Linux for Education) takes a “Leap” to 42.1. openSUSE Education community is proud to present this latest edition based on openSUSE 42.1 with all the features, updates and bug fixes available on it till date. This effectively makes it the only enterprise grade long term supported(LTS) distribution for Education.

As with previous releases we have bundled a ton of softwares on this live DVD/USB specially packaged for education, along with the Plasma, GNOME and Mate Desktop Environments, full multimedia experience is also provided out of the box thanks to the Packman repositories. Only x86_64 architecture is supported, if you have a lot of machines that only support x86 then read on to find out how you can extend their Li-f-e.
(more…)

Banana Pi M2 running openSUSE Tumbleweed

December 3rd, 2015 by

Following up from my earlier post about openSUSE LTSP on Banana Pi, Nora Lee from the manufacturer of the board got in touch with me and sent me a couple of their new boards- Banana Pi M2, runs on A31s quad-core CPU and has 1G RAM, powerful enough to run openSUSE Tumbleweed with Xfce Desktop.

Here is how you can get openSUSE running on Banana Pi M2.

* Download the image

* Extract the archive to get openSUSE-Tumbleweed-Bpi-M2-Xfce.img

* Dump openSUSE-Tumbleweed-Bpi-M2-Xfce.img on to a SD card
(dd if=/path/to/openSUSE-Tumbleweed-Bpi-M2-Xfce.img of=/dev/sdX bs=4M; sync #replace /dev/sdX with your actual SD card device)

*  In case you have a bigger SD card, use yast2 disk(partitioner) to “expand” the second partition. You can use yast’s package manager to install more software. The default password for root is linux, you may want to change that first thing after booting.

I am unable to get sound on this hardware, probably their kernel is missing sound related modules, if you figure out how to get sound working drop me a line so I can include it in next release.Everything else(wifi, hdmi out, USB ports etc) works well enough.

LTSP client goes Banana Pi!

December 16th, 2014 by

The Raspberry Pi is a credit-card sized computer running ARM processor that plugs into your TV/PC monitor, mouse and a keyboard, it is capable of running Linux and can be made to do many interesting things.The Banana Pi is a what Chinese ingeniousness came up with after they checked out Raspberry Pi, they made a lot more powerful knockoff. This is a “How-to” use Banana Pi as LTSP client. (more…)

How I ran openSUSE on a Nexus 7

September 22nd, 2013 by

The Nexus 7 (2012 version) is a 7 inch tablet by Google+Asus.
The nice thing about it is, that it has an unlockable bootloader. Also it has an armv7 CPU and we built openSUSE for this CPU for some years. I had one such device with a broken display, so doing some more risky things with it seemed to be appropriate.
I wanted to run my own software on it. Running openSUSE in a chroot (change-root) environment is usually a lot easier than replacing the whole system, so this is where I went.

First, I needed two tools. One is the “adb” – Android DeBug tool from the official sdk and the other is “fastboot” which was hard to find, so I mirror it here.
I got me the stable ROM from http://wiki.cyanogenmod.org/w/Grouper_Info and followed their installation instructions. adb shell only seemed to work while in bootloader (which you reach by holding Volume-Down+Power during boot)
The hardest part was to re-enable USB-debugging by going into Settings/About tablet and tapping Build-Number seven times.

Also before zapping everything that was there, I did in adb shell : cp -a /system/app /sdcard/
and back later.
So after following all the other installation steps, I had cyanogenmod booting. I attached a bluetooth keyboard so that I can better type. The ROM comes with a terminal app, which I opened. type su - to become root after a security popup.
Now, I downloaded my lastest Raspberry-Pi image from http://www.zq1.de/bernhard/linux/opensuse/. This is under /sdcard/Download where I unpacked it with xz -d
Then comes the tricky part. The image has a partition table, but here we just need the root filesystem. With fdisk -lu we can see that it starts at sector 309248. One could copy out that part with dd or use a loop device with offset like this:
#!/system/xbin/sh
mknod /dev/loop0 b 7 0
losetup -d /dev/loop0 # cleanup of previous try
losetup -o `expr 512 \* 309248` /dev/loop0 rasp*img
mkdir -p mnt
mount -t ext2 /dev/loop0 mnt

Now we have access to the openSUSE files under mnt.
In there I created me a chroot.sh:
#!/system/xbin/sh
for m in proc sys dev ; do mount -o bind /$m $m ; done
HOME=/root PATH=/sbin:/usr/sbin:/usr/local/sbin:/root/bin:/usr/local/bin:/usr/bin:/bin:/usr/bin/X11:/usr/X11R6/bin /system/xbin/chroot . bin/bash
for m in proc sys dev ; do umount $m ; done

With that, the only remaining thing to do was to add a nameserver line to /etc/resolv.conf before I could use zypper to install software e.g. zypper install yast2-network yast2-ncurses.
Running yast lan on the Nexus 7 gives nice sight.

I guess one could also use the armv7 rootfs to have software built for armv7 instead of the compatible armv6. But for me it does not matter much.

New Raspberry Pi Image

September 7th, 2013 by

update: new image with kernel-3.6 and minimal X11/icewm http://www.zq1.de/~bernhard/linux/opensuse/raspberrypi-opensuse-20130911x.img.xz (103MB)

We got a new armv6 based image for the Raspberry Pi.
This one is only 82MB compressed, so pretty minimalistic.
http://www.zq1.de/~bernhard/linux/opensuse/raspberrypi-opensuse-20130907.img.xz

The exciting new thing is that this was created using an alternative image building automatism which I wrote from scratch in three hours this morning.
The scripts can be found at
https://build.opensuse.org/package/show/devel:ARM:Factory:Contrib:RaspberryPi/altimagebuild
and are also embedded within the image under /home/abuild/rpmbuild/SOURCES/

This means that everyone can now easily build his own images the way he likes and even branch and do submit requests for changes that are useful for others.
The way to use this is simple.
If you have 6GB RAM, you can speed things up with export OSC_BUILD_ROOT=/dev/shm/arm before you do
osc co devel:ARM:Factory:Contrib:RaspberryPi altimagebuild
cd devel:ARM:Factory:Contrib:RaspberryPi/altimagebuild
bash -x main.sh

This pseudo-package does not easily build within OBS or osc alone because it needs root permissions for some of the steps (chroot, mknod, mount), which could only be workarounded with User-Mode-Linux or patching osc.
The build consists of three steps that can be seen in main.sh:

  1. First, osc build is used to pull in required packages and setup the armv6 rootfs.
  2. Second, mkrootfs.sh modifies a copy of the rootfs under .root to contain all required configs
  3. And finally, mkimage.sh takes the .root dir and creates a .img from it that can be booted

This can build an image from scatch in three minutes. And my Raspberry Pi booted successfully with it within 55 seconds.

There are some remaining open issues:

  • the repo key is initially untrusted
  • still uses old 3.1 kernel – solved
  • build scripts have no error handling

Compared to the old image, this one has some advantages:

  • It is easier to resize because the root partition is the last one
  • Compressed image is much smaller
  • Reproducible image build, so easy to customize
  • It is armv6 with floating point support, so could be faster
  • We have over 5200 successfully built packages from openSUSE:Factory:ARM
    so for example you can install a minimalistic graphical environment with zypper install xauth twm xorg-x11-server xinit and start it with startx

So if you wanted to play with openSUSE on RPi, you can do so right now and have a lot of fun.

openSUSE 12.3 on Android

May 9th, 2013 by

Here is a new image for your armv7l powered phone or tablet(any recent dual core device should work), you can get openSUSE 12.3 XFCE running on it without the need for repartition, formats, bootloader hacks or sacrificing your nicely running latest android on it. What you need is rooted device with busybox, Android VNC and terminal app installed and 4GB free space on sdcard(internal or external).

Instructions to run it are same as mentioned earlier. In addition to those you can also use LinuxonAndroid app with patched bootscript.sh. Replace /data/data/com.zpwebsites.linuxonandroid/files/bootscript.sh on your device with the patched one and follow the directions shown here(last 3 images):

openSUSE on android

openSUSE on phones/tablets

February 20th, 2013 by

Thanks to the fantastic work by openSUSE Arm team, you can get full desktop on your armv7l powered phone or tablet(any recent dual core devices should work), without the need for repartition, formats, bootloader hacks or sacrificing your nicely running latest android on it. What you need is rooted device with busybox, Android VNC and terminal app installed and 4GB free space on sdcard(internal or external).
(more…)

LiveCDs

December 27th, 2012 by

As few of you might know, I made my own SUSE-based LiveCDs a while ago, using (like Knoppix) cloop compression with iso9660 and my own kernel code for file-based overlay to make it writeable. You might be amazed at how fast it runs in KVM. However, the kernel part has bit-rotten and there are other techniques out there today, so I took a look around at how others do their LiveCDs.

But first some broader overview. To make a LiveCD, the biggest problem is that CDs are not writeable (and even modern Flash devices do not want to be written too much). Embedded devices using flash had the same problem. Various approaches have been used in the past to solve this:

  • adapt all software to write into ram-disks e.g. by having symlinks (hard to create and maintain)
  • load all software into RAM (only for small distributions)
  • use file-based overlaying such as unionfs or aufs to have software write into RAM (lsof, pwd, and hardlinks can be tricky)
  • use block-based overlaying (problem: can not easily free disk space again)

Also compression is used to fit more onto a CD. And interestingly, this usually also speeds up booting because it is faster to read 10MB off a CD and decompress it into the original 30MB than to read 30MB from such a slow medium.

Now, to the distributions.

  • openSUSE has the classic DVD installs that use special installation-images and run in RAM and then there are the real LiveCDs that are created by our kiwi tool, use block-based overlaying and LZMA compression of a ext3 by means of our FUSE-based clicfs.
  • All of the other distributions use squashfs for compression. Mageia employs dracut for initrd and unionfs for file-based overlaying
  • Debian uses aufs for file-based overlaying
  • Ubuntu uses overlayfs for file-based overlaying
  • Fedora uses an ext4 filesystem image contained in a squashfs with dm-snapshot for block-based overlaying, thus being most similar to openSUSE

I also spent some time benchmarking (on my AMD A10-5800K) the various technologies with a simple script using Debians uncompressed rootfs of 495132 KiB as data.
squashfs supports three different compression methods: lzo, gzip and xz (aka LZMA).

  • squashfs-lzo: size:220992 compression:11.1MB/s decompression:134.4MB/s
  • squashfs-gzip: size:203328 compression:15.5MB/s decompression:88.9MB/s
  • squashfs-xz: size:176064 compression:6.5MB/s decompression:22.5MB/s
  • cloop(gzip): size:213348 compression:16.2MB/s decompression:49.6MB/s
  • clicfs(xz): size:185300 compression:16.7MB/s decompression:18.2MB/s

This has some surprises: even when using the same compression method, sizes can differ by 5% and speed can differ even more.

If you want to compare numbers on your system, memory throughput is also interesting:
# dd if=/dev/zero of=/dev/null bs=1M count=100000
104857600000 bytes (105 GB) copied, 12.4499 s, 8.4 GB/s

Overall, clicfs is performing OK, considering that it already takes care of the overlaying, but for my own LiveCD I would prefer Debian’s method and I am wondering how it would work.

Linux Kernel built with clang boots into openSUSE

July 14th, 2012 by

Whatch this:  http://youtu.be/Jp04DMXH2Rg

The kernel was compiled with Clang (C frontend of LLVM)  and boots into a running openSUSE desktop!