Home Home > Server > Virtualization
Sign up | Login

Deprecation notice: openSUSE Lizards user blog platform is deprecated, and will remain read only for the time being. Learn more...

Archive for the ‘Virtualization’ Category

Micro openSUSE Leap 15.1 for AWS

February 16th, 2020 by

I make the minimalist version of openSUSE available on AWS. In addition to multipurpose, complete stable and easy to use. It is intended for users, developers, administrators, and any professional who wants openSUSE resources on the server. It’s great for beginners, experienced users and ultra geeks, in short, it’s perfect for everyone! Suggestions at cabelo@opensuse.org, More information here: https://aws.amazon.com/marketplace/pp/B083XBP51G

micro-opensuse-15.1

Here are the main advantages:

Resources openSUSE Leap 15.1 Micro openSUSE 15.1
Disk space 1,5G 686M
Used memory 70M 55M
Packages 576 236

Disadvantage: It does not have YAST!

Highlights of YaST Development Sprint 73

March 14th, 2019 by

As (open)SUSE releases are approaching, the YaST team is basically in bug squashing mode. However, we are still adding some missing bits, like the bcache support for AutoYaST. Additionally, there are some interesting improvements we would like to let you know about:

  • AutoYaST support for using Btrfs subvolumes as user home directories.
  • Improved Certificates management in the registration module.
  • Correct detection of DASDs when using virtio-blk.
  • Proper handling of the resume option in the bootloader module.
  • Display fonts and icons properly during installation.

And, as a bonus, some insights about a YaST font scaling problem on the GNOME desktop (spoiler: not a YaST bug at all).

Adding bcache support to AutoYaST

A few days ago, support for bcache landed in the YaST Partitioner. In a nutshell, bcache is a caching system that allows to improve the performance of any big but slow disk (so-called backing device) by using a faster and smaller disk (caching device).

The way to describe a bcache in AutoYaST is pretty similar to how a RAID or a LVM Volume Group is described. On one hand, you need to specify which devices are going to be used as backing and caching devices by setting bcache_backing_for and bcache_caching_for elements. And, on the other hand, you need to describe the layout of the bcache device itself. As you would do for a RAID, you can partition the device or use it as a filesystem.

The example below creates a bcache device (called /dev/bcache0) using /dev/sda to speed up the access to /dev/sdb.

<partitioning config:type="list">
    <drive>
      <type config:type="symbol">CT_DISK</type>
      <device>/dev/sda</device>
      <disklabel>msdos</disklabel>
      <use>all</use>
      <partitions config:type="list">
        <partition>
          <!-- It can serve as caching device for several bcaches -->
          <bcache_caching_for config:type="list">
            <listentry>/dev/bcache0</listentry>
          </bcache_caching_for>
          <size>max</size>
        </partition>
      </partitions>
    </drive>

    <drive>
      <type config:type="symbol">CT_DISK</type>
      <device>/dev/sdb</device>
      <use>all</use>
      <!-- <disklabel>none</disklabel> -->
      <disklabel>msdos</disklabel>
      <partitions config:type="list">
        <partition>
          <!-- It can serve as backing device just for one bcache -->
          <bcache_backing_for>/dev/bcache0</bcache_backing_for>
        </partition>
      </partitions>
    </drive>

    <drive>
      <type config:type="symbol">CT_BCACHE</type>
      <device>/dev/bcache0</device>
      <bcache_options>
        <cache_mode>writethrough</cache_mode>
      </bcache_options>
      <use>all</use>
      <partitions config:type="list">
        <partition>
          <mount>/data</mount>
          <size>20GiB</size>
        </partition>
        <partition>
          <mount>swap</mount>
          <filesystem config:type="symbol">swap</filesystem>
          <size>1GiB</size>
        </partition>
      </partitions>
    </drive>
  </partitioning>

Using Btrfs Subvolumes as User Home Directories in AutoYaST

In our last report we presented a new feature to allow using Btrfs subvolumes as user’s home directories. However, the AutoYaST support for that feature was simply missing.

Now you can use the home_btrfs_subvolume to control whether a Btrfs should be used as home directory.

<user>
   <encrypted config:type="boolean">false</encrypted>
   <home_btrfs_subvolume config:type="boolean">true</home_btrfs_subvolume>
   <fullname>test user</fullname>
   <gid>100</gid>
   <home>/home/test</home>
   <shell>/bin/bash</shell>
   <uid>1003</uid>
   <user_password>test</user_password>
   <username>test</username>
</user>

Tuning the Bootloader’s resume parameter

The resume parameter is used by the bootloader to tell the kernel which swap partition should be used for the suspend to disk feature. If you are curious enough, you can find the value for your system in the Kernel Parameters tab of the YaST bootloader module. Now that we know what the resume parameter is, it is time to talk about the two issues we have solved recently.

The first problem was related to the way in which YaST determines which swap partition should be used. The bug report mentioned that YaST was taking a swap partition not used by the system that, in addition, was located in a removable device. After checking the code, we found out that we were using a simplistic heuristic which just selected the biggest swap partition available. We improve that logic to use the biggest swap partition which is being used by the system. However, if no suitable partition is found, YaST will fall back to the old behaviour.

The second problem was related to AutoYaST not handling the noresume option properly. When a user specified that option, AutoYaST just blindly added it to the kernel command line keeping the conflicting resume parameter too. Of course, that caused troubles. Now when noresume is given, AutoYaST simply removes all occurrences of the resume parameter.

Registration, OpenSSL and Debugging

These days, handling the SSL certificates in a proper way is key to keep our systems secured. So during this sprint, we invested quite some time improving how certificates are used in our registration module. Basically, we have improved YaST behaviour in these scenarios:

  • Using self-signed certificates.
  • Handling with unknown certificate authorities.

When the custom registration server (the new RMT or the older SMT) use a self-signed certificate, YaST offers to import the server certificate and make it known to the system.
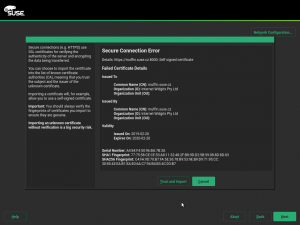
Self-signed Certificate Dialog

On the other hand, when the server SSL key was signed by an unknown key, YaST used to just display an error popup. That was not much helpful as it was not obvious what to do. Now a new popup which contains some hints about how to import the CA certificate manually is displayed. In this case it cannot be imported automatically as YaST does not know where to obtain it, it is not present in the server response.
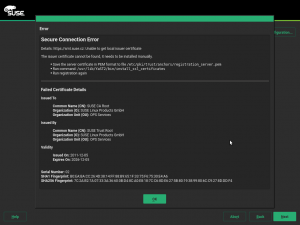
Unknown Certificate Authority Dialog

The work of importing and activating the certificate is now performed by a YaST script, preventing the user from having to run some complicated (and error prone) commands manually.

These improvement and some other OpenSSL details have been documented in the OpenSSL Certificates documentation. Additionally, if you ever need to debug some SSL related issue, this new OpenSSL Debugging Hints documentation might be useful for you. It covers basic topics, like displaying PEM certificate details, running a testing HTTPS server, creating a self-signed certificate, etc.

Detecting DASDs when using virtio-blk in zKVM

IBM’s S/390 platform has some special features that you will not find in conventional architectures like x86. One of them are DASD hard disks. These devices can be accessed in zKVM using the virtio-blk backend, but DASDs need special handling. For instance, the most common DASD type (CDL ECKD) cannot be used with an MS-DOS partition table nor a GPT, instead a DASD partition table is required. Having this requirement in mind, YaST now detects DASDs using virtio-blk properly and uses the correct DASD partition table.

Improving Fonts and Icons Handling in the Installer

Back some time ago, Stasiek Michalski (a.k.a. as hellcp), one of our very active openSUSE community contributors, spent quite some work for better artwork in YaST. As a result, icons are now used from the desktop’s icon theme whenever possible, and the installer font was changed.

One fallout of the latter was that the font size was now too small for users with diminishing eyesight: That new font has different font metrics, so the default font size was too small. We fixed that during this sprint. See also openSUSE/branding#107.

By the way, the disappearing icons issue was solved too. See libyui/libyui-qt#100 if you are interested in the details.

And just to get this straight: We are welcoming active community members to contribute (thanks again, @hellcp!). There will be some bugs; that’s just natural. We need to cooperate to fix them.

YaST Font Scaling Problem on the GNOME Desktop

This is not really a YaST problem, but of course it was still the natural thing to write a bug report against YaST for this bsc#1123424. And it took us quite a while to figure out what went wrong here.

Basically, when you use the GNOME Tweak Tool to set a Font Scaling Factor that is not a multiple of 0.25, this is completely ignored, and so all Qt5 applications (including the YaST Qt Control Center and all YaST modules) appear with unscaled fonts.

The problem is this GNOME Tweak Tool setting non-integer DPI values (which is already out of spec and thus a bug) and the Qt5 libraries consequently completely ignoring that DPI value. So that GNOME tool should do it correctly, but the Qt5 libs could also handle this more gracefully.

Unfortunately, there is nothing that we can do about this from the YaST side, even though we are aware that this might become reported as a YaST bug again in the future 🙂

Closing Thoughs

As we stated at the beginning of this post, we are basically in bug squashing mode. So, please, if you have some time, give the testing versions of (open)SUSE a try and report as many bugs as you can.

Thanks!

Announcing openSUSE Education Li-f-e 13.1

December 17th, 2013 by

Get Li-f-e from here : Direct Download | Torrents | Metalinks | md5sum

openSUSE Education community is proud to bring you an early Christmas and New Year’s present: openSUSE Education Li-f-e. It is based on the recently released openSUSE 13.1 with all the official online updates applied.

We have put together a nice set of tools for everyone including teachers, students, parents and IT administrators.  It covers quite a lot of territory: from chemistry, mathematics to astronomy and Geography. Whether you are into software development or just someone looking for Linux distribution that comes with everything working out of the box, your search ends here.

Edit: We now also have x86_64 version supporting UEFI boot available for download.

(more…)

Hongkong OpenStack Design Summit

November 13th, 2013 by

So last week many OpenStack (cloud software) developers met in Hongkong’s world expo halls to discuss the future development and show off what is done already.

Overall, I heard there were 3000 attendees, with 800 being developers or so. That sounds like a large number of people, but luckily everything felt well-organized and the rooms were always big enough to have seats for all interested.

The design sessions were usually pretty low-level and focused into one component, so it was not easy for me to make useful contributions in there. The session about read-only API access (e.g. for helpdesk workers and monitoring) and about HA were most useful to me.

In the breakout rooms were interesting sessions by many large OpenStack users (CERN, Ebay, Paypal, Dreamhost, Rackspace) giving valuable insights into what people expect from and do with a cloud. Many of them are using custom-built parts, because the plain OpenStack is still not complete to run a cloud. SUSE Cloud ships with some such missing parts (e.g. deployment and configuration management), but most organisations seem to run their own at the moment.

Cloudbase was there telling about their Hyper-V support that we integrated in SUSE Cloud.
Apart from the 6 SUSE Cloud developers there were several local (and one Australian) SUSE guys manning the booth.

Overall it was quite some experience to be there (in such an exotic and yet nice place) and listen and talk to so many different people from very different backgrounds.

CLI to upload image to openstack cloud

April 18th, 2012 by

I work on automatic testing of one of our products that creates other projects.
And because there is a lot of clouds everywhere I want to use them too. We
have internally an OpenStack cloud (still Diablo release). So I need to solve
automatic uploading of images built in the Build Service. Below I describe my working version.

(more…)

openSUSE Edu Li-f-e 12.1 out now!

December 22nd, 2011 by

openSUSE Education team is proud to present another edition of openSUSE-Edu Li-f-e (Linux for Education) based on openSUSE 12.1. Li-f-e comes loaded with everything that students, parents, teachers and system admins of educational institutions may need.

  more screenshots…

(more…)

1-2-3 Cloud

June 20th, 2011 by

Towards the end of last year there was an article in openSUSE news “announcing” the cloud efforts in the openSUSE project and on OBS. Well, cloud is still all the rage (see Jos’ contribution to openSUSE News issue 180) and people just cannot stop talking about cloud computing.

Using openSUSE as a host for your cloud infrastructure is also making great progress. We have 3 cloud projects in OBS and hopefully these cover your favorite cloud infrastructure code, Virtualization:Cloud:Eucalyptus, Virtualization:Cloud:OpenNebula, and Virtualization:Cloud:OpenStack. The projects provide repositories for Eucalyptus, OpenNebula, and OpenStack, respectively.

We attempt to make it relatively easy to get a cloud up and running. In this process OpenNebula and OpenStack have progressed the most. Eucalyptus is working, but due to an issue with Eucalyptus and openSSL 1.0 and later (the version in openSUSE) automation has to wait until these issues are resolved.

For OpenNebula we now have a KIWI example that shows how one can get a cloud setup from scratch in less than 2 hours, including the image build. The example contains a firstboot workflow for the head node, and self configuration of cloud nodes.

For OpenStack SUSE Gallery images are in the works and will be published in the near future.

All repositories provide packages you can install on running openSUSE systems. If you are interested in using openSUSE as the underlying OS for your cloud or if you want to contribute to the cloud projects, subscribe to the cloud mailing list opensuse-cloud@opensuse.org

Make vmware workstation 7.1.3 running with opensuse 11.4 (kernel 2.6.37)

November 15th, 2010 by

Note about the 2.6.37xx

There’s a solution to make the kernel modules building under openSUSE factory (11.4) and the kernel 2.6.37

Preparation

download the lastest vmware workstation 7.1.3 (the patch is only for this version)
download the patch vmware-7.1.3-2.6.37-rc5.patch
download the script to patch patch-modules_v62-opensuse.sh

Install

Proceed to the normal installation of workstation, if you have older version, it will be replaced
by running under root account

sh VMware-Workstation-Full-7.1.3-324285.x86_64.bundle

Patch

Now we have to apply the needed patch, just run as root

sh patch-modules_v62-opensuse.sh

Here the output result

sh patch-modules_v62-opensuse.sh 
(Stripping trailing CRs from patch.)
patching file vmci-only/include/compat_semaphore.h
(Stripping trailing CRs from patch.)
patching file vmmon-only/linux/driver.c
(Stripping trailing CRs from patch.)
patching file vmnet-only/compat_semaphore.h
(Stripping trailing CRs from patch.)
patching file vsock-only/shared/compat_semaphore.h
Stopping VMware services:
   VMware USB Arbitrator                                               done
   VM communication interface socket family                            done
   Virtual machine communication interface                             done
   Virtual machine monitor                                             done
   Blocking file system                                                done
Using 2.6.x kernel build system.
make: Entering directory `/tmp/vmware-root/modules/vmmon-only'
make -C /lib/modules/2.6.37-rc5-12-desktop/build/include/.. SUBDIRS=$PWD SRCROOT=$PWD/. \
  MODULEBUILDDIR= modules
make[1]: Entering directory `/usr/src/linux-2.6.37-rc5-12-obj/x86_64/desktop'
make -C ../../../linux-2.6.37-rc5-12 O=/usr/src/linux-2.6.37-rc5-12-obj/x86_64/desktop/. modules
  CC [M]  /tmp/vmware-root/modules/vmmon-only/linux/driver.o
  CC [M]  /tmp/vmware-root/modules/vmmon-only/linux/iommu.o
/tmp/vmware-root/modules/vmmon-only/linux/iommu.c: In function ‘IOMMUUnregisterDeviceInt’:
/tmp/vmware-root/modules/vmmon-only/linux/iommu.c:217:17: warning: ignoring return value of ‘device_attach’, declared with attribute warn_unused_result
  CC [M]  /tmp/vmware-root/modules/vmmon-only/linux/hostif.o
/tmp/vmware-root/modules/vmmon-only/linux/hostif.c: In function ‘HostIFReadUptimeWork’:
/tmp/vmware-root/modules/vmmon-only/linux/hostif.c:2004:37: warning: ‘newUpBase’ may be used uninitialized in this function
  CC [M]  /tmp/vmware-root/modules/vmmon-only/linux/driverLog.o
  CC [M]  /tmp/vmware-root/modules/vmmon-only/common/memtrack.o
  CC [M]  /tmp/vmware-root/modules/vmmon-only/common/vmx86.o
  CC [M]  /tmp/vmware-root/modules/vmmon-only/common/cpuid.o
  CC [M]  /tmp/vmware-root/modules/vmmon-only/common/task.o
  CC [M]  /tmp/vmware-root/modules/vmmon-only/common/hashFunc.o
  CC [M]  /tmp/vmware-root/modules/vmmon-only/common/comport.o
  CC [M]  /tmp/vmware-root/modules/vmmon-only/common/phystrack.o
  CC [M]  /tmp/vmware-root/modules/vmmon-only/vmcore/moduleloop.o
  LD [M]  /tmp/vmware-root/modules/vmmon-only/vmmon.o
  Building modules, stage 2.
  MODPOST 1 modules
  CC      /tmp/vmware-root/modules/vmmon-only/vmmon.mod.o
  LD [M]  /tmp/vmware-root/modules/vmmon-only/vmmon.ko
make[1]: Leaving directory `/usr/src/linux-2.6.37-rc5-12-obj/x86_64/desktop'
make -C $PWD SRCROOT=$PWD/. \
  MODULEBUILDDIR= postbuild
make[1]: Entering directory `/tmp/vmware-root/modules/vmmon-only'
make[1]: `postbuild' is up to date.
make[1]: Leaving directory `/tmp/vmware-root/modules/vmmon-only'
cp -f vmmon.ko ./../vmmon.o
make: Leaving directory `/tmp/vmware-root/modules/vmmon-only'
Built vmmon module
Using 2.6.x kernel build system.
make: Entering directory `/tmp/vmware-root/modules/vmnet-only'
make -C /lib/modules/2.6.37-rc5-12-desktop/build/include/.. SUBDIRS=$PWD SRCROOT=$PWD/. \
  MODULEBUILDDIR= modules
make[1]: Entering directory `/usr/src/linux-2.6.37-rc5-12-obj/x86_64/desktop'
make -C ../../../linux-2.6.37-rc5-12 O=/usr/src/linux-2.6.37-rc5-12-obj/x86_64/desktop/. modules
  CC [M]  /tmp/vmware-root/modules/vmnet-only/driver.o
  CC [M]  /tmp/vmware-root/modules/vmnet-only/hub.o
  CC [M]  /tmp/vmware-root/modules/vmnet-only/userif.o
  CC [M]  /tmp/vmware-root/modules/vmnet-only/netif.o
  CC [M]  /tmp/vmware-root/modules/vmnet-only/bridge.o
  CC [M]  /tmp/vmware-root/modules/vmnet-only/filter.o
  CC [M]  /tmp/vmware-root/modules/vmnet-only/procfs.o
  CC [M]  /tmp/vmware-root/modules/vmnet-only/smac_compat.o
  CC [M]  /tmp/vmware-root/modules/vmnet-only/smac.o
  CC [M]  /tmp/vmware-root/modules/vmnet-only/vnetEvent.o
  CC [M]  /tmp/vmware-root/modules/vmnet-only/vnetUserListener.o
  LD [M]  /tmp/vmware-root/modules/vmnet-only/vmnet.o
  Building modules, stage 2.
  MODPOST 1 modules
  CC      /tmp/vmware-root/modules/vmnet-only/vmnet.mod.o
  LD [M]  /tmp/vmware-root/modules/vmnet-only/vmnet.ko
make[1]: Leaving directory `/usr/src/linux-2.6.37-rc5-12-obj/x86_64/desktop'
make -C $PWD SRCROOT=$PWD/. \
  MODULEBUILDDIR= postbuild
make[1]: Entering directory `/tmp/vmware-root/modules/vmnet-only'
make[1]: `postbuild' is up to date.
make[1]: Leaving directory `/tmp/vmware-root/modules/vmnet-only'
cp -f vmnet.ko ./../vmnet.o
make: Leaving directory `/tmp/vmware-root/modules/vmnet-only'
Built vmnet module
Using 2.6.x kernel build system.
make: Entering directory `/tmp/vmware-root/modules/vmblock-only'
make -C /lib/modules/2.6.37-rc5-12-desktop/build/include/.. SUBDIRS=$PWD SRCROOT=$PWD/. \
  MODULEBUILDDIR= modules
make[1]: Entering directory `/usr/src/linux-2.6.37-rc5-12-obj/x86_64/desktop'
make -C ../../../linux-2.6.37-rc5-12 O=/usr/src/linux-2.6.37-rc5-12-obj/x86_64/desktop/. modules
  CC [M]  /tmp/vmware-root/modules/vmblock-only/linux/filesystem.o
  CC [M]  /tmp/vmware-root/modules/vmblock-only/linux/dentry.o
  CC [M]  /tmp/vmware-root/modules/vmblock-only/linux/stubs.o
  CC [M]  /tmp/vmware-root/modules/vmblock-only/linux/dbllnklst.o
  CC [M]  /tmp/vmware-root/modules/vmblock-only/linux/file.o
  CC [M]  /tmp/vmware-root/modules/vmblock-only/linux/block.o
  CC [M]  /tmp/vmware-root/modules/vmblock-only/linux/module.o
  CC [M]  /tmp/vmware-root/modules/vmblock-only/linux/super.o
  CC [M]  /tmp/vmware-root/modules/vmblock-only/linux/inode.o
  CC [M]  /tmp/vmware-root/modules/vmblock-only/linux/control.o
  LD [M]  /tmp/vmware-root/modules/vmblock-only/vmblock.o
  Building modules, stage 2.
  MODPOST 1 modules
  CC      /tmp/vmware-root/modules/vmblock-only/vmblock.mod.o
  LD [M]  /tmp/vmware-root/modules/vmblock-only/vmblock.ko
make[1]: Leaving directory `/usr/src/linux-2.6.37-rc5-12-obj/x86_64/desktop'
make -C $PWD SRCROOT=$PWD/. \
  MODULEBUILDDIR= postbuild
make[1]: Entering directory `/tmp/vmware-root/modules/vmblock-only'
make[1]: `postbuild' is up to date.
make[1]: Leaving directory `/tmp/vmware-root/modules/vmblock-only'
cp -f vmblock.ko ./../vmblock.o
make: Leaving directory `/tmp/vmware-root/modules/vmblock-only'
Built vmblock module
Using 2.6.x kernel build system.
make: Entering directory `/tmp/vmware-root/modules/vmci-only'
make -C /lib/modules/2.6.37-rc5-12-desktop/build/include/.. SUBDIRS=$PWD SRCROOT=$PWD/. \
  MODULEBUILDDIR= modules
make[1]: Entering directory `/usr/src/linux-2.6.37-rc5-12-obj/x86_64/desktop'
make -C ../../../linux-2.6.37-rc5-12 O=/usr/src/linux-2.6.37-rc5-12-obj/x86_64/desktop/. modules
  CC [M]  /tmp/vmware-root/modules/vmci-only/linux/driver.o
  CC [M]  /tmp/vmware-root/modules/vmci-only/linux/driverLog.o
  CC [M]  /tmp/vmware-root/modules/vmci-only/linux/vmciKernelIf.o
  CC [M]  /tmp/vmware-root/modules/vmci-only/common/vmciDatagram.o
  CC [M]  /tmp/vmware-root/modules/vmci-only/common/vmciDriver.o
  CC [M]  /tmp/vmware-root/modules/vmci-only/common/vmciDs.o
  CC [M]  /tmp/vmware-root/modules/vmci-only/common/vmciContext.o
  CC [M]  /tmp/vmware-root/modules/vmci-only/common/vmciHashtable.o
  CC [M]  /tmp/vmware-root/modules/vmci-only/common/vmciEvent.o
  CC [M]  /tmp/vmware-root/modules/vmci-only/common/vmciQueuePair.o
  CC [M]  /tmp/vmware-root/modules/vmci-only/common/vmciGroup.o
  CC [M]  /tmp/vmware-root/modules/vmci-only/common/vmciResource.o
  CC [M]  /tmp/vmware-root/modules/vmci-only/common/vmciProcess.o
  LD [M]  /tmp/vmware-root/modules/vmci-only/vmci.o
  Building modules, stage 2.
  MODPOST 1 modules
  CC      /tmp/vmware-root/modules/vmci-only/vmci.mod.o
  LD [M]  /tmp/vmware-root/modules/vmci-only/vmci.ko
make[1]: Leaving directory `/usr/src/linux-2.6.37-rc5-12-obj/x86_64/desktop'
make -C $PWD SRCROOT=$PWD/. \
  MODULEBUILDDIR= postbuild
make[1]: Entering directory `/tmp/vmware-root/modules/vmci-only'
make[1]: `postbuild' is up to date.
make[1]: Leaving directory `/tmp/vmware-root/modules/vmci-only'
cp -f vmci.ko ./../vmci.o
make: Leaving directory `/tmp/vmware-root/modules/vmci-only'
Built vmci module
Using 2.6.x kernel build system.
make: Entering directory `/tmp/vmware-root/modules/vsock-only'
make -C /lib/modules/2.6.37-rc5-12-desktop/build/include/.. SUBDIRS=$PWD SRCROOT=$PWD/. \
  MODULEBUILDDIR= modules
make[1]: Entering directory `/usr/src/linux-2.6.37-rc5-12-obj/x86_64/desktop'
make -C ../../../linux-2.6.37-rc5-12 O=/usr/src/linux-2.6.37-rc5-12-obj/x86_64/desktop/. modules
  CC [M]  /tmp/vmware-root/modules/vsock-only/linux/af_vsock.o
/tmp/vmware-root/modules/vsock-only/linux/af_vsock.c: In function ‘VSockVmciStreamConnect’:
/tmp/vmware-root/modules/vsock-only/linux/af_vsock.c:3172:4: warning: case value ‘255’ not in enumerated type ‘socket_state’
  CC [M]  /tmp/vmware-root/modules/vsock-only/linux/vsockAddr.o
  CC [M]  /tmp/vmware-root/modules/vsock-only/linux/util.o
  CC [M]  /tmp/vmware-root/modules/vsock-only/linux/stats.o
  CC [M]  /tmp/vmware-root/modules/vsock-only/linux/notify.o
  CC [M]  /tmp/vmware-root/modules/vsock-only/driverLog.o
  LD [M]  /tmp/vmware-root/modules/vsock-only/vsock.o
  Building modules, stage 2.
  MODPOST 1 modules
  CC      /tmp/vmware-root/modules/vsock-only/vsock.mod.o
  LD [M]  /tmp/vmware-root/modules/vsock-only/vsock.ko
make[1]: Leaving directory `/usr/src/linux-2.6.37-rc5-12-obj/x86_64/desktop'
make -C $PWD SRCROOT=$PWD/. \
  MODULEBUILDDIR= postbuild
make[1]: Entering directory `/tmp/vmware-root/modules/vsock-only'
make[1]: `postbuild' is up to date.
make[1]: Leaving directory `/tmp/vmware-root/modules/vsock-only'
cp -f vsock.ko ./../vsock.o
make: Leaving directory `/tmp/vmware-root/modules/vsock-only'
Built vsock module
Starting VMware services:
   VMware USB Arbitrator                                               done
   Virtual machine monitor                                             done
   Virtual machine communication interface                             done
   VM communication interface socket family                            done
   Blocking file system                                                done
   Virtual ethernet                                                    done
   Shared Memory Available                                             done


All done, you can now run VMWare WorkStation.
Modules sources backup can be found in the '/usr/lib/vmware/modules/source-workstation7.1.3-2010-12-13-19:07:07-backup' directory

References

vmware community post
vmware community thread

Mark D Bernstein aka InitiaZero for providing the script and patch by email and having ping me about it

Enjoy, and thanks to people having done the crappy job before.

OBS 2.1: Status of SuperH (sh4) support with QEMU

October 24th, 2010 by

With established ARM support in OBS the as well as emulated MIPS and PowerPC is getting more mature, the last big embedded architecture not working in OBS with QEMU user mode was SH4. QEMU developers community had done a lot of work in improving QEMU user mode during the last months, so I can proudly present with currently only a few patches to QEMU git master OBS builds working with the SH4 port of Debian Sid. The new QEMU 0.13 released recently is a big milestone for this.

Another news is that I had fixed the bugs in Virtual Machine builds (build script) when using them with some architectures like PowerPC 32bit and SH4. So now also the combination of using for example KVM (XEN should also work) in a worker together with ARM, MIPS, PowerPC and SH4 is working. The appropriate fixes are in one of the next build script releases (if not even released already now with OBS 2.1, I have to check that). You can select architecture “sh4” with OBS 2.1 and also start a scheduler with “sh4”.

With the use of the QEMU User Mode, you can build also accelerated native cross toolchains for your host architecture so time critical parts like the compiler can run without the emulator. This works with .deb as well as with .rpm based backages. The MeeGo Project as well as the openSUSE Port to ARM uses this technique to provide an optimum between compatibility and performance. It means you can mix natively build packages and use cross toolchains on it. The “CBinstall:” feature helps you to use native or cross builds automatically depending on if your build host is a native machine or a x86 machine with cross build. In summary, we have the current classics of linux embedded archs together now in OBS: ARM, x86, MIPS 32, PowerPC 32 and SH4.

I have uploaded the fixed QEMU package to the OBS project openSUSE:Tools:Unstable inside the package “qemu-devel” after some more testing. I have of course also a OBS meta prjconf file working with Debian Sid. The SH4 port of Debian Sid you can find at Debian Ports Site.

And last but not least I would like to thank Riku Voipio of the Debian Project, QEMU project and MeeGo project and other major contributors during the QEMU 0.13 development cycle for the restless work on QEMU user mode improvements. In case of KVM, QEMU is used even twice, with QEMU-KVM as well as QEMU User Mode. I am sure I had forgotten other important people, so thanks to them also.

Matryoshka

October 20th, 2010 by

A matryoshka doll, also known as a Russian nesting doll or a babushka doll, is a set of dolls of decreasing sizes placed one inside the other. A set of matryoshkas consists of a wooden figure which separates, top from bottom, to reveal a smaller figure of the same sort inside, which has, in turn, another figure inside of it, and so on. Matryoshka Doll

Virtualization is a concept similar to the Matryoshka analogy. There is another system running inside the host machine. So it is box in a box. There are many virtualization techniques available at the disposal of the user; vmware, virtualbox, xen to name a few which requires lots of resources. Another alternative which is OpenVZ , container-based virtualization for Linux. Each container performs and executes exactly like a stand-alone server; a container can be rebooted independently and have root access, users, IP addresses, memory, processes, files, applications, system libraries and configuration files.

Here is a quote from TechRepublic Blog :

In the past we have looked at using OpenVZ for container virtualization on Linux. OpenVZ is great as it allows you to run compartmentalized “servers” within an operating system so you can separate systems, much like running virtual machines on a host system. With OpenVZ, you can get the benefits of virtualization without the overhead.

The downside of OpenVZ is that it isn’t in the mainline kernel. This means you need to run a kernel provided by the OpenVZ project. By itself this isn’t necessarily a problem, unless you are running an unsupported Linux distribution, and also if you don’t mind a bit of lag from upstream security fixes

So what is an alternative; well maybe lxc is the answer.According to http://lxc.sourceforge.net/

The  container  technology  is actively being pushed into the mainstream linux kernel. It provides the resource management through the control groups aka process containers and resource isolation through the namespaces.

There is very little information regarding LXC in the opensuse wiki and the only one available is still draft, yet provides enough information to start rolling up your containers.  Here is the preamble of the above mentioned page:

LXC is a form of paravirtualization. Being a sort of super duper chroot jail, it is limited to running linux binaries, but offers essentially native perfomance as if those binaries were running as normal processes right in the host kernel. Which in fact, they are.

LXC is interesting primarily in that:

  • It can be used to run a mere application, service, or a full operating system.
  • It offers essentially native performance. A binary running as an LXC guest is actually running as a normal process directly in the host os kernel just like any other process. In particular this means that cpu and i/o scheduling are a lot more fair and tunable, and you get native disk i/o performance which you can not have with real virtualization (even Xen, even in paravirt mode) This means you can containerize disk i/o heavy database apps. It also means that you can only run binaries that the host kernel can execute. (ie: you can run Linux binaries, not another OS like Solaris or Windows)

The same page also states there is not another HOWTO or documentation explaining how to use lxc with opensuse even though the lxc package has been part of the main oss repo since 11.2 version. Furthermore there are no scripts like lxc-fedora or lxc-debian  that will automate the creation or installation of opensuse. Now while it may be true that there are no opensuse specific scripts are available (at least I could not find through a Google search), though there is an interesting video on youtube showing the lxc with opensuse 11.2.

Based on the the information on the LXC wiki page, using the  SUSEStudio , I built an appliance which  is almost ready to use lxc. In order to create a container image, a very primitive lxc_opensuse script that will do a fairly basic job is also included. Once the script is issued,it will download opensuse 11.3 base system and the user can start playing with the wonders of lxc. For the impatient, who wants do discover Matryoshka, here is the link for  the appliance .

Have fun with Matryoshka !