Home Home > Tag > installation
Sign up | Login

Deprecation notice: openSUSE Lizards user blog platform is deprecated, and will remain read only for the time being. Learn more...

Posts Tagged ‘installation’

Highlights of YaST Development Sprint 92

January 24th, 2020 by

An Actionable Partitioner Overview Screen

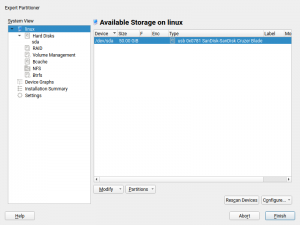
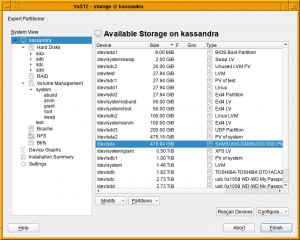
Until now, the Partitioner landing screen has been useful to have a big picture of the devices in your system and as a shortcut to jump directly to the device page just with a double click over it. But, do you know what? From yast-storage-ng 4.2.74 on you can work directly with devices from that screen similar as you already do in the more specific pages, through the contextual actions added below the devices list. That means, for example, no more jumps to Hard Disks just to add a new partition nor resize an existing one. Enjoy 😉

More details: PR 1024

Numeric Sorting in Tables

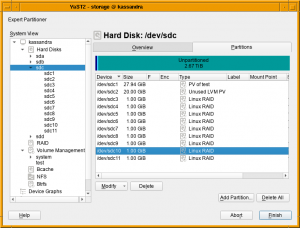
We have improved the sorting for tables in libyui, the UI library of YaST. So far columns were sorted directly by the text displayed, e.g. the device name or the size in the expert partitioner. For some use-cases this resulted in unexpected ordering, e.g. partitions of a disk were ordered “/dev/sda1”, “/dev/sda10”, “/dev/sda2”, and sizes were ordered “1 GiB”, “2 TiB” and “4 GiB”.

Now it is possible to provide a sort-key for every table entry which is then used instead of the displayed text. This allows the expected ordering and is already implemented for the tables in the expert partitioner as the two pictures below show.

Improving the NFS Module

YaST offers a specific module to configure your NFS shares. Similar to every YaST module, you can run it by executing yast2 nfs in your terminal, or by launching it from the YaST Control Center. But there is another cool way to use the YaST NFS module: opening the Expert Partitioner!
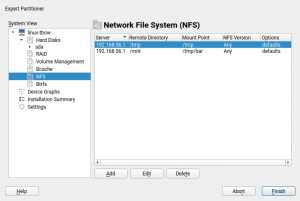

The Expert Partitioner offers a NFS section on the left menu tree where you can do everything that the NFS module provides. Thanks to that, you can configure your NFS shares at the same time you format your partitions!

But that integration needed some improvements after we migrated YaST to the new Storage Stack (a.k.a. storage-ng). Moreover, some bugs were detected when using the NFS module for mounting and unmounting shares, see for example bsc#1006815 and bsc#1151426.

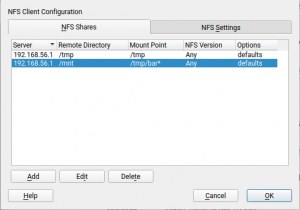
All those bugs were fixed, ww the NFS module behaves as expected in both cases, when running in standalone mode and inside the Expert Partitioner. Note that now the current status of the existing shares is preserved. That is, an unmounted share will continue unmounted after editing it. Unmounted entries are indicated with an asterisk in the list of shares, similar to what the Expert Partitioner does for the rest of unmounted devices. All these improvements will be available for SUSE Linux Enterprise SP1, openSUSE Leap 15.1 and openSUSE Tumbleweed.

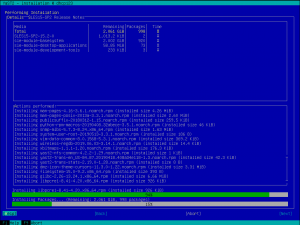
Installation Progress Improvements

We got some bug reports about how installation progress reporting works and while we were touching it, we also added a few smaller improvements to the code.

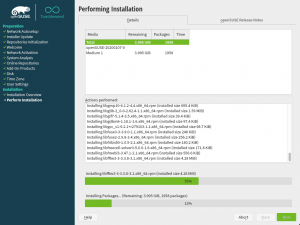
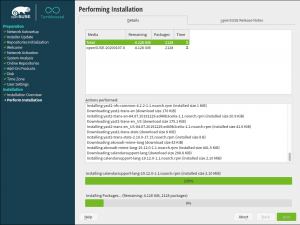
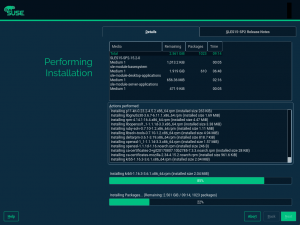
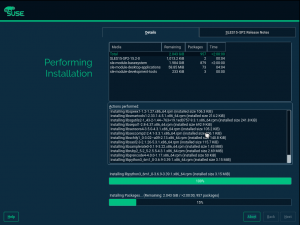
The first change is that nowadays installing from multiple discs almost never happens but still there was always a “Medium 1” column which did not make much sense. So we removed the column and if there is a multi-media source, it will be appended to the name if needed.

The second visible change is a new Unicode character ⌛ (hourglass) during the initial phase of RPM installation until the remaining time can be estimated.

The third change is that now the maximum time is always capped at 2 hours, so even if there are multiple sources and some of them took more then two hours, it always show just “>2:00:00” and even in total it is capped, so it can no longer show something like “>6:00:00”.

The fourth one is that now you can read the release notes without disturbances. Previously you would get switched to the package log tab after each package finished its installation. Now it will redraw only when you go back from the release notes screen.

The fifth one is a fix for showing the remaining packages, where it is shown only for the active source and not for all. So now it shows remaining packages for all repositories.

And last but not least we do a bunch of refactoring, code quality improvements and also adding automatic unit tests to reduce regressions in the future.

Tumbleweed before and now:

SLE before and now:

and new ncurses:

Doomsday Preparations: Retracted Packages

If a maintenance update is released for any of our supported products, it may happen that after its release we realize that it introduces new problems, so we have to unpublish (retract) it.

So far, our maintenance team always managed to find other solutions, but sooner or later it will happen that it takes too long to realize that an update was broken, so users will install it.

For that purpose we introduced a new status retracted for patches and packages. We hope that we will never need it, but if we do, we need it in a hurry — until a better, fixed version of those packages is released.

We added new filters “Retracted Packages” and “Retracted Installed Packages” to the package selection, and the affected versions are colored in red and get a [RETRACTED] marker in the “Versions” tab:
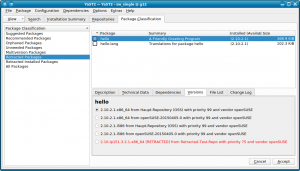

Those lists should always be empty. Also, retracted versions will never automatically be installed. If package versions are retracted, but are already installed, the “Retracted Installed Packages” view will be opened automatically when starting the package selection to make you aware of them. Then you can choose to manually downgrade to a previous version or to wait until a fixed version is available.

In general, don’t worry: We never needed this so far, and we hope that we will never need it. Still, we take precautions for the worst case.

More details: PR 82

Qt Package Selection Gets Faster

This came as a byproduct of the previous item: While working on the new filter views for retracted packages, we found that it could take a long time (10-20 seconds) when switching away from the “All Packages” view, so we started digging deeper to find out why.

We found it strange that clearing the package list on the right side of that dialog was so slow; considerably slower than filling it with all packages. After some investigations, we found that in the course of all those changes for all those Qt versions (since Qt 3.x in mid-2006) some internal housekeeping for those list items was now no longer necessary because later Qt versions took over more and more of those responsibilities, and our own housekeeping now got in the way of that and was considerably slowing it down.

Once we found the cause, the fix was easy: We threw out our own housekeeping code and are now relying on what the Qt widget does, and hey presto, clearing that list now happens instantly instead of taking 10-20 seconds.

More details: PR 82 (“Other Fixes”)
Highlights of YaST Development Sprint 68

December 4th, 2018 by
  • UDF: Share big files with other operating systems
  • Raspberry Pi: Fully customized installation with YaST

Support for UDF file system

UDF (Universal Disk Format) is a file system format widely used for DVDs and newer optical disk formats, replacing ISO 9660. But this technology is not limited to optical media only, in fact it can be perfectly used on flash devices like USB sticks and hard drives too. UDF is one of the best choices when transferring data between platforms. Mostly all modern operating system already support it, including Windows, BSD, MacOS X, Solaris, OS/2 (eComStation), BeOS (Haiku) as well as Linux kernel.

UDF offers several advantages. One of them is the support for quite very large files. With UDF you can create files of several terabytes, making really ridiculous the maximum limitation of 4 gigabytes in VFAT. And not only that, UDF also has optional built-in ability to minimize wearing-off of rewritable media with limited rewrite cycles, such as flash, CD-RW and DVD-RAM.

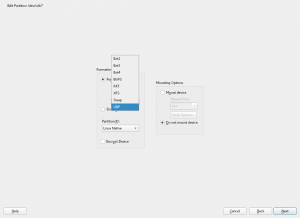
YaST is starting to support UDF file systems out of the box. The Expert Partitioner now offers the UDF option when formatting a device, see the following screenshot. And this is available even during the installation, so you could create a volume with UDF format and share it between your different operating systems.

Just click "next" to install (open)SUSE in a Raspberry Pi

Anybody who has not been living under a rock for the last five years knows Raspberry Pi. And anyone who has used one of those devices knows the usual way to put an operating system into it is different from what we are used to do in other computers. Instead of installing from a regular ISO, customizing all the options in the process, Raspberry Pi and similar mini-computers are usually loaded with a pre-built image of an operating system (specific for each model) downloaded from the Internet. Many of those precooked Linux systems are purpose-specific and many decisions (like the file-system type to use) are already taken by those who built the image.

But we wanted SLE 15-SP1 and openSUSE Leap 15.1 to be the first multi-purpose operating systems to support a full standard Linux experience in Raspberry Pi. No custom specific ISO to install from, no precooked image to be copied, just taking the standard unmodified SLE or openSUSE ISO image and installing like you would do in any other computer. And we wanted the process to be as easy as pressing "next", "next", "next", "install". With the installer detecting and proposing the set of default configurations that makes sense, as usual.

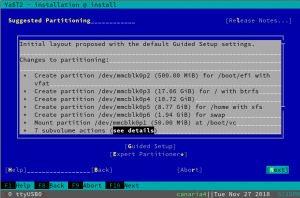
The main challenge in that regard was the partitioning layout. In order to boot, the Raspberry Pi needs a very specific partition containing the system firmware. So it is important for the installer to detect such a partition and preserve it no matter what, mounting it in /boot/vc to allow the operating system to perform updates of the firmware. In the following screenshot of the installation process performed trough the Raspberry Pi serial console you can see that in action.

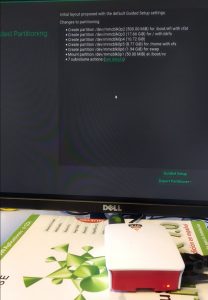
The serial console is the method preferred by the experts to manage the Raspberry Pi locally and it works out of the box with the pre-releases of the upcoming SLE-15-SP1 and Leap 15.1. But less advanced users will likely prefer to perform a graphical installation with a keyboard and a screen attached to the device. For it to work flawlessly, the following arguments must be provided to the installer during boot.

textmode=0 modprobe.blacklist=vc4

The second argument prevents the HDMI output to be disconnected shortly after the computer has booted, something that will only happen with some monitors. It happened to us during our testing (that you can see below) and that argument certainly made the problem disappear.

Just one final note if you want to play with this: Take into account Raspberry Pi uses a different internal architecture than usual PCs. So instead of the x86 image of the installer, you will need to use the aarch64 one. The aarch64 architecture is officially fully supported by SLE and also available for openSUSE Leap and Tumbleweed as an unofficial port.

Fun things to do with driver updates

April 25th, 2017 by

Today: And what if I want to remove some files?

It’s easy and obvious to add new files with a driver update (DUD). But what if you need to remove some files? Or, related: can you replace some read-only file by a writable copy?

Let’s for this article assume you want to modify the Xorg configuration. Say,
/usr/share/X11/xorg.conf.d/10-evdev.conf troubles you.

The direct way would be to write an update.pre script than removes the file and include this into a DUD.

update.pre is run right after the DUD has updated the files in the installation system.

For example:

echo \
  rm /usr/share/X11/xorg.conf.d/10-evdev.conf \
  > update.pre
mkdud --create test1.dud --dist tw --name "remove 10-evdev.conf" update.pre

But when we try test1.dud we run into this:

Driver Update: remove 10-evdev.conf
Driver Updates added:
  remove 10-evdev.conf
[...]
rm: cannot remove '/usr/share/X11/xorg.conf.d/10-evdev.conf': Read-only file system

So, we see the catch: much of the installation system resides on a read-only file system! You can’t just go and modify things.

But how does the driver update process manage to add new files to the installation system then? It does so by restructuring the file system using symlinks. In the process all directories that need to be modified are replaced by writable copies.

In other words: if you include the file you want to remove in the DUD – you will be able to remove it. It’s actually sufficient to include the directory the file resides in to make this work.

So, let’s try this:

mkdir -p /tmp/dud/usr/share/X11/xorg.conf.d
echo \
  "rm /usr/share/X11/xorg.conf.d/10-evdev.conf" \
  > update.pre
mkdud --create test2.dud --dist tw --name "remove 10-evdev.conf" update.pre /tmp/dud

Now we don’t get any error applying test2.dud and when we login to the installation system, we see:

console:vm9732:/ # ls -l /usr/share/X11/xorg.conf.d
total 0
console:vm9732:/ # 

Tip

For easy testing a DUD, boot the machine with

startshell=1 sshd=1 password=*** dud=<URL>

startshell=1 wi ll stop the installation workflow after the installation system has been fully prepared just before YaST will be started. sshd=1 will start an SSH daemon and you’ll be able to connect to the machine and look around.

A similar trick can be used to make files writable (watch out for correct shell quoting):

mkdir -p /tmp/dud/usr/share/X11/xorg.conf.d
echo \
  cp --remove-destination '$(readlink -f /usr/share/X11/xorg.conf.d/10-evdev.conf)' \
  /usr/share/X11/xorg.conf.d/10-evdev.conf \
  > update.pre
mkdud --create test3.dud --dist tw --name "make 10-evdev.conf writable" update.pre /tmp/dud

We can verify the result:

console:vm9732:/ # ls -l /usr/share/X11/xorg.conf.d               
total 4
-rw-r--r-- 1 root root 1099 Apr 24 13:06 10-evdev.conf
console:vm9732:/ #

The file is now writable.

Fun things to do with driver updates

March 16th, 2017 by

Today: But what if I need a new kernel?

A driver update (DUD) can of course update a single driver. But if that’s not enough and you need a whole new kernel to run an installation?

There are two parts to solve:

  1. replace the kernel used during installation and
  2. get the new kernel installed

We’ll need two tools for this (both available in Tumbleweed or here: mksusecd and mkdud).

1. Replace the kernel used during installation

For this it’s important to know which kernel packages you’ll actually need. Typically it will be kernel-default and kernel-firmware. But older SUSE distributions (SLE 11 comes to mind) had the kernel packages split into kernel-default and kernel-default-base – you’ll need them both.

To make things confusing, modern SUSE distributions also have kernel-default-base – but it’s an alternative to kernel-default. In this case we don’t need it.

If unsure, check kernel-default. If it contains the actual kernel (e.g. /boot/vmlinuz) then you don’t need kernel-default-base.

On some architectures modules are also taken from xen-kmp-default. If that’s important for you, you can add this package to the kernel list as well.

In fact you can add any number of kernel packages or kmps you like.

In the past, sometimes a different kernel flavor was used. For example PowerPC had kernel-ppc64 for a while. Simply use the flavor you need.

It’s a good idea to gather all the kernel rpms into a single directory for easier use:

> mkdir k
> cp kernel-default.rpm kernel-firmware.rpm k
> cp kernel-default-base.rpm k    # only if needed
# add any kernel-related rpms you need

Then, take your SUSE installation iso and run

> mksusecd --create new.iso \
  --kernel k/* -- \
  original_dvd1.iso

Note that the --kernel option accepts a variable number of arguments, so you have to add an isolated -- to terminate the argument list properly.

The output could look like this:

> mksusecd --create new.iso \
  --kernel k/* -- \
  SLES-11-SP4-DVD-ppc64-GM-DVD1.iso
kernel version: 3.0.101-63-ppc64 --> 3.0.101-94-ppc64
CHRP bootable (ppc64)
building: 100%
calculating sha1...

The command above will actually get the list of required modules from the old installation iso. If you are missing some driver or the new kernel comes with some additional driver, the module will not be added to the new iso.

But there’s the --modules option. It will add the listed modules together with any implicitly required modules via module dependencies.

For example, let’s add the airport wifi-module to our PowerPC iso:

> mksusecd --create new.iso \
  --kernel k/* \
  --modules airport -- \
  SLES-11-SP4-DVD-ppc64-GM-DVD1.iso
kernel version: 3.0.101-63-ppc64 --> 3.0.101-94-ppc64
kernel modules added:
  airport, cfg80211, orinoco
CHRP bootable (ppc64)
building: 100%
calculating sha1...

As you can see, it automatically adds orinoco and cfg80211 as well.

2. Get the new kernel installed

This is relatively simple. A driver update can do this:

> mkdud --create foo.dud \
  --dist sle11 \
  --install repo \
  k/*

This creates a driver update for SLE 11 (which also applies to SP4) and the kernel rpms are installed via an auto-generated add-on repo (--install repo).

Now we have the driver update that installs our kernel packages. But how do we use it?

We integrate it into our iso above!

> mksusecd --create new.iso \
  --initrd foo.dud \
  --kernel k/* -- \
  SLES-11-SP4-DVD-ppc64-GM-DVD1.iso

mksusecd has an --initrd option that directly accepts driver updates and integrates them into the iso.

3. Can I have a choice?

Maybe you just want to test this new kernel or sometimes need the old one and sometimes the new one. Can you make an installation iso that lets you choose the kernel?

Oh yes! 🙂

> mksusecd --create new.iso \
  --add-entry 3.0.101-94 \
  --initrd foo.dud \
  --kernel k/* -- \
  SLES-11-SP4-DVD-ppc64-GM-DVD1.iso

This does not replace the old kernel but adds a new boot entry Installation - 3.0.101-94.

So you can install with old or the new kernel.