Home Home > Tag > partitioner
Sign up | Login

Deprecation notice: openSUSE Lizards user blog platform is deprecated, and will remain read only for the time being. Learn more...

Posts Tagged ‘partitioner’

Highlights of YaST Development Sprint 92

January 24th, 2020 by

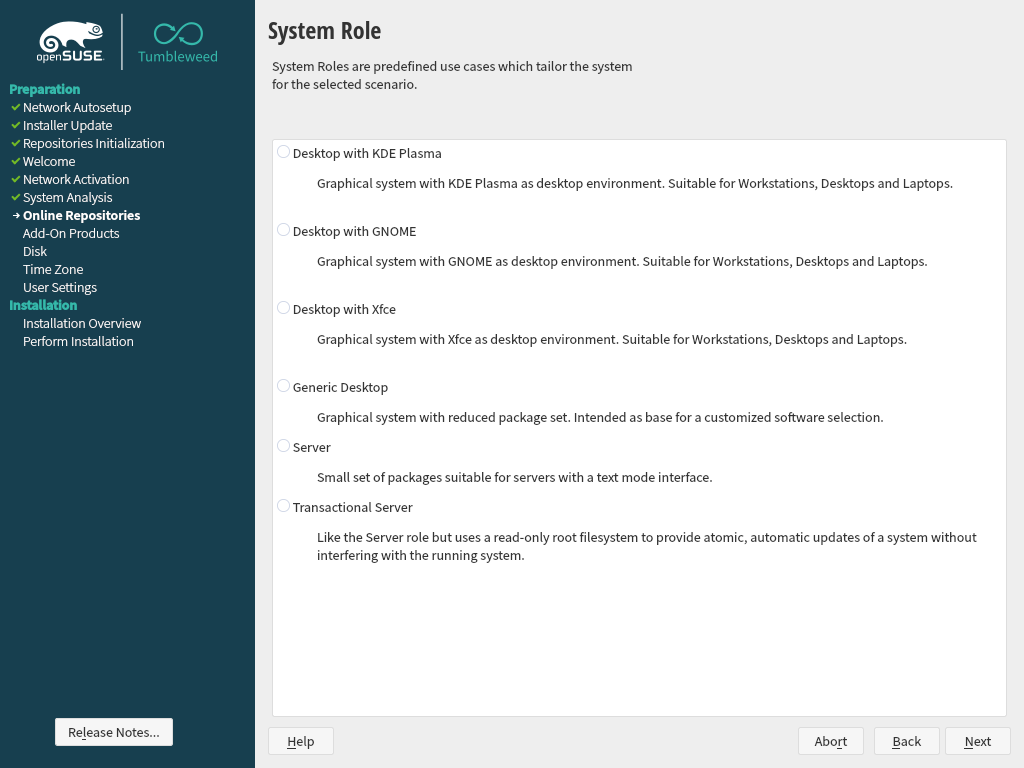
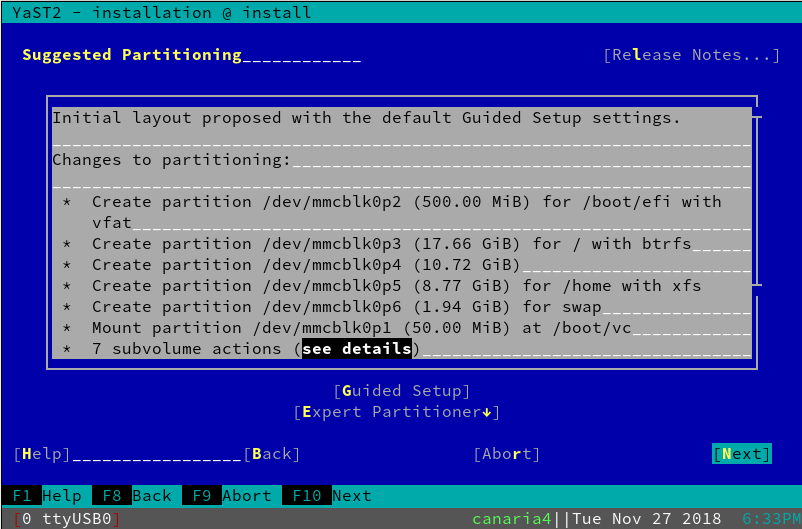
An Actionable Partitioner Overview Screen

Until now, the Partitioner landing screen has been useful to have a big picture of the devices in your system and as a shortcut to jump directly to the device page just with a double click over it. But, do you know what? From yast-storage-ng 4.2.74 on you can work directly with devices from that screen similar as you already do in the more specific pages, through the contextual actions added below the devices list. That means, for example, no more jumps to Hard Disks just to add a new partition nor resize an existing one. Enjoy 😉


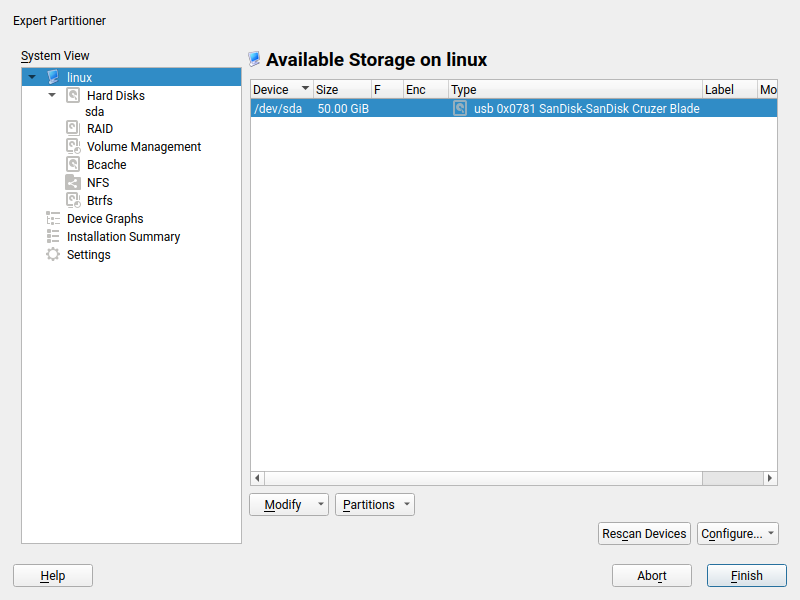
More details: PR 1024

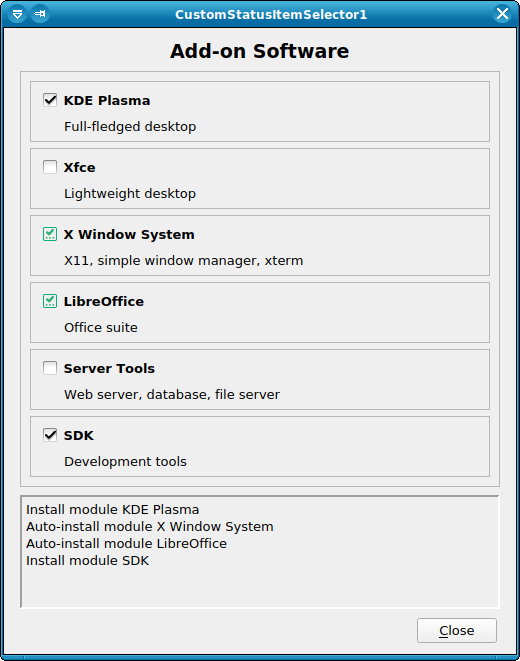
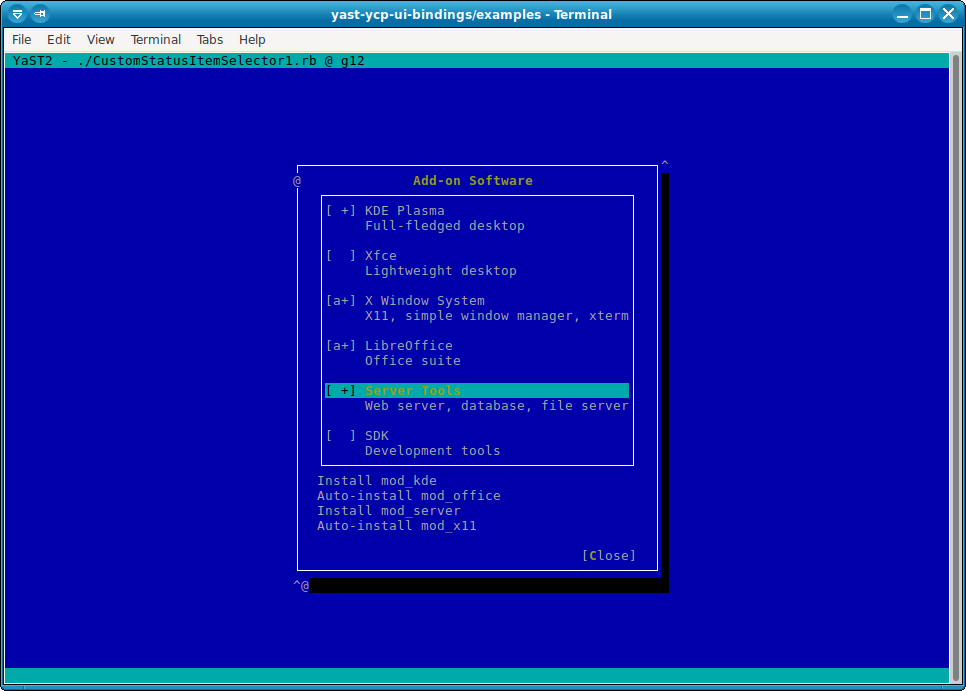
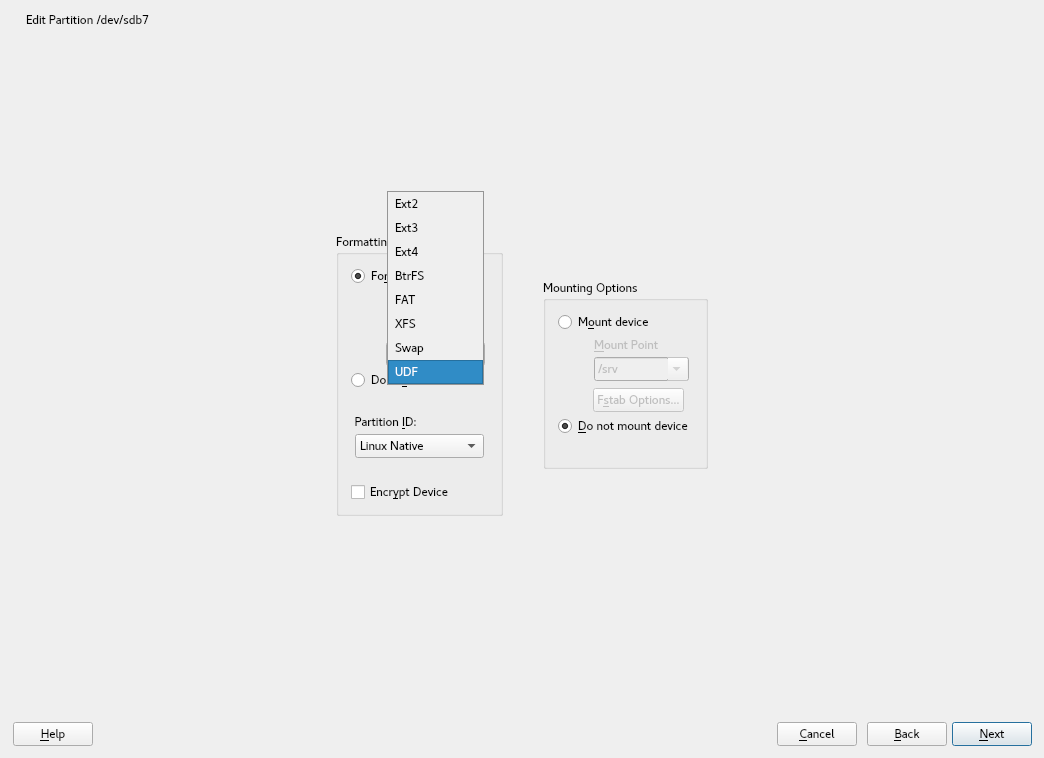
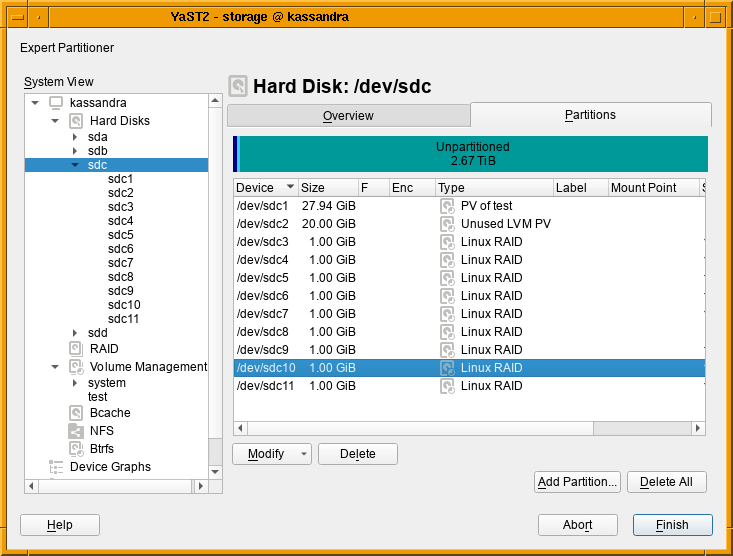
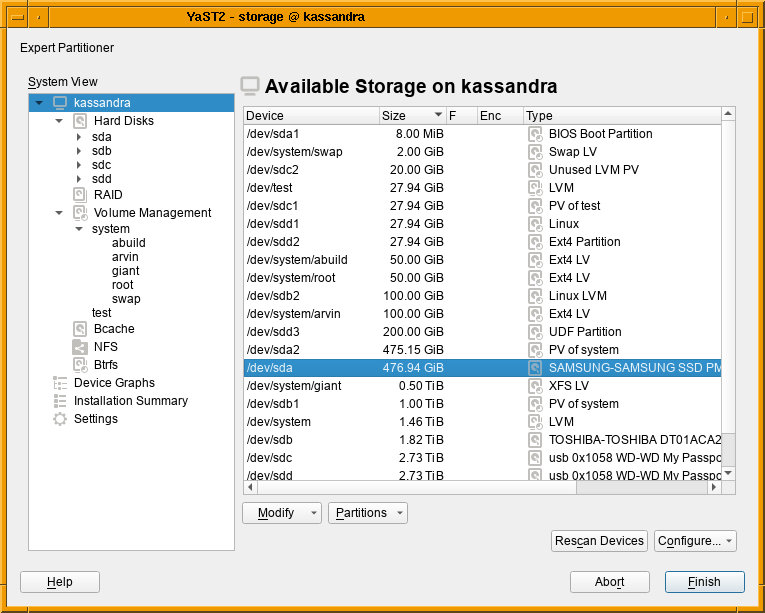
Numeric Sorting in Tables

We have improved the sorting for tables in libyui, the UI library of YaST. So far columns were sorted directly by the text displayed, e.g. the device name or the size in the expert partitioner. For some use-cases this resulted in unexpected ordering, e.g. partitions of a disk were ordered “/dev/sda1”, “/dev/sda10”, “/dev/sda2”, and sizes were ordered “1 GiB”, “2 TiB” and “4 GiB”.

Now it is possible to provide a sort-key for every table entry which is then used instead of the displayed text. This allows the expected ordering and is already implemented for the tables in the expert partitioner as the two pictures below show.


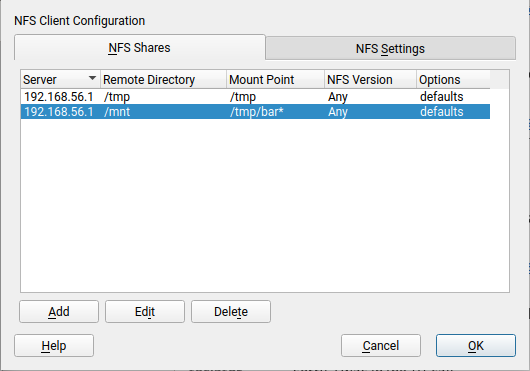
Improving the NFS Module

YaST offers a specific module to configure your NFS shares. Similar to every YaST module, you can run it by executing yast2 nfs in your terminal, or by launching it from the YaST Control Center. But there is another cool way to use the YaST NFS module: opening the Expert Partitioner!


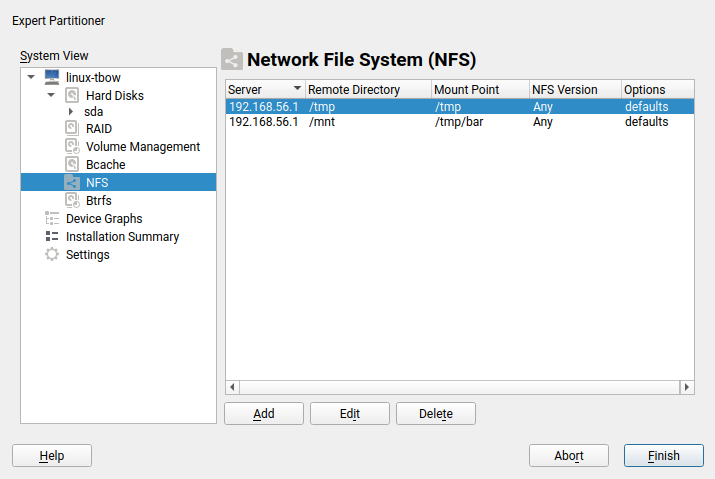
The Expert Partitioner offers a NFS section on the left menu tree where you can do everything that the NFS module provides. Thanks to that, you can configure your NFS shares at the same time you format your partitions!

But that integration needed some improvements after we migrated YaST to the new Storage Stack (a.k.a. storage-ng). Moreover, some bugs were detected when using the NFS module for mounting and unmounting shares, see for example bsc#1006815 and bsc#1151426.

All those bugs were fixed, ww the NFS module behaves as expected in both cases, when running in standalone mode and inside the Expert Partitioner. Note that now the current status of the existing shares is preserved. That is, an unmounted share will continue unmounted after editing it. Unmounted entries are indicated with an asterisk in the list of shares, similar to what the Expert Partitioner does for the rest of unmounted devices. All these improvements will be available for SUSE Linux Enterprise SP1, openSUSE Leap 15.1 and openSUSE Tumbleweed.


Installation Progress Improvements

We got some bug reports about how installation progress reporting works and while we were touching it, we also added a few smaller improvements to the code.

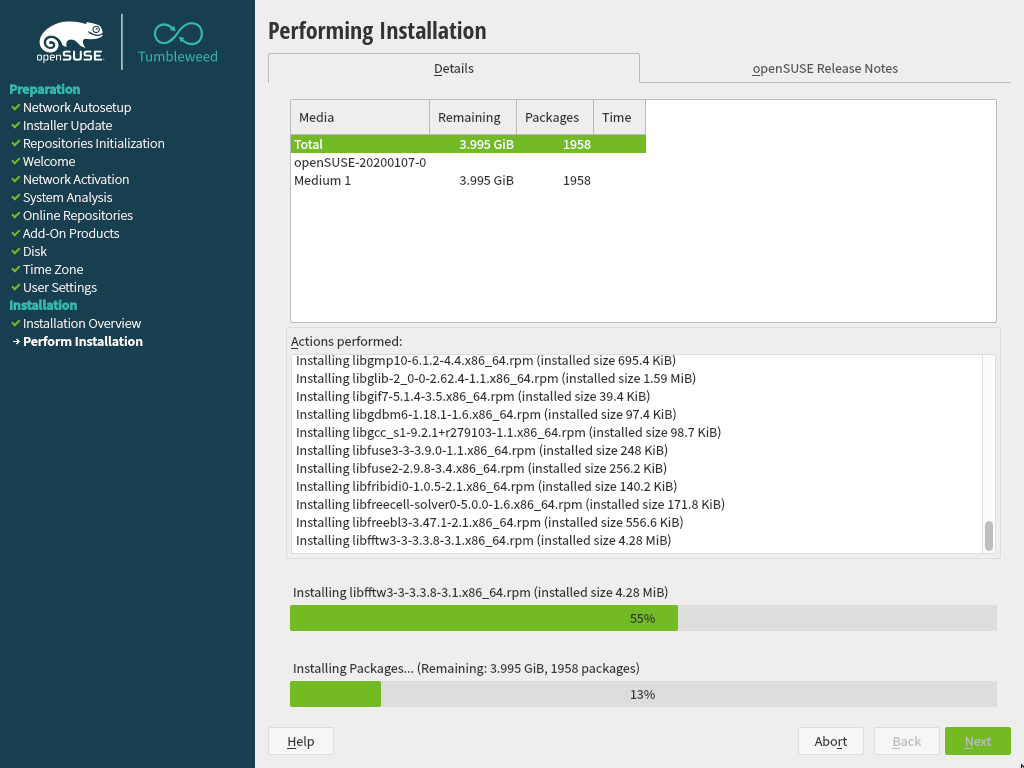
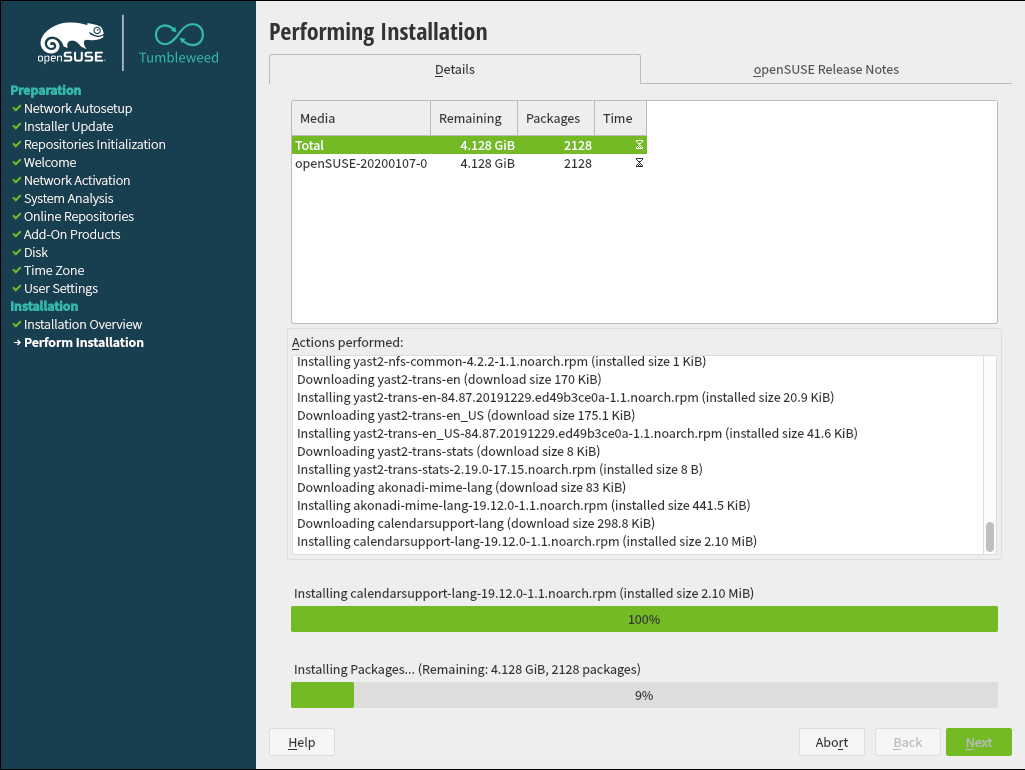
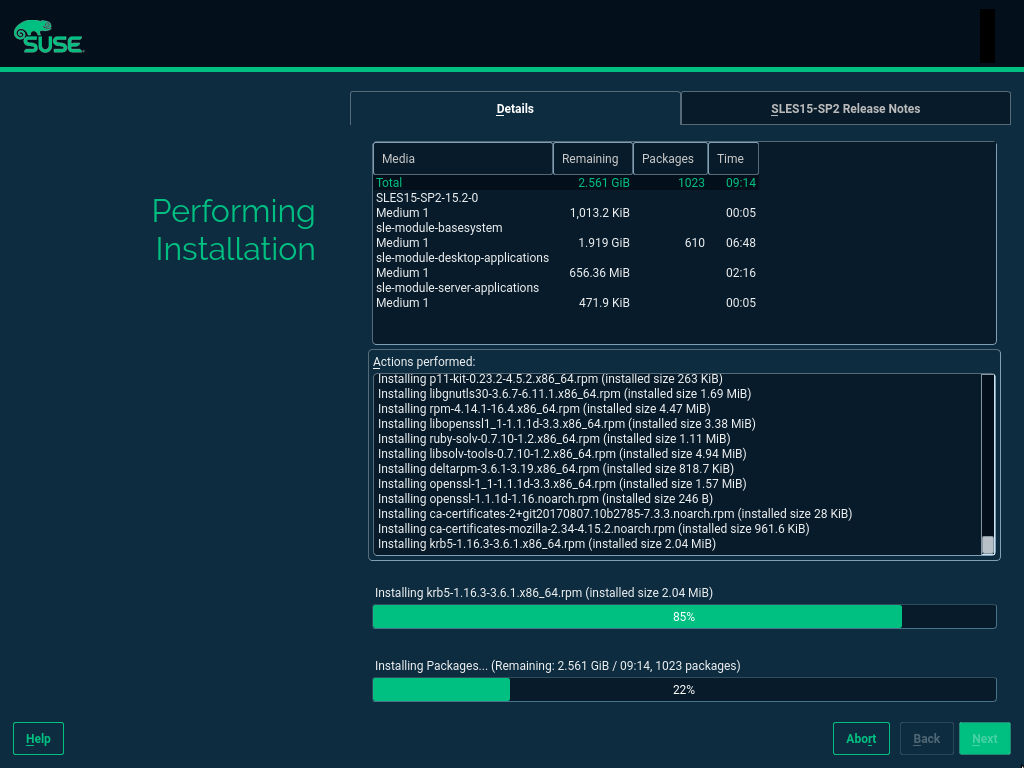
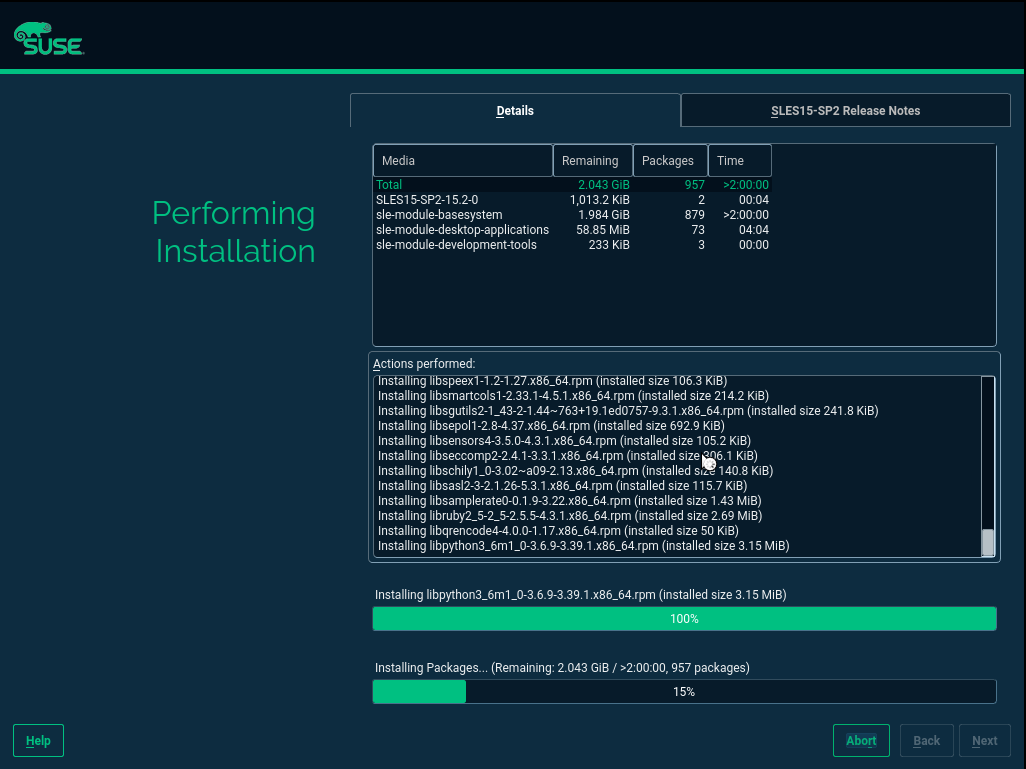
The first change is that nowadays installing from multiple discs almost never happens but still there was always a “Medium 1” column which did not make much sense. So we removed the column and if there is a multi-media source, it will be appended to the name if needed.

The second visible change is a new Unicode character ⌛ (hourglass) during the initial phase of RPM installation until the remaining time can be estimated.

The third change is that now the maximum time is always capped at 2 hours, so even if there are multiple sources and some of them took more then two hours, it always show just “>2:00:00” and even in total it is capped, so it can no longer show something like “>6:00:00”.

The fourth one is that now you can read the release notes without disturbances. Previously you would get switched to the package log tab after each package finished its installation. Now it will redraw only when you go back from the release notes screen.

The fifth one is a fix for showing the remaining packages, where it is shown only for the active source and not for all. So now it shows remaining packages for all repositories.

And last but not least we do a bunch of refactoring, code quality improvements and also adding automatic unit tests to reduce regressions in the future.

Tumbleweed before and now:

SLE before and now:

and new ncurses:

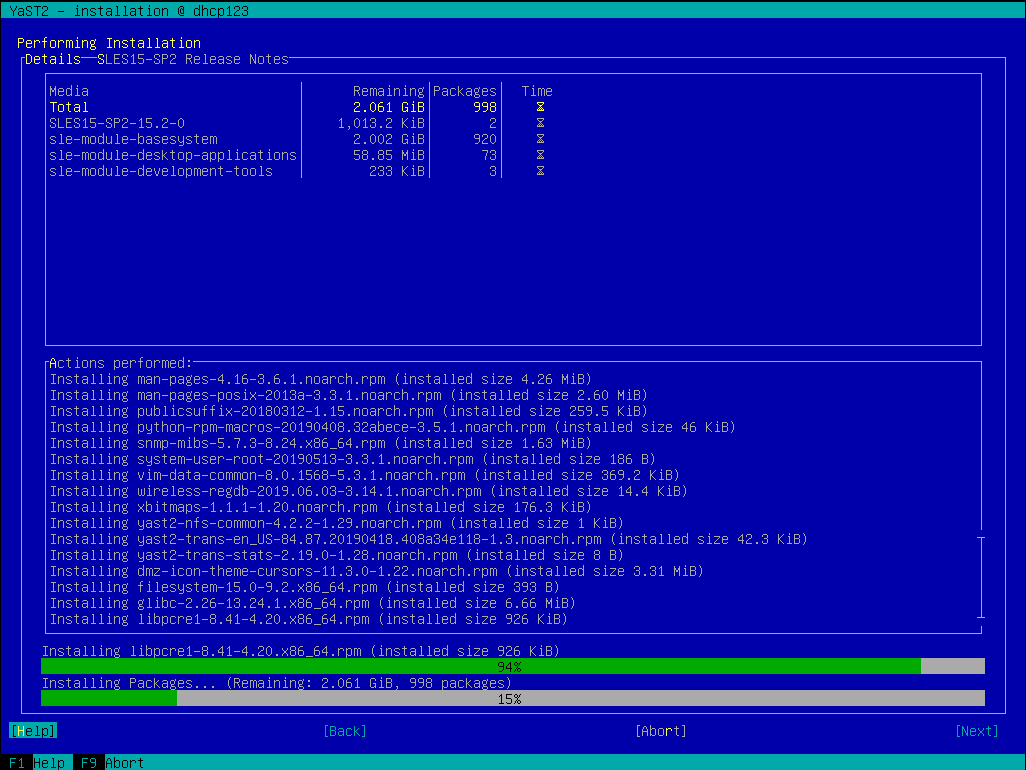
Doomsday Preparations: Retracted Packages

If a maintenance update is released for any of our supported products, it may happen that after its release we realize that it introduces new problems, so we have to unpublish (retract) it.

So far, our maintenance team always managed to find other solutions, but sooner or later it will happen that it takes too long to realize that an update was broken, so users will install it.

For that purpose we introduced a new status retracted for patches and packages. We hope that we will never need it, but if we do, we need it in a hurry — until a better, fixed version of those packages is released.

We added new filters “Retracted Packages” and “Retracted Installed Packages” to the package selection, and the affected versions are colored in red and get a [RETRACTED] marker in the “Versions” tab:


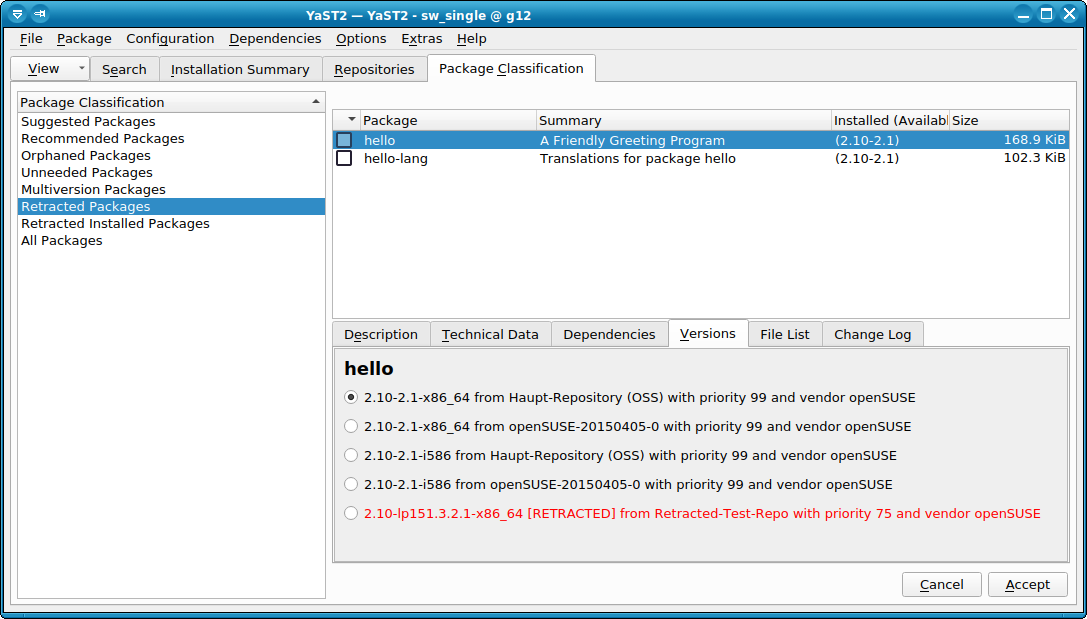
Those lists should always be empty. Also, retracted versions will never automatically be installed. If package versions are retracted, but are already installed, the “Retracted Installed Packages” view will be opened automatically when starting the package selection to make you aware of them. Then you can choose to manually downgrade to a previous version or to wait until a fixed version is available.

In general, don’t worry: We never needed this so far, and we hope that we will never need it. Still, we take precautions for the worst case.

More details: PR 82

Qt Package Selection Gets Faster

This came as a byproduct of the previous item: While working on the new filter views for retracted packages, we found that it could take a long time (10-20 seconds) when switching away from the “All Packages” view, so we started digging deeper to find out why.

We found it strange that clearing the package list on the right side of that dialog was so slow; considerably slower than filling it with all packages. After some investigations, we found that in the course of all those changes for all those Qt versions (since Qt 3.x in mid-2006) some internal housekeeping for those list items was now no longer necessary because later Qt versions took over more and more of those responsibilities, and our own housekeeping now got in the way of that and was considerably slowing it down.

Once we found the cause, the fix was easy: We threw out our own housekeeping code and are now relying on what the Qt widget does, and hey presto, clearing that list now happens instantly instead of taking 10-20 seconds.

More details: PR 82 (“Other Fixes”)

Highlights of YaST Development Sprints 88 and 89

November 22nd, 2019 by

A More User Friendly Role Selector Dialog

Step by step, we continue improving the user experience making use of the newly added widgets to libyui. This sprint was the turn to update the role selection dialog to use the new item selector introduced during the sprint 87. Apart from looking better as it can be seen in the screenshots below, there are two immediate improvements:

  • the vertical scroll, when present, is respected after selecting a role (instead of “jumping to the beginning”), and
  • the selected role (if any) will be visible when arriving at the dialog even when the list is quite long or the available space too short.
Before After

What is more, updating the dialog was also useful for us to realize about some needed improvements for the widget itself, mentioned in the next section. Quite a productive change 🙂

When one Bit is not Enough: The CustomStatusItemSelector

A few weeks ago, we wrote about the new ItemSelector widget that is finding its way into YaST user interfaces. It turned out that just a simple on/off status is not enough in some cases, so we had to extend that concept. For example, software modules may have dependencies, and we want to show the difference between one that was explicitly selected by the user and one that was auto-selected because some other software module requires it.

This kind of shook the foundations of the underlying classes; all of a sudden a bit is no longer just a bit, but it needs to be broken down into even smaller pieces. Well, we cheated; we now use integer values instead. Most of the class hierarchy still only uses 0 and 1, but the new YCustomStatusItemSelector also supports using higher numbers for application-defined purposes.

For each possible status value, the application defines the name of the icon to be displayed (for graphical UIs like the Qt UI), the text equivalent (for text mode / the NCurses UI), and an optional nextStatus which tells the widget what status to cycle to when the user changes the status of an item with a mouse click or with the keyboard. A value of -1 lets the application handle this.

So this is not a one-trick-pony that is useful only for that one use case (the software modules), but a generic tool that might find good uses in other places all over YaST as well.

Usage examples: C++, Ruby.

Snapper and Machine-readable Output

Most likely you already know snapper, a great tool to work with your filesystem snapshots. Some third-party scripts and tools (e.g., YaST) use the snapper CLI to get some information, but generally, snapper generates an output intended to be human-readable. Sometimes that could cause some troubles in scripts checking the snapper output. Now on, snapper also offers CLI options to generate its output in a machine-readable format, i.e., CSV and JSON. Please, check this post for more information about those new options.

Fix Boot Problems with Remote Encrypted Devices

Since we adopted systemd, the management during system boot of encrypted devices on top of network-based devices like iSCSI or FCoE disks has been less than optimal. But now we are happy to announce that we have put all the pieces together to make the experience as smooth as possible.

One of the main responsibilities of systemd is sorting the actions performed during boot and setting the dependencies between them. For example, if there are encrypted devices, systemd will first ask you for the password and activate the devices to afterwards mount the file system contained in those encrypted devices. Systemd should be able to distinguish when an encrypted device is based on a network-based storage device and, thus, can only be initialized after the network is up. In some cases that detection failed (for example network block device based mounts, such as iSCSI and FCoE disks) and systemd got stuck before initializing the network waiting for the device to be available.

Recently, SLE and openSUSE Leap has incorporated support for specifying the _netdev option in the /etc/crypttab file. With such option, systemd will recognize the encrypted device as network-based and will only try to activate it after setting up the network. That’s analogous to the corresponding _netdev option in /etc/fstab that has been already there for quite some time and that can be used to defer when a device is mounted. For it to work properly, the _netdev option must be present in all the relevant entries of both crypttab and fstab.

And that’s exactly what YaST will do now in openSUSE Tumbleweed and upcoming releases of both SLE and openSUSE Leap. From now on, the _netdev option will be added fstab for all mount points depending (directly or indirectly) on the network. In addition, that option (and also the noauto and nofail ones) will be propagated from fstab to all the corresponding crypttab entries.

This should mark the end of a dark age of encrypted iSCSI and FCoE devices timing out during boot.

AutoYaST Support for Random and Pervasive Encryption

Back in October, we announced that YaST got support for new encryption methods like random or pervasive encryption. At that time, AutoYaST was out of scope because we wanted to have a stable (and tested) API first. Fortunately, the time has come and now AutoYaST supports these encryption mechanisms.

Starting in autoyast2 4.2.17, you can specify the encryption method using a crypt_method element, as shown in the example below. Possible values are luks1 (regular LUKS1 encryption), pervasive_luks2 (pervasive volume encryption), protected_swap (encryption with volatile protected key), secure_swap (encryption with volatile secure key) and random_swap (encryption with volatile random key).

    <drive>
     <type config:type="symbol">CT_DISK</type>
     <use>all</use>
     <partitions config:type="list">
      <partition>
       <size>20G</size>
       <mount>/</mount>
       <filesystem config:type="symbol">ext4</filesystem>
       <crypt_method config:type="symbol">luks1</crypt_method> <!-- default method if crypt_key is defined -->
       <crypt_key>S3CR3T</crypt_key>
      </partition>
      <partition>
       <size>1G</size>
       <mount>swap</mount>
       <crypt_method config:type="symbol">random_swap</crypt_method> <!-- set encryption method -->
      </partition>
     </partitions>
    </drive>

As we want AutoYaST to be as user-friendly as possible, it will try to help you if you do some mistake setting the encryption configuration as when in the screenshot below.

Finally, the old crypt_fs element is deprecated, although it stills works for backward-compatibility reasons. Basically, it is equivalent to setting crypt_method to luks1.

Improve Support for AutoYaST Guided Partitioning

When it comes to partitioning, we can categorize AutoYaST use cases into three different levels:

  • Automatic partitioning: the user does not care about the partitioning and trusts in AutoYaST to do the right thing.
  • Guided partitioning: the user would like to set some basic settings (use LVM, set an encryption password, etc.)
  • Expert partitioning: the user specifies how the layout should look, although a complete definition is not required.

To some extent, it is like using the regular installer where you can skip the partitioning screen and trust in YaST, use the Guided Proposal, or define the partitioning layout through the Expert Partitioner.

The second level (Guided partitioning) was introduced in AutoYaST with the release of SUSE Linux Enteprise 15 (and Leap 15.0) but it was not documented at all. Additionally, although it was working as designed at first sight, it was far from being that useful.

This sprint with invested quite some time improving the documentation (kudos to our awesome documentation team) and the behaviour. Now, if you want to set up an LVM system without having the specify all the details, you can use the following snippet in your profile:

<general>
  <storage>
    <lvm config:type="boolean">true</lvm>
  </storage>
</general>

If you are interested in the available options, you can check the documentation draft.

Highlights of YaST Development Sprint 68

December 4th, 2018 by
  • UDF: Share big files with other operating systems
  • Raspberry Pi: Fully customized installation with YaST

Support for UDF file system

UDF (Universal Disk Format) is a file system format widely used for DVDs and newer optical disk formats, replacing ISO 9660. But this technology is not limited to optical media only, in fact it can be perfectly used on flash devices like USB sticks and hard drives too. UDF is one of the best choices when transferring data between platforms. Mostly all modern operating system already support it, including Windows, BSD, MacOS X, Solaris, OS/2 (eComStation), BeOS (Haiku) as well as Linux kernel.

UDF offers several advantages. One of them is the support for quite very large files. With UDF you can create files of several terabytes, making really ridiculous the maximum limitation of 4 gigabytes in VFAT. And not only that, UDF also has optional built-in ability to minimize wearing-off of rewritable media with limited rewrite cycles, such as flash, CD-RW and DVD-RAM.

YaST is starting to support UDF file systems out of the box. The Expert Partitioner now offers the UDF option when formatting a device, see the following screenshot. And this is available even during the installation, so you could create a volume with UDF format and share it between your different operating systems.

Just click "next" to install (open)SUSE in a Raspberry Pi

Anybody who has not been living under a rock for the last five years knows Raspberry Pi. And anyone who has used one of those devices knows the usual way to put an operating system into it is different from what we are used to do in other computers. Instead of installing from a regular ISO, customizing all the options in the process, Raspberry Pi and similar mini-computers are usually loaded with a pre-built image of an operating system (specific for each model) downloaded from the Internet. Many of those precooked Linux systems are purpose-specific and many decisions (like the file-system type to use) are already taken by those who built the image.

But we wanted SLE 15-SP1 and openSUSE Leap 15.1 to be the first multi-purpose operating systems to support a full standard Linux experience in Raspberry Pi. No custom specific ISO to install from, no precooked image to be copied, just taking the standard unmodified SLE or openSUSE ISO image and installing like you would do in any other computer. And we wanted the process to be as easy as pressing "next", "next", "next", "install". With the installer detecting and proposing the set of default configurations that makes sense, as usual.

The main challenge in that regard was the partitioning layout. In order to boot, the Raspberry Pi needs a very specific partition containing the system firmware. So it is important for the installer to detect such a partition and preserve it no matter what, mounting it in /boot/vc to allow the operating system to perform updates of the firmware. In the following screenshot of the installation process performed trough the Raspberry Pi serial console you can see that in action.

The serial console is the method preferred by the experts to manage the Raspberry Pi locally and it works out of the box with the pre-releases of the upcoming SLE-15-SP1 and Leap 15.1. But less advanced users will likely prefer to perform a graphical installation with a keyboard and a screen attached to the device. For it to work flawlessly, the following arguments must be provided to the installer during boot.

textmode=0 modprobe.blacklist=vc4

The second argument prevents the HDMI output to be disconnected shortly after the computer has booted, something that will only happen with some monitors. It happened to us during our testing (that you can see below) and that argument certainly made the problem disappear.

Just one final note if you want to play with this: Take into account Raspberry Pi uses a different internal architecture than usual PCs. So instead of the x86 image of the installer, you will need to use the aarch64 one. The aarch64 architecture is officially fully supported by SLE and also available for openSUSE Leap and Tumbleweed as an unofficial port.