Home Home > 2012 > 01 > 19
Sign up | Login

Deprecation notice: openSUSE Lizards user blog platform is deprecated, and will remain read only for the time being. Learn more...

Archive for January 19th, 2012

running openSUSE on ARM

January 19th, 2012 by

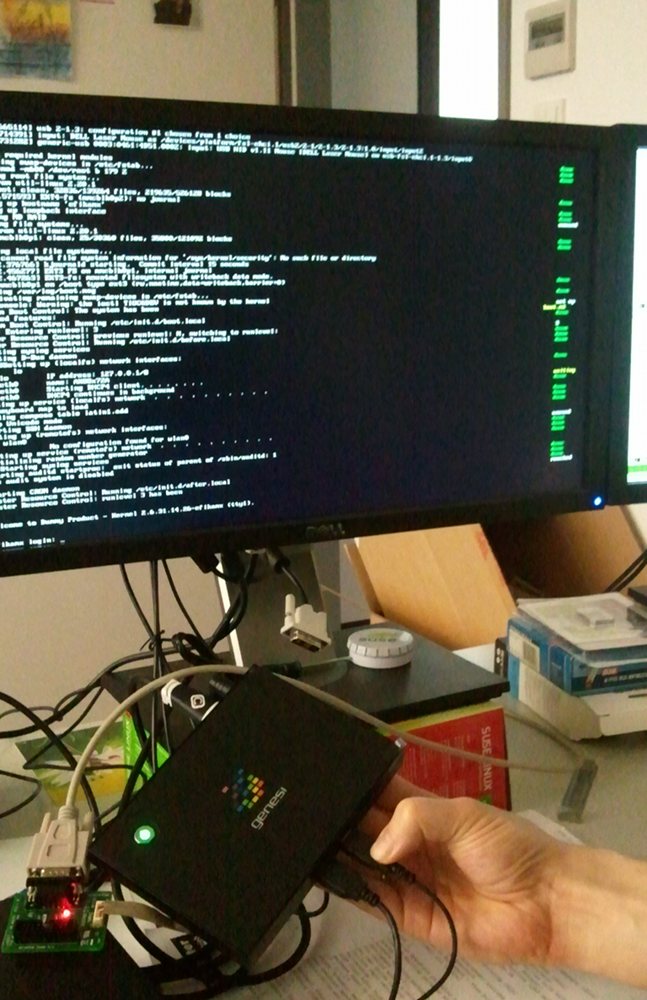
This week I finally got my genesi efika MX box. By default it has on old Ubuntu version installed on its internal IDE-attached 8GB SSD. It features 512 MB RAM and a 800 MHz ARMv7 CPU.

Using a HDMI-cable and an HDMI-DVI-Adaptor I got it connected to a monitor, plugged in a USB keyboard+mouse and it pretty much worked out of the box with WLAN,Ethernet,X11 (except for a bug that causes it to force you to change PW on every console login). How boring.

Having read about recent progress with openSUSE on ARM I wanted the excitement of running it on this box.

Michal’s image and script (now in alpha) was very helpful to get me started within 15 minutes.

If you have any (e.g. x86) openSUSE system running, there is another easy way to create a working ARM chroot-environment:

zypper ar http://download.opensuse.org/repositories/openSUSE:/Tools:/Unstable/openSUSE_12.1/openSUSE:Tools:Unstable.repo
zypper install qemu osc
osc co openSUSE:Factory:ARM bash
cd openSUSE:Factory:ARM/bash
edit bash.spec # add lines with your packages like BuildRequires: zypper,vim
osc build –no-verify –clean standard armv7l

If it worked well, /var/tmp/build-root/ should contain a chroot environment. E.g. you can run

file /var/tmp/build-root/bin/bash
/var/tmp/build-root/bin/bash: ELF 32-bit LSB executable, ARM, version 1 (SYSV), dynamically linked (uses shared libs), for GNU/Linux 2.6.16, BuildID[sha1]=0xed9ca12f44c8591560d780cf807b6b6cf8ca8873, stripped

I partitioned my SD-card into two partitions. The first one for /boot with ext2 (needs only 150MB) and the second one for / to contain the rootfs. Be sure to have barrier=0 in your fstab for all ext[34] partitions so that writing to SD will not be as slow. The default U-Boot configuration first checks on the first partition of an SD-card for boot.scr which is a uImage-formatted version of a U-boot script. I copied all of Ubuntu’s /boot and /lib/modules/, slightly adapted their boot.script file to have root=/dev/mmcblk0p2 and uImage/uInitrd-2.6.31.14.26-efikamx as kernel/initrd, dropped “quiet splash” and added “console=ttymxc0,115200” to see more of the boot and ran a line from another helpful site:

mkimage -A arm -O linux -T script -C none -a 0 -e 0 -n “my boot script” -d boot.script boot.scr
echo mxc0:S12345:respawn:/sbin/agetty -L 115200 ttymxc0 vt102 >> /etc/inittab # for serial console

However, this failed to boot. Using the serial debug console, I could see U-boot trying to load the boot.scr but it was thinking it was zero bytes for some strange reason. Re-creating my /boot partition as a raw copy of /dev/sda1 with my adaptions ontop finally gave me an SD-card that just boots openSUSE Factory on ARM with framebuffer console on HDMI/DVI.

Find more ARM-related info on our openSUSE ARM Portal
fuk the kit you will love

January 19th, 2012 by

Dear fellows, in our moving free world, it’s not always bienvenue to talk about one of the *kit* software around.
Most of them have bad reputation, (with good or bad reasons) this is the debate of this post.

But in the uni-kit-verse there’s one you must known, especially if you are the proud owner of a laptop or one of this computer the manufacter deliver its firmware only in DOS exe format.
FirmwareUpdateKit (was introduced in 2008 in openSUSE by Steffen Winterfeldt

How that works?

As the title of the post give you the right command, open a console, then use the cnf (command-not-found) tool to learn what to do

Install the package

cnf fuk

The program 'fuk' can be found in the following package:
  * FirmwareUpdateKit [ path: /usr/bin/fuk, repository: zypp (repo-oss) ]

Try installing with:
    zypper install FirmwareUpdateKit

Pretty clear and cool, let’s install that stuff!

sudo zypper install FirmwareUpdateKit
root's password:
Loading repository data...
Reading installed packages...
Resolving package dependencies...

The following NEW packages are going to be installed:
  FirmwareUpdateKit syslinux 

2 new packages to install.
Overall download size: 758.0 KiB. After the operation, additional 2.1 MiB will be used.
Continue? [y/n/?] (y): y
Retrieving package syslinux-4.04-12.1.3.x86_64 (1/2), 642.0 KiB (1.9 MiB unpacked)
Retrieving: syslinux-4.04-12.1.3.x86_64.rpm [done]
Retrieving package FirmwareUpdateKit-1.1-14.1.1.x86_64 (2/2), 116.0 KiB (178.0 KiB unpacked)
Retrieving: FirmwareUpdateKit-1.1-14.1.1.x86_64.rpm [done]
Installing: syslinux-4.04-12.1.3 [done]
Installing: FirmwareUpdateKit-1.1-14.1.1 [done]

Firmware Update

Get your bios

Nothing easy for that, you will have to surf on boring mfg website, and find an appropriate bios for your computer.

Be serious during that selection, you can screw up totally your computer

Time to fuk

As always before running a program, it’s always good to check if there’s the fine manual (not the case here) or try a -h –help

fuk --help
Usage: fuk [OPTIONS] FILES
FirmwareUpdateKit version 1.1.

Create bootable DOS system and add FILES to it.
The main purpose is to assist with DOS-based firmware updates.

Options:
  --grub                        Add boot entry to /boot/grub/menu.lst.
  --lilo                        Add boot entry to /etc/lilo.conf.
  --title TITLE                 Use TITLE as label for boot menu entry.
  --iso FILE                    Create bootable CD.
  --floppy FILE                 Create bootable (1440 kB) floppy disk.
  --image FILE                  Create bootable harddisk.
  --run COMMAND                 Run COMMAND after booting DOS.
  --verbose                     Be more verbose.

Nothing complicated as a nuclear plan here, everything seems to be self explicit.
Let try it, and install a new grub entry for the new A8 version for my lappy.

fuk --verbose --grub --run M4600A08.exe /home/bruno/src_tmp/HARDWARE/DELL_M4600/M4600A08.exe 
/tmp/fuk.lSVIgS0cMt/fwupdate.img: chs = 186/4/16, size = 11904 blocks
- writing mbr
- writing fat12 boot block
- copying:
    /usr/share/FirmwareUpdateKit/kernel.sys
    /usr/share/FirmwareUpdateKit/command.com
    /tmp/fuk.lSVIgS0cMt/config.sys
    /tmp/fuk.lSVIgS0cMt/autoexec.bat
    /home/bruno/src_tmp/HARDWARE/DELL_M4600/M4600_A08.exe
c-3po:~ # 

That’s all I’ve now a new entry in my grub list

title Firmware Update
    kernel /boot/memdisk
    initrd /boot/fwupdate.img

Apply

Now just reboot and use the grub entry, then upgrade your bios, like you will normally have done with you old complicated build iso, or diskette (I’m joking)