Home Home > Miscellaneous
Sign up | Login

Deprecation notice: openSUSE Lizards user blog platform is deprecated, and will remain read only for the time being. Learn more...

Archive for the ‘Miscellaneous’ Category

Highlights of YaST Development Sprint 53

March 23rd, 2018 by

As the release dates for SUSE Linux Enterprise 15 and openSUSE Leap 15 approach, we keep adapting YaST to make easier for our users to take advantage of all the new features that these rock-solid operating systems will bring.

During the last two weeks that has implied, apart from regular bug fixing that we usually don’t cover here, working on AutoYaST, improving Storage-ng and polishing several aspects related to modules and extensions, like their registration and licenses.

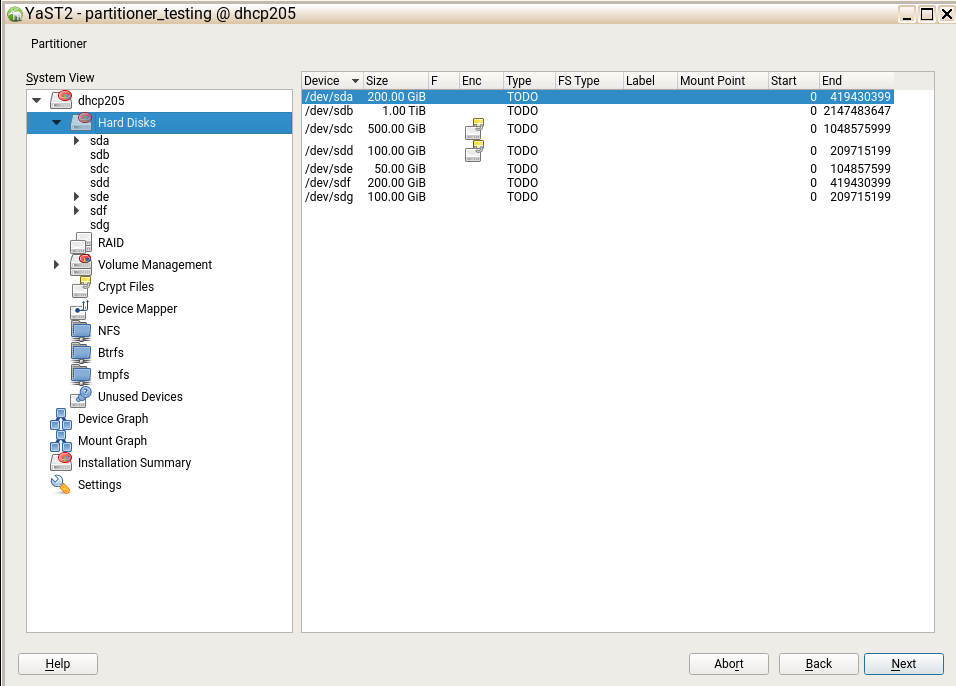
Let’s start with the rewritten Partitioner that is part of yast2-storage-ng.

Partitioner: more flexibility with the partition id

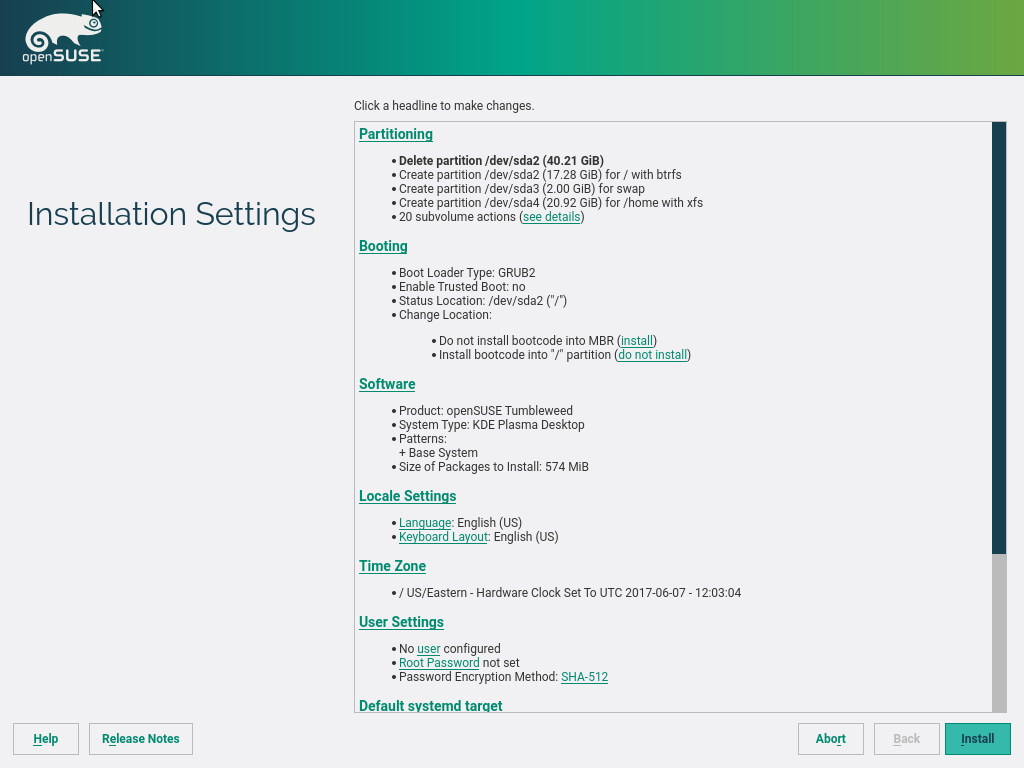
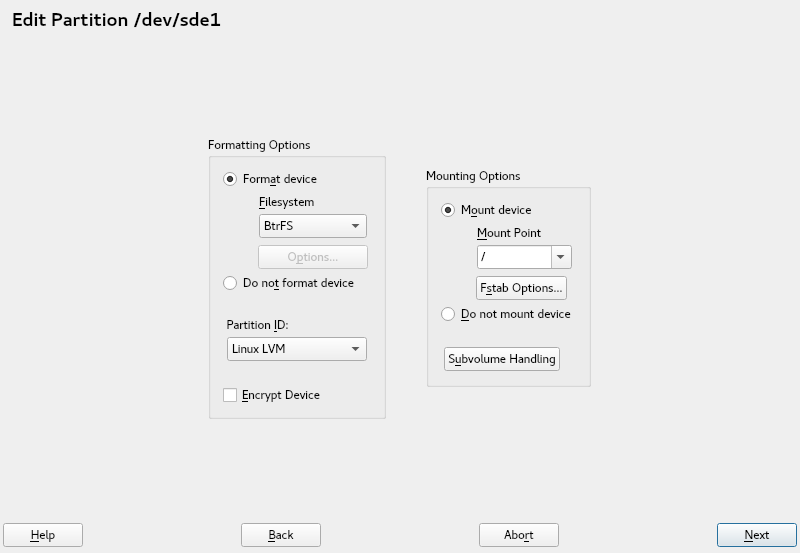
Setting the right partition id (also known as partition type) for each partition is an important part of the system setup that is often overlooked. Our Partitioner has always displayed in a prominent place the widget allowing to set that id, suggesting always the best value based on the selected role and the chosen file system type. But in many cases, that was more than a simple suggestion. In the old Partitioner (and in the new one until this sprint) the value of the partition id field (Linux, swap, Linux LVM, etc.) could only be manually edited in case the user had selected to not format the partition. When the option “Format device” was selected, the automatically chosen value could not be changed.

In SLE15 and openSUSE Leap 15 (and quite soon in openSUSE Tumbleweed), it will be possible to modify the id, no matter if the partition is going to be formatted or not. Of course, the logic to propose the best option every time the user selects a file system type is still there, but now it can be always overridden if the user wish. That change resulted in a small rearrangement of the widgets in that screen, as you can see below (remember we are trying to be very conservative with the UI changes in the Partitioner).

UI adjustments for the partition id

Partitioner: better support for DASD

In our previous report we explained some of the aspects in which the Direct-access storage devices (DASD) used in s390 mainframes are different from regular hard disks. But as you can imagine, there are more differences… and we know our readers love to learn new stuff while enjoying our reports. 😉

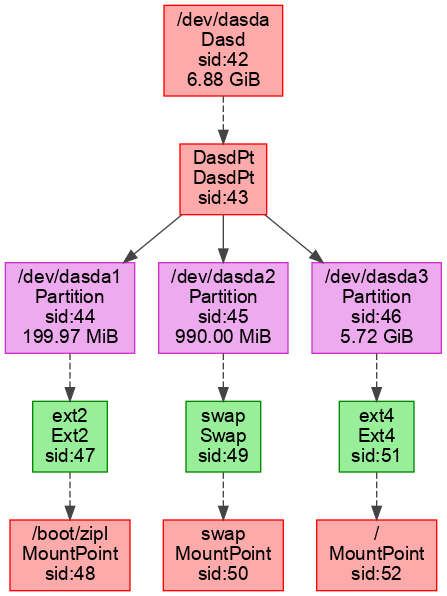
In short, there are two possible kinds of DASDs devices: Extended Count Key Data (ECKD) and Fixed Block Architecture (FBA). As explained in the previous report, the ECKD devices need to be formatted at low-level in order to be used by the operating system and, moreover, there are two possible low-formats for them: Compatible Disk Layout (CDL) and Linux Disk Layout (LDL).

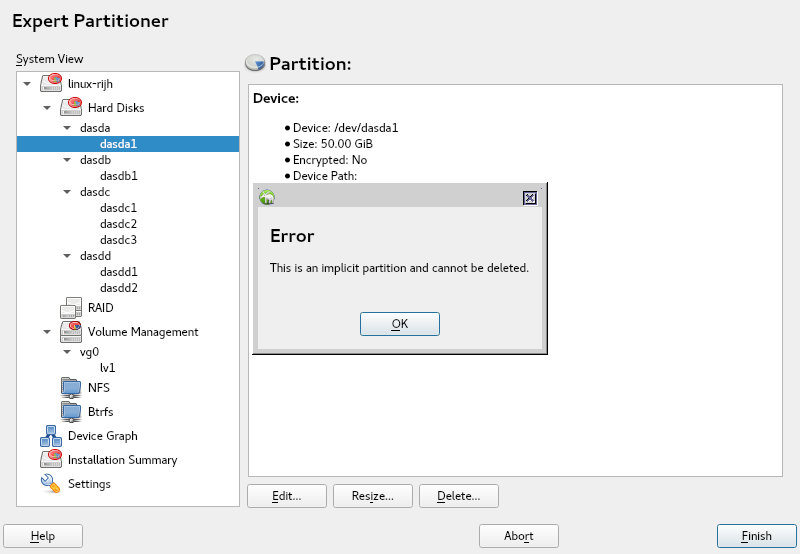
And now the fun – ECKD devices formatted as LDL do NOT have a partition table. FBA devices can potentially have one, but it’s also often skipped. To manage those DASDs without partition table, the Linux kernel simulates an implicit single partition taking the whole disk. Of course, working with such implicit partitions implies some restrictions, and we have introduced several controls to make sure things stay under control in the storage-ng Partitioner. For example, an error message is now shown if the user tries to remove an implicit partition.

Trying to delete an implicit partition

For curious readers, there is more information about DASD available in this link.

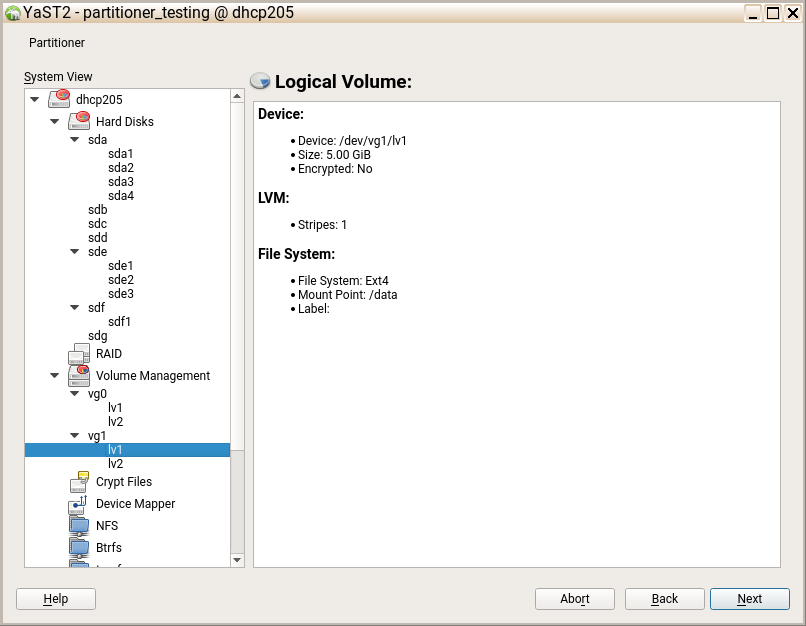
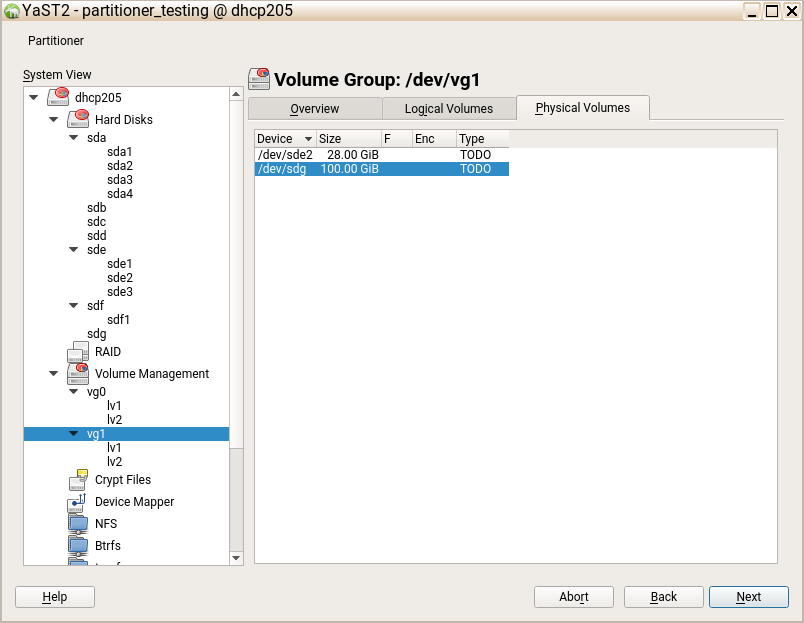
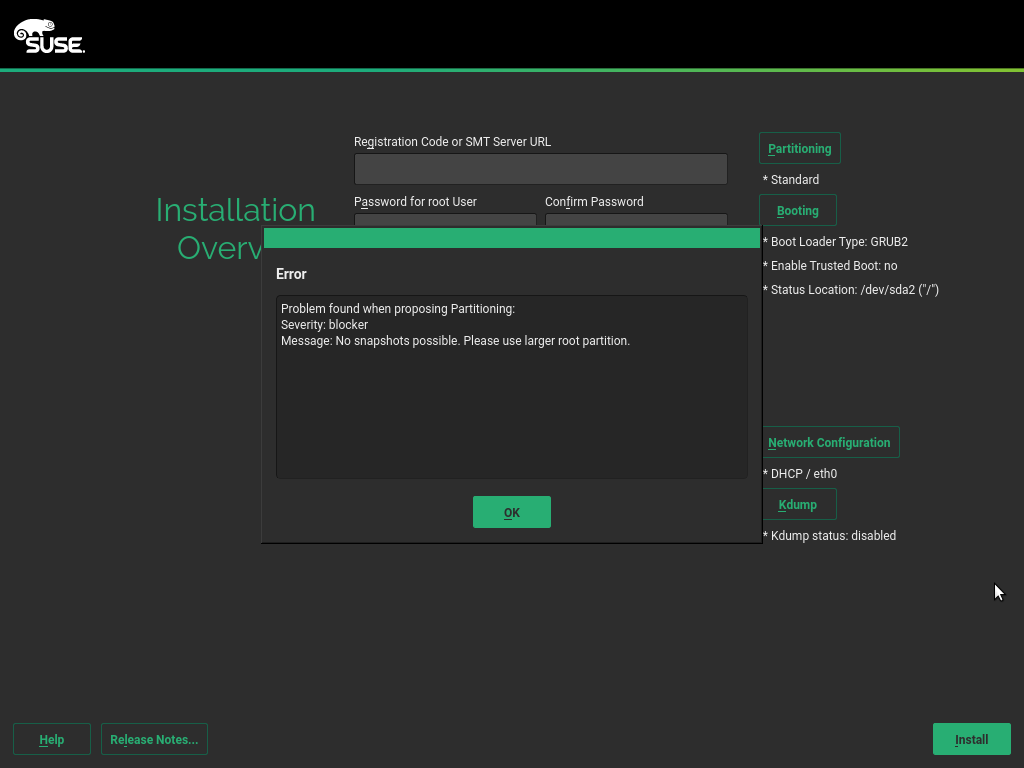
Partitioner: can’t resize a partition… but why?

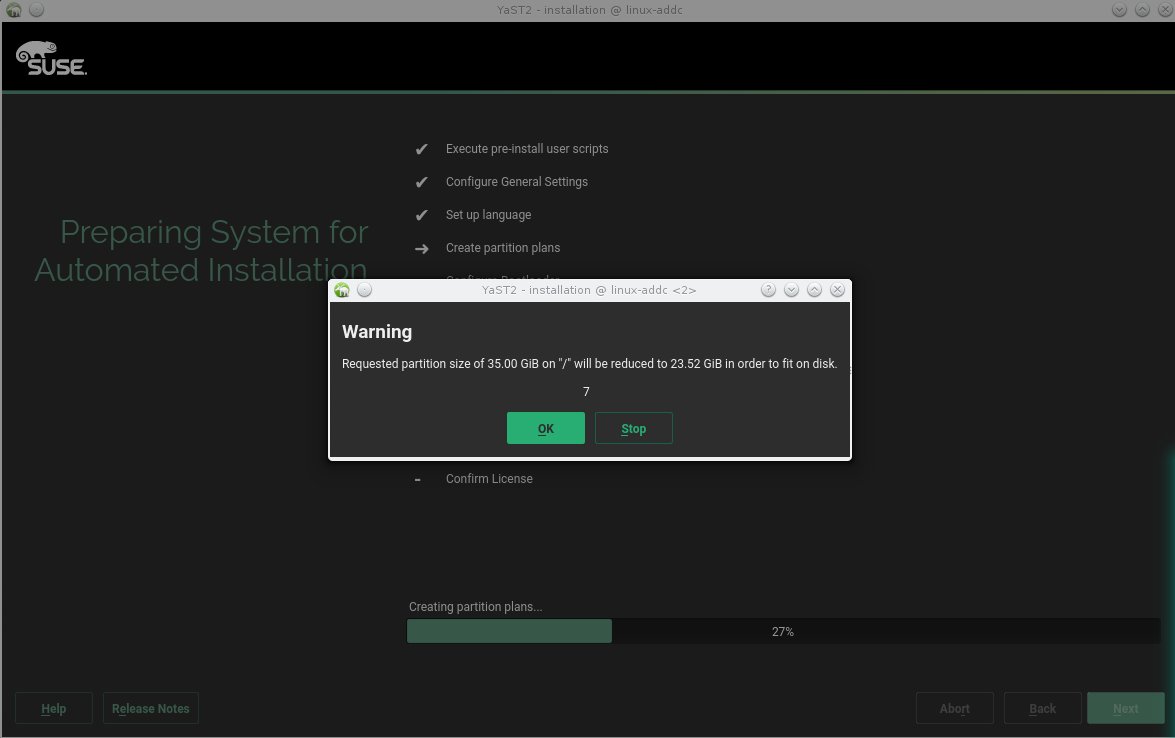
In SLE15 and openSUSE Leap 15 we will report very detailed reasons why a partition or a file system cannot be resized, as you can see in this screenshot.

Detailed description of resizing restrictions

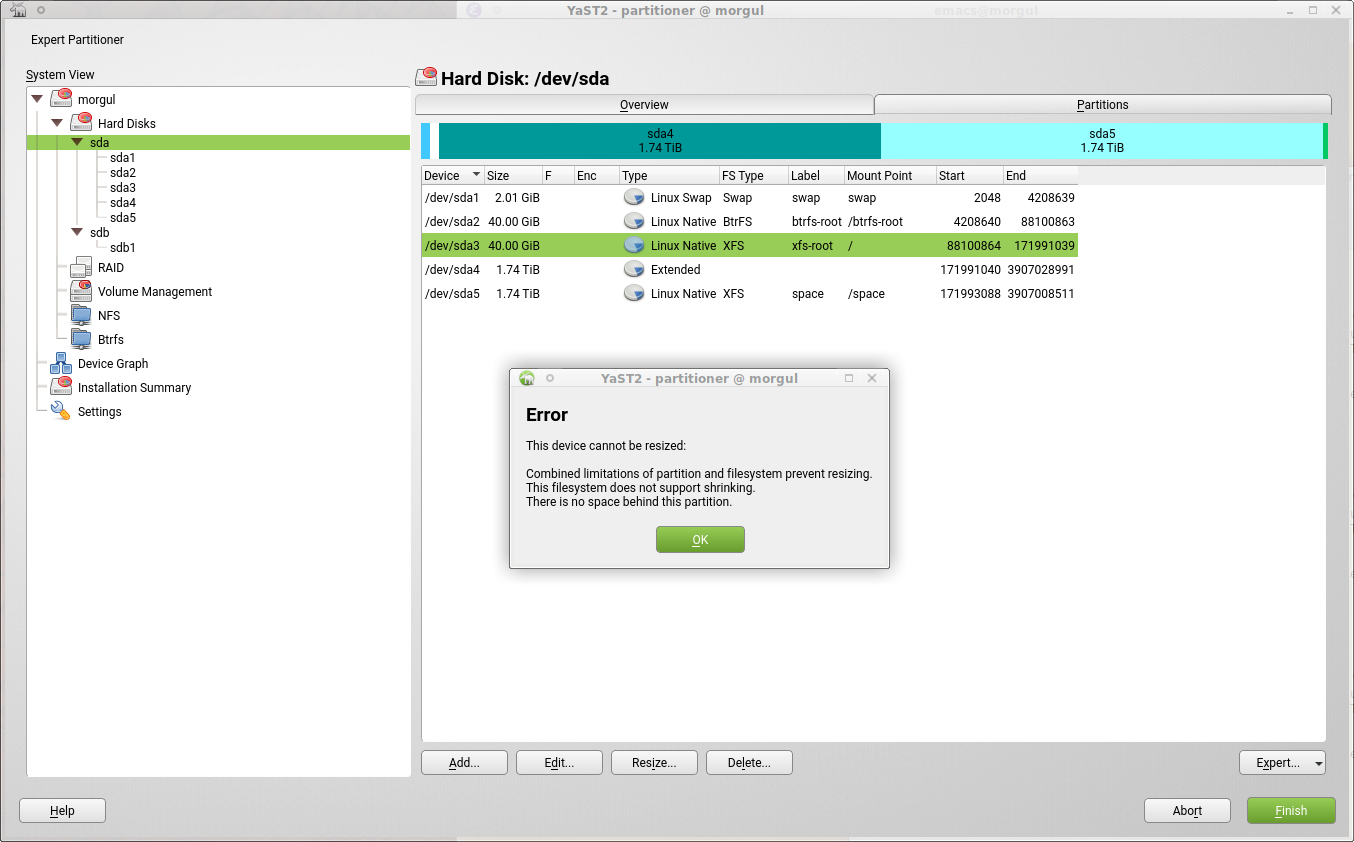
This used to be just a very simplistic message “Device cannot be resized”. But there may be many reasons for that, and sometimes different restrictions might contradict each other: While some type of file system only lets you grow, not shrink (e.g. XFS), the partition that the file system is on might not be able to grow, for example because there is another partition right next to it. We want to minimize user frustration that might happen when we only report the first reason, and when the user somehow managed to fix that problem, show another one that can’t be fixed.

As usual, this feature will be available in Tumbleweed in a matter of days.

Handling registration rollback in SLE15 Migration

Of course, the Partitioner was not the only YaST area to get attention during this sprint. Several aspects related to products, modules and extensions were also worked, with all the implications they have about registration, migration and licenses.

For the offline migration to SLE15 we reused some parts from the online migration which handles service pack upgrade. But it tuned out that the reused part was not correctly integrated into the installer and in some corner cases (registration errors) it did not behave correctly.

Moreover if the upgrade failed early then the system still contained a SLE12 installation but was registered as a SLE15 system on the SCC server. After booting the original SLE12 system the access to the online repositories was broken.

This sprint we fixed that so in case of registration error or when going back the original registration is restored. Now you can go back and choose a different system to upgrade and it will work as expected.

Additionally we fixed some small issues with custom repositories (add-on or driver updates) used at upgrade.

More fun with hiding/showing beta versions in SLE15

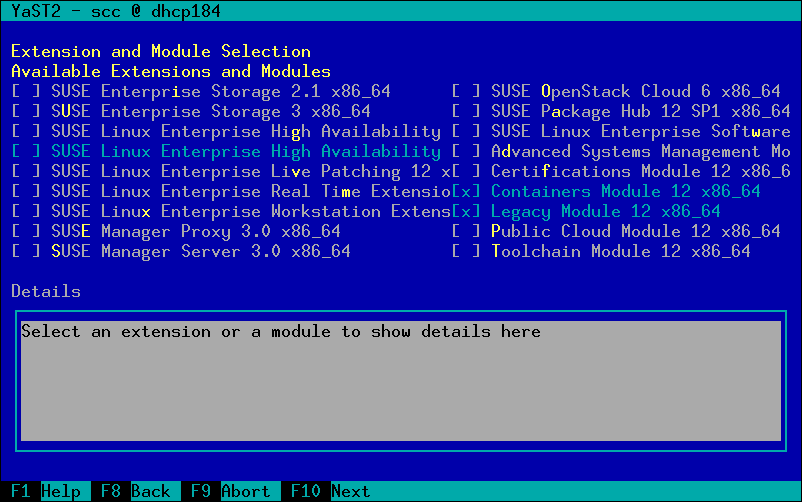
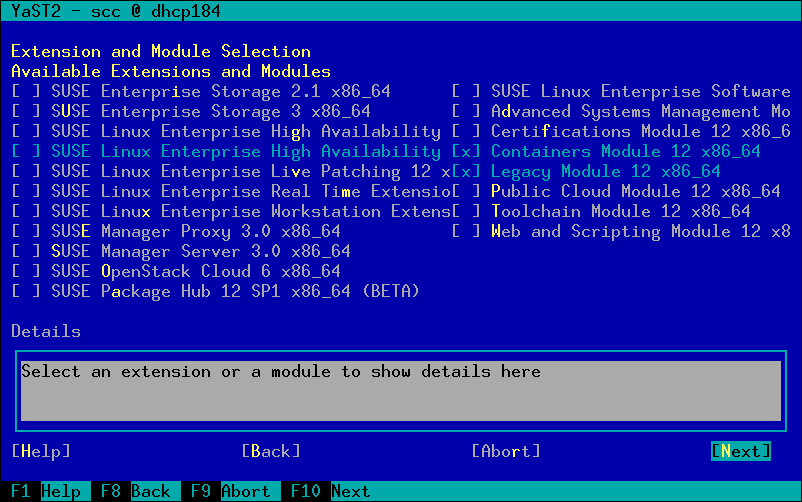
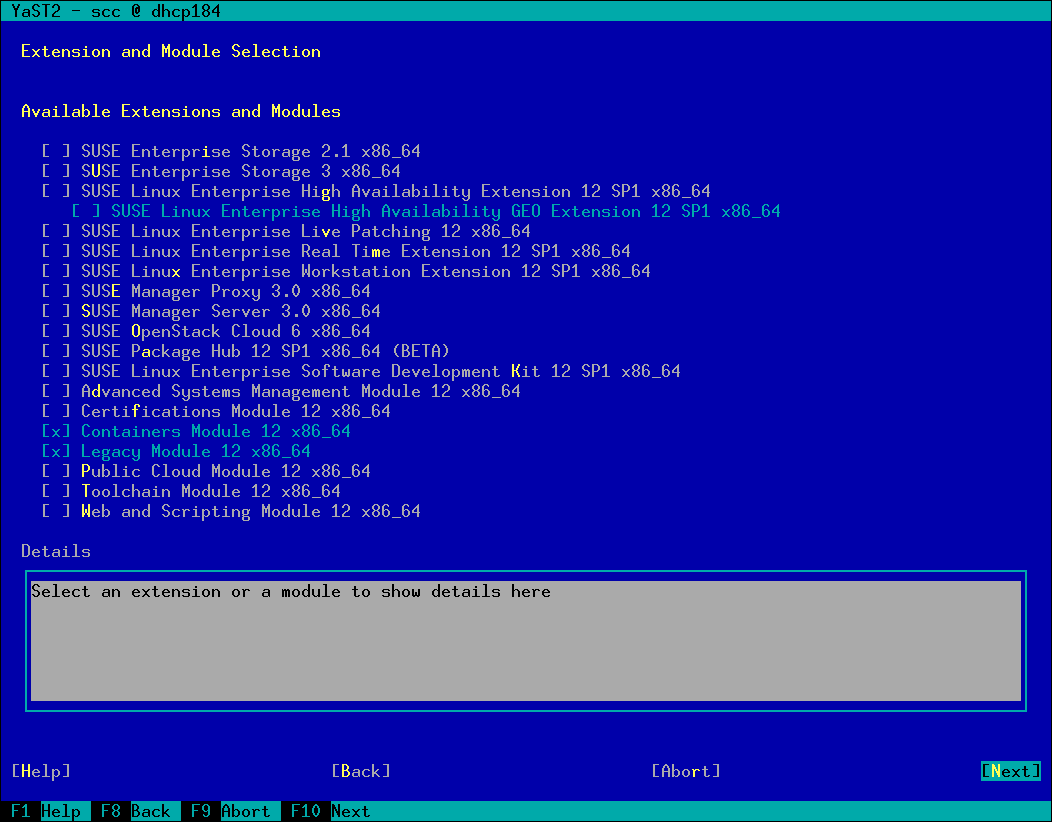
Usual readers of our blog already know that SUSE is taking extensions and modules to a whole new level in SLE15, making them a cornerstone of the system installation and upgrade process. As already explained in previous posts, that implies more complex dependencies between extensions and modules. All those mechanisms usually work nice… except a small problem we found out with beta versions.

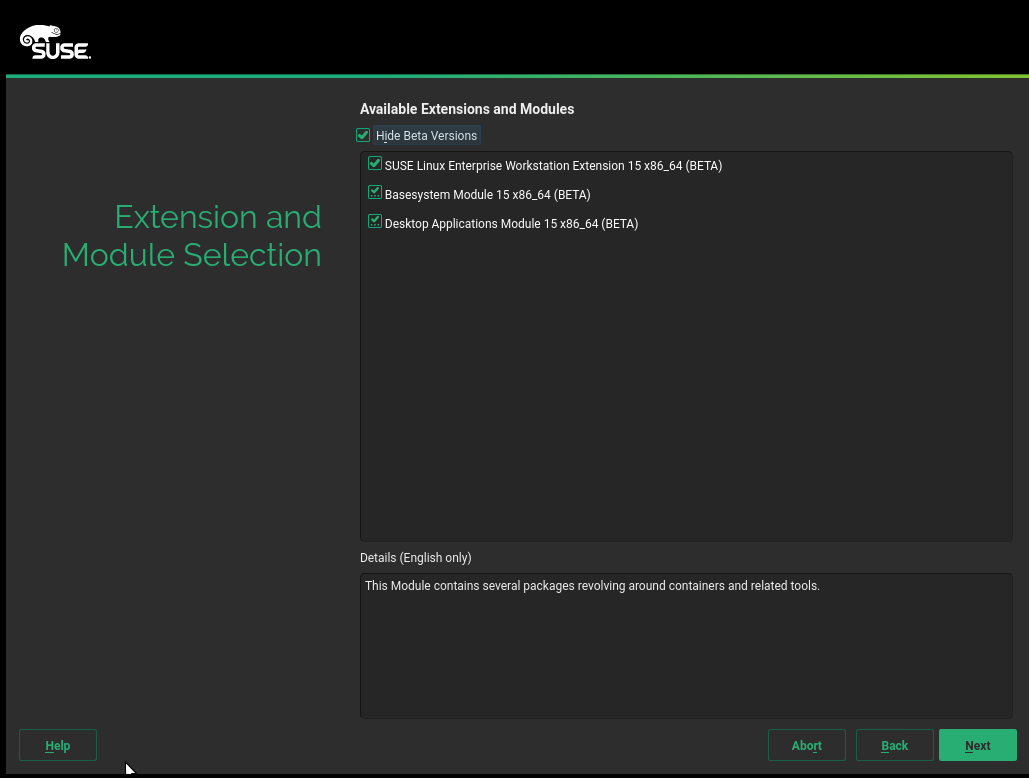
If a given extension was in beta phase and some of its dependencies were also in beta, if the “Hide Beta Versions” checkbox was unchecked the system was displaying only the extension selected by the user, but not the auto-selected dependent beta extensions. Our SLE testers found that quite confusing. So to make everyone’s life easier, we fixed the behavior as shown in the following screenshot.

Displaying selected and auto-selected beta extensions

A look into the future: analyzing how we display licenses

Currently there are many different ways to handle and display licenses. That can happen during the installation or upgrade process, while adding additional products to an installed system and, last but not least, while using YaST2 Firstboot to perform additional installation steps on the first system execution.

Additional there are 3 different locations from which these licenses come from. They can be provided by the SUSE Customer Center, be provided by libzypp or come from a repository using a legacy approach.

To simplify and unify all that in a close future, the first step was researching all those possibilities and how they are handled in (Auto)YaST. The result of such research can be found in this document hosted on Github.

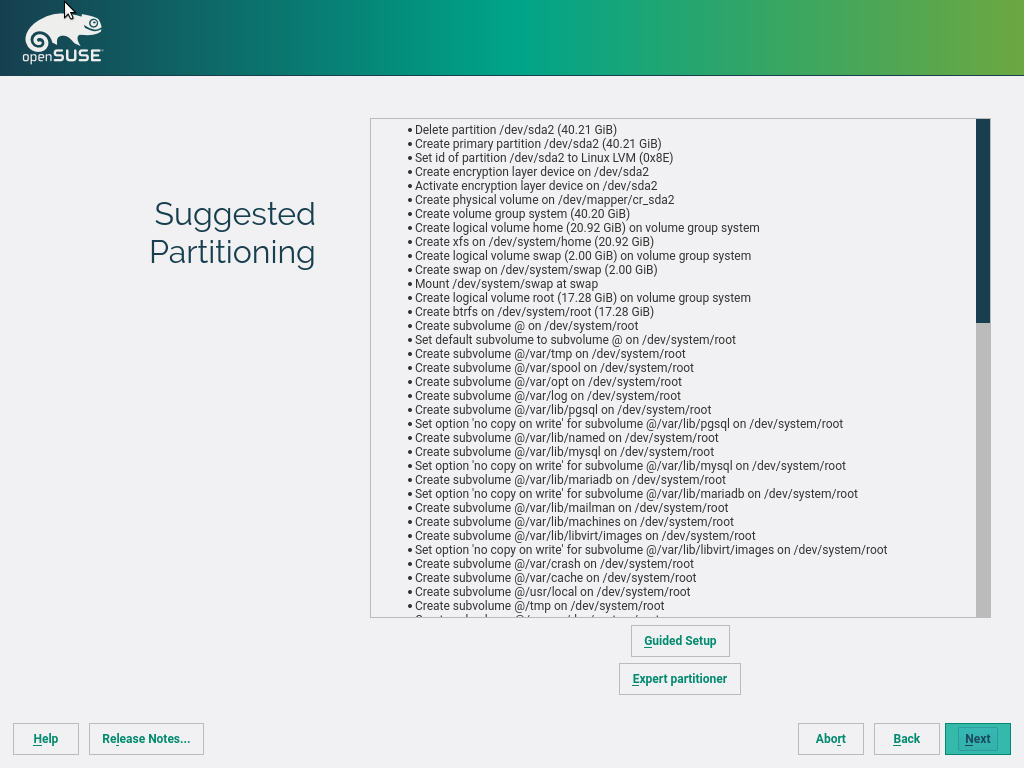
AutoYaST product selection and installer update improvements

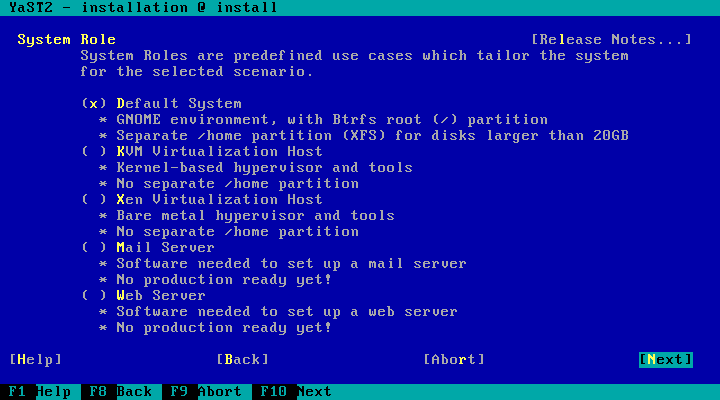
As you probably already know, starting with SLE-15, all products are distributed using one medium and you need to choose explicitly which product to install. Of course, if the medium only contains one product that would not be needed.

In AutoYaST profile the product is selected using the /software/products/product XML node:

<software>
  <products config:type="list">
    <product>SLED</product>
  </products>
</software>

Due to a bug, the cloned system exported the product short_name instead of the name, resulting in an internal error reported by the installer update and a later error during the auto-installation which aborted it because no product was selected.

So, during this sprint we have made improvements for both scenarios.

  1. The installer update will not rely in the product selection at all (the installer is the same for all the products) but will use the
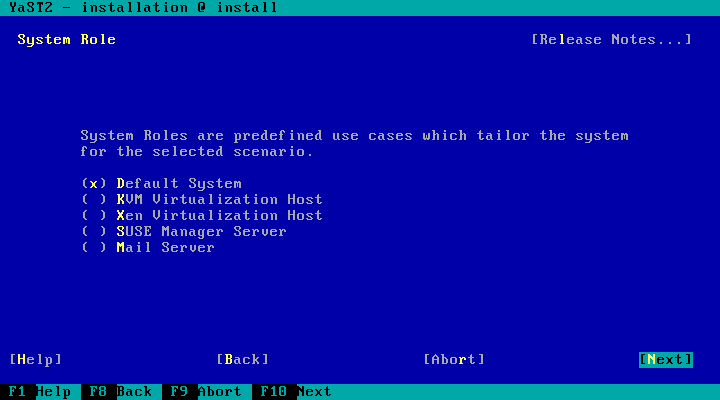
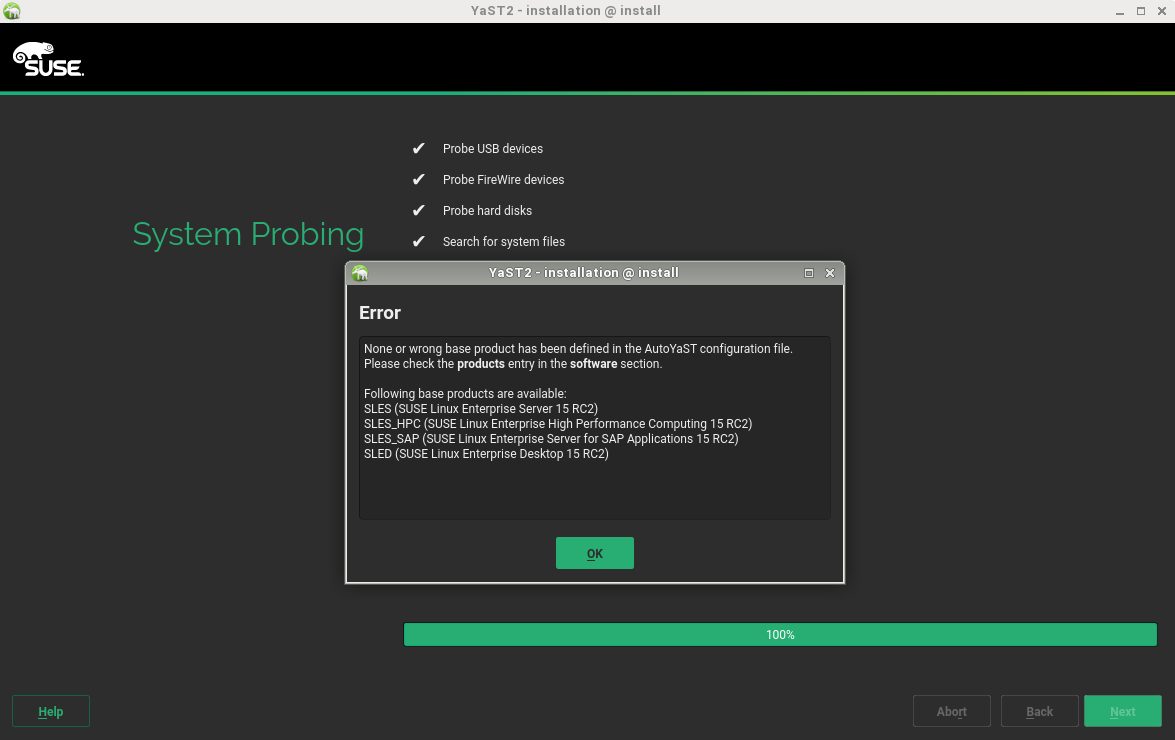
 self_update_id from the control file and the version and architecture from the first product available on the media. The installer update documentation has been also updated according the last changes and it is probably the best place for knowing more about its behavior.
  2. The wrong product selection error reported was not very useful and it was decided to provide more information about the list of available products from the media. Just see the image below with the latest implementation:

Warning about wrong product in AutoYaST

Document main differences in AutoYaST profiles between SLE12 and SLE15

The need to select a product is not the only relevant change affecting AutoYaST profiles for SLE15. There are many other significant changes in SLE15 compared to SLE12. Like the new modules concept, replacing SuSEfirewall2 with firewalld, replacing ntp with Chrony… Users wanting to reuse existing SLE12 profiles with SLE-15, will probably need to adjust them.

We have created this summary describing some of the most important changes in order to help with the conversion.

That document is just a preliminary and temporary work that is currently being reviewed and improved by the awesome documentation team at SUSE. Very soon (probably already done at the time you are reading this) the content will be merged and a new section titled “Main differences between SLES 12 and 15 profiles” will be available in the current guide for AutoYaST. Have we ever mentioned how much the doc team rocks? So please, use that last link as final reference instead of our temporary summary.

Cron config for NTP client

It is possible to setup the YaST-ntp-client module to sync the system clock at regular intervals. If that feature is used, YaST writes the needed configuration to a cron.d config file. We were still using “novell” as part of the name of such file, which was reported as a bug. It turned to be a good opportunity to take a look to a module that, as you can guess from that bug, we don’t update very often. 😉

First of all, we made sure that newly written files will have a more up-to-date name. Straightforward and easy.

The second part was to provide an upgrade path if the file already existed. We integrated that with the existing ntp to chrony conversion. That means the existing configuration is updated when a new version of the yast2-ntp-client package is installed, so the user does not need to run the module again to start using chrony with an existing configuration.

Last but not least, the third part was to adapt the package to be a better citizen in the RPM world, marking that file as ghost file in RPM spec. Now this command can recognize that yast2-ntp-client is responsible for that configuration file.

  rpm -qf <file>

Two months… and counting

Only two months of countdown until the release date of openSUSE Leap 15! That means a lot of hard work ahead of us, so stay tuned for more updates.

Highlights of YaST development sprint 36

June 16th, 2017 by

We are still digesting all the great content and conversations from openSUSE Conference 2017, but the development machine never stops, so here we are with the report of our post-conference sprint.

Storage reimplementation: expert partitioner

You have been reading for months about the new stack for managing storage devices and the new features and improvements it will bring to the installation. But so far there was no way to view and fine-tune the details of those devices. During this sprint we have implemented a first prototype of the new version of the YaST2 Expert Partitioner, that awesome tool you can invoke with yast2 storage.

To make the transition easier and to be able to submit it to Tumbleweed as soon as possible (hopefully in a couple of months, together with the rest of the new stack) we decided to postpone any UI redesign. So this first incarnation of the new expert partitioner looks and behaves exactly like the one available in current versions of (open)SUSE.

To try it out (on a scratch machine!), add a repository and remove the current storage library, as described in yast-storage-ng: Trying on Running System and then run zypper install yast2-partitioner. As you may have noticed, we split the partitioner in a separate package, unlike the current version that was part of the basic yast2-storage.

The new expert partitioner will only give you a read-only view of things similar to the following screenshots, not being able to modify anything yet.

New expert partitioner - hard disks list

As you can see in your own system or in the screenshots, the following items are already functional

  • Hard disks and their partitions
  • Volume Groups, Logical Volumes, and Physical Volumes of the Logical Volume Manager (LVM)

The other kinds of devices that you can see in the navigation tree are so far only stubs.

New Expert Partitioner - logical volume overview

You may feel a bit underwhelmed by this, and that’s OK, because most of the effort that we spent on this is actually hidden in a set of nice UI classes which we use to reconstruct the legacy procedural UI code. So the new expert partitioner not only relies on the revamped storage stack, but also on a powerful and reusable set of shiny UI components. If you ever need to code a user interface for YaST, the next section is for you.

New Expert Partitioner - list of physical volumes

New CWM Widgets

This section may be a little bit too developer-oriented, so feel free to skip it if you don’t care about the YaST implementation details. If, to the contrary, you want to have a glance at the new YaST widgets, go ahead.

Before diving into the new widgets, let us introduce what CWM is. It stands for Common Widget Manipulation and it is an old procedural YaST module which puts together a widget, its help and its callbacks. These callbacks are used to initialize, validate and store the content of the widget. This organization allows easier re-usability of widgets, which are then put together into a dialog. We also made an object-oriented version of CWM, which uses the old one under the hood, but is based on classes. So the contents and callbacks all live in their own class which is then used in dialogs. It is already used e.g. in the bootloader module.

As part of the Expert Partitioner rewrite, we created new types of reusable widgets, like Table or Tree, that are now available for its usage in any YaST module.

We also realized that it would be cool to be able to construct full dialogs out of smaller “bricks”, because the partitioner dialogs usually have rather complex structures in which some parts are shared by several dialogs. For this purpose we added new kinds of widgets – a Page which represents a part of a dialog that contains other widgets, and a Pager which allows switching of pages. So far there are two different pagers. The first one is Tabs which shows a set of tabs and allows switching among them and the second one is TreePager which allows switching pages according the item selected in a tree.

As you can see in the screenshots from the Expert Partitioner, there is a tree on the left side, which decides which page is shown on the right side. That right side sometimes contains a set of tabs, which decides what is displayed for every single tab.

Building blocks for the win!

Added support for allocation of memory high into YaST Kdump Command-line

A new option to allocate memory high during enable of Kdump was already implemented in YaST interface but unavailable through command-line. From the next Service Pack (i.e. SLES 12 SP3, Leap 42.3, and Tumbleweed), the user will be able also to use this option in command-line and scripts. In order to do that you can just use the command yast2 kdump enable alloc_mem=low,high, where low sets Kdump Low Memory and high sets Kdump High Memory.

For current users of Kdump command line, the old command to enable kdump yast2 kdump enable alloc_mem=$mem will still work as before, keeping its compatibility.

Handle optional filesystem packages correctly

During installation, when YaST detects in the system a particular filesystem or technology for which the installer would need additional packages to deal with, it alerts the user and tries to install those packages. A very visible case are the ntfs-3g and ntfsprogs packages, installed when a MS Windows partition is found in the system.

But, what happens if those packages are simply not available for installation? That’s the case of SLE12-SP3, which doesn’t include ntfs-3g. Should the installer block the installation of SLE12-SP3 alongside an existing MS Windows just because of that?

Fortunately we have solved that problem for the upcoming SLE12-SP3… and also created the code infrastructure to avoid similar problems in the future. Now we have a separate list for packages that would be nice to have installed in order to deal with a particular technology but that are not 100% mandatory to the point of blocking the installation process if they are not available. So we don’t bother the user about things that cannot be solved anyway.

Issues solved in YaST Remote command-line

But apart from looking into the future, we keep taking care of the existing YaST modules and its supported scenarios. During this sprint, we also addressed some issues related to YaST Remote, when using the command line.

The command yast2 remote list was installing required packages for YaST Remote and also restarting the display manager. However, as this command is expected to be a read-only operation, it shouldn’t change anything in the system. Such a problem was solved and now this command just lists the status of remote options.

Another issue was in the command yast2 remote allow=yes, which was opening a pop-up interface to alert the user about the changes in the system. Such a pop-up was impeding the use of this command in scripts. Therefore, we removed it when executing YaST Remote in command-line and, instead, we now just show a warning message on the console.

Both fixes were submitted as a maintenance update to all the supported versions of SLE and openSUSE and will reach our user as soon as they pass all the extra security checks performed by the respective maintenance teams. Of course, both fixes will also be included in future releases.

Storage reimplementation: simplified actions summary

The Expert Partitioner was not the only thing we did related to the new storage stack during this sprint. We also tried to improve how the information is presented to the user everywhere.

Having a huge amount of information at a glance might be useful in certain cases… as long as that amount can be handled by a human brain! Since we don’t expect all our users to be androids, we decided to improve our storage actions summary. Now is much easier to understand what is going to happen in the disks after pressing the confirmation button.

They say a picture is worth a thousand words. So let’s compare the ultra-detailed list offered before this sprint…

Summarized actions: before

…with the new digested one.

Summarized actions: after

As you can see, the new summary carries the essential information in a clear and legible way. Delete actions are highlighted in bold and, moreover, the set of actions related to btrfs subvolumes are grouped in a collapsible list.

Summarized actions: extended view

Integration of AutoYaST with the new storage has also received our attention during this sprint. Now, the summary dialog in AutoYaST shows the list of storage actions in the new compact way. Currently it is not possible to edit partitions from this AutoYaST dialog, but stay tuned for more information in upcoming sprints.

Summarized actions: AutoYaST

AutoYaST: warn the user when creating smaller partitions

You already know how powerful can AutoYaST be in terms of automating complex installations based on flexible profiles, even trying its best if the profile contains parts that are challenging to implement in the target system.

One of those adjustments that AutoYaST can perform is reducing the size of some of the partitions specified in the provided profile if the target disk is not big enough, to make sure the installation doesn’t get blocked just by some missing space.

The mechanism works very well but that kind of automatic adjustments can be unexpected and can produce undesired results. That’s why we have added the following warning message.

AutoYaST: alert user about adjusted partititions

Of course, this new warning uses the usual AutoYaST reporting mechanisms, so even if the users are not in front of the screen (something very common when performing an unattended installation) they will be notified about the special circumstance.

Docker, Docker everywhere!

And now, another dose of technical content for those of you that love to lurk into the kitchen.

In the report of the sprint 30 we already described how we adopted Docker to power up our continuous integration process in the master branch of our repositories (the one in which we develop Tumbleweed and upcoming products). As also reported, we adopted the same solution for Libyui in the next sprint. And now it was the turn the branches of YaST that we use to maintain already released version of our products. Not a trivial task taking into account the many repositories YaST is divided in and the many products we provide maintenance for.

If you want to refresh your memory about the whole topic of using Docker for the continuous integration infrastructure, here you can watch the talk Ladislav offered about the topic a few days ago in the openSUSE Conference 2017.

Storage reimplementation: full support for DASD devices

If you don’t have a S/390 mainframe laying around, maybe you are not familiar with the concept of DASD (direct-access storage devices). DASDs are used in mainframe basically as regular disks… just that they are not.

DASDs are special disks in various aspects – they have a different partition table type allowing only three partitions with a restricted set of partition ids, they must be managed by a different set of partitioning tools, they have their own specific alignment logic and requirements…

But thanks to YaST and libstorage, in (open)SUSE you don’t have to care about most of those details. The expert partitioner and the installer allow you to treat DASDs almost as regular disks.

During this sprint we adjusted the new libstorage, i.e. the library C++ based layer of the stack, to be able to deal with DASD. As usual with new features implemented in the library, the only “screenshot” we have to show is one of the graphs generated by the library. Enjoy.

DASD support: the example graph

More to come… very soon

We want to have a shorter and more agile feedback loop regarding our development efforts. To achieve that, we have decided to shorten our Scrum sprints from the current three weeks to just two. So you will have more news from us in half a month.

But a feedback loop works in both ways, so we also expect to have more news from you. 🙂 See you soon!

Fun things to do with driver updates

April 25th, 2017 by

Today: And what if I want to remove some files?

It’s easy and obvious to add new files with a driver update (DUD). But what if you need to remove some files? Or, related: can you replace some read-only file by a writable copy?

Let’s for this article assume you want to modify the Xorg configuration. Say,
/usr/share/X11/xorg.conf.d/10-evdev.conf troubles you.

The direct way would be to write an update.pre script than removes the file and include this into a DUD.

update.pre is run right after the DUD has updated the files in the installation system.

For example:

echo \
  rm /usr/share/X11/xorg.conf.d/10-evdev.conf \
  > update.pre
mkdud --create test1.dud --dist tw --name "remove 10-evdev.conf" update.pre

But when we try test1.dud we run into this:

Driver Update: remove 10-evdev.conf
Driver Updates added:
  remove 10-evdev.conf
[...]
rm: cannot remove '/usr/share/X11/xorg.conf.d/10-evdev.conf': Read-only file system

So, we see the catch: much of the installation system resides on a read-only file system! You can’t just go and modify things.

But how does the driver update process manage to add new files to the installation system then? It does so by restructuring the file system using symlinks. In the process all directories that need to be modified are replaced by writable copies.

In other words: if you include the file you want to remove in the DUD – you will be able to remove it. It’s actually sufficient to include the directory the file resides in to make this work.

So, let’s try this:

mkdir -p /tmp/dud/usr/share/X11/xorg.conf.d
echo \
  "rm /usr/share/X11/xorg.conf.d/10-evdev.conf" \
  > update.pre
mkdud --create test2.dud --dist tw --name "remove 10-evdev.conf" update.pre /tmp/dud

Now we don’t get any error applying test2.dud and when we login to the installation system, we see:

console:vm9732:/ # ls -l /usr/share/X11/xorg.conf.d
total 0
console:vm9732:/ # 

Tip

For easy testing a DUD, boot the machine with

startshell=1 sshd=1 password=*** dud=<URL>

startshell=1 wi ll stop the installation workflow after the installation system has been fully prepared just before YaST will be started. sshd=1 will start an SSH daemon and you’ll be able to connect to the machine and look around.

A similar trick can be used to make files writable (watch out for correct shell quoting):

mkdir -p /tmp/dud/usr/share/X11/xorg.conf.d
echo \
  cp --remove-destination '$(readlink -f /usr/share/X11/xorg.conf.d/10-evdev.conf)' \
  /usr/share/X11/xorg.conf.d/10-evdev.conf \
  > update.pre
mkdud --create test3.dud --dist tw --name "make 10-evdev.conf writable" update.pre /tmp/dud

We can verify the result:

console:vm9732:/ # ls -l /usr/share/X11/xorg.conf.d               
total 4
-rw-r--r-- 1 root root 1099 Apr 24 13:06 10-evdev.conf
console:vm9732:/ #

The file is now writable.

Highlights of YaST development sprint 32

March 22nd, 2017 by

To make sure you didn’t missed us too much, in our latest blog post we summarized all the YaST-related projects worked during Hack Week 15. But after all the fun, it was time for… more fun! So let’s take a look to what the team has delivered on this first sprint after Hack Week 15.

Storage reimplementation: encrypted proposal without LVM

One of the known limitations of the current installer is that it’s only able to automatically propose an encrypted schema if LVM is used. For historical reasons, if you want to encrypt your root and/or home partitions but not to use LVM, you would need to use the expert partitioner… and hope for the best from the bootloader proposal.

But the new storage stack is here (well, almost here) to make all the old limitations vanish. With our testing ISO it’s already possible to set encryption with just one click for both partition-based and LVM-based proposals. The best possible partition schema is correctly created and everything is encrypted as the user would expect. We even have continuous tests in our internal openQA instance for it.

The part of the installer managing the bootloader installation is still not adapted, which means the resulting system would need some manual fixing of Grub before being able to boot… but that’s something for an upcoming sprint (likely the very next one).

Improved add-ons listing for SLE12-SP1

The dialog in SLES-12-SP1 for selecting the add-ons after registering the system was originally designed just for a small list of add-ons. Unfortunately (or fortunately, depending on how you look at it), the number of add-ons grew over the time and it exceeded the original limit for the text mode UI.

The equivalent screen in SLE-12-SP2 is not affected by the problem because it uses a different layout with scrollable list. But the SP1 dialog looks like this.

Broken add-ons list in SP1

If you look carefully at the screenshot you will see that the Web and Scripting Module is missing in the list and the Back, Next and Abort buttons at the bottom are also not displayed.

The fix decreased the size of the Details widget and allowed displaying more items in each column. Now there is even free space for three more add-ons.

Fixed addons list in SP1

Moreover the dialog is now dynamic and checks the current size of the screen. If there is enough free space then the list is displayed in one column so the labels are not truncated and the Details widget size is increased back to the original size.

Add-ons list in SP1 with enough space

Storage reimplementation: Btrfs subvolumes

The management of subvolumes is one of those features that make Btrfs rather unique and that need special handling when compared to more traditional file systems. That was indeed one of the several reasons to rewrite libstorage – Btrfs subvolumes never fully fitted the philosophy and data structures on the old (current) libstorage and yast2-storage.

In this sprint we introduced support for subvolumes in libstorage-ng from the ground up, taking into consideration all the specificities, use cases and scenarios found in the past. And, hopefully, in a way that is also prepared for whatever the future brings.

The new functionality is already working and tested and it’s included in the latest versions of libstorage-ng, but is still not used in the proposal or any other part yast2-storage. You will have to wait another sprint to see more visible results. At least if “more visible” means screenshots. Meanwhile, if you like images you can always enjoy the graphs generated from the internal structures managed by libstorage-ng.

Internal subvolumes representation in libstorage-ng

Storage reimplementation: system upgrade

The new storage stack has been able to install an openSUSE system for quite some time already. While we keep improving that area, the next challenge was to make the upgrade from a previous openSUSE version also possible using our testing ISO.

That implies scanning the hard disks looking for previous installations, allowing the user to select one, mounting the corresponding partitions or LVM volumes, performing the update of every package and doing some final tasks like updating the bootloader configuration.

Following the iterative approach encouraged by Scrum, we focused in the first three steps, which is something that a user (or openQA, for that matter) can test and verify. So now we are able to detect and list pre-existing systems and start the upgrade process on the selected one. And we have automated tests in openQA to ensure it works across all the combinations of partition-based vs LVM-based layout and UUID-based vs name-based fstab file.

Add-ons can define new system roles

YaST is pretty customizable when it comes to adapt/modify the installation workflow. Among other things, add-ons are allowed to adapt the workflow (adding/removing steps), define new proposals, etc. And starting now, they can also define new system roles.

Let’s see an example of adding a new mail server role:

<update>
  <system_roles>
    <insert_system_roles config:type="list">
      <insert_system_role>
        <system_roles config:type="list">
          <system_role>
            <id>mail_role</id>
            <software>
              <default_patterns>base Minimal mail_server</default_patterns>
            </software>
          </system_role>
        </system_roles>
      </insert_system_role>
    </insert_system_roles>
  </system_roles>
</update>

<!-- Don't forget to add the texts -->
<texts>
  <mail_role>
    <label>Mail Server</label>
  </mail_role>
  <mail_role_description>
    <label>• Software needed to set up a mail server
• No production ready yet!</label>
  </mail_role_description>
</texts>

And now let’s see how it looks:

A role added by an addon

Which leads us to the next section…

The list of roles becomes responsive in text mode

A really nice thing about YaST is that it’s able to run in textmode, so you don’t need a graphical interface to install or configure your system. As a consequence, YaST developers need to keep certain limitations in mind when working in the user interface.

Now that add-ons can add new system roles, we noticed a potential problem in the dialog selection screen: we eventually will get out of space if more than one system role is added. So we decided to improve how system roles are displayed to make them fit in a 80×25 mode (that is, only 25 lines of text). Let’s see the changes with some examples.

This is how the screen looks by default, with a reasonably small set of roles.

Default system roles list

If the system detects there is no space to present all the information in such a convenient way, it removes all the spaces so at least the information is all there, even if it looks a little bit packed.

Roles list with no extra space

If even that is not enough, the extra descriptions are omitted, which gives us way more room.

Compact roles list

If roles don’t fit even without the descriptions, the introductory text will be also omitted which means we can present up to eighteen (yes, 18!) roles in the screen.

Storage reimplementation: guided setup mock-up

As explained in several previous reports, we are collaborating closely with SUSE UX experts to design the revamped interfaces of the installer’s partitioning proposal and the expert partitioner. We already showed you the document we used as a base to discuss the partitioning proposal, including the conclusions, and the first very simple prototype of the so-called Guided Setup.

During this sprint, that collaborative effort focused on defining exactly how every step of that wizard should work and look like. The goal was to get some interface mock-ups to be used as starting point for the upcoming sprint. More than ever, a picture (well, four of them) is worth a thousand words.

First step of the guided partitioning setup mock-up

Second step of the guided partitioning setup mock-up

Third step of the guided partitioning setup mock-up

Fourth step of the guided partitioning setup mock-up

Prevent the installation of CaaSP if Btrfs snapshots are not possible

CaaSP is a single purpose system, and having snapshots enabled is essential. So there’s now a check in place that will simply prevent you from going on with the installation if snapshots are disabled (for example, if the disk is too small).

Blocked CaaSP installation

Storage reimplementation: better handling of /etc/fstab and /etc/cryptab

For the new storage stack, we refactored the classes to handle /etc/fstab. While this would normally not be anything to write much about, we included intelligent handling for existing comments based on this standalone GitHub project.

This means that existing comment blocks at the start and at the end of the file remain untouched, and comments before any content entry remain attached to that entry; i.e. when that entry is moved around in the file (e.g. because of mount dependencies), that comment is moving along with the entry it belongs to. While this is not 100% fool proof, it is much better than the usual strategy to simply discard such comments when the file is rewritten.

Quite some adaptations and bugfixes for CaaSP

As you already know from previous reports and other sources, a considerable part of SUSE’s development firepower is focused on building the upcoming CaaSP. As part of that heavy development process, the YaST team invested a significant part of the sprint adapting YaST for CaaSP and fixing bugs introduced by previous adaptations. A large collection of changes here and there that are hard to summarize here but that help CaaSP to be a couple of steps closer to the final goal.

Keep it rolling!

We have already planned our next sprint which will hopefully bring more features to the new storage stack, CaaSP-related improvements, a surprise about AutoYaST and more stuff. And, of course, it will be followed by its corresponding report.

So see you in three weeks. Stay tuned and have a lot of fun!

Fun things to do with driver updates

March 16th, 2017 by

Today: But what if I need a new kernel?

A driver update (DUD) can of course update a single driver. But if that’s not enough and you need a whole new kernel to run an installation?

There are two parts to solve:

  1. replace the kernel used during installation and
  2. get the new kernel installed

We’ll need two tools for this (both available in Tumbleweed or here: mksusecd and mkdud).

1. Replace the kernel used during installation

For this it’s important to know which kernel packages you’ll actually need. Typically it will be kernel-default and kernel-firmware. But older SUSE distributions (SLE 11 comes to mind) had the kernel packages split into kernel-default and kernel-default-base – you’ll need them both.

To make things confusing, modern SUSE distributions also have kernel-default-base – but it’s an alternative to kernel-default. In this case we don’t need it.

If unsure, check kernel-default. If it contains the actual kernel (e.g. /boot/vmlinuz) then you don’t need kernel-default-base.

On some architectures modules are also taken from xen-kmp-default. If that’s important for you, you can add this package to the kernel list as well.

In fact you can add any number of kernel packages or kmps you like.

In the past, sometimes a different kernel flavor was used. For example PowerPC had kernel-ppc64 for a while. Simply use the flavor you need.

It’s a good idea to gather all the kernel rpms into a single directory for easier use:

> mkdir k
> cp kernel-default.rpm kernel-firmware.rpm k
> cp kernel-default-base.rpm k    # only if needed
# add any kernel-related rpms you need

Then, take your SUSE installation iso and run

> mksusecd --create new.iso \
  --kernel k/* -- \
  original_dvd1.iso

Note that the --kernel option accepts a variable number of arguments, so you have to add an isolated -- to terminate the argument list properly.

The output could look like this:

> mksusecd --create new.iso \
  --kernel k/* -- \
  SLES-11-SP4-DVD-ppc64-GM-DVD1.iso
kernel version: 3.0.101-63-ppc64 --> 3.0.101-94-ppc64
CHRP bootable (ppc64)
building: 100%
calculating sha1...

The command above will actually get the list of required modules from the old installation iso. If you are missing some driver or the new kernel comes with some additional driver, the module will not be added to the new iso.

But there’s the --modules option. It will add the listed modules together with any implicitly required modules via module dependencies.

For example, let’s add the airport wifi-module to our PowerPC iso:

> mksusecd --create new.iso \
  --kernel k/* \
  --modules airport -- \
  SLES-11-SP4-DVD-ppc64-GM-DVD1.iso
kernel version: 3.0.101-63-ppc64 --> 3.0.101-94-ppc64
kernel modules added:
  airport, cfg80211, orinoco
CHRP bootable (ppc64)
building: 100%
calculating sha1...

As you can see, it automatically adds orinoco and cfg80211 as well.

2. Get the new kernel installed

This is relatively simple. A driver update can do this:

> mkdud --create foo.dud \
  --dist sle11 \
  --install repo \
  k/*

This creates a driver update for SLE 11 (which also applies to SP4) and the kernel rpms are installed via an auto-generated add-on repo (--install repo).

Now we have the driver update that installs our kernel packages. But how do we use it?

We integrate it into our iso above!

> mksusecd --create new.iso \
  --initrd foo.dud \
  --kernel k/* -- \
  SLES-11-SP4-DVD-ppc64-GM-DVD1.iso

mksusecd has an --initrd option that directly accepts driver updates and integrates them into the iso.

3. Can I have a choice?

Maybe you just want to test this new kernel or sometimes need the old one and sometimes the new one. Can you make an installation iso that lets you choose the kernel?

Oh yes! 🙂

> mksusecd --create new.iso \
  --add-entry 3.0.101-94 \
  --initrd foo.dud \
  --kernel k/* -- \
  SLES-11-SP4-DVD-ppc64-GM-DVD1.iso

This does not replace the old kernel but adds a new boot entry Installation - 3.0.101-94.

So you can install with old or the new kernel.

Fun things to do with driver updates

February 16th, 2017 by

Today: update the update process!

Yesterday a colleague asked me if it would be possible to apply a driver update (DUD) to the rescue system. He wanted to use a new btrfsprogs package.

My immediate reaction was: no, you can’t do it. But then, there’s no technical reason why it shouldn’t be possible – it actually nearly works. The updates are downloaded as usual – just not applied to the rescue system.

So I thought: “Why not make a driver update so driver updates work also for the rescue system?”

Here’s how I did it.

First, let’s find out how driver updates are usually applied. The code is here:

https://github.com/openSUSE/installation-images/blob/master/data/root/etc/inst_setup#L84-L87

We need just these three lines:

for i in /update/[0-9]*/inst-sys ; do
  [ -d "$i" ] && adddir "$i" /
done

linuxrc downloads the driver updates and stores them in an /update directory. One (numbered) subdirectory for each update.

It obviously uses some adddir script. So we’ll need it as well. Luckily, it’s not far away:

https://github.com/openSUSE/installation-images/blob/master/data/root/etc/adddir

Next, we’ll have to find the spot where the rescue system is set up. It’s done in this script:

https://github.com/openSUSE/installation-images/blob/master/data/initrd/scripts/prepare_rescue

Let’s do some copy-and-paste programming and insert the above code near the end of the script. It then might look like this

# driver update: add files to rescue system
if [ -d /mounts/initrd/update ] ; then
  cp -r /mounts/initrd/update /
  for i in /update/[0-9]*/inst-sys ; do
    [ -d "$i" ] && /mounts/initrd/scripts/adddir "$i" /
  done
fi

Some notes:

  • You have to know that prepare_rescue is run as the last thing before we exec to init. So everything is already in place, the left-over files from initrd are mounted at /mounts/initrd and will be removed at the end of the script.
  • This means we have to copy our updates into the new root directory, else they will be lost.
  • Also, we plan to make the adddir script available at /scripts/adddir by our driver update (see below).

Now let’s create the driver update:

mkdud --create dud_for_rescue.dud \
  --dist tw --dist leap42.1 --dist leap42.2 --dist sle12 \
  --name 'Apply DUD also to rescue system' \
  --exec 'cp adddir prepare_rescue /scripts' \
  adddir prepare_rescue

Here’s what this call does, line-by-line:

  • the fix works for all current SUSE distributions, so let’s support them
  • give the driver update some nice name
  • this command is run right after the driver update got loaded; we copy the scripts out of the driver update to their final location
  • add adddir and our modified prepare_rescue script

Here is the result: dud_for_rescue.dud.

Now, back to the original problem: how to use this to update a package in the rescue system? That’s easy:

mkdud --create new_btrfs.dud \
  --dist sle12 \
  dud_for_rescue.dud btrfsprogs.rpm

creates a driver update (for SLE12) that updates btrfsprogs also in the rescue system.

How we run our OpenStack cloud

January 23rd, 2017 by

This post it to document how we setup cloud.suse.de which is one of our many internal SUSE OpenStack Cloud deployments for use by R&D.

In 2016-06 we started the deployment with SOC6 on 4 nodes. 1 controller and 3 compute nodes that also served for ceph (distributed storage) with their 2nd HDD. Since the nodes are from 2012 they only have 1gbit network and spinning disks. Thus ceph only delivers ~50 MB/s which is sufficient for many use cases.

We did not deploy that cloud with HA, even though our product supports it. The two main reasons for that are

  • that it will use up two or three nodes instead of one for controller services, which is significant if you start out with only 4 (and grow to 6)
  • that it increases the complexity of setup, operations and debugging and thus might lead to decreased availability of the cloud service

Then we have a limited supply of vlans even though technically they are just numbers between 1 and 4095, in SUSE we do allocations to be able to switch together networks from further away. So we could not use vlan mode in neutron if we want to allow software defined network (=SDN) (we did not in old.cloud.suse.de and I did not hear complaints, but now I see a lot of people using SDN)
So we went with ovs+vxlan +dvr (open vSwitch + Virtual eXtensible LAN + Distributed Virtual Router) because that allows VMs to remain reachable even when the controller node reboots.
But then I found that they cannot use DNS during that time, because distributed virtual DNS was not yet implemented. And ovs has some annoying bugs are hard to debug and fix. So I built ugly workarounds that mostly hide^Wsolve the problems from our users’ point of view.
For the next cloud deployment, I will try to use linuxbridge+vlan or linuxbridge+vxlan mode.
And the uptime is pretty good. But it could be better with proper monitoring.

Because we needed to redeploy multiple times before we got all the details right and to document the setup, we scripted most of the deployment with qa_crowbarsetup (which is part of our CI) and extra files in https://github.com/SUSE-Cloud/automation/tree/production/scripts/productioncloud. The only part not in there are the passwords.

We use proper SSL certs from our internal SUSE CA.
For that we needed to install that root CA on all involved nodes.

We use kvm, because it is the most advanced and stable of the supported hypervisors. Xen might be a possible 2nd choice. We use two custom kvm patches to fix nested virt on our G3 Opteron CPUs.

Overall we use 3 vlans. One each for admin, public/floating, sdn/storage networks.
We increased the default /24 IP ranges because we needed more IPs in the fixed and public/floating networks

For authentication, we use our internal R&D LDAP server, but since it does not have information about user’s groups, I wrote a perl script to pull that information from the Novell/innerweb LDAP server and export it as json for use by the hybrid_json assignment backend I wrote.

In addition I wrote a cloud-stats.sh to email weekly reports about utilization of the cloud and another script to tell users about which instances they still have, but might have forgotten.

On the cloud user side, we and other people use one or more of

  • Salt-cloud
  • Nova boot
  • salt-ssh
  • terraform
  • heat

to script instance setup and administration.

Overall we are now hosting 70 instance VMs on 5 compute nodes that together have cost us below 20000€

Live USB improvements

August 14th, 2016 by

Tools to create multi distribution bootable USB stick got couple of new improvements and features.

live-usb-gui now offers choice of scripts to use, depending in your need you can either use live-fat-stick with vfat partitioned stick or live-grub-stick script which works with any partition format supported by grub2 including vfat, must be used if you have iso bigger than 4G.

(more…)

Tally ERP 9 on Linux

July 21st, 2016 by

Recently we implemented Tally ERP 9 solution for Antico Pumps. That itself is not interesting, the interesting part is they are using LTSP Fat client system on openSUSE. They have only one server from which all their client computers boot over the network, the clients do not have hard disk, client OS with all softwares they need including wine(Tally is Windows only software), as well as users’ data resides on the server. Once the client boots all the local resources are used so single low power server can be used to serve many clients.

Tally multiuser is served from a Samba share  on a NAS device, Tally folder is copied to samba share and path to Tally Data is changed so that it points there. Everything they need including printing and export(CSV) works from all clients. Same way Tally can be run on standalone computers. Neither Tally, Wine or openSUSE are modified for getting it working as it would under Windows environment.

Oh hell! It’s open source project

August 18th, 2015 by

This was supposed to be survival guide to open source and free software world but I realized I’m not that good citizen of open source world that I can give any advises to others. What I’m giving are hint’s what I have learn along the years. So why I’m not very good open source citizen? I read several projects mail lists but only topics that I like and make contributions but not with rage but when I feel like it. I answer few mails that I receive about open source in limited time frame that I have (which sometimes can be too long) and use many projects with out giving anything back. I prefer license to steal and freedom as value not as in beer.
(more…)