Home Home > Systems-management
Sign up | Login

Deprecation notice: openSUSE Lizards user blog platform is deprecated, and will remain read only for the time being. Learn more...

Archive for the ‘Systems Management’ Category

Product Creation with the openSUSE Build Service

February 11th, 2009 by

Product

First of all, what is a “Product”? The openSUSE Wiki has the following statement on the Product Definition Article:

“A product is a defined set of packages plus extra information”

In the most simple interpretation this means a set of RPM files plus a set of metadata which contains the installation kernel, information about the installation work flow, hardware detection, languages, licenses, slide shows and the like.

Thus the most simple product imaginable is a basic set of RPM files for the system to be installed and a minimum set of metadata: an installation system consisting of kernel, initrd and the packages necessary for installation.

(more…)

Registering your shiny new HP Mini-Note 2133

February 6th, 2009 by

So you just got an HP Mini-Note 2133 pre-loaded with SLED 10?  Great, right?

Well…  It’s not been so great for a lot of people.  It seems that HP simply put this laptop together, half-assed a SLED load and sent it out into the wild.  I’ve had a ton of problems with it, the two major ones being that I couldn’t register the machine with the Novell Customer Center (not even with my site license) it ships with a non-working wireless card.

My wifi fix was simple, buy a new usb wifi dongle…  Registration, however, was a little easier to fix (after some wailing, gnashing of teeth, and chat in #opensuse-GNOME… thanks captiain_magnus!).

If you attempt to use YaST to register you copy of SLED on the 2133, you’ll be re-directed to a “special” Novell Customer Center login.  It’s a little different than the normal one in that it wants an HP license, not any other SLED license you may have.  The biggest difference, however, is that it’s broke.  It simply refreshes the page when you click submit and sends nothing to Novell.

They’re pretty sneaky about hiding your license number as well.  It happens to be on your restore DVD.  It’s located on the right hand side below the HP logo and the “2133” text.  It’s in a series something like NNNNNN-XNN, where N’s are numbers and X is some letter.

To get around the registration bug, have your license number handy and fire up your terminal.  Use ‘sudo’ or just ‘su to root and issue the following command:

suse_register -n -a serial-hp=NNNNNN-XNN

Where “NNNNNN-XNN” is your registration code.  Sit back and wait, it took almost 20 minutes for this command to finish for me and you’ll receive absolutely no indication that it’s functioning.  Once it’s done, you’ll simply be returned to your prompt.  Fire up YaST or your favorite terminal emulator and check your repositories.  You should now have a Novell repository added.

Enjoy!

Application Icons in the Package Selector

February 4th, 2009 by

Desktop files contain a lot of information about KDE/Gnome/X11 applications (e.g. names, icons).

Displaying this data in the package selector allows to provide a more detailed package description. The user can easily see which applications are included in an installed package.

Running these applications via mouse click is technically possible, but unfortunately security concerns don’t allow it. Please let me know if you have an idea how to solve this issue.

YaST WEB

February 3rd, 2009 by

Aim

First of all we want to provide an general web based interface with the
functionality which is already provided by the YaST command line interface.

This API is based on the REST (Representational state transfer) architecture. This is a
simple interface which transmits domain-specific data over HTTP.
Please have a look to

http://en.wikipedia.org/wiki/Representational_State_Transfer

for more information about REST.

The second aim is to provide a YaST Web UI which can be used by every
web browser.

The current state of the project is an existing YaST-Webservice on the
host side which provides the REST based interface.
On the client side we have the concerning YaST-Webclient which can be
used be any web browser.

YaST-Webservice and YaST-Webclient are running as a webserver
(currently lighttpd) on different or even the same computer.

So the aim is to configure a host via the internet in a simple and
safety way.

How does it work ?

YaST Web

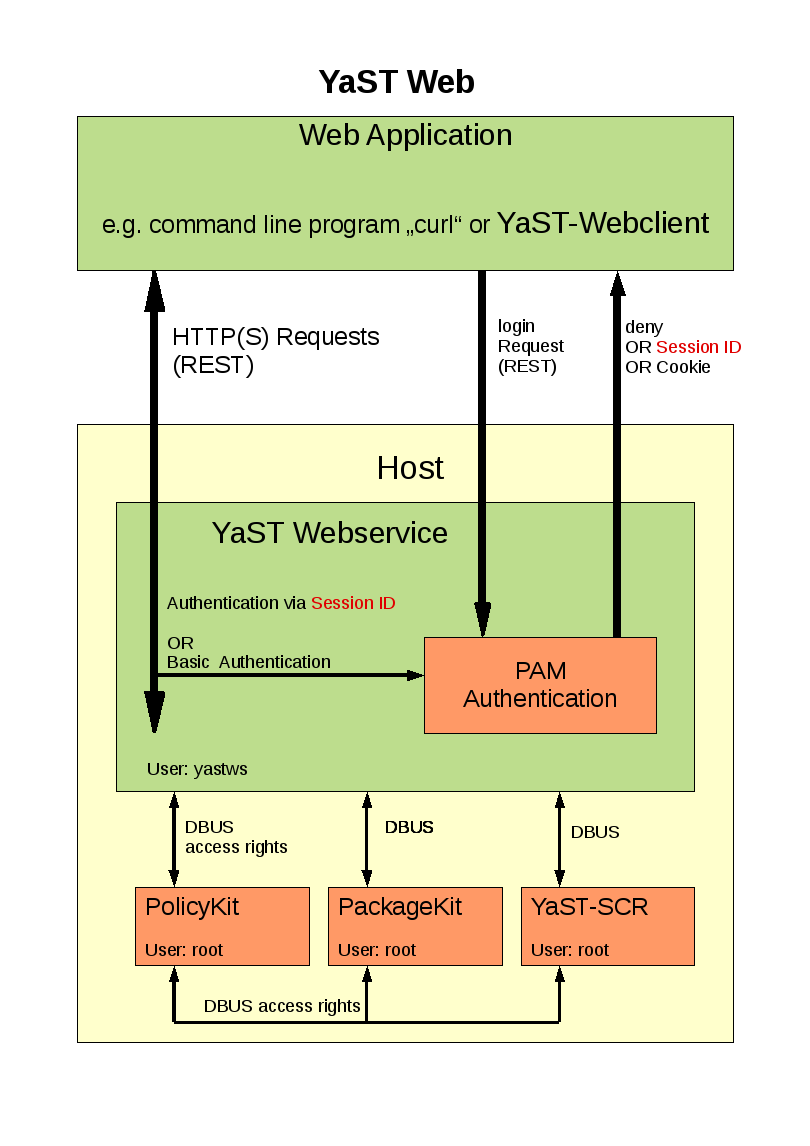
The YaST Webclient communicate via HTTP(s) with the YaST Webservice. The
user has to authenticate ( username, password ) to the host via PAM
(Pluggable Authentication Modules) which is available on every linux system.

The YaST Webclient sends requests ( e.g. create a user, install patch) to
the YaST Webservice. This service checks if the user has the right to
execute this request via PolicyKit. For each kind of request there is
PolicyKit rule defined. These rights has to be granted to the concerning user.

After permission check the request will be send via DBUS to the SCR agent of
YaST. The return value will be given back to YaST-Webclient in XML or JSON
format.

Patches will be handled by PackageKit. These requests will also be sent from
the YaST Webservice to PackageKit via DBUS.

How to get it ?

Have a look the openSUSE buildservice project

YaST Webservice (home:schubi2)

There are all needed packages for version openSuSE 11.1 and above.

As some additional packages (e.g. lighttpd) are needed which are not on openSuSE 11.1 you should add a
repositories ( e.g. factory ) in order to provide these packages.
The simplest way for installation would be to use zypper:

zypper in yast2-core-2*.rpm
zypper in ruby-dbus-*.rpm
zypper in yast2-webservice-*.rpm
zypper in yast2-webclient-*.rpm

How to use the YaST-Webservice

After you have installed these packages you can start the YaST-Webservice-Server with

rcyastws start

The server is running as “localhost:8080” with which you can connect with a web browser:

http://localhost:8080

YaST-Webservice

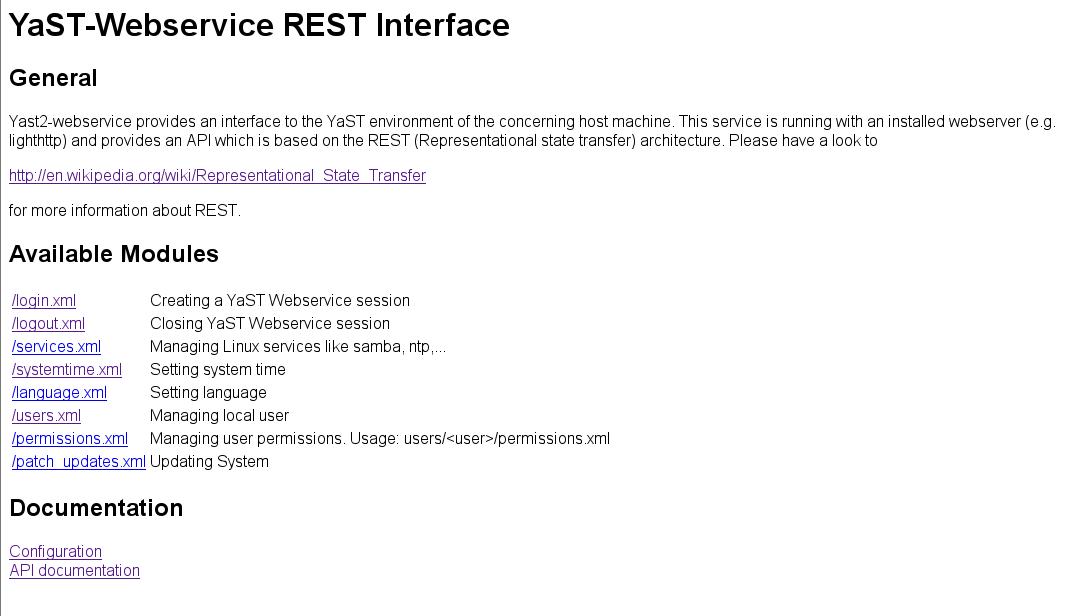
This “pure” web page shows the available modules which can be used via the REST interface.

This REST API is described under

http://localhost:8080/doc_interface.html

Additional configuration stuff like

– setup Hostname and Port
– setup HTTPS connection
– granting permissions for an single user
– AVAHI support

can be found here:
http://localhost:8080/doc_config.html

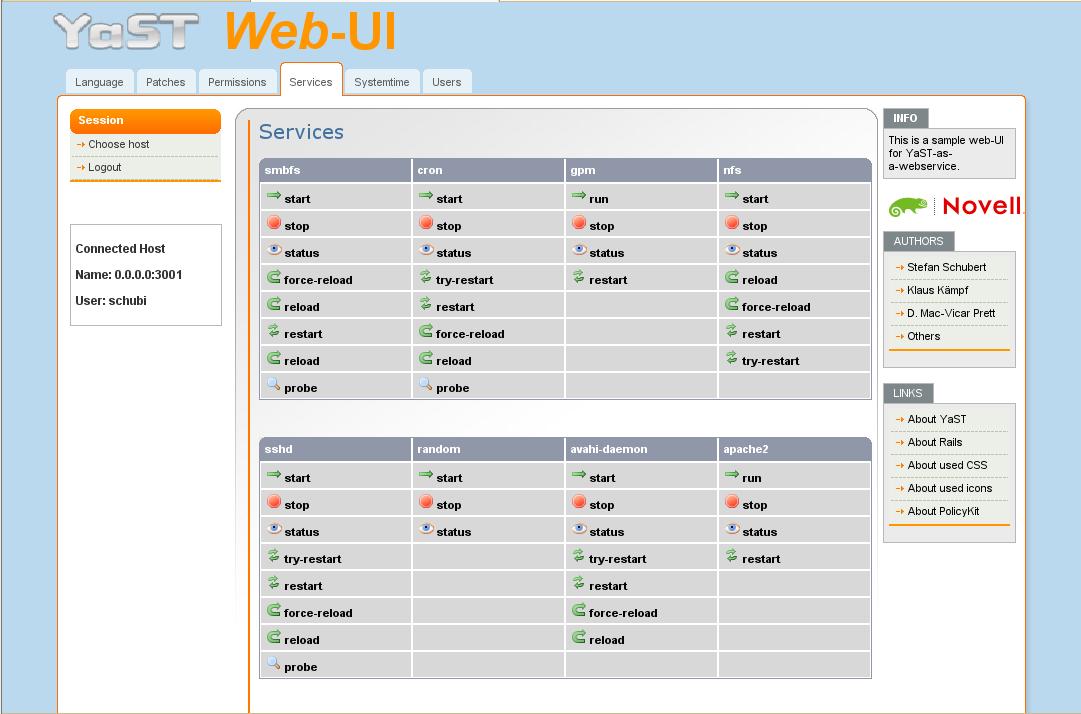
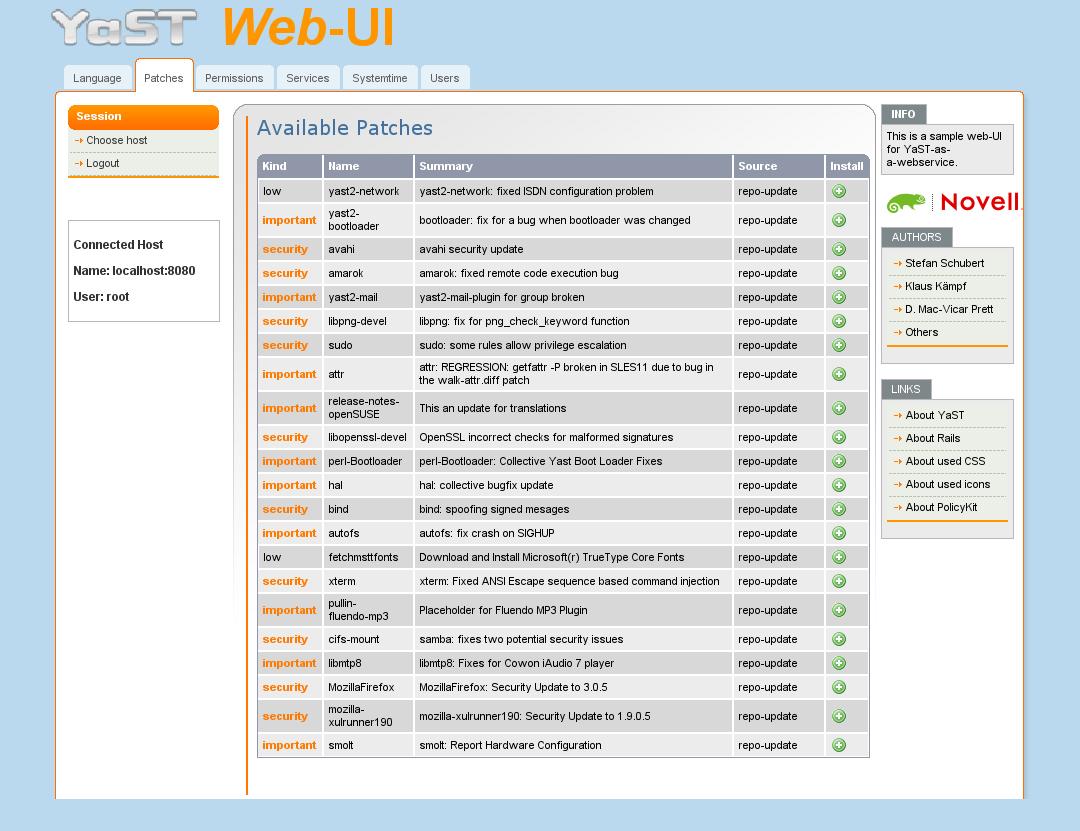
How to use the YaST-Webclient

After you have started the YaST-Webservice-Server you also can start the YaST-Webclient:

rcyastwc start

Now you can use any browser and connect with http://<name of your computer> to your
computer.
The default rights of the YaST Webservice are set to root only. So you can login with the root password
of that machine.

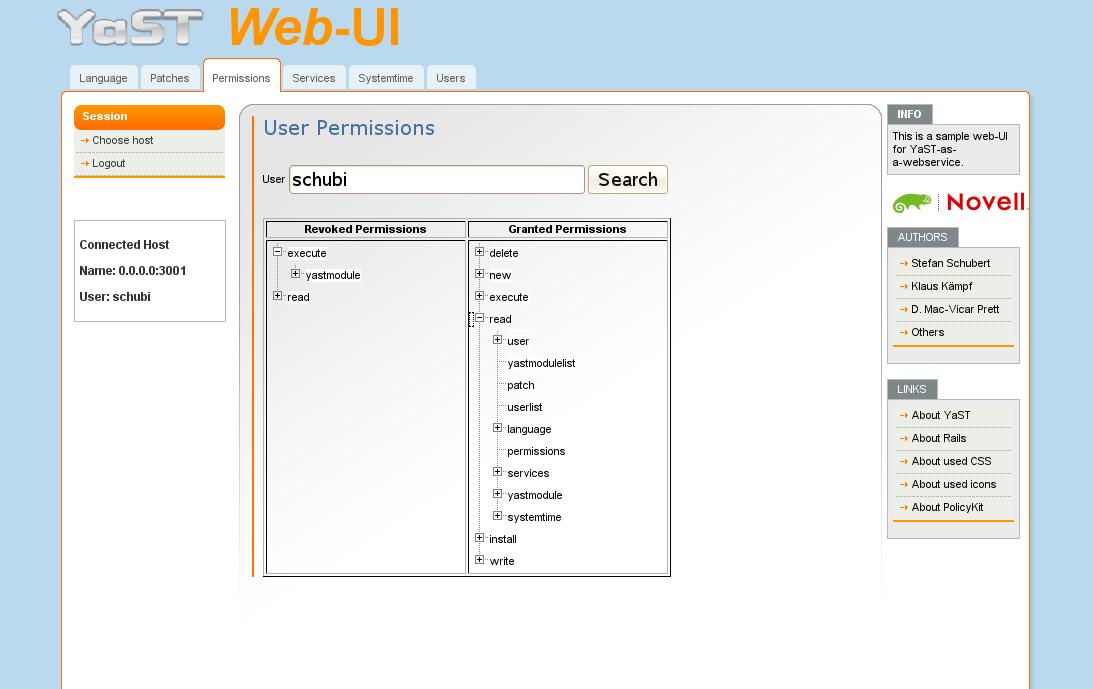
Following features are implemented:

– setting languages
– setting system time
– setting user permissions
– installing patches
– managing local users
– export user SSH-keys
– starting,stopping,status,… of services
– configuration of ntp server

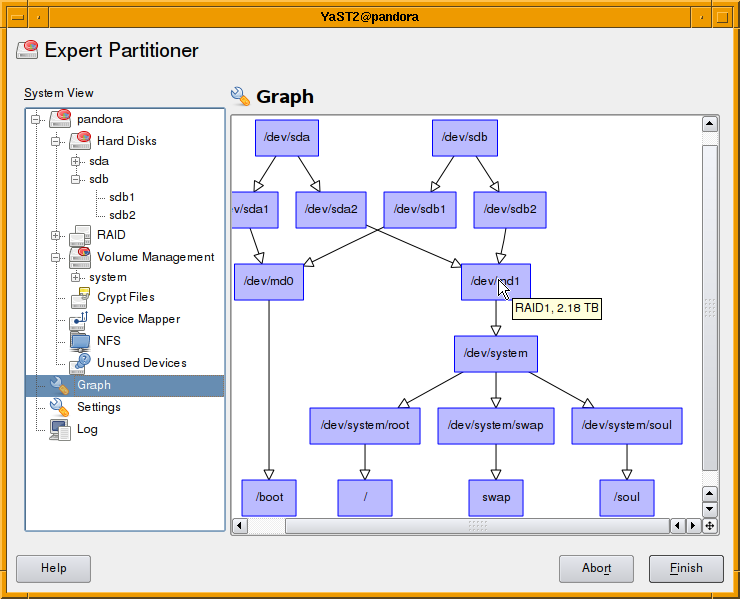
Have a look to the following screen shot it order to give an overview how it looks like:

System Services

Available Patches

User Permissions

Known Bugs
-The first call of an menue entry will be slow cause an additional process will be started.
The second one should be much more faster 🙂
-Permissions will sometime not be shown correctly (just click “search” again) Bug 470645

Writing wrapper packages for server applications or a generic YaST module?

January 27th, 2009 by

As we get more and more PHP-, Perl- and other applications like openSIS, Koha, Moodle, … in the Education repository, the question turns up, how to package those applications “the right way”.

A normal user, who wants to use one of these apps, might just choose to install the package and has the problem how to proceed afterwards. openSUSE sadly has no “post config” scripts like Debian based distributions – even the SuSEconfig scripts are deprecated. So all a packager can currently do is:

  1. write a README.SuSE (which is already the case for many packages) and place it in /usr/share/doc/packages/<packagename>/README.SuSE explaning how to proceed
  2. sugget what the user always wants to do and do it via %post-script after the installation of the RPM
  3. combine 1&2 and point the user to a script in the README.SuSE 🙂
  4. write a YaST module which can be started during installation or afterwards
  5. any other option I missed (please inform me!)

For the Education project, I’m currently thinking about two ways to make the life of the admins easier.

First: think about “wrapper packages” around the normal packages. I’ll take moodle as example. The normal moodle package installs the php-scripts, an apache configuration and some other config stuff – but will not setup the complete moodle instance. So the user has to install the mysql database himself. An additional wrapper package can do this for him. This package comes with a SQL-Dump of the current moodle version (therefore requires the exact moodle version), and uses a stored mysql-root password to create a new database and insert the database-dump. If needed (for example: the user enables the “user LDAP-Auth wherever possible” checkbox in a (to be written) yast-edu module), additional tasks can be triggered by the wrapper package.

We can also think about calling a “generic” YaST module after installation of such a “needs postconfiguring” package. If we define a place (say: /var/adm/YaST/postinstall/) where packages can place a file containing some important questions to configure the application, and someone writes a YaST module which can be started, this would perhaps be “very cool”. If the user has entered his values, the YaST module can start one or more scripts (coming with the package) and feeds it with the entered values. The biggest questions for this solution:

  1. When should this YaST module be started? IMO it could be enough to let the user start it manually and select the package he wants to configure. => No adaptions of the current workflows is needed. But perhaps there are other options (like calling it via “SuSEconfig”)?
  2. Who can write such a module?
  3. Who defines the config syntax?

Think about a file like this:

<package name=”moodle”>
<questionpack type=”string” action=”/usr/share/moodle/scripts/install_database”>
<question arg=”1″ type=”string”>What’s the database password?</question>
<question arg=”2″ type=”string”>What should be the name of the new database (suggest: moodle)?</question>
<question arg=”3″ type=”string”>What’s the username of the new database user?</question>
<question arg=”4″ type=”string”>What’s the password of the new database user?</question>
</questionpack>

<questionpack action=”/use/share/moodle/scripts/configure_auth_backend” type=”selectbox”>
<question arg=”1″>What auth-backend should be used?</question>
<answer value=”1″>ldap</answer>
<answer value=”2″>mail</answer>
<answer value=”3″>passwd</answer>
</questionpack>
</package>

I think, there’s room for many enhancements in this area – what do you think ?

Should/Could we produce something like a “Windows-Installer” for openSUSE? Or is it enough to provide special “wrapper packages”? Or is “what was hard to write, should be hard to install” still a valid answer?

Tabbed Browsing for Packages – Follow-up

January 27th, 2009 by

In last Friday’s blog entry about tabbed browsing for packages, I had asked for comments and opinions. There were quite a number of them, all of them very constructive. Thanks to all who participated!

The overall feedback was positive, welcoming the change. To us, this means that we will indeed merge that code branch (yes, it’s largely working already, it’s not just a mock-up) to the main development line, and you will see that new user interface appear in the next versions of the yast2-qt-pkg package on FACTORY.

There were a number of concerns and side issues that I’d like to summarize here:
(more…)

Tabbed Browsing for Packages

January 23rd, 2009 by

There are many approaches to managing software packages. Some users like to use command line tools like zypper. Others prefer a GUI tool like the YaST2 package selector. And even within such a GUI tool, there are many ways to deal with the packages you’d like to install, update or remove: Install a bunch of packages that make up a functionality like “KDE desktop” or “web development”, find one specific package with a known name, or just look through packages that are available. That’s why there are different filter views for those different approaches.

How do you select any of those filter views? In previous versions of the (Qt) package selector, we used to have a combo box to do that:

That’s somewhat unusual, and there have always been critics who claimed that we should use tabs instead. Our standard reply was always that this would not really be helpful because there are so many of them; you’d run out of screen space quickly, and with the number of filter views we have, this would look overwhelming and confusing:

Ugh… not good. Not even at this screen resolution. Now think about 800×480 netbooks and more verbose languages like German, French or Hungarian. No way to make this fit on the screen. And left/right scroll buttons are the last thing you want for tabs.

So, what else could we do?
(more…)

Smolt Popup

January 23rd, 2009 by

kupdateapplet shows a popup that asks the user to send his/her hardware profile to the smolt project.

I think kupdateapplet isn’t the appropriate application for showing this notification because smolt has nothing in common with update installation.
I’ve written a tiny python-qt script that shows the smolt popup.

You can find a package called smolt-qt in my build service home. Feel free to test and comment!

Controlling your minions with Ruby and Capistrano

January 21st, 2009 by

Welcome to yet another installment of our Ruby mini-series.  Capistrano (http://capify.org/) is a DSL written in Ruby for automating common tasks.  While Capistrano is more often used for Rails deployment, it can easily be used for system automation as well.

A while back, I put together a presentation for the local Ruby user’s group.  The presentation covers a very brief intro to Capistrano for simple system automation.  You can download it here.  I’m aware of at least one typo (a missing single quote) in the slides, there may be others.

Rather than repeat myself here, I’ll let the PDF do the talking.  For the official documentation, see http://capify.org/getting-started

Graph of Storage Devices

January 19th, 2009 by

With openSUSE 11.1 on the road we developers can use some time for new ideas. One idea on my mind for month was to show the dependencies of storage devices in a graph. Using graphviz and QGraphicsScene a first version was running within few days.

It’s far from finished. Some items still missing are:

  • Use different shapes and colors for different devices types.
  • Some basic user-interaction.

Will be available in Factory within the next weeks. Further improvements are welcome.