Home Home > Systems-management
Sign up | Login

Deprecation notice: openSUSE Lizards user blog platform is deprecated, and will remain read only for the time being. Learn more...

Archive for the ‘Systems Management’ Category

Highlights of YaST Development Sprint 74

March 29th, 2019 by

It took only 73 sprints to complete all YaST features, and there are none left to do. That’s what you might think after reading this article, because we worked on no features, just bug fixes.

It might be related to an upcoming release of SLE 15 SP1. For its openSUSE sibling we have put together a recap of YaST features in the upcoming openSUSE Leap 15.1 (scheduled for May 2019), since Leap 15.0 (May 2018).

No more locale errors during Kubic runtime

Did you know that an installed Kubic (the certified Kubernetes distribution & container-related technologies built by the openSUSE community) only has the American English locale (en_US) available? That is because it intends to be as small as possible (you can run du -h /usr/share/locale if you are curious enough).

However, YaST allows you to change the language and the keyboard layout at the very beginning of the installation process, which will be persisted as the default locale in the installed system. This is the reason for those locale errors mentioned above. Until now. Because we introduced some changes during this sprint to allow that the chosen language will be used only during the installation in case the product needs it.

So, from now on you can go through the installation of Kubic in your preferred language without those errors in the final system and, of course, preserving the selected keyboard layout. Not bad, huh? 😎

Various Fixes

Repositories for add-ons would be marked as disabled after the installation has finished. We have fixed this bug#1127818.

When registering your SUSE Linux Enterprise with the SUSE Customer Center or its proxy such as the SUSE Subscription Management Tool, a network timeout can occur. Formerly you had to use the Back and Next buttons to try again but we have added a Retry button for that.

When creating a new partition or editing an existing one, the widget for the partition type would list the types in a seemingly random order. We have made this widget more boring.

Highlights of YaST Development Sprint 73

March 14th, 2019 by

As (open)SUSE releases are approaching, the YaST team is basically in bug squashing mode. However, we are still adding some missing bits, like the bcache support for AutoYaST. Additionally, there are some interesting improvements we would like to let you know about:

  • AutoYaST support for using Btrfs subvolumes as user home directories.
  • Improved Certificates management in the registration module.
  • Correct detection of DASDs when using virtio-blk.
  • Proper handling of the resume option in the bootloader module.
  • Display fonts and icons properly during installation.

And, as a bonus, some insights about a YaST font scaling problem on the GNOME desktop (spoiler: not a YaST bug at all).

Adding bcache support to AutoYaST

A few days ago, support for bcache landed in the YaST Partitioner. In a nutshell, bcache is a caching system that allows to improve the performance of any big but slow disk (so-called backing device) by using a faster and smaller disk (caching device).

The way to describe a bcache in AutoYaST is pretty similar to how a RAID or a LVM Volume Group is described. On one hand, you need to specify which devices are going to be used as backing and caching devices by setting bcache_backing_for and bcache_caching_for elements. And, on the other hand, you need to describe the layout of the bcache device itself. As you would do for a RAID, you can partition the device or use it as a filesystem.

The example below creates a bcache device (called /dev/bcache0) using /dev/sda to speed up the access to /dev/sdb.

<partitioning config:type="list">
    <drive>
      <type config:type="symbol">CT_DISK</type>
      <device>/dev/sda</device>
      <disklabel>msdos</disklabel>
      <use>all</use>
      <partitions config:type="list">
        <partition>
          <!-- It can serve as caching device for several bcaches -->
          <bcache_caching_for config:type="list">
            <listentry>/dev/bcache0</listentry>
          </bcache_caching_for>
          <size>max</size>
        </partition>
      </partitions>
    </drive>

    <drive>
      <type config:type="symbol">CT_DISK</type>
      <device>/dev/sdb</device>
      <use>all</use>
      <!-- <disklabel>none</disklabel> -->
      <disklabel>msdos</disklabel>
      <partitions config:type="list">
        <partition>
          <!-- It can serve as backing device just for one bcache -->
          <bcache_backing_for>/dev/bcache0</bcache_backing_for>
        </partition>
      </partitions>
    </drive>

    <drive>
      <type config:type="symbol">CT_BCACHE</type>
      <device>/dev/bcache0</device>
      <bcache_options>
        <cache_mode>writethrough</cache_mode>
      </bcache_options>
      <use>all</use>
      <partitions config:type="list">
        <partition>
          <mount>/data</mount>
          <size>20GiB</size>
        </partition>
        <partition>
          <mount>swap</mount>
          <filesystem config:type="symbol">swap</filesystem>
          <size>1GiB</size>
        </partition>
      </partitions>
    </drive>
  </partitioning>

Using Btrfs Subvolumes as User Home Directories in AutoYaST

In our last report we presented a new feature to allow using Btrfs subvolumes as user’s home directories. However, the AutoYaST support for that feature was simply missing.

Now you can use the home_btrfs_subvolume to control whether a Btrfs should be used as home directory.

<user>
   <encrypted config:type="boolean">false</encrypted>
   <home_btrfs_subvolume config:type="boolean">true</home_btrfs_subvolume>
   <fullname>test user</fullname>
   <gid>100</gid>
   <home>/home/test</home>
   <shell>/bin/bash</shell>
   <uid>1003</uid>
   <user_password>test</user_password>
   <username>test</username>
</user>

Tuning the Bootloader’s resume parameter

The resume parameter is used by the bootloader to tell the kernel which swap partition should be used for the suspend to disk feature. If you are curious enough, you can find the value for your system in the Kernel Parameters tab of the YaST bootloader module. Now that we know what the resume parameter is, it is time to talk about the two issues we have solved recently.

The first problem was related to the way in which YaST determines which swap partition should be used. The bug report mentioned that YaST was taking a swap partition not used by the system that, in addition, was located in a removable device. After checking the code, we found out that we were using a simplistic heuristic which just selected the biggest swap partition available. We improve that logic to use the biggest swap partition which is being used by the system. However, if no suitable partition is found, YaST will fall back to the old behaviour.

The second problem was related to AutoYaST not handling the noresume option properly. When a user specified that option, AutoYaST just blindly added it to the kernel command line keeping the conflicting resume parameter too. Of course, that caused troubles. Now when noresume is given, AutoYaST simply removes all occurrences of the resume parameter.

Registration, OpenSSL and Debugging

These days, handling the SSL certificates in a proper way is key to keep our systems secured. So during this sprint, we invested quite some time improving how certificates are used in our registration module. Basically, we have improved YaST behaviour in these scenarios:

  • Using self-signed certificates.
  • Handling with unknown certificate authorities.

When the custom registration server (the new RMT or the older SMT) use a self-signed certificate, YaST offers to import the server certificate and make it known to the system.

Self-signed Certificate Dialog

On the other hand, when the server SSL key was signed by an unknown key, YaST used to just display an error popup. That was not much helpful as it was not obvious what to do. Now a new popup which contains some hints about how to import the CA certificate manually is displayed. In this case it cannot be imported automatically as YaST does not know where to obtain it, it is not present in the server response.

Unknown Certificate Authority Dialog

The work of importing and activating the certificate is now performed by a YaST script, preventing the user from having to run some complicated (and error prone) commands manually.

These improvement and some other OpenSSL details have been documented in the OpenSSL Certificates documentation. Additionally, if you ever need to debug some SSL related issue, this new OpenSSL Debugging Hints documentation might be useful for you. It covers basic topics, like displaying PEM certificate details, running a testing HTTPS server, creating a self-signed certificate, etc.

Detecting DASDs when using virtio-blk in zKVM

IBM’s S/390 platform has some special features that you will not find in conventional architectures like x86. One of them are DASD hard disks. These devices can be accessed in zKVM using the virtio-blk backend, but DASDs need special handling. For instance, the most common DASD type (CDL ECKD) cannot be used with an MS-DOS partition table nor a GPT, instead a DASD partition table is required. Having this requirement in mind, YaST now detects DASDs using virtio-blk properly and uses the correct DASD partition table.

Improving Fonts and Icons Handling in the Installer

Back some time ago, Stasiek Michalski (a.k.a. as hellcp), one of our very active openSUSE community contributors, spent quite some work for better artwork in YaST. As a result, icons are now used from the desktop’s icon theme whenever possible, and the installer font was changed.

One fallout of the latter was that the font size was now too small for users with diminishing eyesight: That new font has different font metrics, so the default font size was too small. We fixed that during this sprint. See also openSUSE/branding#107.

By the way, the disappearing icons issue was solved too. See libyui/libyui-qt#100 if you are interested in the details.

And just to get this straight: We are welcoming active community members to contribute (thanks again, @hellcp!). There will be some bugs; that’s just natural. We need to cooperate to fix them.

YaST Font Scaling Problem on the GNOME Desktop

This is not really a YaST problem, but of course it was still the natural thing to write a bug report against YaST for this bsc#1123424. And it took us quite a while to figure out what went wrong here.

Basically, when you use the GNOME Tweak Tool to set a Font Scaling Factor that is not a multiple of 0.25, this is completely ignored, and so all Qt5 applications (including the YaST Qt Control Center and all YaST modules) appear with unscaled fonts.

The problem is this GNOME Tweak Tool setting non-integer DPI values (which is already out of spec and thus a bug) and the Qt5 libraries consequently completely ignoring that DPI value. So that GNOME tool should do it correctly, but the Qt5 libs could also handle this more gracefully.

Unfortunately, there is nothing that we can do about this from the YaST side, even though we are aware that this might become reported as a YaST bug again in the future 🙂

Closing Thoughs

As we stated at the beginning of this post, we are basically in bug squashing mode. So, please, if you have some time, give the testing versions of (open)SUSE a try and report as many bugs as you can.

Thanks!

Highlights of YaST Development Sprint 71 & 72

February 27th, 2019 by

We know we owe you a report for the previous development sprint (namely the 71th). But we also know how to compensate that. This week we have not only one, but up to three blog posts to keep you tuned to the YaST evolution.

So let’s start with the summary of what have been implemented and fixed lately. That includes

  • Improvements in the Bcache support in the Partitioner
  • Users home as Btrfs subvolumes
  • Better visualization of Salt formulas in YaST Configuration Management
  • Automatic selection of the needed driver packages
  • Improvements in many other areas like AutoYaST, bootloader, the Partitioner and the storage Guided Setup

You will find links to the other more exhaustive blog posts, about the recently added Bcache support and the revamped Configuration Management module, in the corresponding sections of this report.

Final Improvements in the Bcache Support

During several sprints, we have been detailing our efforts to offer a decent support for the Bcache technology in the YaST partitioner. During this sprint we have implemented what we consider the three final bits:

  • Bache devices without caching
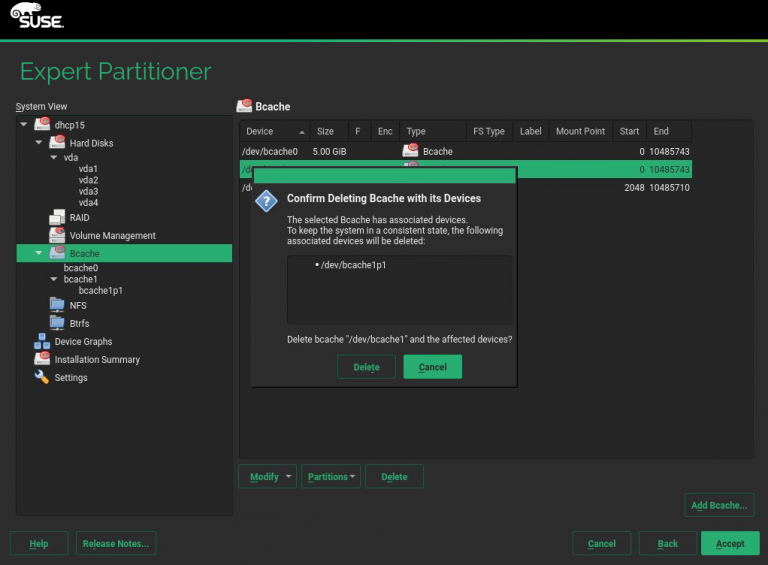
  • Modifying Bcache devices
  • Listing all caching sets

We will now detail this three improvements. But to celebrate that Bcache support looks complete now in the Partitioner, we have published a separate blog post explaining what Bcache is and how to take advantage of that technology using the YaST Partitioner. Enjoy!

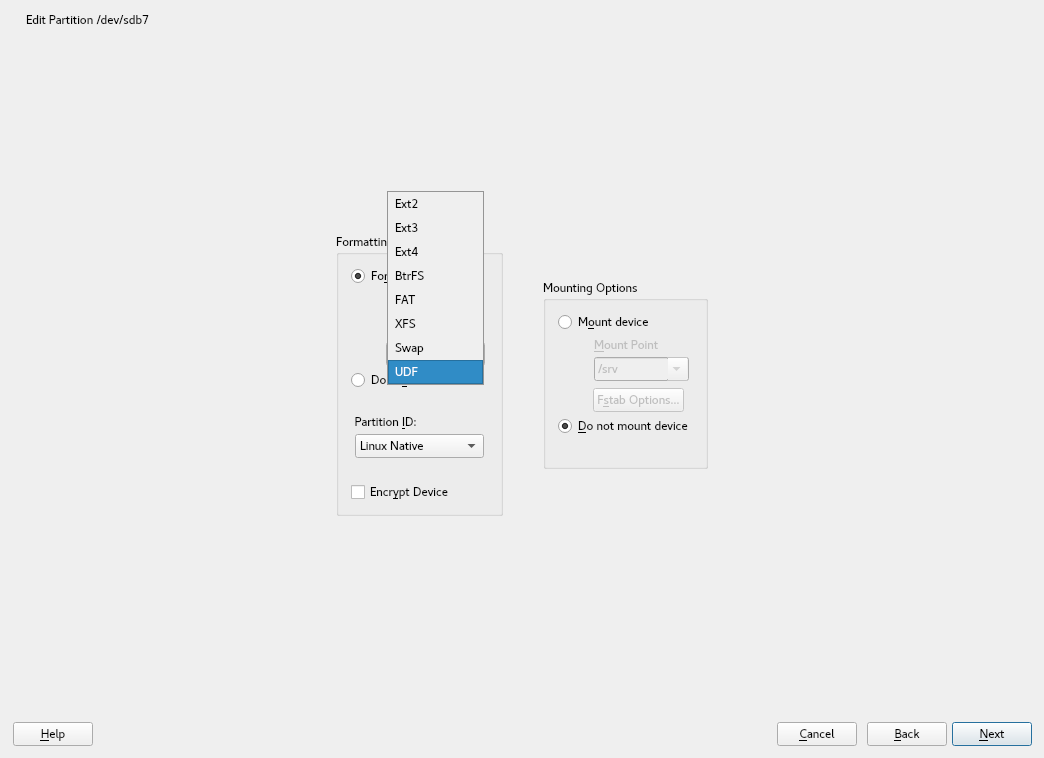
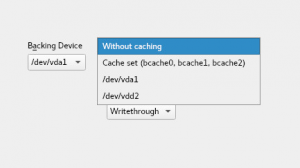
And back to the topic of recent improvements, we should mention that the Bcache technology allows to create a Bcache device without an associated caching one. This is useful if you are considering to use Bcache in the future. In that case you can setup all your slow devices as Bcache backing devices without a cache, leaving open the possibility of adding caching devices later. That is now possible by selecting the new option labeled “without caching” during creation, as shown in the following screenshot.

No caching device in Bcache

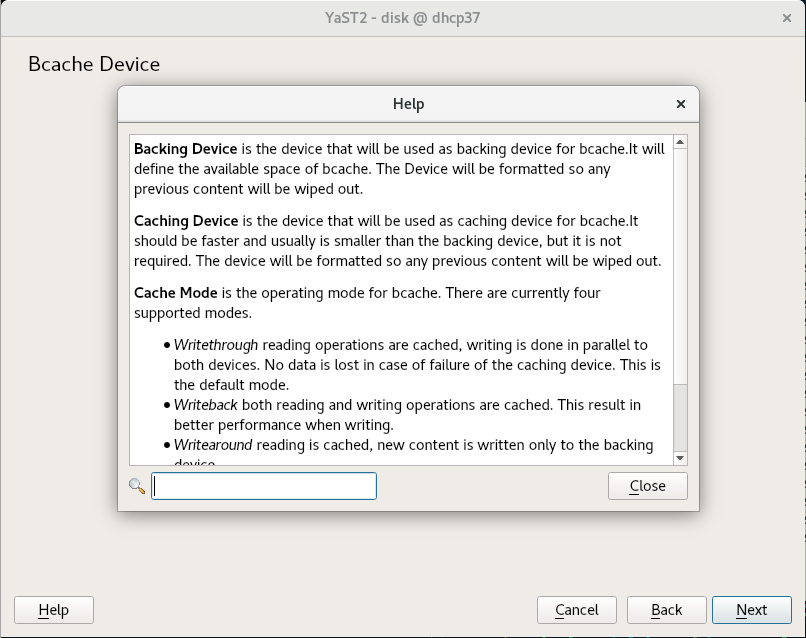
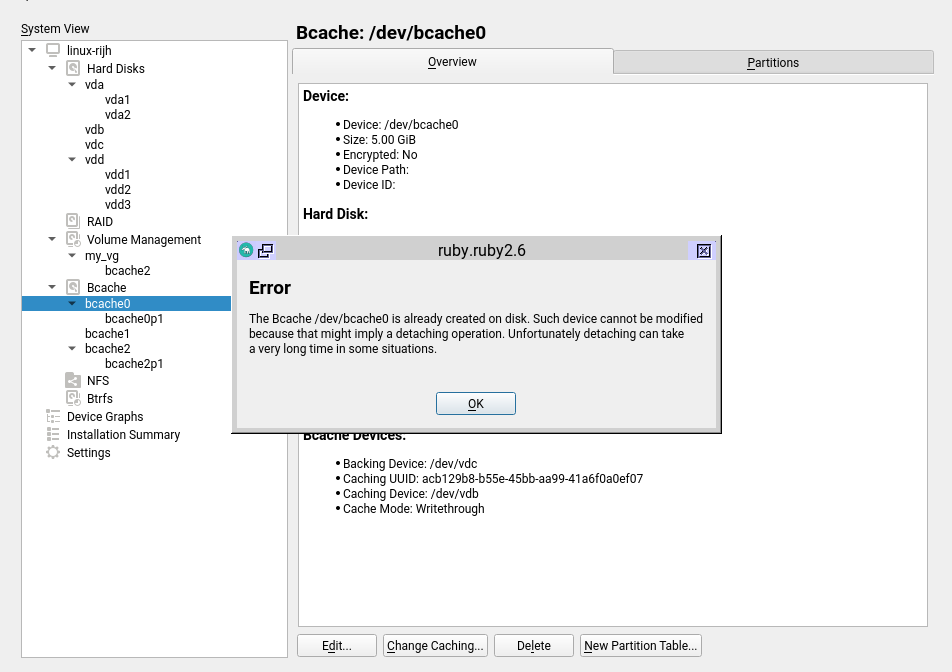
Of course, that’s not much useful without the possibility of modifying a Bcache device. So in the latest sprints we also added a new “Change Caching” button.

New option to modify a bcache

This option will only work for bcaches that do not exist in your system yet (e.g., a bcache that you are creating right now). For existing bcache devices, this option is only available when the bcache has no associated caching device yet. Otherwise, a detaching action would be required, and that could take very long time in some situations.

Avoiding detach operations in bcache

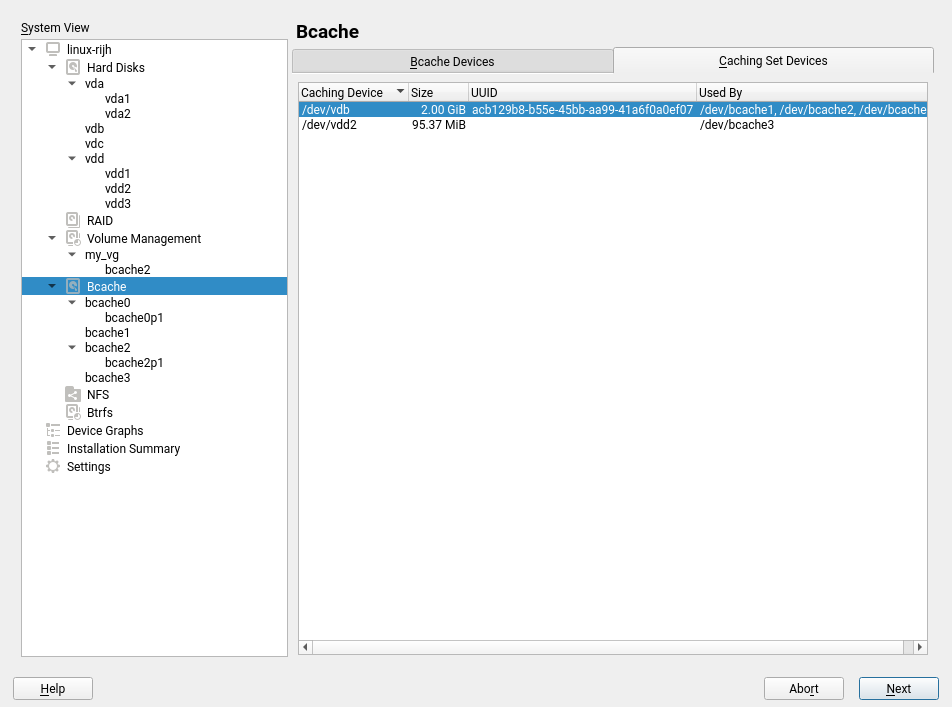
And last but not least (regarding Bcache), now the Expert Partitioner also shows the list of all caching sets in a separate tab (unsurprisingly) titled “Caching Set Devices”. It is only an informative tab, but thanks to it you will be able to check all devices currently used for caching at a quick glance.

List of caching sets

Create the User’s Home as a Btrfs Subvolume

As many (open)SUSE users know, Btrfs offers several advantages over traditional Linux file-systems. One of them is the possibility of using subvolumes to customize the configuration and features of different parts of the same file-system.

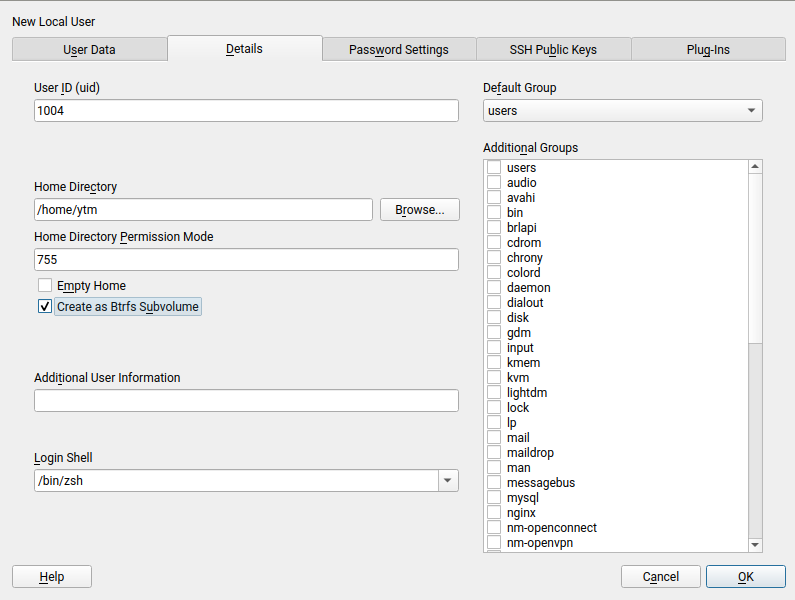
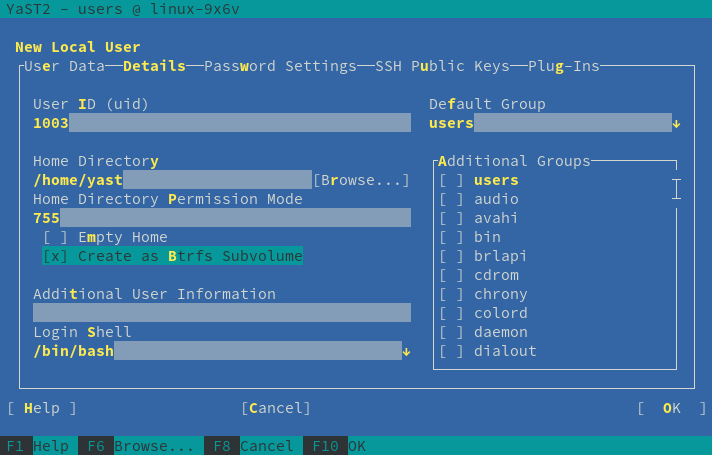
From now on, the YaST Users module allows to create the home path of new users as a subvolume instead of a plain directory, as long as a Btrfs file-system could be found in the system, of course. As simple as checking the “Create as Btrfs Subvolume” option that you will find just below the “Home Directory” field.

Using a Btrfs subvolume as home

In a multi-user system, using Btrfs subvolumes for the home paths of the users can open a world of possibilities. The system administrator can decide to give some users the ability to create snapshots of their corresponding home directories, even automated on every login and/or logout using PAM Snapper. Similar ideas can be applied to a Samba deployment. Moreover, using subvolumes as homes can also be useful to implement per user quotas.

Beyond multi-user systems, fine-tuning the mount options or customizing snapshots and quotas can also be useful for some special system users (e.g. the user associated to a database system).

And all that, as always in YaST, equally easy to configure with the graphical interface and with the text-based one.

Moreover, using subvolumes as homes can also be useful to implement per user quotas, ncurses version

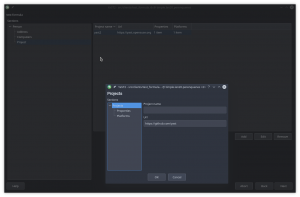
Better Visualization of SUSE Manager Salt Formulas

As we announced on January, we have been working on updating the SUSE Manager Salt Formulas support in YaST Configuration Management to comply with the latest forms specification. As it happens with the Bcache support, we feel we have reached a point in which the feature is polished enough to be shipped in the next (open)SUSE stable releases and to deserve its own separate blog post. So go and enjoy our third blog post of this week, a sneak peak into the marriage of SUSE Manager and YaST, thanks to the magic of Salt Formulas.

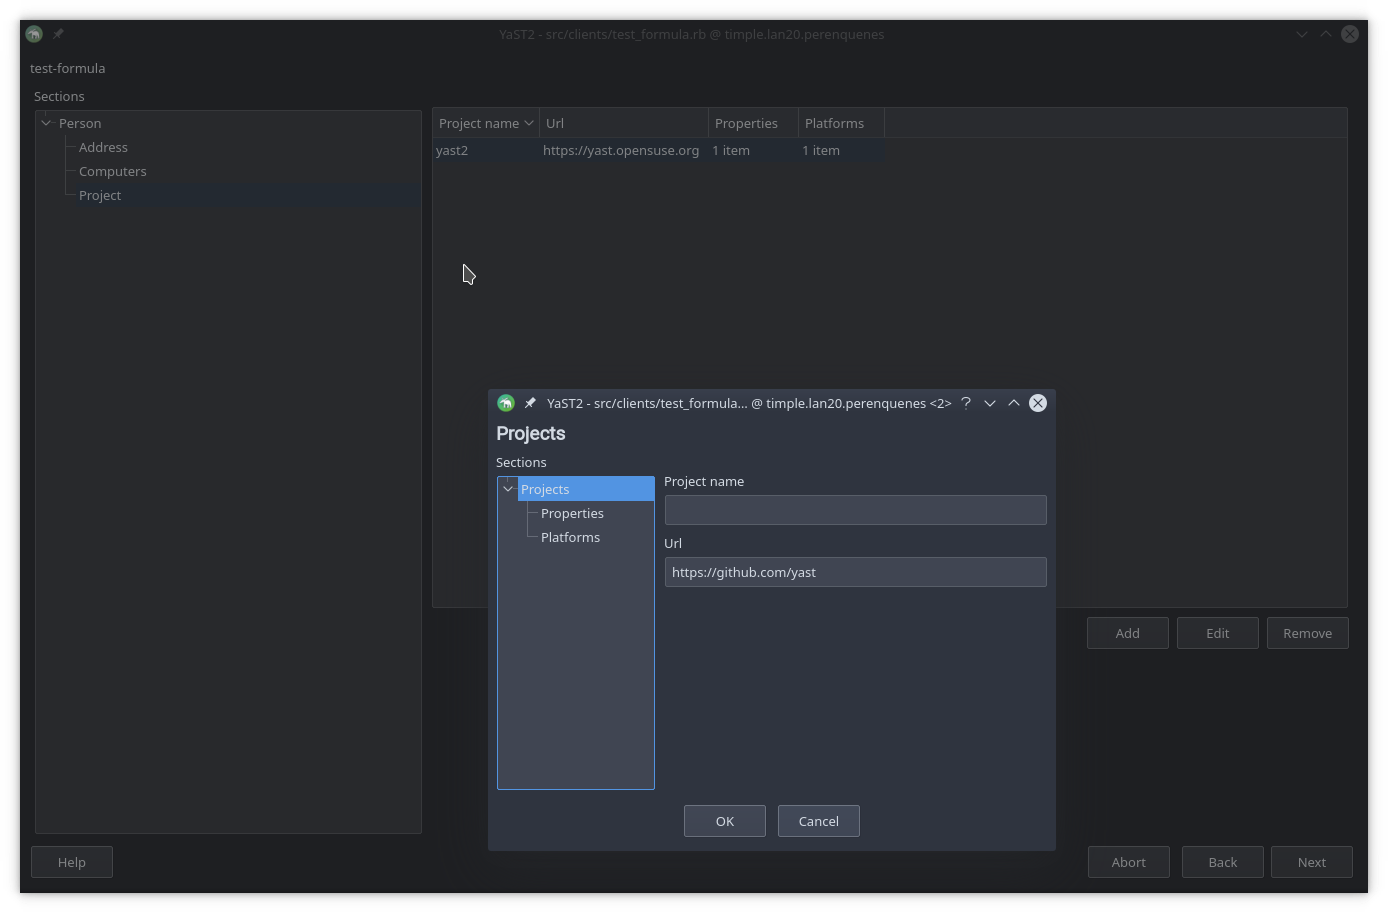
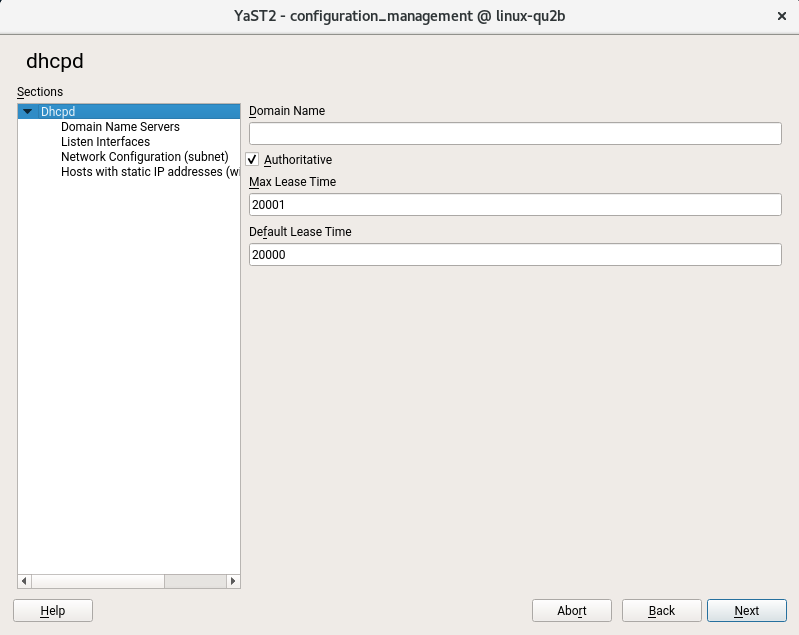
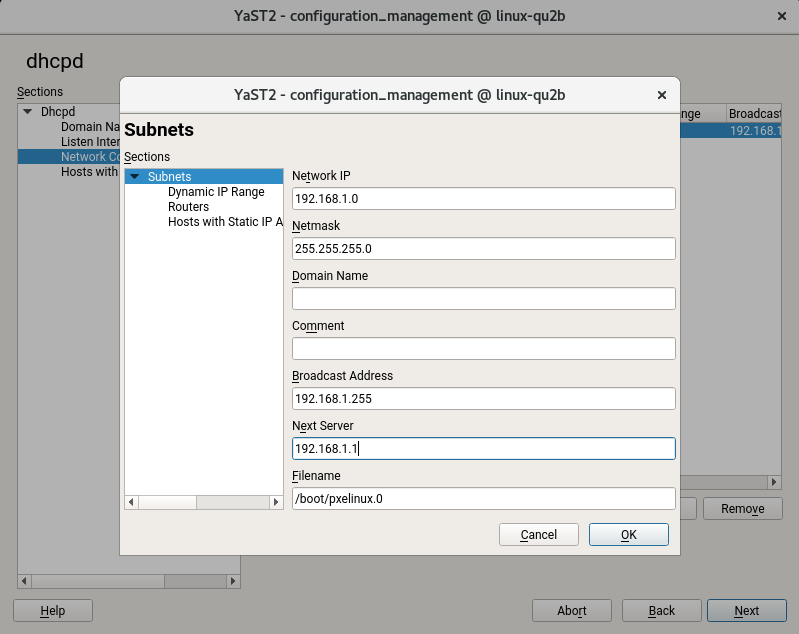
In that regard, we have been recently improving how the forms look like to make them as easy to use as possible. Bear in mind that a form can be quite long and the support for scrolling in YaST2 is quite limited. In order to workaround this problem, YaST2 will display a tree at the left side outlining the structure of the form.

Tree view of long salt formulas

Apart from that, we have solved some known problems, like exporting date/time and numeric values in a correct way or handling missing and default values properly.

Sure there are some details that we like to improve but, for now, what we need is feedback from you. So, if you are interested in such a functionality, please check the mentioned dedicated blog post about the topic and have a look to yast2-configuration-management 4.1.5.

Automatically Selecting the Driver Packages in Installed System

In openSUSE Leap 15.0 and SUSE Linux Enterprise 15, the packages containing drivers needed by the system are installed automatically if they are available during the installation. However, if a repository with driver packages is added later in the installed system then the drivers are not automatically selected to install.

Fortunately, in Leap 15.1 and SLE-15-SP1 the package solver implements a new solver mode in which it selects for installation only the recommended driver packages, without also dragging other non-driver recommended packages into the system.

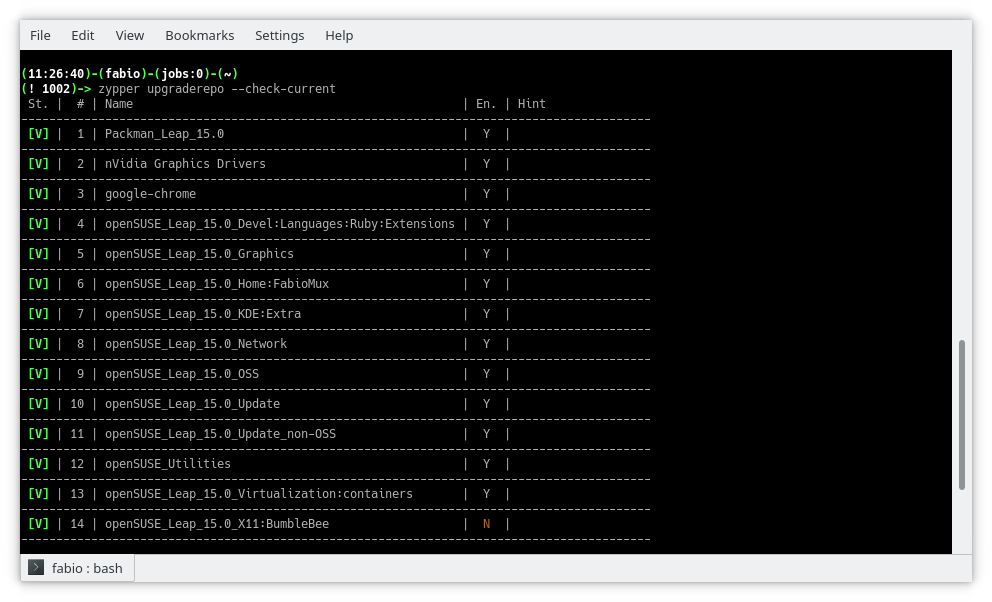
For example, after adding the nVidia driver repository in Leap 15.1 (YaST ➝ Software Repositories ➝ Add ➝ Community Repositories, select “nVidia Graphics Drivers”) and starting the package manager (YaST ➝ Software Management), the respective nVidia driver packages are automatically selected to install if there is a supported nVidia graphics card present in the system. This of course works also for the other driver packages and hardware devices.

Just a last note about automatic selection of recommended driver packages. When running the package manager for the first time in a recently installed openSUSE Leap 15.1, it might automatically select some additional packages to install coming from the Leap OSS on-line repository (which is added automatically the end of the installation). Do not be surprised, that’s actually desired. If you do not want to install those packages simply deselect them, YaST will remember that and it will not select them next time.

See more details in the corresponding documentation.

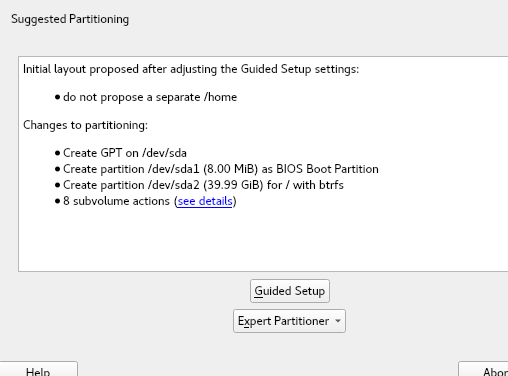
Improved Disk Selection Screen in the Storage Guided Setup

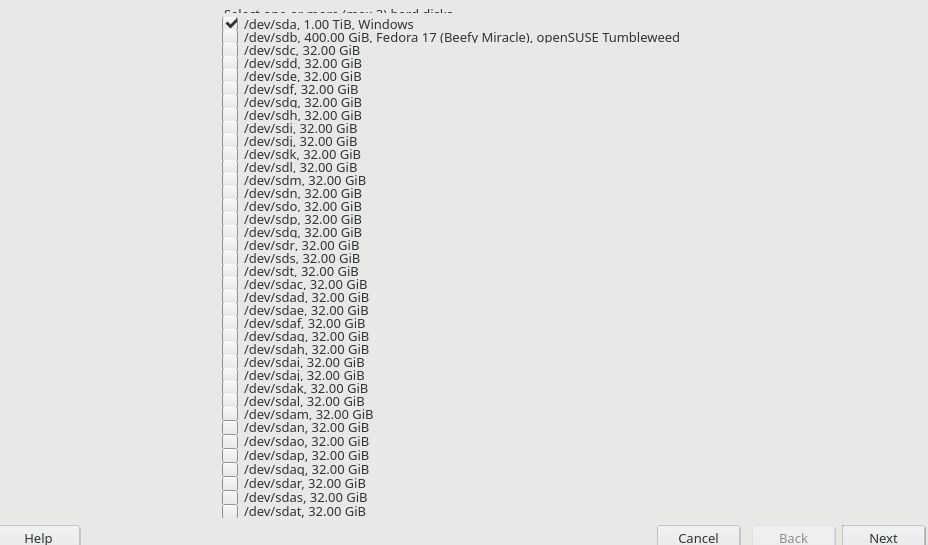
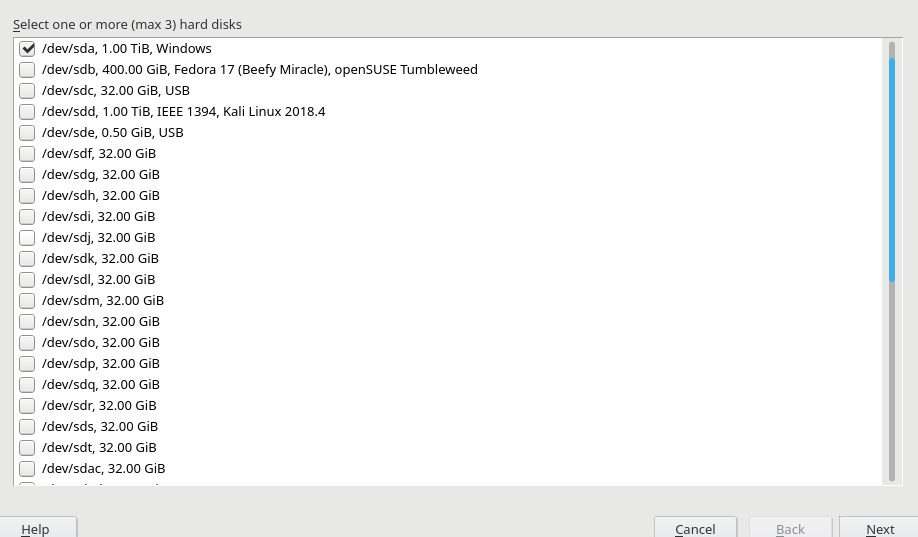
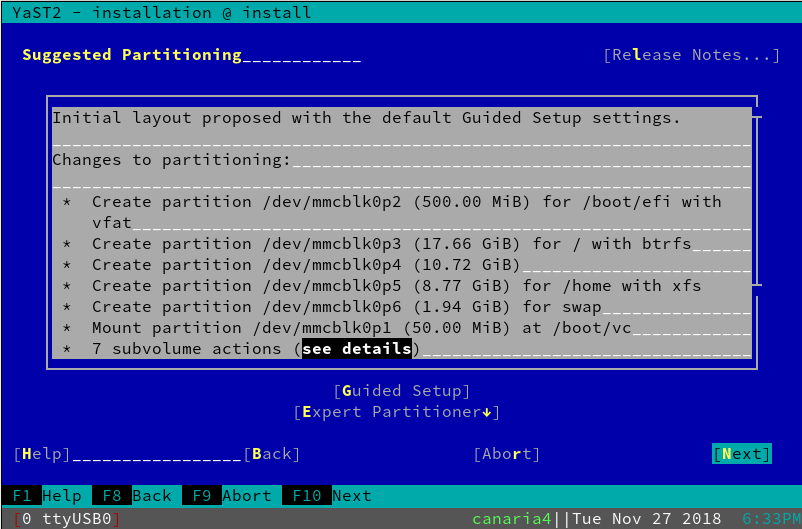
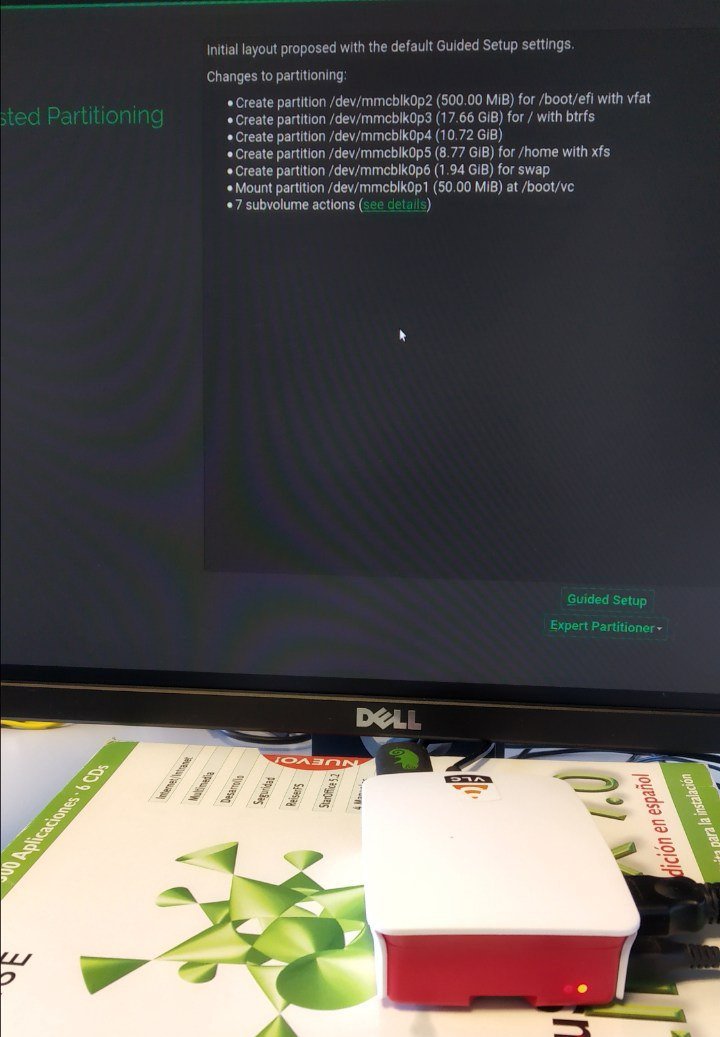
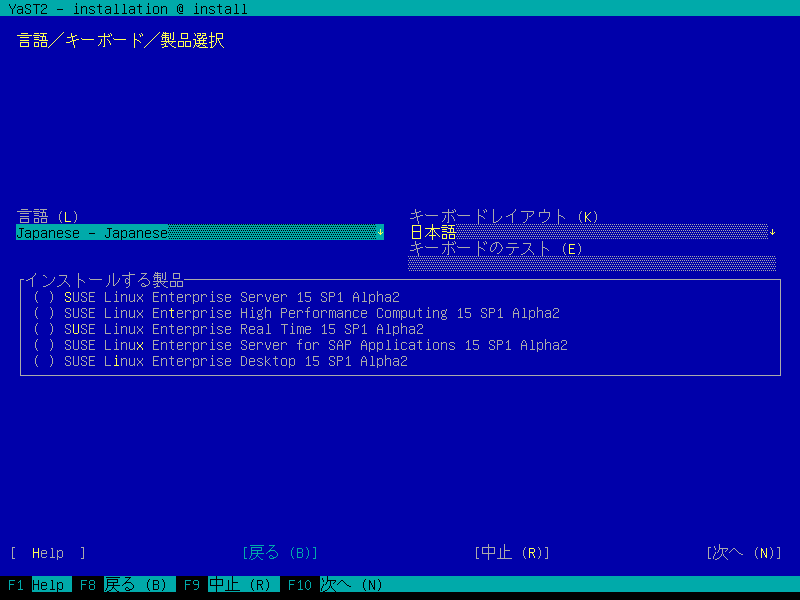
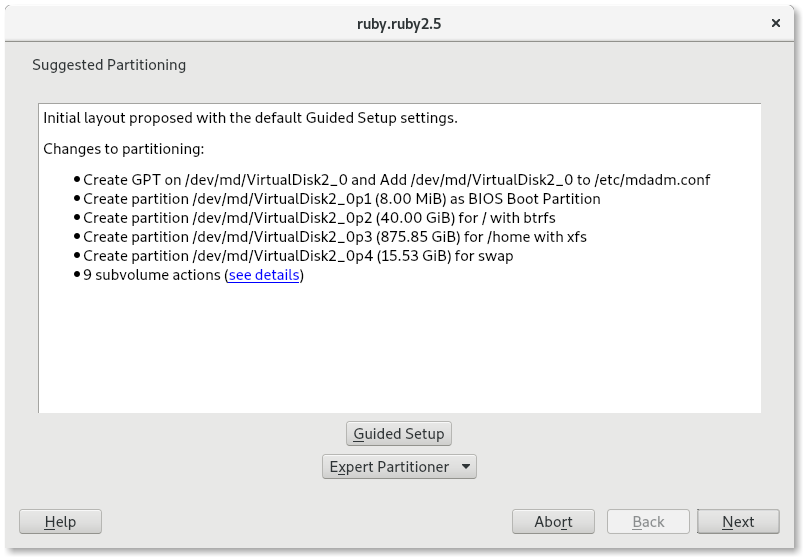
Although it may sound surprising for some users, it’s not uncommon to install SUSE Linux Enterprise on systems with dozens or even hundreds of disks. Of course, in those advanced scenarios the automatic partitioning proposal is not much useful and users are expected to use the Expert Partitioner. But, what if someone tries to use the partitioning Guided Setup in a system with 30 disks? In SLE-15 (or Leap 15.0, in the case of this concrete screenshot) they will see a screen as unusable as this.

Broken Guided Setup screen

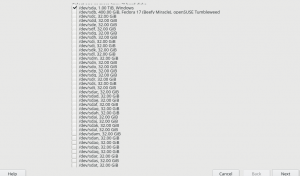
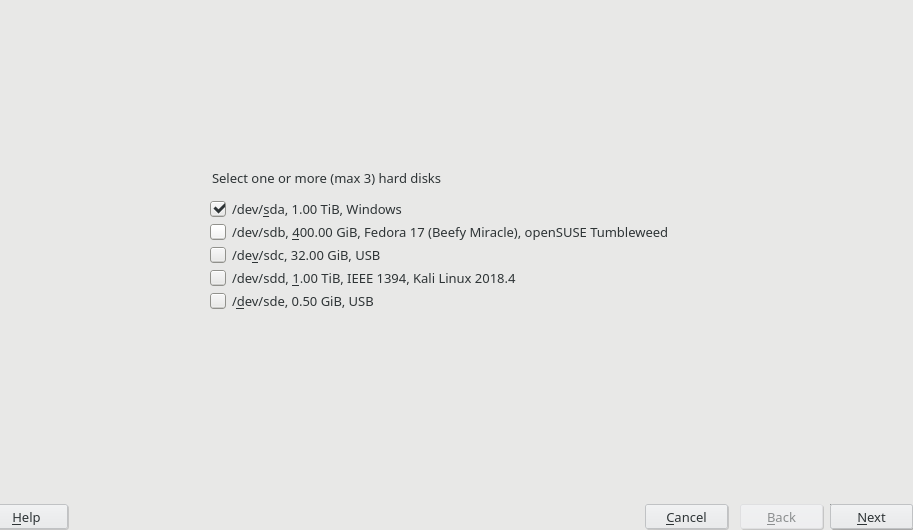
Of course, it only gets worse if the number of disks increases or if the text-mode interface is used. So we improved the disk selection screen, taking also the opportunity to include additional information to make easier to identify removable devices like USB and IEEE 1394 ones. In future releases, the screen will normally look pretty much as it looks in the previous version, just with the extra information about USB.

Normal Guided Setup screen

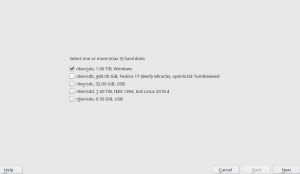
But if the system contains more than 10 disks to choose from, then a different widget that makes scrolling possible will be used, ensuring the user interface remains usable enough in both graphical and text-based modes.

Guided Setup screen with more than 10 disks

YaST Bootloader Becomes Less Whinny

When the installation of the system is spread over multiple physical disks, YaST Bootloader always tries to setup the bootloader in all those disks. This helps for example when MD RAID is used to achieve redundancy and some disk fails. Then the system can still boot from any of the other disks, since they also contain a proper bootloader.

But in some cases the installation can be spread over multiple disks but with only one of them being prepared to host the bootloader (e.g. containing the needed partitions). YaST bootloader used to complain about it while generating its proposal, which resulted in an error shown during installation.

In this sprint we have relaxed the YaST Bootloader expectations a bit. It still tries to create a fail-over setup, but the proposal does not complain if at least one disk looks bootable. Additionally if Grub2 is properly installed to at least one device, then possible failures in other disks will not result in an error pop-up, but just logged for future reference.

Device Order for MD RAIDs in AutoYaST

During the development of storage-ng, the feature to specify the device order for MD RAIDs with AutoYaST was lost. The feature can be useful for RAID level 10 to ensure that one full half of the RAID will only reside on one disk subsystem and the other half on the other subsystem. Only then a complete failure of a single subsystem keeps the RAID working.

Now the feature has been re-implemented for Leap 15.1 and SLE-15-SP1 and the “device_order” tag of the AutoYaST profile works as expected. For further information about configuring RAID with AutoYaST, consult the AutoYaST documentation.

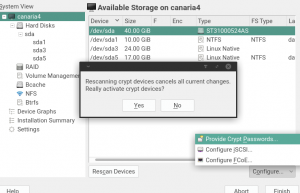
Improvements in the Partitioner

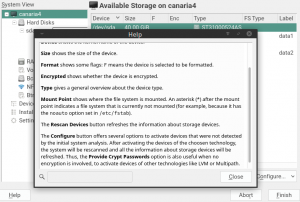
That AutoYaST feature was not the only thing that temporarily disappeared with the replacement of the old storage components by storage-ng. The “Provide Crypt Passwords” button in the Partitioner was also not there in the early versions included in openSUSE Leap 15.0. But it was not really an omission, but a consequence on how the activation of logical devices works now in YaST.

During installation, all pre-existing logical devices that need some initialization are always activated to make possible to use them. That includes LVM, Multipath devices (for which a user confirmation is requested) and encrypted devices (for which the password is asked to the user). But triggering such activations in an already installed and running system cannot be done so lightly, since it affects the execution of the whole system.

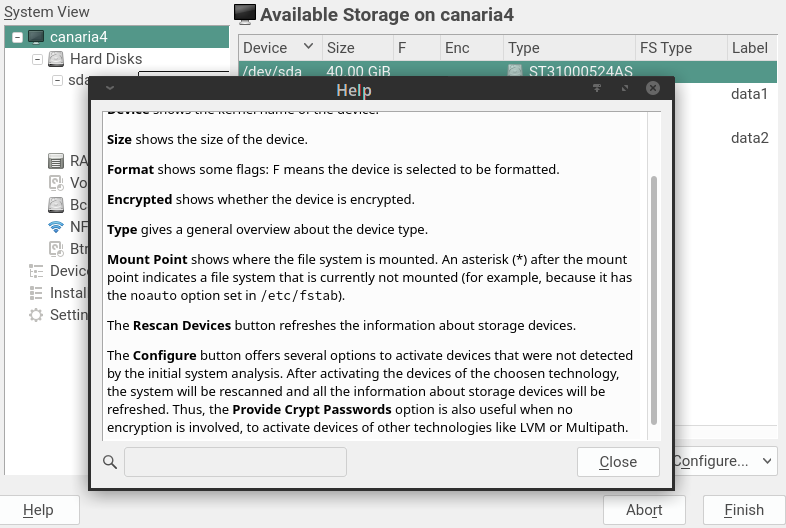
Still, there are cases in which a user executing the YaST Partitioner in an already installed system may desire to activate currently inactive devices. To allow that we brought back the “Provide Crypt Passwords” button, but with two small changes compared to its historical behavior.

  • It activates all kind of devices, not only the crypt ones.
  • It refreshes all the Partitioner information, reading again the status of all the storage devices.

Provide Crypt Passwords button

Of course, any change in behavior is a nice opportunity to revisit and expand the help texts.

The button explained

Another change that was intentionally introduced in the first versions of the rewritten Partitioner was the fact that new file-systems always got an empty label by default, independently of the previous content of the partition being formatted.

But the old Partitioner used to do things differently when reformatting a partition. In that case, it actually copied the label of the previous file-system into the new one. Some users told us (via bug reports) they wanted the old behavior back, so now the Partitioner preserves the old label when a partition is reformatted.

Wow, that was a lot!

As usual, this report only covers a small portion of what the YaST Team has been doing. But definitely this time our readers will have enough material to keep themselves entertained for quite some time. Specially combining this with the two already mentioned monographic posts about the Bcache support and about the compatibility with SUSE Manager Salt Formulas.

Have a lot of fun reading!

Getting YaST Configuration Module up-to-date

February 27th, 2019 by

An Introduction to the YaST Configuration Management Module

YaST Configuration Management is a relatively unknown module that was born back in 2016 during a workshop and was developed further during Hack Week 14. The idea was to enable AutoYaST to delegate part of its duties to a configuration management system like Salt or Puppet. Therefore, AutoYaST would take care of the initial installation (partitioning, software installation, etc.) and it will hand the control over to one of those systems for further configuration.

During Hack Week 15 the module got support for SUMA Salt Parametrizable Formulas and later it was adapted to
run during the 1st stage of the installation. Apart from that, the module received fixes and minor updates as needed.

But by the end of 2018, we started to work on the module again in order to:

  • Update the SUMA Salt Parametrizable Formulas support.
  • Add support for YaST Firstboot
  • Improve the documentation (the README was basically rewritten).

In this article, we will review these changes including, of course, some screenshots. If you want to try this features by yourself, you will need to install yast2-configuration-management 4.1.5 and yast2-firstboot 4.1.5 (or later).

Updating the SUMA Salt Parametrizable Formulas Support

Since the initial implementation of the SUMA Salt Parametrizable Formulas support, the forms specification evolved quite a lot, rendering the module outdated. Support for new data types, collections, conditions, etc. was simply missing.

When it comes to the new UI design, the main problem we faced is that, in YaST, we must take 80×24 interfaces into account and the support for scrolling in our libraries is quite limited. So we needed to organize the information minimizing the chance of getting out of space.

Configuring the dhcpd formula

The screenshot above belongs to a fairly complex dhcp formula. At the left side, there is a tree that you can use to browse through the formula. At the right, YaST displays a set of form controls that you will use to enter the formula parameters.

When dealing with collections, YaST displays the information in pop-up dialogs as you can see below.

Managing collections

Do you want to try it by yourself? No problem, but bear in mind that it may modify your system configuration, so it would be wiser to do such experiments in a virtual machine.

Having said that, the easiest way to try the module is to grab some formulas from OBS, install them and start the module from the YaST control center by clicking on YaST2 Configuration Management under the Miscellaneous section. If you are a console lover, you can just run yast2 configuration_management.

Adding Firstboot Support

YaST Firstboot is a module that allows the user to configure a pre-installed system during the first boot (hence the name). It implements a set of YaST clients to perform different stuff like setting the language, configuring the timezone, etc.

If you need to configure something which is not supported by YaST Firstboot, you could write your own client having the power of YaST under your fingers. Or, if you prefer, you could use YaST Configuration Management to run a configuration management system. Of course, you can combine this feature with the support for SUMA Salt Parametrizable Formulas to offer a nice UI.

Now let’s see an example. YaST Firstboot configuration lives in /etc/YaST/firstboot.xml. That file contains the list of clients to use, among other settings. So if you want to use the YaST Configuration Management module, you only need to add the firstboot_configuration_management client to the workflow.

<workflows config:type="list">
  <workflow>
    <stage>firstboot</stage>
    <label>Configuration</label>
    <mode>installation</mode>
    <modules  config:type="list">
      <!-- other modules -->
      <module>
        <label>Finish Setup</label>
        <name>firstboot_configuration_management</name>
      </module>
    </modules>
    <!-- and more modules -->
  </workflow>
</workflows>

Additionally, you might be interested in modifying the firstboot_configuration_management behaviour. In that case, you can add a <configuration_management/> section with the relevant settings. The nice thing is that it uses the same options that are supported by AutoYaST. Let’s say that we want to run some Salt formulas:

<configuration_management>
  <type>salt</type>
  <!-- Default Salt Formulas root directories -->
  <formulas_roots config:type="list">
    <formulas_root>/usr/share/susemanager/formulas/metadata</formulas_root>
    <formulas_root>/srv/formula_metadata</formulas_root>
  </formulas_roots>
</configuration_management>

Or do you prefer to run Salt against a master server?

<configuration_management>
  <type>salt</type>
  <master>linux-addc</master>
  <auth_attempts config:type="integer">5</auth_attempts>
  <auth_time_out config:type="integer">10</auth_time_out>
  <keys_url>http://keys.example.de/keys</keys_url>
</configuration_management>

Asking for Help

YaST Configuration Management has been greatly improved during these weeks and the new SUMA formulas support opens a lot of possibilities. However, now we need your help: if you are interested in this module, please, check it out and try to report as many bugs as possible. We now they are there just waiting for you to find them ;-).

Thanks!

Recapping the Bcache support in the YaST Partitioner

February 27th, 2019 by

Usual readers of the YaST Team development sprint reports on this blog already know we have been working steadily on adding support for the Bcache technology to the YaST Partitioner. We have already reached a point in which we consider such feature to be ready to be shipped with openSUSE Leap 15.1 and SUSE Linux Enterprise 15 SP1. That sounds like a nice occasion to offer the full picture in a single blog post, so our beloved users don’t need to dig into several blog posts to know what the future releases will bring regarding Bcache in YaST. Needless to say, all this is already available for openSUSE Tumbleweed users, or will be available in the following weeks.

Bcache 101

But, to begin with, what is Bcache? It’s a Linux technology that allows to improve the performance of any big but relative slow storage device (so-called “backing device” in Bcache terminology) by using a faster and smaller device (so-called caching device) to speed up read and write operations. The resulting Bcache device has then the size of the backing device and (almost) the effective speed of the caching one.

In other words, you can use one or several solid state drives, which are typically fast but small and expensive, to act as a cache for one or several traditional rotational (cheap and big) hard disks… effectively getting the best of both worlds.

How does it all look in your Linux system? Let’s explain it with some good old ASCII art:

(slow hard disk)   (faster device, SSD)
    /dev/sda            /dev/sdb
      |                     |
[Backing device]    [Caching device]  <-- Actually, this is a set of
      |                     |             caching devices (Caching Set)
      |__________ __________|                   
                 |
              [Bcache]
           /dev/bcache0

Take into account that the same caching device (or the same “caching set”, sticking to Bcache terminology) can be shared by several Bcache devices.

If you are thinking about using Bcache later, it is also possible to setup all your slow devices as Bcache backing devices without a cache. Then you can add the caching device(s) at a later point in time.

(slow hard disk)   
    /dev/sda            
      |                     
[Backing device]    
      |                     
      |__________ __________|                   
                 |
              [Bcache]
           /dev/bcache0

Last but not least, the Bcache technology allows to create virtual devices on top of an existing caching set without an associated backing device. Such a device is known as Flash-only Bcache and is only useful in some very specific use cases.

                   (faster device, SSD)
                        /dev/sdb
                            |
                    [Caching device]
                            |
      |__________ __________|                   
                 |
         [Flash-only Bcache]
           /dev/bcache0

You may be thinking: “hmm, all that sounds interesting and daunting at the same time… how can I get started with it in an easy way?“. And sure you are already figuring the answer. 😉

Bcache in the YaST Partitioner

When running on an x86 64 bits system, the YaST Partitioner will offer a Bcache entry in its usual left tree. There you can see two tabs. The second one lists the Bcache caching sets available in the system and its purely informative. But the first one is your entry door to all the power of the Bcache world. That tab allows to visualize, modify and delete the existing Bcache devices. And, of course, it also enables you to create new Bcache devices on top of any of your not-so-fast existing block devices.

Bcache devices in the Partitioner

All Bcache devices can be formatted, mounted or partitioned with the same level of flexibility than other block devices in the system. See the previous screenshots, in which some devices contains partitions while others are formatted directly.

The creation and edition of Bcache devices allow to select which devices to use as backing and as caching, and also to choose one of the available cache modes (more on this below). Any available block devices (like a disk, a partition or an LVM logical volume) can be used as backing device or as caching one. But a screenshot is worth a thousand words.

Screen for creating and editing a Bcache

The backing device is mandatory. Flash-only Bcaches cannot be created and there are no plans to include support for them in the future. But as you can see in the previous screenshot, the caching device can be specified as “without caching”. That allows to create Bcache devices that will get their caching devices in the future, as explained at the beginning of this post.

As mentioned, the third field allows to choose one of the cache modes offered by Bcache. If you are not sure what a particular cache mode means, YaST also provides a quite extensive help text explaining them.

Help about Bcache

Moreover, when modifying a device, the Partitioner will limit risky combinations, preventing data loss and avoiding operations that can result in unreliable results. For example, it prevents modifying Bcache devices with a caching device that is being already used by the system, because that would require a detaching action. That could take a very long time in some situations and interfere with other operations performed by the Partitioner.

Only safe operations allowed

Of course the operation to delete a Bcache device offers the usual checks and information available in other parts of the YaST Partitioner, like shown in the following screenshot (this time using the look and feel of the SLE installer).

Deleting a Bcache device

Bcache for everyone?

With all the functionality explained above, we could say the YaST Partitioner lowers the entry barrier enough for all the (open)SUSE users to begin enjoying the bells and whistles of the Bcache technology. Unfortunately, that’s not exactly true for all the hardware architectures supported by our beloved distributions.

Bcache is only considered stable and mature enough in x86_64 systems (i.e. x86 architecture of 64 bits). If you don’t know whether your computer fits into that description, then almost for sure it does. 😉 We have no evidence of anyone using Bcache successfully in 32 bits systems or in any ARM platform. Moreover, we know for sure the technology is unreliable in the PPC64LE and S390x architectures.

As a result, the YaST Partitioner will only present the “Bcache” section in the left tree when running in a x86_64 system, even in the highly unlikely case of an unsupported system in which a Bcache device is found. If that would even happen, YaST will alert the users about the dangers of using Bcache in such unsupported scenario and will urge them to use manual procedures to modify the existing setup.

Warning: Bcache not supported!

What’s next?

Obviously, as it always happens when a new technology is added to YaST, there is still a lot of room for improvement regarding the Bcache management in the Partitioner. But now it’s the turn for our users to test it and come with bug reports and ideas for further improvements and use cases. Profit!

zypper-upgraderepo 1.2 is out

February 23rd, 2019 by

Fixes and updates applied with this second minor version improved and extended the main functions, let’s see what’s new.

If you are new to the zypper-upgraderepo plugin, give a look to the previous article to better understand the mission and the basic usage.

Repository check

The first important change is inherent the way to check a valid repository:

  • the HTTP request sent is HEAD instead of GET in order to have a more lightweight answer from the server, being the HTML page not included in the packet;
  • the request point directly to the repodata.xml file instead of the folder, that because some server security setting could hide the directory listing and send back a 404 error although the repository works properly.

Check just a few repos

Most of the times we want to check the whole repository’s list at once, but sometimes we want to check few of them to see whether or not they are finally available or ready to be upgraded without looping through the whole list again and again. That’s where the –only-repo switch followed by a list of comma-separated numbers comes in help.

--only-repo switch

–only-repo switch

All repo by default

The disabled repositories now are shown by default and a new column highlights which of them are enabled or not, keeping their number in sync with the zypper lr output. To see only the enabled ones just use the switch –only-enabled.

Table view

Table view

Report view

Beside the table view, the switch –report introduce a new pleasant view using just two columns and spanning the right cell to more rows in order to improve the number of info and the reading quality.

Report view

Report view

Other changes

The procedure which tries to discover an alternative URL now dives back and forth the directory list in order to explore the whole tree of folders wherever the access is allowed by the server itself. The side effect is a general improvement also in repo downgrade.

The output in upgrade mode is now verbose and shows a table similar to the checking one, giving details about the changed URLs in the details column.

The server timeout error is now handled through the switch –timeout which allows tweaking the time before to consider an error any late answer from the server itself.

Final thoughts and what’s next

This plugin is practically completed, achieving all the goals needed for its main purpose no other relevant changes are scheduled, so I started thinking of other projects to work in my spare time.

Among them, there is one I am interested in: bring the power of openSUSE software search page to the command line.

However, there are some problems:

  • This website doesn’t implement any web API so will be a lot of scraping job;
  • There are missing packages while switching from the global research (selecting All distribution) to the specific distribution;
  • Packages from Packman are not included.

I have already got some ideas to solve them and did lay down several lines of code, so let’s see what happens!

Replacing Github Services with GitHub Webhooks

February 1st, 2019 by

The GitHub team announced some time ago that the so called GitHub Services will be obsolete and will be replaced with the GitHub web hooks.

We use the GitHub Services quite a lot in the YaST Team and, as we promised, we will try to summarize how replaced them.

Travis

Travis should add the new web hook automatically, just check if you can see a https://notify.travis-ci.org webhook configured for your repository. If it is missing then the easiest way to add them is just disabling the Travis builds for the repository and enabling it back. Doing this should add the new Travis web hook automatically.

Weblate

If your project uses Weblate for managing the translations then use the https://<weblate_server>/hooks/github/ webhook URL. If you use the openSUSE Weblate instance, then use the https://l10n.opensuse.org/hooks/github/ URL for the web hook.

See the Weblate documentation for more details.

RubyDoc.info

The RubyDoc.info service can be replaced by adding the https://www.rubydoc.info/checkout web hook (leave the other web hook options unchanged).

Read the Docs

The Readthedocs service uses unique web hook URL for each GitHub repository. You need to log into the Read the Docs site, select your project in the dashboard and in the Admin section select option Integrations. Then press Add integration and select the GitHub incoming webhook option. This will generate an URL address which can be used at GitHub as the web hook URL (again, leave the other options unchanged).

Email GitHub Service

The email service is automatically converted by GitHub to the new email notification setting so you should not need to do any change. If the notification emails are not delivered then check the Notifications section in the repository settings. In order to do that, you need the admin permission, see the GitHub documentation.

Bye GitHub Services!

Github Services has served well for quite some time but moving to a webhooks based approach looks like the correct decision. We have already completed the transition in all of our repositories. Kudos to Ladislav Slezak for taking care!

Highlights of YaST Development Sprint 69 & 70

January 31st, 2019 by

Almost two months has passed since our last sprint report but, except during the Christmas break, the team has been quite busy working on some features and bugfixes for the upcoming (open)SUSE releases.

But a post describing all that we have done would be quite long :), so let’s try to highlight a few of them.

  • YaST got a security audit and, although no real security problems were found, we were asked to introduce some improvements.
  • Now it is possible to run the installer through PXE Boot without any local repository. Pretty specific but cool stuff!
  • We are in the process of revamping SUSE Manager Salt Formulas support in the YaST2 Configuration Management module. Do not be fooled by the name, it is not limited to SUSE Manager.
  • YaST icons are now included in the package were they are used. We hope it will make things easier for icon designers.
  • The Firewall module got support for creating firewalld custom zones.
  • Performance when reading huge /etc/hosts files has been greatly improved.
  • CD/DVD sources are always disabled after installation.

YaST Security Hardening

Our SUSE security team did a security audit for YaST. The good news is that there were no real security problems that you should be concerned about. Still, we did some hardening to make the code even more secure.

This might have caused some breakages in Factory / Tumbleweed because many places in the code were touched. We apologize for any inconveniences that might have caused; but we are sure you prefer YaST to be more secure.

Most changes were centered around calling external commands, which YaST does a lot. Since YaST is running with root permissions in most cases, we want to make sure that this is as secure as possible. If you find any problems with it, please write bug reports.

What exactly we did and how we did it is summarized here: YaST Security Audit Fixes: Lessons Learned and Reminder

Installing via PXE Boot without any Installation Repository

In data centers and other big-scale enterprise environments, administrators rarely install new software via removable media such as DVDs. Instead, administrators rely on PXE (Preboot eXecution Environment) booting to image servers.

Installing Linux Enterprise in such environments typically requires two auxiliary servers in the local network:

  • The DHCP/TFTP server providing the minimal system used by PXE to execute the installer.
  • A server making the SLE DVD repository accessible in the local network via FTP, HTTP or any similar protocol.

Very often, the second one is more a requisite imposed by the installer than something really useful. In most cases, the system been installed will be registered in the SUSE Customer Center (or any of its proxy technologies like SMT or RMT) and will get all the software from there. Thus, we decided to save the administrators the extra steps of downloading the SLE ISO image and setting up an install server to serve the content of that ISO, for cases in which that was really not needed.

But the repositories are not only used to get the software been installed in the final system. As explained often in this blog, we have a single installer for all the products and flavors of SUSE and openSUSE, as different as the installation process looks for all of them. That generic installer uses the information in the installation repository to get its own configuration. That includes the available products (and its corresponding system roles), the steps and options to present to the user, the desired partitioning setup and many other aspects. Without that information, the installer is basically a musician without his score.

Starting with SLE-15-SP1, it will be possible to use the boot parameter NOREPO=1 to tell the installer to not expect (and more important, to not require) any local repository in the DVD or in the local network. In that case, the installer will be able to proceed up to the registration screen and get the information for the upcoming steps of the installation from the registration server. In the openSUSE case (where registration makes no sense), it will be able to reach the screen that allows to add more repositories.

Another step (and certainly not an easy one) to improve the installation experience for our users. Data center administrators, enjoy! 🙂

Revamping SUSE Manager Salt Formulas Support

Back in 2017, the YaST Configuration Management module got support to handle SUSE Manager Salt Formulas as part of a Hack Week project. If you do not know what this feature is about, you might be interested in checking the Forms are the Formula for Success presentation or the Hack Week project follow-up post.

Since then, the forms specification has evolved quite a lot and YaST support was basically outdated. So on November 2018 we started to work in order to bring the missing pieces to the YaST module. Basically, we rewrote the forms support and, although there are still rough edges, we are pretty close to release a new version with up-to-date support for this powerful feature.

Screenshot of how the dhcpd formula looks like

Managing Custom Zones Definitions in YaST Firewall

The new YaST UI for configuring firewalld was announced in the report of the sprint #63 (four months ago… time flies!) and, since then, we have continued improving it.

firewalld ships with some predefined zones. Although it covers most users needs, in addition it allows the user to define custom zones. During the last sprint we have added support in the new UI and also in AutoYaST to manage custom zones.

YaST2 Firewall custom zones definition dialog

During the development process some problems detected in the AutoYaST configuration were addressed too.

Updated YaST Branding and Icon Handling

In the past the YaST icons were included in the yast2-branding-openSUSE (openSUSE) and yast2-theme-SLE (SUSE Linux Enterprise) packages. The standard YaST icons were included in these packages, the standard YaST modules did not include any icons.

However, the disadvantage for the icon designer was that it was not clear which icons were really used.
If you wanted to update the icon theme you could potentially do a lot of useless work because some icons were not used anymore.

Now the icons are included in the respective YaST package, if the package is dropped the icon is dropped as well.

The package manager UI includes compiled-in fallback icons. That means if the branding package is broken or the icon files are accidentally deleted from disk then it will be still usable for emergency recovery.

The branding still works, the vendor can still provide specific icons which will override the included ones. So it is still possible to have a different look in the openSUSE and SLE products.

YaST2 Control Center new branding Screenshot

A big thank you goes to Stasiek Michalski and Noah Davis from the community who did the changes in the YaST code, designed the new icons and did a lot of cleanup!

Improving Performance when Loading Huge /etc/hosts Files

It might happen that you need to maintain a huge /etc/hosts file, especially when dealing with ads blockers. Such file with thousands of lines took an incredible amount of time to get loaded into YaST2. On some configurations it could even happen that loading a /etc/hosts with around 10.000 lines freezes the system completely. After some refactoring in YaST2 Host module, the performance has been significantly improved and loading a file with 10.000 lines now takes approximately 30s on the same configuration where it crashed before.

Disabling CD/DVD Repositories After Installation

If you install your system from a CD/DVD source it usually happens that this repository was not available for whole live of the system. In some use cases this was only uncomfortable because of some warnings but, in other cases, it caused serious complications, for instance, when trying to do a migration.

In the past, under some circumstances, those repositories were already disabled. But, from now on, they will be disabled always in order to avoid unwanted side effects.

Closing Thoughts

That’s all for the first report of 2019. In case you are wondering, the plan is to stick to the plan of publishing a report after each sprint, so expect the next one in about two weeks.

However, we recently had to migrate from the so called GitHub Services (now deprecated) to GitHub web hooks, so you might get an extra blog post about that very soon.

Stay tuned!

Highlights of YaST Development Sprint 68

December 4th, 2018 by
  • UDF: Share big files with other operating systems
  • Raspberry Pi: Fully customized installation with YaST

Support for UDF file system

UDF (Universal Disk Format) is a file system format widely used for DVDs and newer optical disk formats, replacing ISO 9660. But this technology is not limited to optical media only, in fact it can be perfectly used on flash devices like USB sticks and hard drives too. UDF is one of the best choices when transferring data between platforms. Mostly all modern operating system already support it, including Windows, BSD, MacOS X, Solaris, OS/2 (eComStation), BeOS (Haiku) as well as Linux kernel.

UDF offers several advantages. One of them is the support for quite very large files. With UDF you can create files of several terabytes, making really ridiculous the maximum limitation of 4 gigabytes in VFAT. And not only that, UDF also has optional built-in ability to minimize wearing-off of rewritable media with limited rewrite cycles, such as flash, CD-RW and DVD-RAM.

YaST is starting to support UDF file systems out of the box. The Expert Partitioner now offers the UDF option when formatting a device, see the following screenshot. And this is available even during the installation, so you could create a volume with UDF format and share it between your different operating systems.

Just click "next" to install (open)SUSE in a Raspberry Pi

Anybody who has not been living under a rock for the last five years knows Raspberry Pi. And anyone who has used one of those devices knows the usual way to put an operating system into it is different from what we are used to do in other computers. Instead of installing from a regular ISO, customizing all the options in the process, Raspberry Pi and similar mini-computers are usually loaded with a pre-built image of an operating system (specific for each model) downloaded from the Internet. Many of those precooked Linux systems are purpose-specific and many decisions (like the file-system type to use) are already taken by those who built the image.

But we wanted SLE 15-SP1 and openSUSE Leap 15.1 to be the first multi-purpose operating systems to support a full standard Linux experience in Raspberry Pi. No custom specific ISO to install from, no precooked image to be copied, just taking the standard unmodified SLE or openSUSE ISO image and installing like you would do in any other computer. And we wanted the process to be as easy as pressing "next", "next", "next", "install". With the installer detecting and proposing the set of default configurations that makes sense, as usual.

The main challenge in that regard was the partitioning layout. In order to boot, the Raspberry Pi needs a very specific partition containing the system firmware. So it is important for the installer to detect such a partition and preserve it no matter what, mounting it in /boot/vc to allow the operating system to perform updates of the firmware. In the following screenshot of the installation process performed trough the Raspberry Pi serial console you can see that in action.

The serial console is the method preferred by the experts to manage the Raspberry Pi locally and it works out of the box with the pre-releases of the upcoming SLE-15-SP1 and Leap 15.1. But less advanced users will likely prefer to perform a graphical installation with a keyboard and a screen attached to the device. For it to work flawlessly, the following arguments must be provided to the installer during boot.

textmode=0 modprobe.blacklist=vc4

The second argument prevents the HDMI output to be disconnected shortly after the computer has booted, something that will only happen with some monitors. It happened to us during our testing (that you can see below) and that argument certainly made the problem disappear.

Just one final note if you want to play with this: Take into account Raspberry Pi uses a different internal architecture than usual PCs. So instead of the x86 image of the installer, you will need to use the aarch64 one. The aarch64 architecture is officially fully supported by SLE and also available for openSUSE Leap and Tumbleweed as an unofficial port.

Highlights of YaST Development Sprint 67

November 20th, 2018 by

Time flies and another development sprint has finished for the YaST team. During it we have focused on improving the installation process, refining it and adding new features to unleash new possibilities. That includes:

  • More options to configure Kubic during installation.
  • Several improvements in the storage proposal.
  • Easing the network configuration and the usage of online repositories in openSUSE.
  • Improving installation in text mode for CJK and other languages.
  • Configuring SSH access during installation and in a running system.
  • And many other small fixes here and there!
  • Many of these features will be already available in openSUSE Tumbleweed during November (the sprint just finished November 16th and the integration process usually takes some days), others will be visible for the first time in the next SLE-15-SP1 and Leap 15.1 Alpha versions.

    New Dialogs in the openSUSE Kubic Installation

    The SUSE CaaSP and the openSUSE Kubic products got a new installation workflow some time ago. Originally they used a specific installation workflow (a single all-in-one configuration dialog), but the problem was that many openSUSE/SLE installation features were missing because the installer code was completely different.

    That has been changed some time ago to use the usual installation as in standard SLE or openSUSE products. You can read the details about the new installation workflow at the Kubic wiki page.

    However, the CaaSP or Kubic products required some more specific settings depending on the selected role. During this sprint we have added the corresponding steps to the installation.

    New installation steps for openSUSE Kubic

    Currently the extra dialog only asks for the NTP server address, but some more options can be added later.

    Improve Textmode Support for CJK and Other Languages

    YaST is able to cope with many languages even when running in textmode. When a user wants to run the installer in textmode using some specific languages -like Chinese, Japanese or Korean-, YaST will use a special terminal emulator called fbiterm which is able to display the characters which are needed in those languages.

    Now, instead of keeping two different approaches depending on the language, YaST will try to use this special terminal emulator whenever is possible for all text based installations. Unfortunately, there is a small set of languages that are not properly handled by fbiterm. In those cases, YaST will inform the user about the problem and it will fall back to English.

    YaST installing SLE-15-SP1 in Japanese

    As a side effect of this unification, the font used during the textmode installation has changed for all the languages that didn’t used fbiterm in the past. So your SUSE or openSUSE installation may now look slightly different.

    Storage proposal: playing nicely with Intel Rapid Start Technology

    Intel Rapid Start Technology (shorted as IRST) enables systems to quickly resume from deep sleep (e.g. if your battery runs out). It’s a firmware-driven technology that relies on the existence of a special partition located on a SSD (solid state device).

    But our partitioning proposal (the so-called Guided Setup) was not aware of the important role of such partition, so it sometimes proposed to delete it in order to use the freed space for installing (open)SUSE on top.

    We have improved that and now the IRST partition will only be deleted as a last resort, if deleting all other allowed partitions in the disk is still not enough to make the new system fit. Moreover, an IRST partition located in the same disk than a Windows system will only be deleted if the user explicitly allows the storage proposal to delete that Windows installation.

    Running the storage proposal on top of software RAIDs and USB devices

    But that’s not the only improvement done in the area of the partitioning guided setup. We have also broadened its usefulness by allowing it to be used on top of new kinds of devices.

    First of all, it’s now possible to execute the guided setup on top of a software MD RAID. For that, the candidate RAIDs has to fulfill one of two conditions: to contain a partition table or to be completely empty (which includes not being formatted, encrypted or used for any other purpose). That is not only another step to take advantage of the relatively recent capability of YaST to partition software RAIDs (thanks to libstorage-ng) but also a very natural way to support the usage of Dell EMC PowerEdge RAID controllers S130 and S140, which offer an hybrid solution based on software RAIDs but backed up by a firmware-driven configuration.

    Partitioning proposal on top of a software MD RAID

    Almost for the same price, we decided that it was time to offer the available USB devices as candidates for the guided setup, even when there are also non-USB candidates. Excluding, of course, the installation media (except when performing a network-based installation, in that case the USB device can be reused to install the system).

    As usual, these features will be soon available in openSUSE Tumbleweed, as well as in the next stable versions of openSUSE Leap (15.1) and SUSE Linux Enterprise (SLE-15-SP1).

    Fine-tuning the initial storage proposal

    All the described changes open new possibilities for the users to decide where to execute the storage proposal. But as our users already know, when the installer reaches the storage proposal step for first time (before the user has had the chance to run the Guided Setup or the Expert Partitioner), an initial proposal is automatically calculated and displayed. This proposal is performed without user intervention, and all necessary information is taken from the control file of the current product. For example, whether to create a separate home, or whether to enable snapshots for root, etc.

    During the previous sprint, this initial proposal was already improved to make an attempt over each individual disk instead of considering all disks together. Now we have improved this behavior to not discard the first disk so early, even if that means getting a smaller (open)SUSE system.

    For example, let’s image we have a system with a first small SSD disk of 40 GiB and a second big Hard Disk of 1 TiB, which is a relatively common configuration for laptops. Since the first disk is too small to allocate a system with the optimal partition sizes and a separate /home partition, the installer used to switch to the second disk, in which it could propose a root partition of the recommended size to use Btrfs snapshots (50 GiB) and a partition for /home bigger than the 40GiB specified as minimum for it in the product description.

    Initial storage proposal before the latest change

    Now, more attempts will be performed in the first disk before giving up and moving to the next one. So, when the proposal is not possible with the desired sizes and with all the optional devices enabled, it will try to disable some optional settings and to relax the size requirements (using the minimum sizes instead of the recommended ones). In the following screenshot you can see the result of this adjusted initial proposal.

    Initial storage proposal after the latest change

    Tumbleweed: Add Online Repositories during Installation

    We added a step in the installation workflow to enable online repositories. This means you can now get the latest packages installed immediately during installation instead of installing older versions from the installation media first and later updating them to the latest versions from the openSUSE servers.

    Also, because of disk space limitations, the installation media don’t contain all the packages that openSUSE provides and thus not all system roles; some of the less frequently used desktops, for example, had not been available in the role selection (formerly desktop selection) dialog. With online repositories, they are now available immediately during installation.

    For details, see the corresponding pull request.

    Choosing the network backend

    And more changes to the installer you will be able to enjoy very soon in openSUSE Tumbleweed and also in the upcoming openSUSE Leap 15.1. Now it’s possible to choose the network backend, wicked or NetworkManager, to be used in the final installed system from the Network proposal.

    As easy as a click on a hyperlink, as you can see in the images below.

    New shortcut to change the network backend

    Managing SSH public keys

    When you want to access to a system via SSH, it is a good practice to use public key based authentication instead of the common password-based approach. For that reason, we have added support to handle authorized SSH public keys in the user and group management module, also known as the users module.

    Configuring SSH in yast2-users

    Additionally, you will be able to set up a public key for the root user at installation time, something that can be especially handy for products like the SUSE CaaS Platform.

    And it keeps moving!

    The YaST crew keeps working hard on fixing bugs and, specially, on building new features for everybody to enjoy in the upcoming versions of all the products of the SLE and openSUSE families. So, as much as we would like to keep talking to you all about all the improvements… it’s time to go back to coding! See you again in two weeks with a new report.