Home Home
Sign up | Login

Deprecation notice: openSUSE Lizards user blog platform is deprecated, and will remain read only for the time being. Learn more...

openSUSE WSL images in OBS

October 9th, 2019 by

A fundamental concept of all openSUSE packages as well as any image offered for download is a fully transparent, reproducible and automatic build and development process based on sources.

In openSUSE developers do not perform manual builds on some specially crafted machine in their basement and then upload the result somewhere. Instead all sources are stored in a version control system inside the open build service (OBS) instance at build.opensuse.org. OBS then automatically builds the sources including all dependencies according to defined build instructions (eg spec files for rpms). OBS also automatically adds cryptographic signatures to files that support it to make sure nobody can tamper with those files.

The WSL appx files are basically zip files that contain a tarball of a Linux system (like a container) and a Windows exe file, the so called launcher. Building a container is something OBS can already do fully automatic by means of Kiwi. The launcher as well as the final appx however is typically built on a Windows machine using Visual Studio by the developer.

Since the goal of the openSUSE WSL offering is to have the appx files officially and automatically be produced along with other images such as the DVD installer, Live images or containers, the appx files have to be built from sources in OBS.

Fortunately there’s already a MinGW cross toolchain packaged as rpms OBS and a tool to generate appx files on Linux.

Combining that all together OBS can actually build the WSL appx from sources. The current state of development can be found in the Virtualization:WSL project in OBS. The generated appx files are published on download.opensuse.org.
The current images for Leap 15.2 Alpha and Tumbleweed there are good enough for some testing already so please go ahead and do so, feedback welcome!
Note that since the appx files are signed by OBS rather than Microsoft, there are a few steps required to install them.

Going forward there is still quite some work needed to polish this up. Kiwi for example can’t build the appx directly itself but rather the fb-util-for-appx is called by a spec file. That requires some hacks with the OBS project config to work. On Linux side there’s currently no password set for the root user, so we need a better “first boot” solution. More details on that in a later article. Meanwhile, remember to have a lot of fun…

Highlights of YaST Development Sprint 86

October 9th, 2019 by

Now that you had a chance to look at our post about Advanced Encryption Options (especially if you are an s390 user), it is time to check what happened during the last YaST development sprint, which finished last Monday.

As usual, we have been working in a wide range of topics which include:

  • Improving support for multi-device file systems in the expert partitioner.
  • Fixing networking, secure boot and kdump problems in AutoYaST.
  • Stop waiting for chrony during initial boot when it does not make sense.
  • Preparing to support the split of configuration files between /usr/etc and /etc.
  • Using /etc/sysctl.d to write YaST related settings instead of the /etc/sysctl.conf main file.

Expert Partitioner and Multi-Device File Systems

So far, the Expert Partitioner was assuming that Btrfs was the only file system built on top multiple devices. But that is not completely true because some file systems are able to use an external journal to accomplish a better performance. For example, Ext3/4 and XFS can be configured to use separate devices for data and the journaling stuff.

We received a bug report caused by this misunderstanding about multi-device file systems. The Expert Partitioner was labeling as “Part of Btrfs” a device used as an external journal of an Ext4 file system. So we have improved this during the last sprint, and now external journal devices are correctly indicated in the Type column of the Expert Partitioner, as shown in the screenshot below.

External Journal Type

Moreover, the file system information now indicates which device is being used for the external journal.

External Journal Device Details

And finally, we have also limited the usage of such devices belonging to a multi-device Btrfs. Now, you will get an error message if you try to edit one of those devices. In the future, we will extend this feature to make possible to modify file systems using an external journal from the Expert Partitioner.

AutoYaST Getting Some Love

During this sprint, we have given AutoYaST some attention in different areas: networking, bootloader and kdump.

About the networking area, we have finished s390 support in the new network layer, fixing some old limitations in devices activation and udev handling. Apart from that, we have fixed several bugs and improved the documentation a lot, as we found it to be rather incomplete.

Another important change was adding support to disable secure boot for UEFI through AutoYaST. Of course, we updated the documentation too and, during the process, we added some elements that were missing and removed others that are not needed anymore.

Finally, we fixed a tricky problem when trying to get kdump to work on a minimal system. After some debugging, we found out that AutoYaST adds too late kdump to the list of packages to install. This issue has been fixed and now it should work like a charm.

As you may have seen, apart from writing code, we try to contribute to the documentation so our users have a good source of information. If you are curious, apart from the documents for released SUSE and openSUSE versions, you can check the latest builds (including the AutoYaST handbook). Kudos to our documentation team for such an awesome work!

Avoiding chrony-wait time out

Recently, some openSUSE users reported a really annoying issue in Tumbleweed. When time synchronization is enabled through YaST, the system might get stuck during the booting process if no network connection is available.

The problem is that, apart from the chrony service, YaST was enabling the chrony-wait service too. This service is used to ensure that the time is properly set before continuing with other services that can be affected by a time shift. But without a network connection, chrony-wait will wait for around 10 minutes. Unacceptable.

The discussion about the proper fix for this bug is still open, but for the time being, we have applied a workaround in YaST to enable chrony-wait only for those products that require precise time, like openSUSE Kubic. In the rest of cases, systems will boot faster even without network, although some service might be affected by a time shift.

Splitting Configuration Files between /etc and /usr/etc

As Linux users, we are all used to check for system-wide settings under /etc, which contains a mix of vendor and host-specific configuration values. This approach has worked rather well in the past, not without some hiccups, but when things like transactional updates come into play, the situation gets messy.

In order to solve those problems, the plan is to split configuration files between /etc and /usr/etc. The former would contain vendor settings while the latter would define host-specific values. Of course, such a move have a lot of implications.

So during this sprint we tried to identify potential problems for YaST and to propose solutions to tackle them in the future. If you are interested in the technical details, you can read our conclusions.

Writing Sysctl Changes to /etc/sysctl.d

In order to be able to cope with the /etc and /usr/etc split, YaST needs to stop writing to files like /etc/sysctl.conf and use an specific file under .d directories (like /etc/sysctl.d).

So as part of the aforementioned research, we adapted several modules (yast2-network, yast2-tune, yast2-security and yast2-vpn) to behave this way regarding /etc/sysctl.conf. From now on, YaST specific settings will be written to /etc/sysctl.d/30-yast.conf instead of /etc/sysctl.conf. Moreover, if YaST founds any of those settings in the general .conf file, it will move them to the new place.

What’s next?

Sprint 87 is already running. Apart from fixing some bugs that were introduced during the network refactoring, we plan to work on other storage-related stuff like resizing support for LUKS2 or some small snapper problems. We will give your more details in our next sprint report.

Stay tunned!

Advanced Encryption Options Land in the YaST Partitioner

October 9th, 2019 by

Welcome to a new sneak peek on the YaST improvements you will enjoy in SLE-15-SP2 and openSUSE Leap 15.2… or much earlier if you, as most YaST developers, are a happy user of openSUSE Tumbleweed.

In our report of the 84th sprint we mentioned some changes regarding the encryption capabilities of the YaST Partitioner, like displaying the concrete encryption technology or the possibility to keep an existing encryption layer.

Keeping the previous encryption layer

And the report of sprint 85 contained a promise about a separate blog post detailing the new possibilities we have been adding when it comes to create encrypted devices.

So here we go! But let’s start with a small disclaimer. Although some of the new options are available for all (open)SUSE users, it’s fair to say that this time the main beneficiaries are the users of s390 systems, which may enjoy up to four new ways of encrypting their devices.

Good Things don’t Need to Change

As you may know, so far the YaST Partitioner offered an “Encrypt Device” checkbox when creating or editing a block device. If such box is marked, the Partitioner asks for an encryption password and creates a LUKS virtual device on top of the device being encrypted.

LUKS (Linux Unified Key Setup) is the standard for Linux hard disk encryption. By providing a standard on-disk-format, it facilitates compatibility among distributions. LUKS stores all necessary setup information in the partition header, enabling to transport or migrate data seamlessly. So far, there are two format specifications for such header: LUKS1 and LUKS2. YaST uses LUKS1 because is established, solid and well-known, being fully compatible with the (open)SUSE installation process and perfectly supported by all the system tools and by most bootloaders, like Grub2.

You should not fix what is not broken. Thus, in most cases, the screen for encrypting a device has not changed at all and it still works exactly in the same way under the hood.

Editing an encrypted device

But using an alternative approach may be useful for some use cases, and we wanted to offer an option in the Partitioner for those who look for something else. So in some special cases that screen will include a new selector to choose the encryption method. Let’s analyze all those new methods.

Volatile Swap Encryption with a Random Key

When a swap device has been marked to be encrypted, the user will be able to choose between “Regular LUKS1” and “Volatile Encryption with Random Key”. Both options will be there for swap devices on all hardware architectures. The first option simply uses the classical approach described above.

Selecting the encryption method

The second one allows to configure the system in a way in which the swap device is re-encrypted on every boot with a new randomly generated password.

Encrypt swap with a random password

Some advanced users may point that configuring such a random encryption for swap was already possible in versions of openSUSE prior to Leap 15.0. But the procedure to do so was obscure to say the least. The encryption with a random password was achieved by simply leaving blank the “Enter a Password” field in the encryption step. The exact implications were not explained anywhere in the interface and the help text didn’t mention all the risks.

Now the same configuration can be achieved with a more explicit interface, relevant information is provided as you can see in the screenshot below and some extra internal controls are in place to try to limit the potential harm.

Help text for the random swap method

With this approach, the key used to encrypt the content of the swap is generated on every boot using /dev/urandom which is extremely secure. But you can always go a bit further…

Swap Encryption with Volatile Protected AES Keys

One of the nice things about having a mainframe computer (and believe us there are MANY nice things) is the extra security measures implemented at all levels. In the case of IBM Z or IBM LinuxONE that translates into the so-called pervasive encryption. Pervasive encryption is an infrastructure for end-to-end data protection. It includes data encryption with protected and secure keys.

In s390 systems offering that technology, the swap can be encrypted on every boot using a volatile protected AES key, which offers an extra level of security compared to regular encryption using data from /dev/urandom. This document explains how to setup such system by hand. But now you can just use YaST and configure everything with a single click, as shown in the following screenshot.

Encrypting swap with volatile protected keys

The good thing about this method is that you can use it even if your s390 system does not have a CCA cryptographic coprocessor. Oh, wait… you may not know what a cryptographic coprocessor is. Don’t worry, just keep reading.

Pervasive Encryption for Data Volumes

Have you ever wondered how James Bond would protect his information from the most twisted and resourceful villains? We don’t know for sure (or, at least, we are supposed to not disclosure that information), but we would bet he has an s390 system with at least one Crypto Express cryptographic coprocessor configured in CCA mode (shortly referred as a CCA coprocessor).

Those dedicated pieces of hardware, when properly combined with CPU with CPACF support, make sure the information at-rest in any storage device can only be read in the very same system where that information was encrypted. They even have a physical mechanism to destroy all the keys when the hardware is removed from the machine, like the self-destruction mechanisms in the spy movies!

As documented here, the process to enjoy the full power of pervasive encryption for data volumes in Linux can be slightly complex… unless you have the YaST Partitioner at hand!

Pervasive volume encryption

As you can see in the screenshot above, the process with YaST is as simple as choosing “Pervasive Volume Encryption” instead of the classic LUKS1 that YaST uses regularly for non-swap volumes. If YaST finds in the system a secure AES key already associated to the volume being encrypted, it will use that key and the resulting encryption device will have the DeviceMapper name specified for that key. If such secure keys don’t exist, YaST will automatically register a new one for each volume.

Help for pervasive volume encryption

Pervasive encryption can be used on any volume of the system, even the root partition.

I want it all!

So far we have seen you can use protected AES keys for randomly encrypting swap and registered secure keys for protecting data volumes. But what if you want your swap to be randomly encrypted with a volatile secure AES key? After all, you have already invested time and money installing those great CCA coprocessors, let’s use them also for the random swap encryption!

If your hardware supports it, when encrypting the swap you will see a “Volatile Encryption with Secure Key” option, in addition to the other four possibilities commented above. As easy as it gets!

All possible methods for encrypting a swap

More Booting Checks in non-s390 Systems

As described in the help for pervasive volume encryption showed above, that encryption method uses LUKS2 under the hood. So we took the opportunity to improve the Partitioner checks about encryption and booting. Now, in any architecture that is not s390 the following warning will be displayed if the expert partitioner is used to place the root directory in a LUKS2 device without a separate plain /boot.

New check for booting

As mentioned, that doesn’t apply to s390 mainframes. The usage of zipl makes possible to boot Linux in those systems as long as the kernel supports the encryption technology, independently of the Grub2 (lack of) capabilities.

What’s next?

We are still working to smooth off the rough edges of the new encryption methods offered by YaST and to add AutoYaST support for them. You may have noticed that most of the improvements currently implemented will only directly benefit s390 systems… even just a subset of those. But at the current stage, we already have built the foundation for a new era of encryption support in YaSTland.

We are thinking about adding more encryption methods that could be useful for all (open)SUSE users, with general support for LUKS2 being an obvious candidate. But that’s not something we will see in the short term because there are many details to iron up first in those technologies to make then fit nicely into the current installation process.

But hey, meanwhile you can play with all the other new toys!

Highlights of YaST Development Sprint 85

September 26th, 2019 by

Refactored Network on its way to Tumbleweed

A few weeks ago we submitted the first round of changes to the network module to Tumbleweed. At that point, it was still using the old data model for most operations (except routing and DNS handling) and a lot of work remained to be done.

We have been working hard on improving the overall quality of this module and we will submit an updated (and much improved) version in the upcoming days. To summarize, here are some highlights:

  • Completed the new data model (support for TUN/TAP, bridges, bonding, VLANs, etc.).
  • New wireless configuration workflow.
  • Revamped support for interface renaming and driver assignment, including better udev rule handling.
  • Fixed /etc/hosts handling when switching from static to DHCP based configuration.
  • Many small fixes in several areas.

Are we done with the refactoring? No, we are still working on improving S390 support and fixing small issues, but most of the work is already done.

Of course, as soon as we finish, we will publish a blog entry with the gory details. But, as we know that you love screenshots, let us show you a handful of them.

Although we have not introduced big user interface changes, we have tried to improve small things, like properly displaying whether an interface belongs to a VLAN or hiding the "Hardware" tab for virtual interfaces.

DNS resolution not working during installation, or: openQA is different

When we got a bug report that DNS resolution was not working during installation (since SLE-15 apparently), a solution seemed straightforward: /run/netconfig/resolv.conf was missing because the /run directory was not mirrored (bind-mounted) into the target system. That’s a task that used to be done by yast-storage in times before SLE-15 and was for some unknown reason forgotten when we implemented yast-storage-ng. A one-line fix was easily done, tested, and submitted.

Or so it seemed.

A few days later we got reports from SLE openQA that tests started to fail with this patch. Nothing networking related but the installation did not finish because the 10 seconds countdown dialog (‘going to reboot’) at the very end of the installation was frozen. The UI didn’t accept any input whatsoever. But whatever we tried, the issue was not reproducible outside openQA. YaST logs from openQA showed that /run got mounted as planned and was cleanly unmounted at the end of the installation – before that frozen dialog. So no clue so far and the issue was set aside for a while. Until the same reports came in from Tumbleweed testing. It was clearly linked to this one-line patch. But how?

It stayed a mystery until a chat with an openQA expert shed some light on the issue. What we thought was happening was: openQA stopped the dialog (by pressing a button) and when it tried to go on the OK button did not respond anymore. What we learned does actually happen is this: openQA stops the dialog, then switches from X to the text console, collects logs, switches back to X, and then the UI does not respond anymore. So that was quite an essential point missing.

And with this it was easily reproduced outside openQA: the X logs showed that the X server lost all its input devices after the switch. And that was because someone had deleted the whole /run directory. The YaST logs didn’t contain a hint (of course not, would have been too easy) but grepping the sources found the place where YaST deleted the directory.

The code had been added after complaints that the installation left a cluttered /run directory – of course the installation did leave files there, since it was forgotten to bind-mount the directory. So once the mentioned patch bind-mounted it again the deletion code cleaned up not /run in the installation target system but the real /run as well – cutting off the X server from the outside world resulting in freezing the openQA test.

And the moral of the story is: probably none. But it highlights again that the automated test setup can have unexpected feedback on the test itself. Luckily in this case, as the issue would not have been noticed otherwise.

Computer, Enlarge the Device Graph

The partitioner module has a graphical view to help you see the relations in more complex storage setups:

If you turn the mouse scroll wheel up or down, we will zoom the view in or out. Now the direction matches the behavior in web browsers and online maps, previously we had it the wrong way around.

Update: during proofreading, a team mate told me: "A device graph? That’s not a device graph. THAT’s a device graph:"

Highlights of YaST Development Sprint 84

September 16th, 2019 by

The YaST Team finished yet another development sprint last week and we want to take the opportunity to let you all glance over the engine room to see what’s going on.

Today we will confess an uncomfortable truth about how we manage the Qt user interface, will show you how we organize our work (or at least, how we try to keep the administrative part of that under control) and will give you a sneak peak on some upcoming YaST features and improvements.

Let’s go for it!

There Be Dragons: YaST Qt UI Event Handling

The YaST Qt UI is different in the way that it uses Qt. Normal Qt applications are centered around a short main program that after initializing widgets passes control to the Qt event loop. Not so YaST: it is primarily an interpreter for the scripts (today in Ruby, in former times in YCP) that are executed for the business logic. Those scripts, among other things, also create and destroy widget trees. But the control flow is in the script, not in a Qt event loop. So YaST uses different execution threads to handle both sides: graphic’s system events for Qt widgets and the control flow from the scripts.

This was always quite nonstandard, and we always needed to do weird things to make it happen. We always kind of misused Qt to hammer it into shape for that. And we always feared that it might break with the next Qt release, and that we might have a hard time to make it work again.

This time has now come with bug#1139967, but we were lucky enough to find a Qt call to bring it back to life; a QEventLoop::wakeUp() call fixed it. We don’t quite know (yet) why, though. Any hint, anyone?.

Should we even tell you that? Well, we think you deserve to know. After all, it worked well for about 20 years (!)… and now it’s working again.

The Refactoring of YaST Network Keeps Going

What is still not working that fine is the revamped network management. We have been working on it during the latest sprint, but it will take at least another one before it’s stable enough to be submitted to openSUSE Tumbleweed.

On which parts have we be working during the this sprint? Glad you asked! 😉 We are cleaning the current mess in wireless configuration. Soon that part will be more intuitive and consistent with other types of network. We are also making sure we propose meaningful defaults for the new cards added to the network configuration (all types of cards, not only wireless). The functionality to configure udev in order to enjoy stable names for the network interfaces has also received some love. The new version is more stable and flexible. And last but not least, we are improving the device activation in s390 systems for it to be more straightforward in the code and more clear in the user interface.

If everything goes as planned, by the end of the next sprint we will be ready to submit the improved YaST Network to Tumbleweed. That will be the right time for a dedicated blog post with screenshots and further explanations of all the changes.

Enhancing the Partitioner Experience with Encrypted Devices

And talking about ongoing work, we are currently working to broaden the set of technologies and use-cases the Partitioner supports when it comes to data encryption. As with the network area, the big headlines in that regard will have to wait for future blog posts. But if you look close enough to the user interface of the Partitioner available in Tumbleweed you can start spotting some small changes that anticipate the upcoming new features.

The first change is very subtle. When visualizing the details of an encrypted device, next to the previously existing “Encrypted: Yes” text you will now be able to see the concrete type of encryption. For all devices encrypted using YaST, that type will always be LUKS1 since that’s the only format that YaST has supported… so far. 😉

Partitioner: show the type of encryption

Some other small changes are visible when editing an encrypted device. If such a device was not originally encrypted in the system, nothing changes apart from minor adjustments in the labels. The user simply sees a form with an empty field to enter the password.

Encrypting a plain device

When editing for a second time a device that was already marked for encryption during the current execution of the Partitioner, the form is already prefilled with the password entered before. In the past, the previous encryption layer was ditched (so it’s password and other arguments were forgotten) and the user had to define the encryption again from scratch. That will become even more relevant soon, when the form for encryption becomes more than just a password field. Stay tuned for news in that regard.

Editing an encrypted device

Moreover, when editing a device that is already encrypted in the system, an option is offered to just use the existing encryption layer instead of replacing it with a (likely more limited) encryption created by the Partitioner.

Keeping the previous encryption layer

Apart from opening the door for more powerful and relevant changes in the area of encryption, these changes represent an important usability improvement by themselves.

Tidying up the YaST Team’s Trello Board

As you can see in this report and in all the previous ones, the YaST Team works constantly on many different areas like installation, network management, storage technologies… you name it. We use Trello to organize all that work. For each bug in Bugzilla or feature in Jira there is a corresponding Trello card. As it happens, sometimes when a bug is closed its Trello card is forgotten to be updated.

A check with ytrello revealed that, out of a total of 900-something cards, about 500 were outdated and could be closed. More than the half! Why so many?

We found that quite a number of these cards were open cards in closed (archived) lists. So when you archive a list, don’t forget to archive its cards before. We have just learned that Trello does not do this automatically. That’s exactly why there’s a menu item Archive All Cards in This List... besides Archive This List in the Trello user interface.

Back to work!

This has been a summer of promises on our side. We told you we are working to improve our user interface library (libYUI), revamping the code to manage the network configuration, extending the support for encryption… which means we have a lot work to be finished.

So let us go back to work while you do your part – having a lot of fun!

openSUSE OBS git mirror

September 13th, 2019 by

There was some discussion about our OBS and how in contrast Gentoo, VoidLinux or Fedora used git to track packages.

So I made an experimental openSUSE:Factory git mirror to see how well it goes and how using it feels.
The repo currently needs around 1GB but will slowly grow over time. I did not want to spend effort to import all history.

Binary files are replaced by cryptographically secure symlinks into IPFS
and I am currently providing files up to 9MB there.

If you can not run ipfs, you can still get these files through any of the public gateways like this:
curl https://ipfs.io$(readlink packages/a/aubio/aubio-0.4.9.tar.bz2) > OUTPUT

So some benefits are already obvious.
It is now much easier to find and download our patches.
Downloading and seaching all of openSUSE is now much faster.
And it works even on Thursdays (when our maintenance window often causes OBS downtimes).

It is meant to be a read-only mirror, so there is no point in opening pull-requests on github.

I hope, you enjoy it and have a lot of fun…

Highlights of YaST Development Sprint 83

August 30th, 2019 by

The summer is almost gone but, looking back, it has been pretty productive from the YaST perspective. We have fixed a lot of bugs, introduced quite interesting features to the storage layer and the network module refactoring continues to progress (more or less) as planned.

So it is time for another sprint report. During the last two weeks, we have been basically busy squashing bugs and trying to get the network module as feature-complete as possible. But, after all, we have had also some time to improve our infrastructure and organize for the future.

YaST2 Network Refactoring Status

Although we have been working hard, we have not said a word about the yast2-network refactoring progress since the end of July, when we merged part of the changes into yast2-network 4.2.9 and pushed it to Tumbleweed. That version included quite a lot of internal changes related to the user interface and a few bits of the new data model, especially regarding routing and DNS handling.

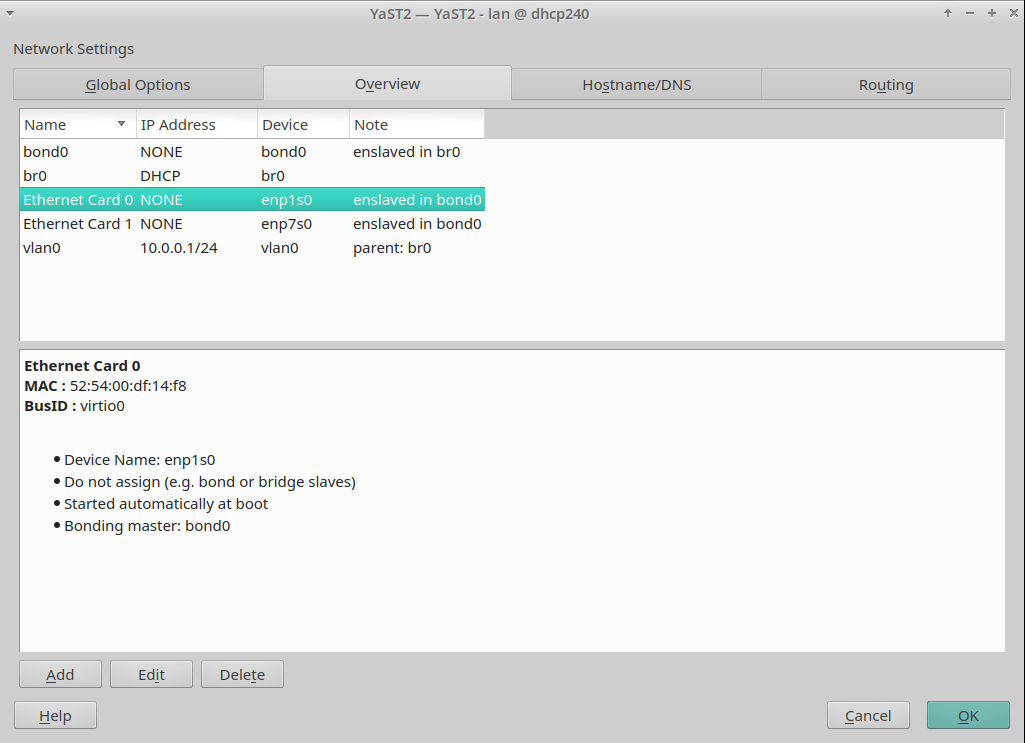
However, things have changed a lot since then, so we would like you to give you an overview of the current situation. Probably, the most remarkable achievement is that the development version is able to read and write the configuration using the new data model. OK, it is not perfect and does not cover all the use cases, but we are heading in the right direction.

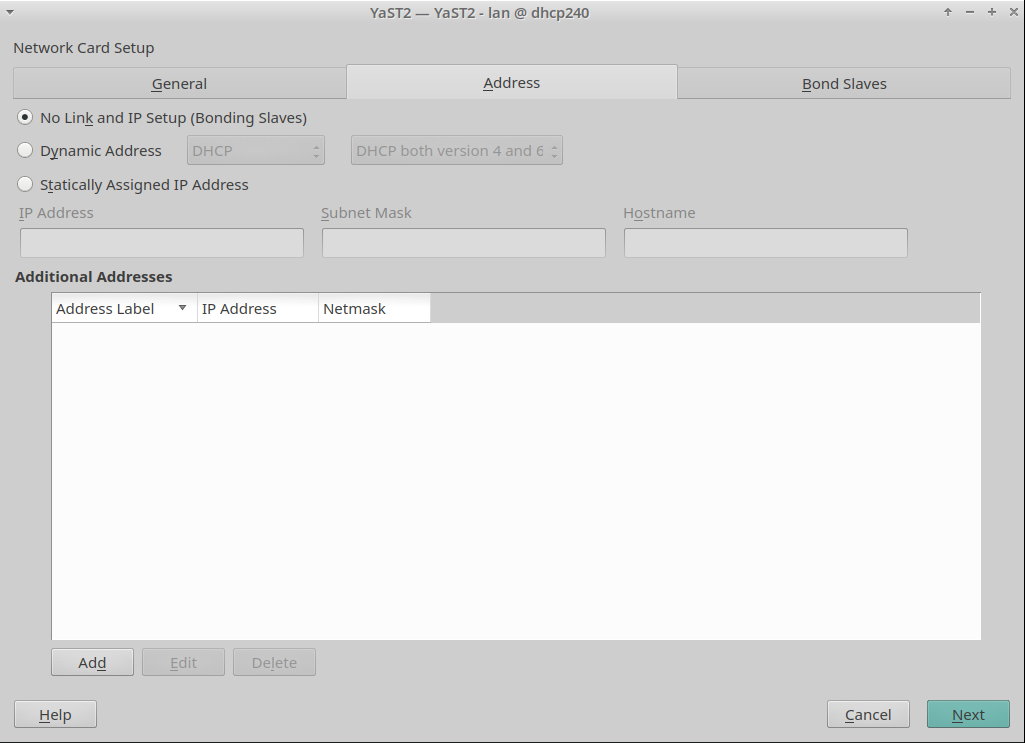
In the screencast below you can see it in action, reading and writing the configuration of an interface. The demo includes handling aliases too, which is done way better than the currently released versions.

YaST2 Network New Data Model in Action

Moreover, we had brought back support for many types of devices (VLAN, InfiniBand, qeth, TAP, TUN, etc.), improved the WiFi set-up workflow and reimplemented the support for renaming devices.

Now, during the current sprint, we are focused on taking this new implementation to a usable state so we can release the current work as soon as possible and get some feedback from you.

Finally, if you like numbers, we can give you a few. Since our last update, we have merged 34 pull requests and have increased the unit test coverage from 44% in openSUSE Leap 15.0/SUSE Linux Enterprise SP1 to around 64%. The new version is composed of 31.702 (physical) lines of code scattered through 231 files (around 137 lines per file) vs 22.542 in 70 files of the old one (more than 300 lines per file). And these numbers will get better as we continue to replace the old code 🙂

Missing Packages in Leap

It turned out that some YaST packages were not updated in Leap 15.1. The problem is that, normally, the YaST packages are submitted to the SLE15 product and they are automatically mirrored to the Leap 15 distribution via the build service bots. So we do not need to specially handle the package updates for Leap.

However, there are few packages which are not included in the SUSE Linux Enteprise product line, but are included in openSUSE Leap. Obviously these packages cannot be updated automatically from SUSE Linux Enterprise because they are not present there. In this case Leap contained the old package versions from the initial 15.0 release.

In order to fix this issue, we manually submitted the latest packages to the Leap 15.2 distribution. To avoid this problem in the future we asked the Leap maintainers to add the Leap specific packages to a check list so they are verified before the next release. Of course, if you see any outdated YaST package in Leap you can still open a bug report. 😉

Just for reference, the affected packages are: yast2-alternatives, yast2-slp-server, yast2-docker and skelcd-control-openSUSE (the content is only present on the installation medium, it’s not released as an RPM).

Let’s use all disks!

As you may remember, three sprints ago we added some extra configuration options to make the storage guided proposal able to deal with the SUSE Manager approach. We even wrote a dedicated blog post about it!

Despite offering the new options in the Guided Setup, we tried to keep the default initial behavior of the installer consistent with other (open)SUSE products. So the installer initially tried to install the whole system in a single disk, unless that was impossible or it was told by the user to expand on several disks.

But the SUSE Manager folks found that to be contrary to the new ideas introduced in their Guided Setup. According to their feedback, in this case remaining consistent with other (open)SUSE product was not reducing the confusion, but rather increasing it. SUSE Manager should try from the very beginning to expand the product as much as possible among all available disks.

For that reason, during this sprint we introduced the first improvement (a.k.a. another configuration option), so now it is possible to tell whether the initial proposal should try to use multiple disks as first try.

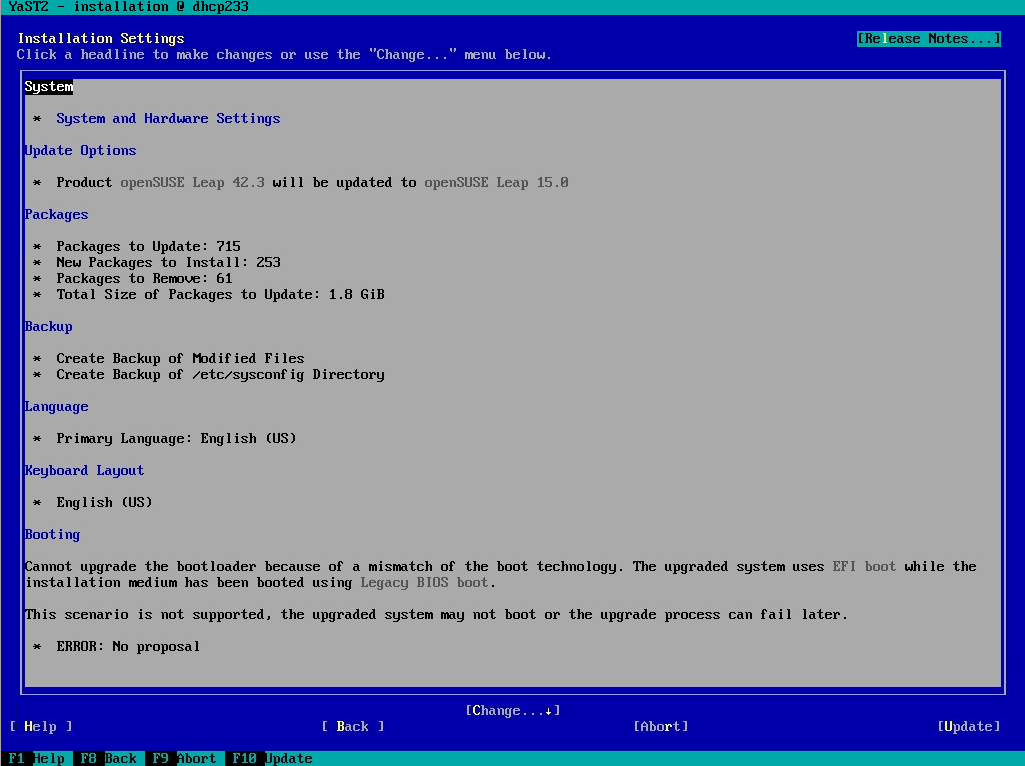
Bootloader and Small MBR Gaps

We received a bug report because a system was not able to boot after installation. In this case, the user decided to use Btrfs and placed the root file system in a logical partition. In theory, this scenario should work but, unfortunately, the MBR gap was too small to embed the Grub2 bootloader code.

At first sight, this problem could be solved by asking YaST to install the bootloader into the logical partition and the generic boot code in the MBR. But this will only work if you set the logical partition as the active one. Sadly, some BIOSes could insist on having a primary partition as the active one.

But don’t worry, we have good news. Grub2 maintainers took care of this problem. In case the MBR gap is too small, Grub2 will automatically fall-back to the Btrfs partition. That’s all. And what does it mean for YaST? Well, thanks to this fix, YaST will simply work out of the box and your system will be bootable again. But not so fast! You still have to wait a little bit more to have these Grub2 improvements available in a Tumbleweed installer.

Handling Empty Comment Lines in NTP Configuration

AutoYaST supports defining an specific NTP configuration to be applied during the installation and it relies in Augeas to read/write the ntp.conf file. But it seems that Augeas has some problems when it tries to write comments with empty lines, as you can see in bug 1142026. The solution was to adapt YaST to filter out empty comment lines before saving the configuration file, working around the Augeas problem.

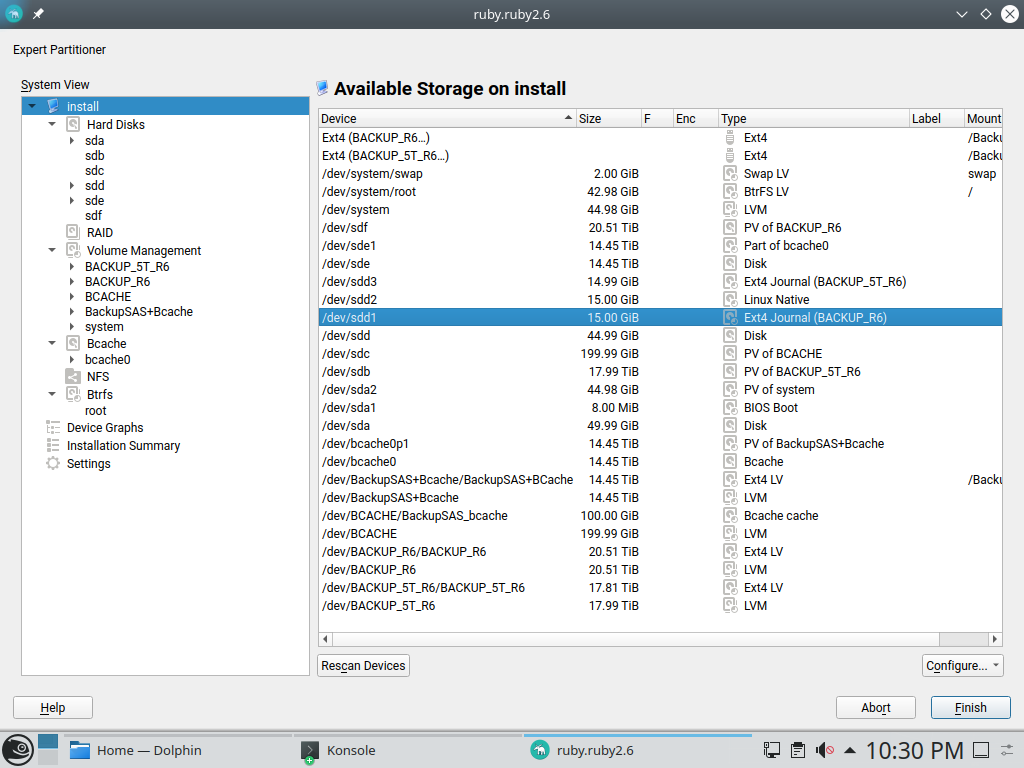
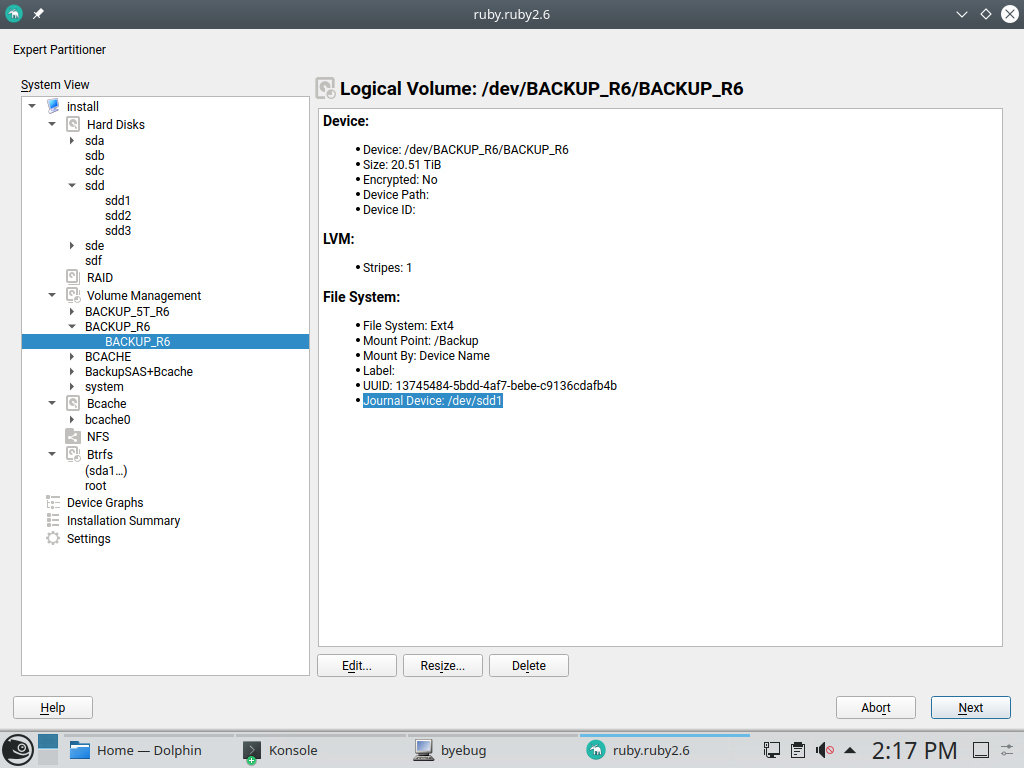
Error Resizing Some Partitions

Typically, an MS-DOS partition table reserves its first MiB for the MBR gap, so the partitions normally start after that point. But it is possible, especially in partitions for old Windows systems, that it starts before that first MiB. In that case, if we try to resize that partition (e.g., by using the Expert Partitioner), YaST crashes due to an error when calculating the resize information. Fortunately, this problem is gone now, and you will be able to resize this kind of partitions as well.

Side Effects of Keyboard Layouts Unification

During the sprint 81, the openSUSE and SUSE Linux Enterprise console keyboard layouts were unified after some minor changes. One of those changes was to stop using the, in appearance, useless keymaps symlinks for Arabic and Cambodian. But they were there for a reason: are being used by YaST to correctly adapt the keyboard in the X11 environment. Just visit the pull request if you prefer to scare yourself want to dive in more technical details.

Fortunately for the users of those keyboards, we realized about this problem before the upcoming SLE-15-SP2 was released 🙂 And, it’s fixed.

House Keeping Tasks

As part of our development duties for this sprint, we invested quite some time in reviewing and updating our continuous integration (CI) set up. Apart from using Travis CI for pull requests, we rely on Jenkins to run the tests and submit the code to the appropriate projects in the Open Build Service instances.

Then, when the development of a new version starts or when the product is about to be released, we need to adjust the configuration. Just in case you are wondering, we do not do this work by hand anymore and we use Salt and Jenkins Job Builder to handle this configuration.

Closing Thoughts

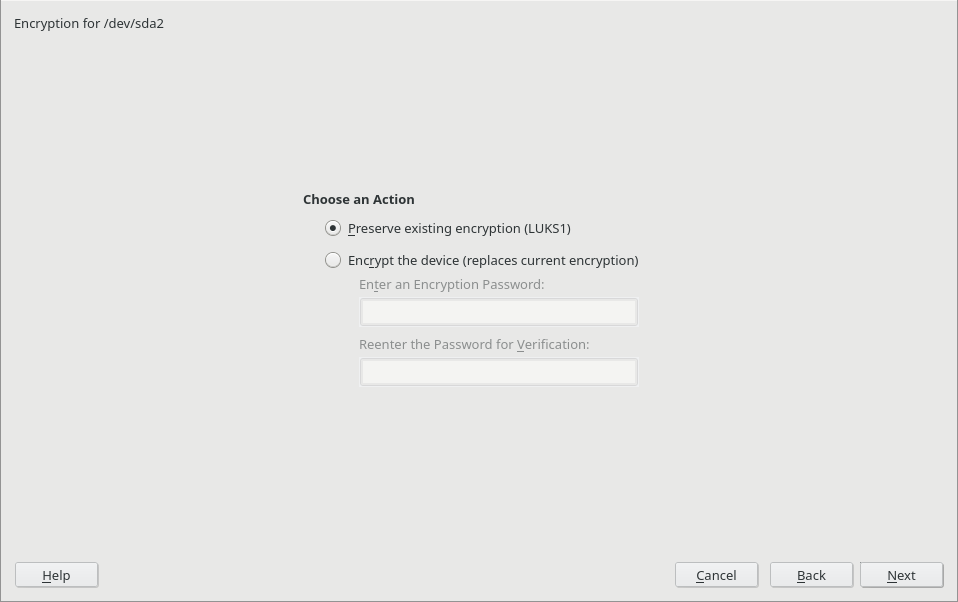
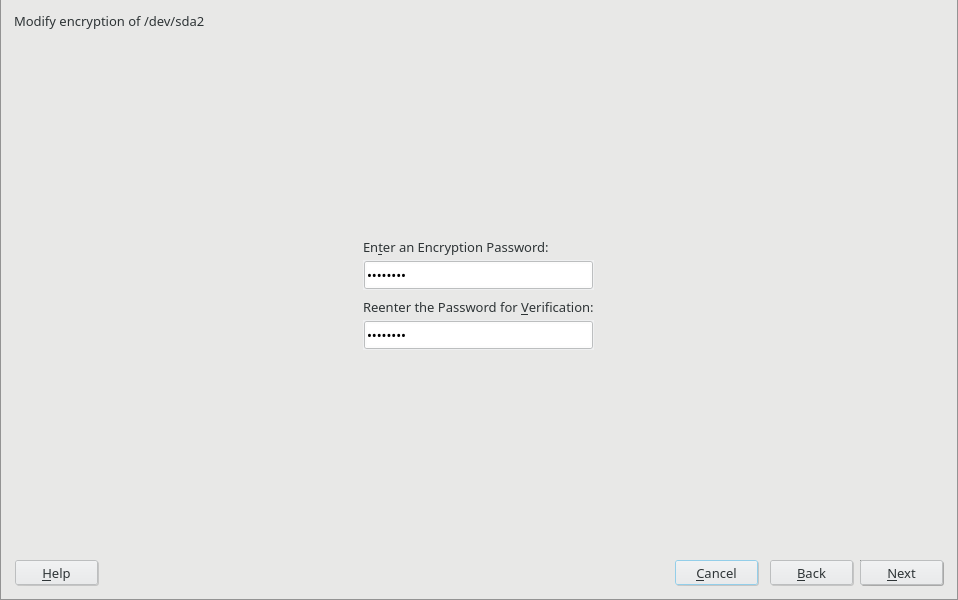
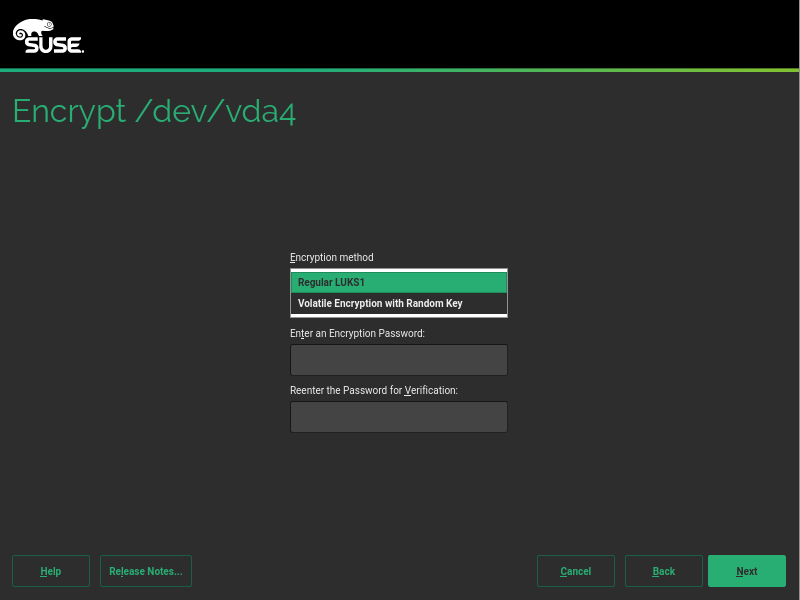
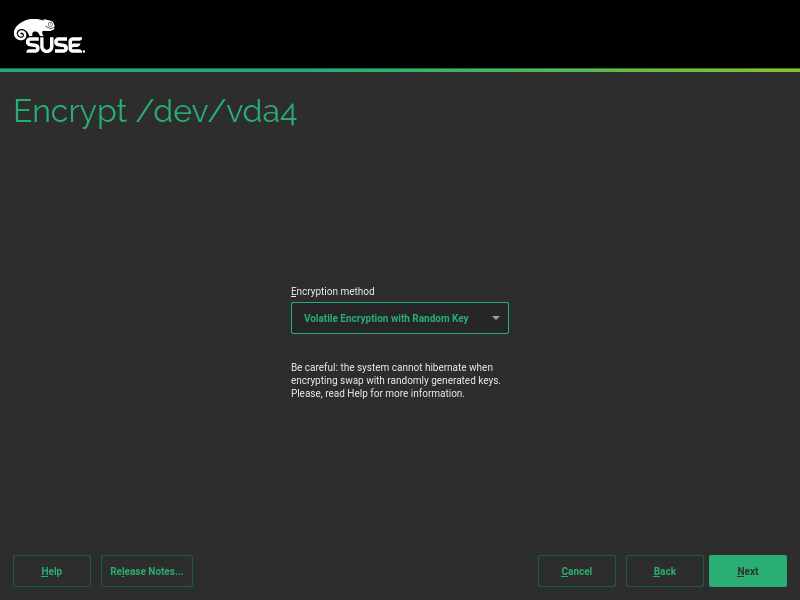
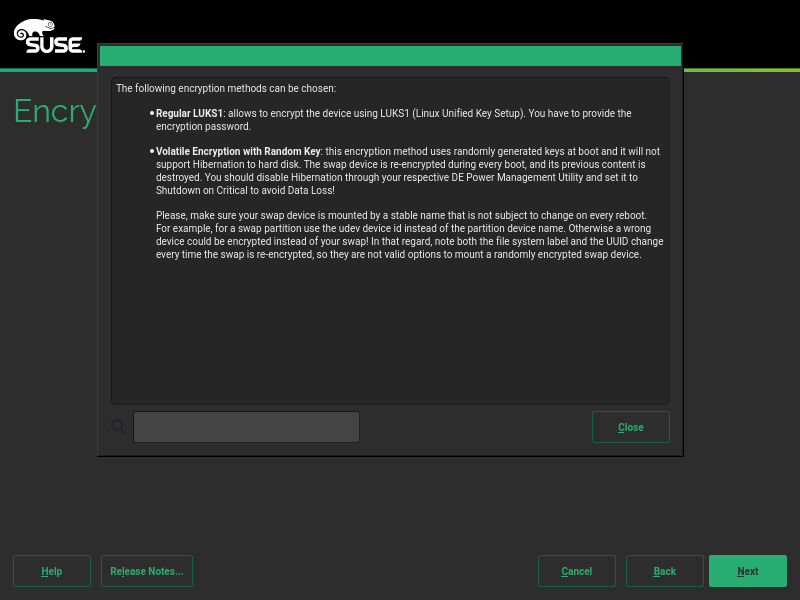
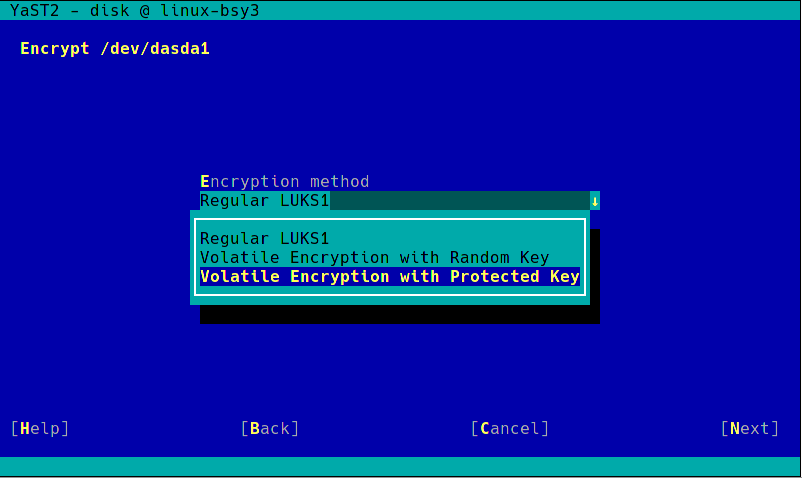
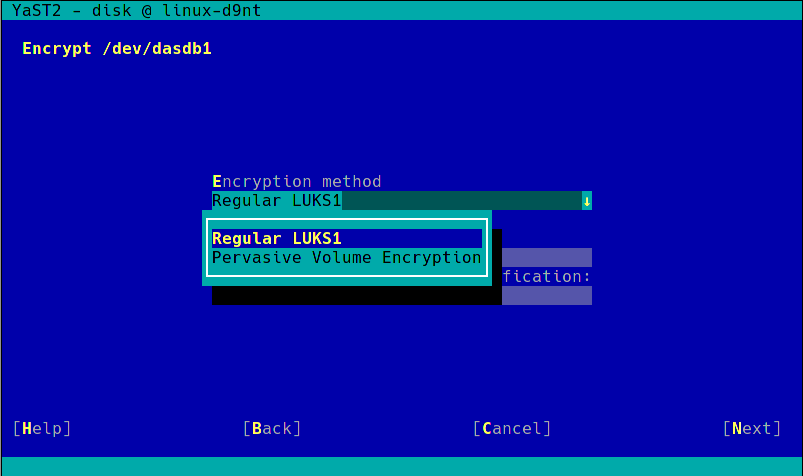
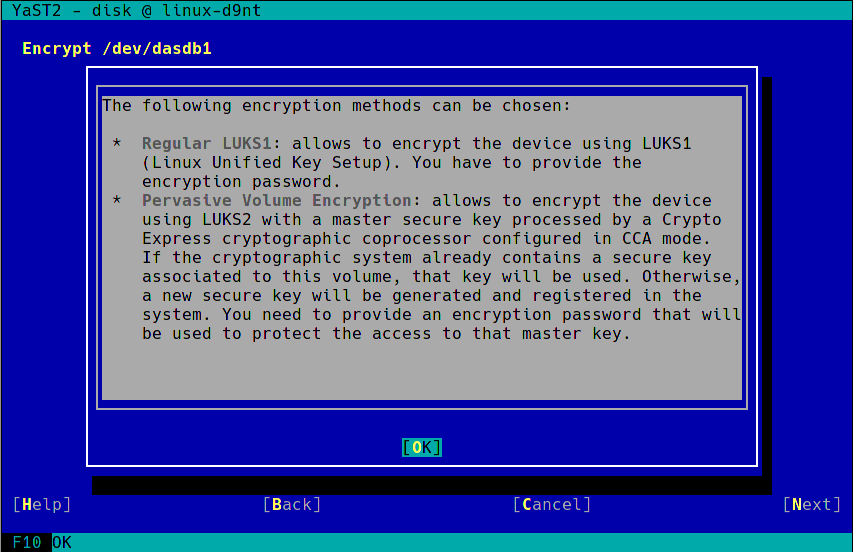
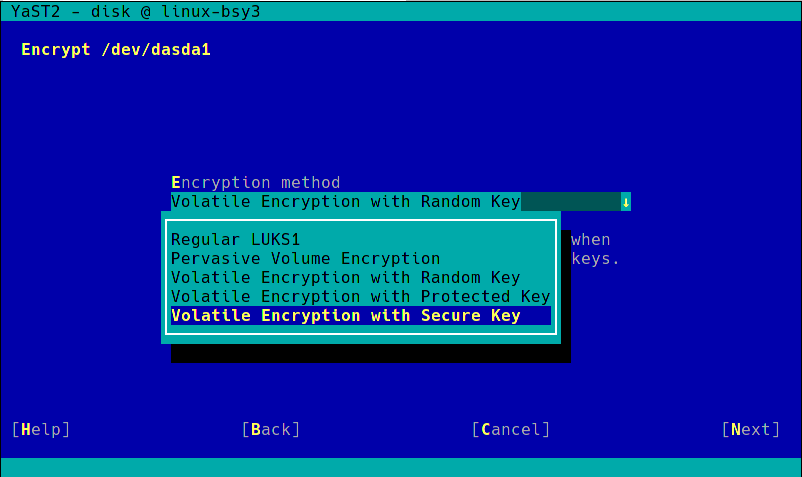
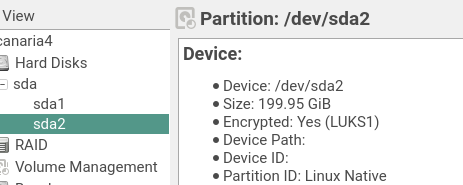
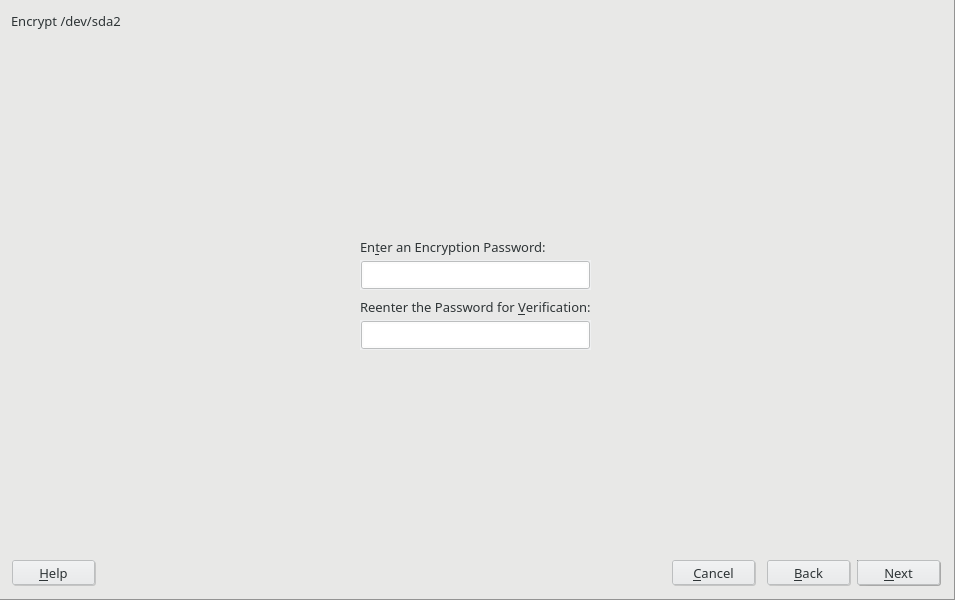
During the next sprint (actually, the current one) we are working in three different areas, apart from squashing bugs: improving encryption support in the storage layer, adding some features to the installer (repo-less installer, support for reading product licenses from a tarball, etc.) and, of course, refactoring the network code. Obviously, we will give you all sort of details in our next sprint report.

Highlights of YaST Development Sprint 82

August 14th, 2019 by

July and August are very sunny months in Europe… and chameleons like sun. That’s why most YaST developers run away from their keyboards during this period to enjoy vacations. Of course, that has an impact in the development speed of YaST and, as a consequence, in the length of the YaST Team blog posts.

But don’t worry much, we still have enough information to keep you entertained for a few minutes if you want to dive with us into our summer activities that includes:

  • Enhancing the development documentation
  • Extending AutoYaST capabilities regarding Bcache
  • Lots of small fixes and improvements

AutoYaST and Bcache – Broader Powers

Bcache technology made its debut in YaST several sprints ago. You can use the Expert Partitioner to create your Bcache devices and improve the performance of your slow disks. We even published a dedicated blog post with all details about it.

Apart of the Expert Partitioner, AutoYaST was also extended to support Bcache devices. And this time, we are pleased to announce that … we have fixed our first Bcache bug!

Actually, there were two different bugs in the AutoYaST side. First, the auto-installation failed when you tried to create a Bcache device without a caching set. On the other hand, it was not possible to create a Bcache with an LVM Logical Volume as backing device. Both bugs are gone, and now AutoYaST supports those scenarios perfectly.

Configuring Bcache and LVM with AutoYaST

But Bcache is a quite young technology and it is not free of bugs. In fact, it fails when the backing device is an LVM Logical Volume and you try to set the cache mode. We have already reported a bug to the Bcache crew and (as you can see in the bug report) a patch is already been tested.

Enhancing Our Development Documentation

This sprint we also touched our development documentation, specifically we documented our process for creating the maintenance branches for the released products. The new branching documentation describes not only how to actually create the branches but also how to adapt all the infrastructure around (like Jenkins or Travis) which requires special knowledge.

We will see how much the documentation is helpful next time when somebody has to do the branching process for the next release. 😉

Working for a better world YaST

We do our best to write code free of bugs… but some bugs are smarter than us and they manage to survive and reproduce. Fortunately we used this sprint to do some hunting.

Those are only some examples of the kind of bugs we have fought during this sprint. But checking bug reports has also made us think in the future…

LibYUI in 21st Century

We fixed a bug related to how the focus was managed in text mode after changing any setting via the hyperlinks available in the installation summary.

Installation summary in text mode

The implemented solution is actually not perfect, it’s just the better we can do with our set of widgets. And that was yet another example of such problem – LibYUI is an awesome library that allows us to create interfaces that work in both graphic and text modes, but it has basically not evolved for more than a decade… and it’s time to fix that!

So we have been discussing how to organize our time in the close future to leave some room for innovation and renovation regarding LibYUI and the YaST UI in general. Stay tuned for more news.

August is still not over

The YaST Team will keep working during the rest of the summer sharpening our Linux Swiss army knife. But half of the team is still on vacation or starting their vacation now. So most likely our next report will be here in two weeks and it will also be a light read.

Meanwhile, don’t forget to have a lot of fun!

Tricks with IPFS

August 7th, 2019 by

Since April I am using IPFS

Now I wanted to document some neat tricks and details.

When you have the hex-encoded sha256sum of a small file – for this example let’s use the GPLv3.txt on our media –
sha256sum /ipns/opensuse.zq1.de/tumbleweed/repo/oss/GPLv3.txt
8ceb4b9ee5adedde47b31e975c1d90c73ad27b6b165a1dcd80c7c545eb65b90

Then you can use the hash to address content directly by prefixing it with /ipfs/f01551220 so it becomes

/ipfs/f015512208ceb4b9ee5adedde47b31e975c1d90c73ad27b6b165a1dcd80c7c545eb65b903

In theory this also works with SHA1 and the /ipfs/f01551114 prefix, but then you risk experiencing non-unique content like
/ipfs/f0155111438762cf7f55934b34d179ae6a4c80cadccbb7f0a

And dont even think about using MD5.

For this trick to work, the file needs to be added with ipfs add --raw-leaves and it must be a single chunk – by default 256kB or smaller, but if you do the adding, you can also use larger chunks.

Here is a decoding of the different parts of the prefix:
/ipfs/ is the common path for IPFS-addressed content
f is the multibase prefix for hex-encoded data
01 is for the CID version 1
55 is for raw binary
12 is for sha2-256 (the default hash in IPFS)
20 is for 32 byte = 256 bit length of hash

And finally, you can also access this content via the various IPFS-web-gateways:
https://ipfs.io/ipfs/f015512208ceb4b9ee5adedde47b31e975c1d90c73ad27b6b165a1dcd80c7c545eb65b903

You can also do the same trick with other multibase encodings of the same data – e.g. base2

Base2 looks pretty geeky, but so far I have not found practical applications.

Debugging jenkins

July 31st, 2019 by

We had strange near-daily outages of our internal busy jenkins for some weeks.

To get to the root cause of the issue, we enabled remote debugging with

-Dcom.sun.management.jmxremote -Dcom.sun.management.jmxremote.port=9010 -Dcom.sun.management.jmxremote.ssl=false -Djava.rmi.server.hostname=ci.suse.de -Dcom.sun.management.jmxremote.password.file=/var/lib/jenkins/jmxremote.password

and attached visualvm to see what it was doing.
This showed the number of threads and memory usage in a sawtooth pattern. Every time the garbage collector ran, it dropped 500-1000 threads.

Today we noticed that every time it threw these java.lang.OutOfMemoryError: unable to create new native thread errors, the maximum number of threads was 2018… suspiciously close to 2048. Looking for the same time in journalctl showed
kernel: cgroup: fork rejected by pids controller in /system.slice/jenkins.service

So it was systemd refusing java’s request for a new thread and jenkins not handling that gracefully in all cases.
That was easily avoided with a
TasksMax=8192

Now the new peak was at 4890 live threads and jenkins served all Geekos happily ever after.