Home Home > Tag > ARM
Sign up | Login

Deprecation notice: openSUSE Lizards user blog platform is deprecated, and will remain read only for the time being. Learn more...

Posts Tagged ‘ARM’

How I ran openSUSE on a Nexus 7

September 22nd, 2013 by

The Nexus 7 (2012 version) is a 7 inch tablet by Google+Asus.
The nice thing about it is, that it has an unlockable bootloader. Also it has an armv7 CPU and we built openSUSE for this CPU for some years. I had one such device with a broken display, so doing some more risky things with it seemed to be appropriate.
I wanted to run my own software on it. Running openSUSE in a chroot (change-root) environment is usually a lot easier than replacing the whole system, so this is where I went.

First, I needed two tools. One is the “adb” – Android DeBug tool from the official sdk and the other is “fastboot” which was hard to find, so I mirror it here.
I got me the stable ROM from http://wiki.cyanogenmod.org/w/Grouper_Info and followed their installation instructions. adb shell only seemed to work while in bootloader (which you reach by holding Volume-Down+Power during boot)
The hardest part was to re-enable USB-debugging by going into Settings/About tablet and tapping Build-Number seven times.

Also before zapping everything that was there, I did in adb shell : cp -a /system/app /sdcard/
and back later.
So after following all the other installation steps, I had cyanogenmod booting. I attached a bluetooth keyboard so that I can better type. The ROM comes with a terminal app, which I opened. type su - to become root after a security popup.
Now, I downloaded my lastest Raspberry-Pi image from http://www.zq1.de/bernhard/linux/opensuse/. This is under /sdcard/Download where I unpacked it with xz -d
Then comes the tricky part. The image has a partition table, but here we just need the root filesystem. With fdisk -lu we can see that it starts at sector 309248. One could copy out that part with dd or use a loop device with offset like this:
#!/system/xbin/sh
mknod /dev/loop0 b 7 0
losetup -d /dev/loop0 # cleanup of previous try
losetup -o `expr 512 \* 309248` /dev/loop0 rasp*img
mkdir -p mnt
mount -t ext2 /dev/loop0 mnt

Now we have access to the openSUSE files under mnt.
In there I created me a chroot.sh:
#!/system/xbin/sh
for m in proc sys dev ; do mount -o bind /$m $m ; done
HOME=/root PATH=/sbin:/usr/sbin:/usr/local/sbin:/root/bin:/usr/local/bin:/usr/bin:/bin:/usr/bin/X11:/usr/X11R6/bin /system/xbin/chroot . bin/bash
for m in proc sys dev ; do umount $m ; done

With that, the only remaining thing to do was to add a nameserver line to /etc/resolv.conf before I could use zypper to install software e.g. zypper install yast2-network yast2-ncurses.
Running yast lan on the Nexus 7 gives nice sight.

I guess one could also use the armv7 rootfs to have software built for armv7 instead of the compatible armv6. But for me it does not matter much.
GPIO on Raspberry Pi

March 31st, 2013 by

We have these working openSUSE Factory images for the Raspberry Pi, which is an ARM-based mini-computer, and since I want to encourage my kid to do more with computers than playing games (even if they are open-source), I looked into how GPIOs worked.
For that, you need to find the pin allocation – e.g.
in the elinux GPIO description or
http://www.raspberrypi.org/archives/1417
has a video which has it explained at 03:00

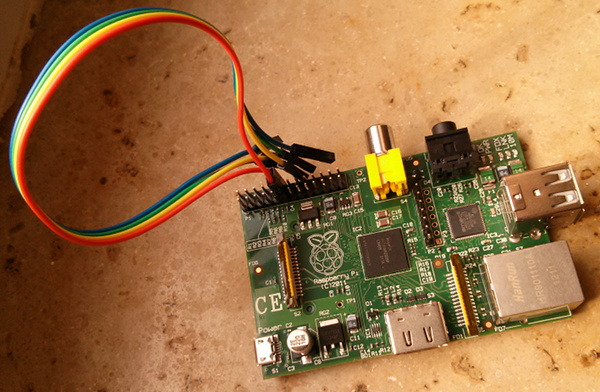
For my test, I wired together pin11 and pin12, which are GPIO17 and GPIO18.
I wanted GPIO17 to receive what is sent by GPIO18.
This is how this looked for me: foto of GPIO17 and 18 wired together

Using it directly from the shell is simple:
echo 17 > /sys/class/gpio/export
echo 18 > /sys/class/gpio/export
echo out > /sys/class/gpio/gpio18/direction
echo 1 > /sys/class/gpio/gpio18/value
watch -n 1 head /sys/class/gpio/gpio*/value

If the wiring and configuration was right, the “watch” will show gpio17/value to become 1 too.
You can then also pull the wire (or insert a physical switch) and see gpio17/value dropping to 0 again, when it is no more receiving the current from the other pin.

If you managed to get this working, you reached level one of hardware-hackery.

openSUSE on phones/tablets

February 20th, 2013 by

Thanks to the fantastic work by openSUSE Arm team, you can get full desktop on your armv7l powered phone or tablet(any recent dual core devices should work), without the need for repartition, formats, bootloader hacks or sacrificing your nicely running latest android on it. What you need is rooted device with busybox, Android VNC and terminal app installed and 4GB free space on sdcard(internal or external).
(more…)

openSUSE ARM image

January 21st, 2012 by

When I wrote this week, how I ran openSUSE on my genesi smarttop some people asked for a ready-to-use image. After spending less than 8 hours fiddling with u-boot-scripts, partition tables, tuning ext3 and initrds, it was done… and is now so easy:

wget http://www.zq1.de/efika.img.xz # 83MB
xz -cd efika.img.xz | dd of=/dev/sdX bs=1M

with sdX being the device name of your SD-card (e.g. “mmcblk0” on the smarttop itself) with at least 1GB (actually 1024000000 bytes) of free space.

When inserted at boot, it should just boot up within 23 seconds and let you login as root with password “linux” on SSH, serial and with a USB-keyboard on HDMI. I spent some effort on putting as few packages as possible into it. Still, you have zypper to install packages and nano to edit files.

There is still a known hangup when you try to reboot. Workaround is: init 2 ; sleep 12 ; killall rsyslogd ; umount /boot/ ; mount -o remount,ro / ; reboot

As it still uses the original linux-2.6.31 kernel, it has another bug that also happens with pre-installed Ubuntu: sometimes (in ~40% of cases), boot stopps early, before graphics is initialized, when the last line on serial is “console handover: boot [ttymxc0] -> real [tty1]”. Try turning it off and on again.

This should allow you to have a whole lot of fun…

running openSUSE on ARM

January 19th, 2012 by

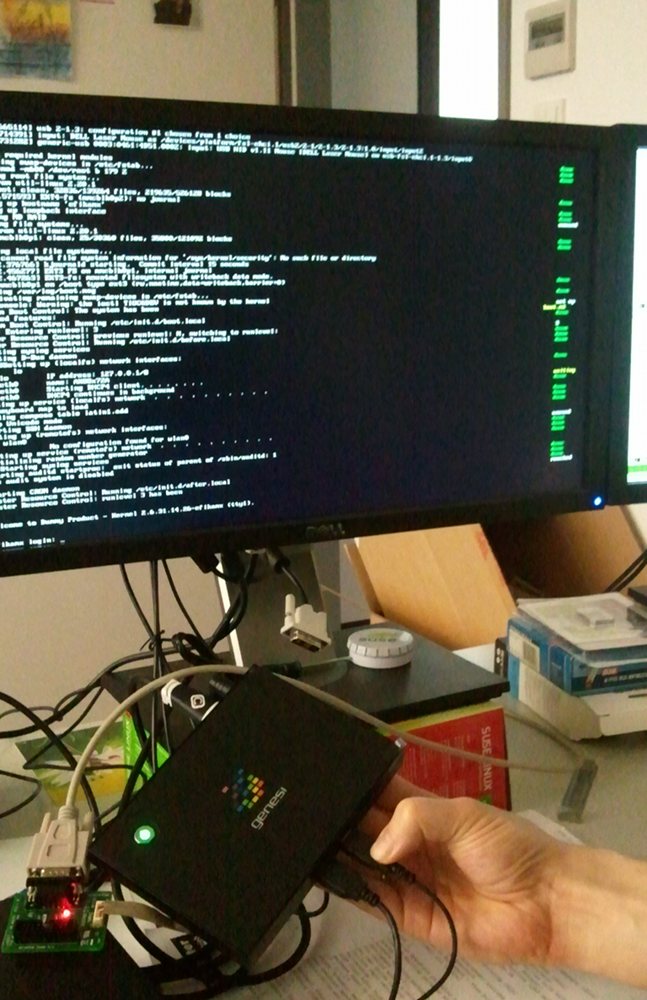
This week I finally got my genesi efika MX box. By default it has on old Ubuntu version installed on its internal IDE-attached 8GB SSD. It features 512 MB RAM and a 800 MHz ARMv7 CPU.

Using a HDMI-cable and an HDMI-DVI-Adaptor I got it connected to a monitor, plugged in a USB keyboard+mouse and it pretty much worked out of the box with WLAN,Ethernet,X11 (except for a bug that causes it to force you to change PW on every console login). How boring.

Having read about recent progress with openSUSE on ARM I wanted the excitement of running it on this box.

Michal’s image and script (now in alpha) was very helpful to get me started within 15 minutes.

If you have any (e.g. x86) openSUSE system running, there is another easy way to create a working ARM chroot-environment:

zypper ar http://download.opensuse.org/repositories/openSUSE:/Tools:/Unstable/openSUSE_12.1/openSUSE:Tools:Unstable.repo
zypper install qemu osc
osc co openSUSE:Factory:ARM bash
cd openSUSE:Factory:ARM/bash
edit bash.spec # add lines with your packages like BuildRequires: zypper,vim
osc build –no-verify –clean standard armv7l

If it worked well, /var/tmp/build-root/ should contain a chroot environment. E.g. you can run

file /var/tmp/build-root/bin/bash
/var/tmp/build-root/bin/bash: ELF 32-bit LSB executable, ARM, version 1 (SYSV), dynamically linked (uses shared libs), for GNU/Linux 2.6.16, BuildID[sha1]=0xed9ca12f44c8591560d780cf807b6b6cf8ca8873, stripped

I partitioned my SD-card into two partitions. The first one for /boot with ext2 (needs only 150MB) and the second one for / to contain the rootfs. Be sure to have barrier=0 in your fstab for all ext[34] partitions so that writing to SD will not be as slow. The default U-Boot configuration first checks on the first partition of an SD-card for boot.scr which is a uImage-formatted version of a U-boot script. I copied all of Ubuntu’s /boot and /lib/modules/, slightly adapted their boot.script file to have root=/dev/mmcblk0p2 and uImage/uInitrd-2.6.31.14.26-efikamx as kernel/initrd, dropped “quiet splash” and added “console=ttymxc0,115200” to see more of the boot and ran a line from another helpful site:

mkimage -A arm -O linux -T script -C none -a 0 -e 0 -n “my boot script” -d boot.script boot.scr
echo mxc0:S12345:respawn:/sbin/agetty -L 115200 ttymxc0 vt102 >> /etc/inittab # for serial console

However, this failed to boot. Using the serial debug console, I could see U-boot trying to load the boot.scr but it was thinking it was zero bytes for some strange reason. Re-creating my /boot partition as a raw copy of /dev/sda1 with my adaptions ontop finally gave me an SD-card that just boots openSUSE Factory on ARM with framebuffer console on HDMI/DVI.

Find more ARM-related info on our openSUSE ARM Portal

LXDE can do it! LXDE on Android smartphone!

August 24th, 2009 by

Yes i did it. I made LXDE running on my new Android smartphoe, the latest HTC masterpiece, the HTC HERO. Here some shots:

That’s great! But there is a main problem here, I’m not running openSUSE with X11:lxde packages, but debian with their stuff. I cannot use my geeko because the phone is an ARM and our openSUSE@ARM looks to still be in an early development stage. This post wants to be a ping to or openSUSE@ARM project and of course some marketing to this great and light Desktop Enviroment. For people interested in, here some hardware infos:

# cat /proc/cpuinfo
Processor       : ARMv6-compatible processor rev 2 (v6l)
BogoMIPS        : 526.25
Features        : swp half thumb fastmult edsp java
CPU implementer : 0x41
CPU architecture: 6TEJ
CPU variant     : 0x1
CPU part        : 0xb36
CPU revision    : 2
Cache type      : write-back
Cache clean     : cp15 c7 ops
Cache lockdown  : format C
Cache format    : Harvard
I size          : 32768
I assoc         : 4
I line length   : 32
I sets          : 256
D size          : 32768
D assoc         : 4
D line length   : 32
D sets          : 256

Hardware        : hero
Revision        : 0080
Serial          : 0000000000000000

# busybox free
total         used         free       shared      buffers
Mem:       197016       191024         5992            0            8
Swap:            0            0            0
Total:       197016       191024         5992

openSUSE@ARM/GSoC: Cross-compilation & speedup

June 16th, 2009 by

This weeks topic was the integration of the cross-compilation mode into the build environment. But it’s more than just a cross-toolchain – it’s a speed-boost for our ARM build environment. As of today, the source is deployed in the repository Base:build:arm:cross. It’s not fully bootstrapped because of the current high load and the upcoming downtime – so watch out for changes there and in Base:build:arm.

But what are these “speedup’s” ? First, you’ve to know that in our build environment the ARM binaries are executed through an emulation-layer. This works on the cost of speed. The goal is now, to exchange some key parts in a transparent manner with native x86 binaries: no emulation, no slowdown. Sounds reasonable, but is it easily possible ?
I had to take care not to mix stuff too much because the environment would break. But now I’ve to say:  WOW, this worked incredibly well  😉 .

The distinctive feature of our approach in comparison to usual cross-build environments is that we use the best of native environment emulation and the speed of cross-compilation. Because of this combination we don’t have to patch the individual packages to make them cross-compilation ready. This is a new way of cross-compiling suitable also for large number of packages. A detailed overview about the different crossbuild types can be found on this page.
Another feature to note is that the exchanged binaries (replacing ARM with x86 in the build environment) also don’t need heavy patching and there’s no need to compile them as static binaries. All of them are normal distribution packages.

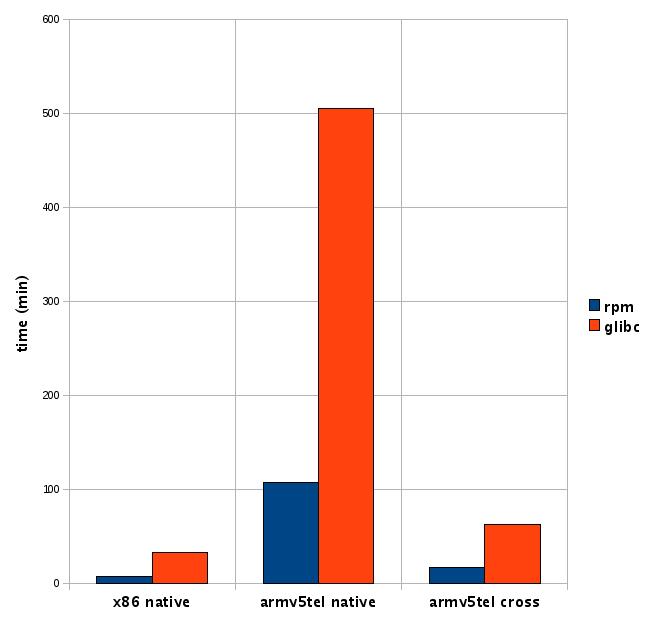
A switch in the project enables/disables the new features. With the new changes in place, the speed could be vastly increased. Some figures:
* package rpm
* package glibc w/o locales

Build time in minutes
x86 native armv5tel native armv5tel cross factor native factor cross
rpm 8 107 17 13,38 2,13
glibc 33 505 63 15,3 1,91

overview cross-environment

Thats a drop from about x15 to x2 in comparison to the native x86 build-time !! See it yourself when the “crosscompiled” repo in Base:build:arm is up and running.

In other words: “Warp 5, Mr. Sulu !” 😉