As (open)SUSE releases are approaching, the YaST team is basically in bug squashing mode. However, we are still adding some missing bits, like the bcache support for AutoYaST. Additionally, there are some interesting improvements we would like to let you know about:
- AutoYaST support for using Btrfs subvolumes as user home directories.
- Improved Certificates management in the registration module.
- Correct detection of DASDs when using virtio-blk.
- Proper handling of the
resume option in the bootloader module.
- Display fonts and icons properly during installation.
And, as a bonus, some insights about a YaST font scaling problem on the GNOME desktop (spoiler: not a YaST bug at all).
Adding bcache support to AutoYaST
A few days ago, support for bcache landed in the YaST Partitioner. In a nutshell, bcache is a caching system that allows to improve the performance of any big but slow disk (so-called backing device) by using a faster and smaller disk (caching device).
The way to describe a bcache in AutoYaST is pretty similar to how a RAID or a LVM Volume Group is described. On one hand, you need to specify which devices are going to be used as backing and caching devices by setting bcache_backing_for and bcache_caching_for elements. And, on the other hand, you need to describe the layout of the bcache device itself. As you would do for a RAID, you can partition the device or use it as a filesystem.
The example below creates a bcache device (called /dev/bcache0) using /dev/sda to speed up the access to /dev/sdb.
<partitioning config:type="list">
    <drive>
      <type config:type="symbol">CT_DISK</type>
      <device>/dev/sda</device>
      <disklabel>msdos</disklabel>
      <use>all</use>
      <partitions config:type="list">
        <partition>
          <!-- It can serve as caching device for several bcaches -->
          <bcache_caching_for config:type="list">
            <listentry>/dev/bcache0</listentry>
          </bcache_caching_for>
          <size>max</size>
        </partition>
      </partitions>
    </drive>

    <drive>
      <type config:type="symbol">CT_DISK</type>
      <device>/dev/sdb</device>
      <use>all</use>
      <!-- <disklabel>none</disklabel> -->
      <disklabel>msdos</disklabel>
      <partitions config:type="list">
        <partition>
          <!-- It can serve as backing device just for one bcache -->
          <bcache_backing_for>/dev/bcache0</bcache_backing_for>
        </partition>
      </partitions>
    </drive>

    <drive>
      <type config:type="symbol">CT_BCACHE</type>
      <device>/dev/bcache0</device>
      <bcache_options>
        <cache_mode>writethrough</cache_mode>
      </bcache_options>
      <use>all</use>
      <partitions config:type="list">
        <partition>
          <mount>/data</mount>
          <size>20GiB</size>
        </partition>
        <partition>
          <mount>swap</mount>
          <filesystem config:type="symbol">swap</filesystem>
          <size>1GiB</size>
        </partition>
      </partitions>
    </drive>
  </partitioning>
Using Btrfs Subvolumes as User Home Directories in AutoYaST
In our last report we presented a new feature to allow using Btrfs subvolumes as user’s home directories. However, the AutoYaST support for that feature was simply missing.
Now you can use the home_btrfs_subvolume to control whether a Btrfs should be used as home directory.
<user>
   <encrypted config:type="boolean">false</encrypted>
   <home_btrfs_subvolume config:type="boolean">true</home_btrfs_subvolume>
   <fullname>test user</fullname>
   <gid>100</gid>
   <home>/home/test</home>
   <shell>/bin/bash</shell>
   <uid>1003</uid>
   <user_password>test</user_password>
   <username>test</username>
</user>
Tuning the Bootloader’s resume parameter
The resume parameter is used by the bootloader to tell the kernel which swap partition should be used for the suspend to disk feature. If you are curious enough, you can find the value for your system in the Kernel Parameters tab of the YaST bootloader module. Now that we know what the resume parameter is, it is time to talk about the two issues we have solved recently.
The first problem was related to the way in which YaST determines which swap partition should be used. The bug report mentioned that YaST was taking a swap partition not used by the system that, in addition, was located in a removable device. After checking the code, we found out that we were using a simplistic heuristic which just selected the biggest swap partition available. We improve that logic to use the biggest swap partition which is being used by the system. However, if no suitable partition is found, YaST will fall back to the old behaviour.
The second problem was related to AutoYaST not handling the noresume option properly. When a user specified that option, AutoYaST just blindly added it to the kernel command line keeping the conflicting resume parameter too. Of course, that caused troubles. Now when noresume is given, AutoYaST simply removes all occurrences of the resume parameter.
Registration, OpenSSL and Debugging
These days, handling the SSL certificates in a proper way is key to keep our systems secured. So during this sprint, we invested quite some time improving how certificates are used in our registration module. Basically, we have improved YaST behaviour in these scenarios:
- Using self-signed certificates.
- Handling with unknown certificate authorities.
When the custom registration server (the new RMT or the older SMT) use a self-signed certificate, YaST offers to import the server certificate and make it known to the system.
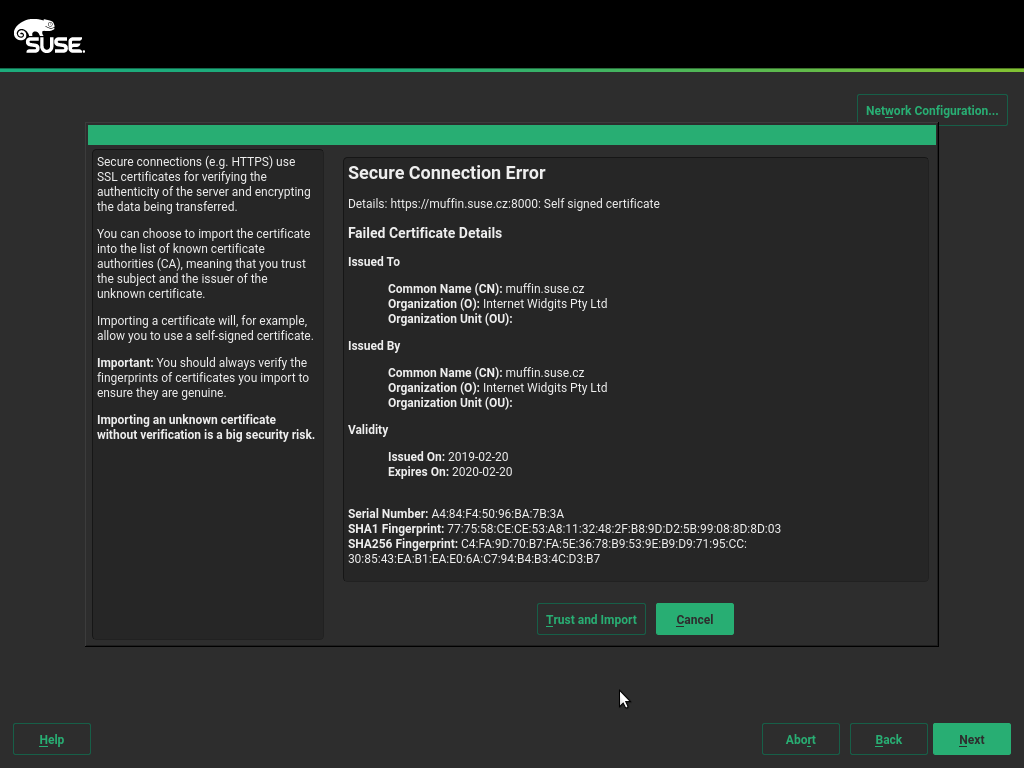
On the other hand, when the server SSL key was signed by an unknown key, YaST used to just display an error popup. That was not much helpful as it was not obvious what to do. Now a new popup which contains some hints about how to import the CA certificate manually is displayed. In this case it cannot be imported automatically as YaST does not know where to obtain it, it is not present in the server response.

The work of importing and activating the certificate is now performed by a YaST script, preventing the user from having to run some complicated (and error prone) commands manually.
These improvement and some other OpenSSL details have been documented in the OpenSSL Certificates documentation. Additionally, if you ever need to debug some SSL related issue, this new OpenSSL Debugging Hints documentation might be useful for you. It covers basic topics, like displaying PEM certificate details, running a testing HTTPS server, creating a self-signed certificate, etc.
Detecting DASDs when using virtio-blk in zKVM
IBM’s S/390 platform has some special features that you will not find in conventional architectures like x86. One of them are DASD hard disks. These devices can be accessed in zKVM using the virtio-blk backend, but DASDs need special handling. For instance, the most common DASD type (CDL ECKD) cannot be used with an MS-DOS partition table nor a GPT, instead a DASD partition table is required. Having this requirement in mind, YaST now detects DASDs using virtio-blk properly and uses the correct DASD partition table.
Improving Fonts and Icons Handling in the Installer
Back some time ago, Stasiek Michalski (a.k.a. as hellcp), one of our very active openSUSE community contributors, spent quite some work for better artwork in YaST. As a result, icons are now used from the desktop’s icon theme whenever possible, and the installer font was changed.
One fallout of the latter was that the font size was now too small for users with diminishing eyesight: That new font has different font metrics, so the default font size was too small. We fixed that during this sprint. See also openSUSE/branding#107.
By the way, the disappearing icons issue was solved too. See libyui/libyui-qt#100 if you are interested in the details.
And just to get this straight: We are welcoming active community members to contribute (thanks again, @hellcp!). There will be some bugs; that’s just natural. We need to cooperate to fix them.
YaST Font Scaling Problem on the GNOME Desktop
This is not really a YaST problem, but of course it was still the natural thing to write a bug report against YaST for this bsc#1123424. And it took us quite a while to figure out what went wrong here.
Basically, when you use the GNOME Tweak Tool to set a Font Scaling Factor that is not a multiple of 0.25, this is completely ignored, and so all Qt5 applications (including the YaST Qt Control Center and all YaST modules) appear with unscaled fonts.
The problem is this GNOME Tweak Tool setting non-integer DPI values (which is already out of spec and thus a bug) and the Qt5 libraries consequently completely ignoring that DPI value. So that GNOME tool should do it correctly, but the Qt5 libs could also handle this more gracefully.
Unfortunately, there is nothing that we can do about this from the YaST side, even though we are aware that this might become reported as a YaST bug again in the future 🙂
Closing Thoughs
As we stated at the beginning of this post, we are basically in bug squashing mode. So, please, if you have some time, give the testing versions of (open)SUSE a try and report as many bugs as you can.
Thanks!