Home Home
Sign up | Login

Deprecation notice: openSUSE Lizards user blog platform is deprecated, and will remain read only for the time being. Learn more...

bmwiedemann

coder, tester, poet

Author Archive

zypper install tab-completion

June 6th, 2015 by

This is a follow-up on my earlier post on zypper tab-completion.

Completion for package-names just made its way into git (thus soon will appear in Factory aka Tumbleweed) after ~6 weeks of back and forth exploring different approaches.

And it is super-fast 🙂

If you do not want to wait, you can use OneClickInstallCLI http://multiymp.zq1.de/zypp:Head/zypper
with allowing some vendor changes for libzypp and libsolv

zypper tab-completion and some thoughts

April 26th, 2015 by

Today I spent some hours implementing nice tab-completion for zypper. There was already a lot done 6 years ago, but the part about installing/removing packages was missing.

Now the thinking part is about the speed. For the tab-completion I needed a list of installed packages and of course we have that in our RPM database (using berkeley DB as a backend). However querying the list with rpm -qa already took over a second on a modern and fast system. On my poor netbook with a cold cache, it took 25 seconds (5 secs on second try with hot cache)… And the point is that you probably do not want to wait 5 seconds for your tab-completion to react.

So to avoid this problem, I used caching via make to produce a better format (plain text). This is then post-processed with sed in a fraction of a second – a speedup factor somewhere between 15 and 150. This makes a big difference.

In the end, I still wonder why plain text is so much faster than a DB. I guess, one reason is that the DB is optimized for retrieval of single values – e.g. rpm -q bash – this is very fast (but even there an egrep “^bash-[^-]+-[^-]+$” is more than twice as fast).

I still want to optimize zypper for better speed, so that a search might some day return in under 2 seconds. One idea for that is to not parse all those config+repo files every time, but only when they change. It could use mmaped files under /var/cache/zypp* as memory to store the binary representations. Though it might become complicated, if dynamic structures such as linked lists are involved.

The future will be interesting…

OpenStack Infra/QA Meetup

July 23rd, 2014 by

Last week, around 30 people from around the world met in Darmstadt, Germany to discuss various things about OpenStack and its automatic testing mechanisms (CI).
The meeting was well-organized by Marc Koderer from Deutsche Telekom.
We were shown plans of what the Telekom intends to do with virtualization in general and OpenStack in particular and the most interesting one to me was to run clouds in dozens of datacenters across Germany, but have a single API for users to access.
There were some introductory sessions about the use of git review and gerrit, that mostly had things I (and I guess the majority of the others) already learned over the years. It included some new parts such as tracking “specs” – specifications (.rst files) in gerrit with proper review by the core reviewers, so that proper processes could already be applied in the design phase to ensure the project is moving in the right direction.

On the second day we learned that the infra team manages servers with puppet, about jenkins-job-builder (jjb) that creates around 4000 jobs from yaml templates. We learned about nodepool that keeps some VMs ready so that jobs in need will not have to wait for them to boot. 180-800 instances is quite an impressive number.
And then we spent three days on discussing and hacking things, the topics and outcomes of which you can find in the etherpad linked from the wiki page.
I got my first infra patch merged, and a SUSE Cloud CI account setup, so that in the future we can test devstack+tempest on openSUSE and have it comment in Gerrit. And maybe some day we can even have a test to deploy crowbar+openstack from git (including the patch from an open review) to provide useful feedback, but for that we might first want to move crowbar (which is consisting of dozens of repos – one for each module) to stackforge – which is the openstack-provided Gerrit hosting.

see also: pleia2’s post

Overall for me it was a nice experience to work together with all these smart people and we certainly had a lot of fun

getting my DVB-T card to work

March 6th, 2014 by

Today I tried to get a DVB-T card to work with a new antenna on a new 13.1 install.
I know it was working, because I ran it with 12.3 on this machine last year.

hwinfo –tv
showed
Model: “Hauppauge computer works WinTV HVR-1110”
Vendor: pci 0x1131 “Philips Semiconductors”
Device: pci 0x7133 “SAA7131/SAA7133/SAA7135 Video Broadcast Decoder”

So after plugging everything in, I started kaffeine, which still knew about all local channels, but could not tune.
http://www.linuxtv.org/wiki/index.php/Hauppauge_WinTV-HVR-1110 gave the important hint that one needs a firmware file. After that was in /lib/firmware/dvb-fe-tda10046.fw and after a reboot, came the next try. kaffeine now would show 99% SNR, so a good signal and even know about what is currently on air, however picture remained black.
kaffeine hinted that it needs extra software, but could not find it, even though packman repos were available (annoying bug).

http://opensuse-community.org/ finally helped – I needed the libxine2-codecs package from the packman repo.
Now everything is working after less than an hour.

another way to access a cloud VM’s VNC console

February 8th, 2014 by

If you have used a cloud, that was based on OpenStack, you will have seen the dashboard including a web-based VNC access using noVNC + WebSockets.
However, it was not possible to access this VNC directly (e.g. with my favourite gvncviewer from the gtk-vnc-tools package), because the actual compute nodes are hidden and accessing them would circumvent authentication, too.

I want this for the option to add an OpenStack-backend to openQA, my OS-autotesting framework, which emulates a user by using a few primitives: grabbing screenshots and typing keys (can be done through VNC), powering up a machine(=nova boot), inserting/ejecting an installation medium (=nova volume-attach / volume-detach).

To allow for this, I wrote a small perl script, that translates a TCP-connection into a WebSocket-connection.
It is installed like this
git clone https://github.com/bmwiedemann/connectionproxy.git
sudo /sbin/OneClickInstallUI http://multiymp.zq1.de/perl-Protocol-WebSocket?base=http://download.opensuse.org/repositories/devel:languages:perl

and is used like this
nova get-vnc-console $YOURINSTANCE novnc
perl wsconnectionproxy.pl --port 5942 --to http://cloud.example.com:6080/vnc_auto.html?token=73a3e035-cc28-49b4-9013-a9692671788e
gvncviewer localhost:42

I hope this neat code will be useful for other people and tasks as well and wish you a lot of fun with it.

Some technical details:

  • The code is able to handle multiple connections in a single thread using select.
  • HTTPS is not supported in the code, but likely could be done with stunnel.
  • WebSocket-code was written in 3h.
  • noVNC tokens expire after a few minutes.

Hongkong OpenStack Design Summit

November 13th, 2013 by

So last week many OpenStack (cloud software) developers met in Hongkong’s world expo halls to discuss the future development and show off what is done already.

Overall, I heard there were 3000 attendees, with 800 being developers or so. That sounds like a large number of people, but luckily everything felt well-organized and the rooms were always big enough to have seats for all interested.

The design sessions were usually pretty low-level and focused into one component, so it was not easy for me to make useful contributions in there. The session about read-only API access (e.g. for helpdesk workers and monitoring) and about HA were most useful to me.

In the breakout rooms were interesting sessions by many large OpenStack users (CERN, Ebay, Paypal, Dreamhost, Rackspace) giving valuable insights into what people expect from and do with a cloud. Many of them are using custom-built parts, because the plain OpenStack is still not complete to run a cloud. SUSE Cloud ships with some such missing parts (e.g. deployment and configuration management), but most organisations seem to run their own at the moment.

Cloudbase was there telling about their Hyper-V support that we integrated in SUSE Cloud.
Apart from the 6 SUSE Cloud developers there were several local (and one Australian) SUSE guys manning the booth.

Overall it was quite some experience to be there (in such an exotic and yet nice place) and listen and talk to so many different people from very different backgrounds.

How I ran openSUSE on a Nexus 7

September 22nd, 2013 by

The Nexus 7 (2012 version) is a 7 inch tablet by Google+Asus.
The nice thing about it is, that it has an unlockable bootloader. Also it has an armv7 CPU and we built openSUSE for this CPU for some years. I had one such device with a broken display, so doing some more risky things with it seemed to be appropriate.
I wanted to run my own software on it. Running openSUSE in a chroot (change-root) environment is usually a lot easier than replacing the whole system, so this is where I went.

First, I needed two tools. One is the “adb” – Android DeBug tool from the official sdk and the other is “fastboot” which was hard to find, so I mirror it here.
I got me the stable ROM from http://wiki.cyanogenmod.org/w/Grouper_Info and followed their installation instructions. adb shell only seemed to work while in bootloader (which you reach by holding Volume-Down+Power during boot)
The hardest part was to re-enable USB-debugging by going into Settings/About tablet and tapping Build-Number seven times.

Also before zapping everything that was there, I did in adb shell : cp -a /system/app /sdcard/
and back later.
So after following all the other installation steps, I had cyanogenmod booting. I attached a bluetooth keyboard so that I can better type. The ROM comes with a terminal app, which I opened. type su - to become root after a security popup.
Now, I downloaded my lastest Raspberry-Pi image from http://www.zq1.de/bernhard/linux/opensuse/. This is under /sdcard/Download where I unpacked it with xz -d
Then comes the tricky part. The image has a partition table, but here we just need the root filesystem. With fdisk -lu we can see that it starts at sector 309248. One could copy out that part with dd or use a loop device with offset like this:
#!/system/xbin/sh
mknod /dev/loop0 b 7 0
losetup -d /dev/loop0 # cleanup of previous try
losetup -o `expr 512 \* 309248` /dev/loop0 rasp*img
mkdir -p mnt
mount -t ext2 /dev/loop0 mnt

Now we have access to the openSUSE files under mnt.
In there I created me a chroot.sh:
#!/system/xbin/sh
for m in proc sys dev ; do mount -o bind /$m $m ; done
HOME=/root PATH=/sbin:/usr/sbin:/usr/local/sbin:/root/bin:/usr/local/bin:/usr/bin:/bin:/usr/bin/X11:/usr/X11R6/bin /system/xbin/chroot . bin/bash
for m in proc sys dev ; do umount $m ; done

With that, the only remaining thing to do was to add a nameserver line to /etc/resolv.conf before I could use zypper to install software e.g. zypper install yast2-network yast2-ncurses.
Running yast lan on the Nexus 7 gives nice sight.

I guess one could also use the armv7 rootfs to have software built for armv7 instead of the compatible armv6. But for me it does not matter much.

New Raspberry Pi Image

September 7th, 2013 by

update: new image with kernel-3.6 and minimal X11/icewm http://www.zq1.de/~bernhard/linux/opensuse/raspberrypi-opensuse-20130911x.img.xz (103MB)

We got a new armv6 based image for the Raspberry Pi.
This one is only 82MB compressed, so pretty minimalistic.
http://www.zq1.de/~bernhard/linux/opensuse/raspberrypi-opensuse-20130907.img.xz

The exciting new thing is that this was created using an alternative image building automatism which I wrote from scratch in three hours this morning.
The scripts can be found at
https://build.opensuse.org/package/show/devel:ARM:Factory:Contrib:RaspberryPi/altimagebuild
and are also embedded within the image under /home/abuild/rpmbuild/SOURCES/

This means that everyone can now easily build his own images the way he likes and even branch and do submit requests for changes that are useful for others.
The way to use this is simple.
If you have 6GB RAM, you can speed things up with export OSC_BUILD_ROOT=/dev/shm/arm before you do
osc co devel:ARM:Factory:Contrib:RaspberryPi altimagebuild
cd devel:ARM:Factory:Contrib:RaspberryPi/altimagebuild
bash -x main.sh

This pseudo-package does not easily build within OBS or osc alone because it needs root permissions for some of the steps (chroot, mknod, mount), which could only be workarounded with User-Mode-Linux or patching osc.
The build consists of three steps that can be seen in main.sh:

  1. First, osc build is used to pull in required packages and setup the armv6 rootfs.
  2. Second, mkrootfs.sh modifies a copy of the rootfs under .root to contain all required configs
  3. And finally, mkimage.sh takes the .root dir and creates a .img from it that can be booted

This can build an image from scatch in three minutes. And my Raspberry Pi booted successfully with it within 55 seconds.

There are some remaining open issues:

  • the repo key is initially untrusted
  • still uses old 3.1 kernel – solved
  • build scripts have no error handling

Compared to the old image, this one has some advantages:

  • It is easier to resize because the root partition is the last one
  • Compressed image is much smaller
  • Reproducible image build, so easy to customize
  • It is armv6 with floating point support, so could be faster
  • We have over 5200 successfully built packages from openSUSE:Factory:ARM
    so for example you can install a minimalistic graphical environment with zypper install xauth twm xorg-x11-server xinit and start it with startx

So if you wanted to play with openSUSE on RPi, you can do so right now and have a lot of fun.
GPIO on Raspberry Pi

March 31st, 2013 by

We have these working openSUSE Factory images for the Raspberry Pi, which is an ARM-based mini-computer, and since I want to encourage my kid to do more with computers than playing games (even if they are open-source), I looked into how GPIOs worked.
For that, you need to find the pin allocation – e.g.
in the elinux GPIO description or
http://www.raspberrypi.org/archives/1417
has a video which has it explained at 03:00

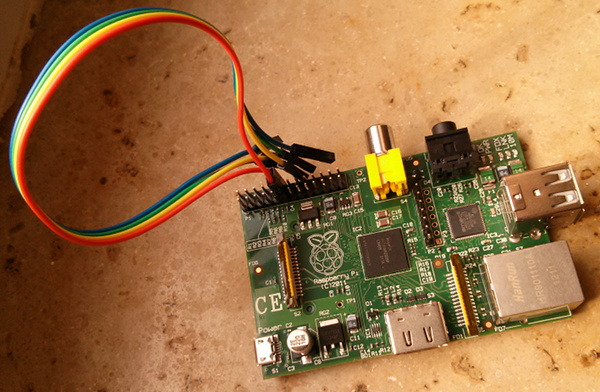
For my test, I wired together pin11 and pin12, which are GPIO17 and GPIO18.
I wanted GPIO17 to receive what is sent by GPIO18.
This is how this looked for me: foto of GPIO17 and 18 wired together

Using it directly from the shell is simple:
echo 17 > /sys/class/gpio/export
echo 18 > /sys/class/gpio/export
echo out > /sys/class/gpio/gpio18/direction
echo 1 > /sys/class/gpio/gpio18/value
watch -n 1 head /sys/class/gpio/gpio*/value

If the wiring and configuration was right, the “watch” will show gpio17/value to become 1 too.
You can then also pull the wire (or insert a physical switch) and see gpio17/value dropping to 0 again, when it is no more receiving the current from the other pin.

If you managed to get this working, you reached level one of hardware-hackery.

OpenStack on openSUSE

January 11th, 2013 by

Do you want to play with cloud software on your own machines?
Some people have been working to package the current OpenStack version “Folsom” for openSUSE (tested on 12.2) and add scripts to configure it into a working state.
You need 2GB of RAM and 3+ GB of free disk space under /var/lib/
Then you do

wget https://raw.github.com/SUSE-Cloud/automation/master/scripts/jenkins/qa_openstack.sh
export cloudsource=openstackfolsom ; bash -x qa_openstack.sh

This is a script we use for continous integration testing, but it is as useful to setup a simple environment for development, testing or demoing.
Folsom packages are still rather rough and might see some change over the coming weeks.

If you want the older stable version, you can use the above snippet with cloudsource=openstackessex
however, there are some known bugs in that old version and backports are really hard.

Soon there will be Grizzly packages upcoming. More is to come…

P.S. To interact with your cloud, you need credentials, which are automatically sourced from /etc/bash.bashrc.local (it is admin:openstack) and then you use commands like
nova list and glance image-list
but there is also a web-interface that allows you to do most actions in a browser – even VNC, if you use KVM instead of the default lxc.